Showing posts with label Dragonfly. Show all posts

Saturday, May 13, 2017

Happy Mother's Day by Debbie Brownmiller

3:30 AM 0 Comments
A warm Hello to you. It's Debbie with you from Debbie's Time Out. I want to wish all you Mothers out there a Happy Mother's Day for tomorrow.  So here is a Mother's Day card that I am sharing with you.


I made a fancy fold card from black cardstock for my base. The back piece I covered with polka dot paper and the front layer of the base I covered with a pattern paper with dress forms on it.


I used the Mirror Die  as a background for my sentiment to be printed on. I then added the corner from the Quadrafoil Tag  under the sentiment. The Dragonfly   was layered onto the top corner.


The flower arrangement was created using the Floral Bouquet Kit  , Black Eyed Susan Strip  ,Judy's Blooms  and the Embellishment #1 .

Well that is it for this time. Thank You for visiting the blog and for the comments you leave. They are so appreciated. Have a crafty day my friends.

Dies Used
Mirror Die - CABD74
Floral Bouquet Kit 8 Piece Die Set - B777
Black Eyed Susan Strip 5 Piece Die Set - B338
Dragonfly small- w/ Angel Wing Die - DL152
Judy's Blooms Die - C184
Embellishment #1 8 Piece Die Set - B181A
Quadrafoil Tag 2 Piece Die Set - B682

Thursday, January 14, 2016

Happy Birthday with Jenny Alia

3:30 AM 1 Comments

Hi, it's Jenny here today.  I'm so excited to share the new release dies with you tomorrow.  Make sure to check back here to see all the new January dies as well as some wonderful inspiration from the team! Today I'm sharing a birthday card featuring this pretty dragonfly.  He's large and would be perfect for scrapbook pages too.  He was cut twice and the one underneath was colored purple.  I glued the two bodies together but left the wings separate so the second pair of wings would show.  He is covered in glitter glue.  


The lattice is half of the Lattice #3 left over from another project.  I used it instead of one the doilies I  usually use to back my florals.  The flowers were made with the Tea Rose Medium die.  I colored them with yellow distress inks, shaped them with a molding tool and added rhinestone centers.  I used the leaves that are included in the rose die and added a few Olive Branches.  The tiny white flowers on the Olive Branches are from the baby breath kit in the Embellishment #2 set.  It's my first time playing with them but I love the detail they add to the floral cluster.  Last, I cut Happy and Birthday with the same purple paper used for the background layer. 


Cheery Lynn Dies

Thanks for visiting today and make sure to join in this week's Snowflakes challenge for your chance to win $20 towards shopping at Cheery Lynn Designs.  Check back tomorrow to see the new release, you are not going to want to miss the gorgeous new dies!

Thursday, June 26, 2014

Summer card with Irina Gerschuk

3:30 AM 3 Comments
Hi my dear friends!
It's Irina Gerschuk with you today. And I'd like to share with you my new card:

 Some close-ups:
I used a crok sheet to die-cut the fence
 I used craft paper to emboss it with the Clocks Embossing Plate:
Dies used:
- Clocks Embossing Plate - E171
- Garden Gate - B124
- Tropical Leaves - B119
- Lilith Doily Edger - B404
- Large Rose - B155
- Medium Rose - B154
- Mailboxes (Set of 2) - B423
- Tiny Things with Wings - B266

And don't miss our new challenge - the theme is so versatile, and the price is yummy)))))

Thank you for stopping by!
Have a lovely day!
Irina

Friday, October 11, 2013

Lilac Dream

3:30 AM 4 Comments

Hi and Good Morning :)  Alison here again today, sharing this weeks card inspired some more gorgeous and easy to use Cheery Lynn Designs Dies.

Now wasnt this picture was taken in the last of the summer rays today ? lol  :)   

I started off using a blank 6 x 6 card base, and layered white american crafts cardstock with some scraps of lilac paper.  This cardstock  was used for all the die cuts, and it cuts like a dream.

I then created my background using the elegant  Daisy Lace Frame, and edged it with the Lady Kate Edger.  I then stuck down 2 strips from Alisons Ribbons to conceal the join.  I coloured my image with PM's and glittered the wings, and matted onto oval stackers and scalloped oval stackers.

I made the lovely sweet flowers using the  Daisy Strip die (my favourite flower die ever!) and secured with pearl and glitter brads.  The pretty dragonfly and olive branch leaves were added as a finishing touch, along with some white pearls.

All dies used on this card are:

FRM118 - Daisy Lace Frame
B278 - Lady Kate Edger
B335 - Alisons Ribbons
B259 - Daisy Strip
DL152 - Dragonfly
B147 - Olive branches
L-7 - Oval Stackers
XL - 8 Scalloped Oval

Thanks so much for visiting our blog today, and I hope to see some fabulous entries in our Halloween Challenge this week.

Have a smashing day


Wednesday, September 18, 2013

Birthday Gift

3:30 AM 2 Comments

Hi and Good Morning everyone, Alison here again today! :)  Well in my part of the world, the summer has ended, and autumn fast approaches with a change in colours as well as the weather.  So todays card is a little more subtle in its hues, and uses some lovely Cheery Lynn Designs Dies.
 
I started off with a 6 x 6 inch blank card base and layered MME papers and white american crafts cardstock.  All dies were cut with this card too.
 
I cut the Tiny Bubbles border and stuck on the apricot top layer panel and also used the gorgeous Cape Cod Doily behind my image.  This is so delicate and beautiful, but cuts like a dream!  My image is matted and layered onto Square Stackers, Scalloped squares and the delighful  Horizon Square Stacker
 
I used Alisons Ribbons along the bubble border, and added a small strip of ric-rac ribbon on top.  The flower was made from the quick and easy Shasta Daisy strip, held together with a pearl brad, and for a finishing touch I added a dragonfly and some pearls.
 
All dies used on this card are
 
 
Thanks so much for visiting our blog today, and I hope you find time to enter our challenge this week where our theme is Things with Wings.
 
Have a smashing day!


Monday, June 10, 2013

Cheery Lynn Designs Challenge #84 - Creative Corners

3:30 AM 4 Comments
What amazing entries we had last week for our Red, White and Blue challenge.  Thank you to all who entered, we enjoy seeing your creations with our dies.  This week our challenge at Cheery Lynn Designs is

Creative Corners
(Must have corner embellishments)

 Here are the rules:
  • You MUST follow the theme and use at least one Cheery Lynn Designs die, of course, we would love to see more than one. 
  • You MUST add a link to your blog post in the InLinkz at the end of this post; no back posting, only new projects are allowed
  • You MUST link to this challenge in your blog post or on your gallery post
  • You may only enter the challenge ONCE per week.
The winner will be chosen based on merit by Cheery Lynn Designs. They will receive $20 towards shopping at the Cheery Lynn website. The challenge will end on Sunday night at 18:00 Eastern time.


And now to our inspiration for today......


Remember to keep playing each week for out Summer Blast with Cheery Lynn Designs. We know with summer quickly approaching there are lots of fun activities to steal you away from your crafting.  We want to give you some extra incentive to keep playing along with us, so how about a chance to win an eBosser!   
If you missed joining us last week, you are out of the running for this month's giveaway - but we will have another contest next month! So keep watching and playing.

Here are the rules:  Play along with all four of our challenges for the month of June (easy enough!)  On the last challenge post for the month, leave a comment if you entered all of the challenges, telling us that you "had a summer blast with Cheery Lynn Designs" and you will be entered to win this fantastic prize!  Due to the cost of shipping and the electrical wiring on the machine, this contest is only open to our North American fans.

Also, for our loyal challenge followers, please note - the Cheery Lynn Designs Challenges will be moving over to our inspiration blog as of June 30th.  We will still have the same challenges and prizes, but now you will be able to find all of your Cheery Lynn Designs inspiration in one stop! Also, our challenges will be going live on Sunday morning rather than Monday.  


Remember, you MUST use a Cheery Lynn Designs die to enter this challenge.

Saturday, January 26, 2013

Hugs

3:30 AM 7 Comments
Hello! Today I have a card featuring the new Build a Flower dies from Cheery Lynn Designs.
I started by cutting the base from Scalloped Rectangle Reflections Boutique. Adding a little texture, I used my favorite Diamonds & Starburst Embossing Plate. The Polynesian Sails Oval doily is the perfect delicate base for my image. Above the image hovers a dragonfly from the new Tiny Things with Wings….such cute little critters in this set!
The larger flower was created using the new Build a Flower #3 set. The flower center, as well as the smaller burgundy flowers were cut from Build a Flower Embellishment #3. Daisies being my favorite flower, you are sure to see more from the Daisy Strip in the future! Foliage from Pair of Ferns, Wreath Strip, Rose Leaf Strip, and Small Leaves #2. Tucked in the flowers is the new Hugs sentiment atop Sentiment Frame #1.
There is still time to enter this weeks challenge for your chance to win the $20 shopping spree! Details Here
Thanks for stopping by!


Wednesday, November 14, 2012

Inspired by Autumn

3:30 AM 5 Comments

 
Hi Everyone :) Alison here today, sharing my card inspired by this weeks challenge theme of  'Autumn Colours'.
 
Now I have been dying to use some more of the gorgeous celtic borders on my cards, and so I chose to start off with an 8 x 5 inch card base, as the borders really work well when used in 8 inch strips.
 
My cardstock for this was 300gsm Kraft and Ivory, so really heavy weights and as you can see they cut the most detailed dies beautifully.   I coloured a fab Crafts & Me digi image as my focal point and used HOTP papers from my scraps box.
 
The gorgeous border dies are the Celtic Chain and the Celtic Heart Border.  I added a cross section of the Tiffany Border die towards the bottom and embellished that with 2 mini doilies taken from the centres of the Polynesian Sails and Nautical Wheeler dies.  These are so useful! 
 
The leaves are a mix of Dimensional Small Leaves,  Olive Branches and Pair of Ferns  I finally added twine, a wooden button and a few more bits and bobs glittered up from my pot pourri bowl - lol! :)
 
All dies used on this card are:
 
B237 - Celtic heart border (tucked behind the image)
Polynesian Sail - mini doily taken from the centre of the main die
Nautical Wheeler Doily - mini doily taken from the centre of the main doily
 
I hope you find time to play along with our challenge this week, and I look forward to seeing some fabulous creations.  Dont forget there is also daily inspiration from the other talented members of the DT over on our Cheery Lynn Designs Inspiration Blog.
 
I hope everyone has a smashing week, and thanks so much for visiting today.


Saturday, June 9, 2012

My Family

2:30 AM 8 Comments


Hello! One of the things I love about my dies from Cheery Lynn Designs, the patterns work for ANYTHING…guys, girls, layout, card, new and funky, or old and vintage!
When I found this old photo of my husband and his siblings, I knew the Dainty Dutch Deco Frame would be perfect for matting the photo.
After inking and masking the edges of my base cardstock, I started with the Mega Tea Party Doily. I added lace touches to my first layer using Francesca. Wanting just a small dainty touch to the middle layer, I adhered Wedding Garter, leaving only a small portion of the edge sticking out. The last layer being the French Flair Classic Silver Stacker. For a little bit if fun, I added 5 portions from the Pennant Die. Resting near the title is the Small Dragonfly.
Anyone that knows me knows how I love to take my creations and dies outside the box! While playing with my dies this week, I created the larger brown flower using Stacker Flower #5 and a brown grocery bag! I was really pleased with how splendidly the paper was to manipulate! The center of the flower is from Build a Flower #1 Also, arriving on my doorstep was a wonderful package of scrap goodies wrapped in gorgeous hounds tooth tissue paper! I was as excited over the tissue paper as the goodies inside! I cut eight layers of the tissue paper using the smallest Sweet Williams die. Staggering the layers, I attached and fluffed! After adding foliage from Pair of Ferns, Flourish Leaf Strip, Stacker Flower #1 Leaf, and Small Leaves 2; I added flowers cut from the Flower Chain Border and a Medium Rose cut from vellum.
Other dies used: Heart Key, Two of Hearts

There is still time to enter this weeks challenge for your chance at the $20 shopping spree. Don’t forget about the big contest, your entry into this weeks challenge is also your entry at a chance to win a Big Shot!! Details Here

Thanks for stopping by!!


Thursday, April 26, 2012

Remember this?? - Kianel

3:30 AM 16 Comments
Hello dear Cheery Lynn Designs fans!
Kianel here with you back on my usual posting day for another creation i made using the marvellous Cheery Lynn designs dies.
Today i am finally allowed to show you the result of the tutorial i made last year to make your own background paper. This was the background i ended up with, using the exotic butterflies dies in various sizes both as stencils and stamps i made with foam:

 Never got to show you the final result though as the page had been published in a french magazine, but i now i can so here it is:

To make my background, i used the exotic butterflies small #2, Exotic butterfly extra large, and stamps and distress inks. (see the tutorial).  To decorate this lay out, i used the small exotic butterflies # 1, the tropical flourish die and the XL scalloped oval stackers combined with XL oval stackers to make my frame around the picture.  We didn't have the flower dies at that time so they are all premade.
I hope you will like this layout, i don't do so many of them because i am totally lost with this much space to "fill": what can i say, i'm a cardmaker, lol!

*******************************************
And speaking of cardmaking, here is a new card i created for Cheery Lynn Designs. I love to give myself challenges from times to times so my challenge this week was to make a card using dies i've never used before. I did it and, apart from the flourish, the miniature rose and the butterflies, the other dies were brand new. Here is the result:
 For the base of my card, i used the XL square stackers. I then created an opening using one of the beautiful frames that Cheery Lynn carries. The stamp and papers are coming from Magnolia.
 When you open the card, you have this "window" created with the Dutch doily rectangle frame that is the same on both sides.
 This flower is made using one of the corner dies from Lace corner deco B that i cut out 5 times and flipped as accordeon. I then glued them on a circle of paper and added a flower in the center made using the miniature rose die which is covered with Creative Inspirations paint and the leaf that goes together with it. I ended with adding pieces of the fanciful flourish die here and there.
 Here is a close up of the small dragonfly that i just slightly inked with distress.
 Here you can see both sides of the window i created using the Dutch doily rectangle frame. I cut it once and placed it on cardstock that i cut just a few millimeters larger than the actual frame. And did the same on the other side.
 Here i used the 1st letter of the name of the person the card is dedicated to and this one is coming from the absolutely divine Flourish font.
 The sentiment stamp is coming from Whimsy stamps and is placed in the center of 3 Sunflower dies that i inked with distress and Adirondack inks. Another fanciful flourish adornates it.
 Have you noticed that Cheery Lynn Designs carries beautiful hearts in their sortiment? Well, it's worth giving it a look and hard to find the one you like the most as they are all beautiful. This one is called Celtic Heart.
And last but not least, 2 beautiful butterflies from the exotic butterflies small set are slightly inked and decorated with half pearls and placed in the inside of the card.
Well, i hope you've enjoyed those creations. Don't forget our challenge blog with a chance to win a 20$ shopping spree every week! Lots of love from France, Kianel.

Tuesday, April 17, 2012

Tuesday Inspiration

1:30 AM 17 Comments
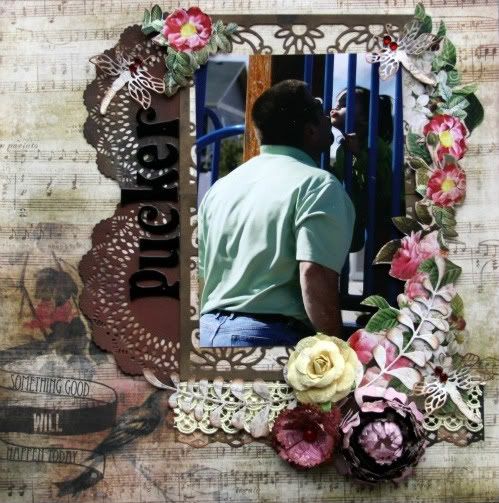
Welcome to Tuesday on the Cheery Lynn Inspirational Blog!  This is Debbie with you today, sharing a layout that I created with some fabulous Cheery Lynn Designs dies!  With Spring coming on I've been in a flower creating mood!!  I have 2 flowers I want to highlight today, one is a Peony...one of my favorite all time flowers! The other flower is a Sweet Williams, love how this little flower can fill a garden or pot very quickly.  So leave me a comment and let me know what you think and I'll create a quick tutorial for them.

The photo is of my sweet grand daughter Adalyn!  she is almost 2 but she OWNS her grandpa's heart!!  When he asks her for a kiss, she puckers up and and it's just the cutest thing! Ok ...enough bragging!

I want to start with the mat back ground I used for the photo, I cut 2 from the Daisy Lace Frame and then adhered them to the layout and added my photo to the top letting the pattern peek out just a little on the top and bottom. I also cut one doily from the English Tea Party Doily and cut it in half to give the layout a little more width.
The first flower is the Peony.  I created it using the Stacker Flower 5 and the Sunflower.  Snuggled up to the Peony is a the Sweet Williams.  For this flower I use the Sweet Williams Die. I layered it 3 times and inked the edges for depth and added an adhesive gem to the center. I then added the Pair of Ferns to the flower cluster.
I also wanted to share with you the cute dragonfly's I added to this layout.  I used the Dragonfly Smallw/Angel Wing  to make these. To high light them I added a few adhesive gems to each one of them and then inked all the edges.
If you'd like a tutorial for the flowers leave me a comment and I'll work one up.

Have a great day and thanks for visiting the Cheery Lynn blog!  Be sure to stop by the Cheery Lynn Challenge Blog for the fun Birthday Challenge details!!

Wednesday, April 4, 2012

Baskets Inspiration

3:30 AM 11 Comments
Hi Alison here, and I am chuffed to bits to be sharing my first project for the Cheery Lynn Designs Team.  I am so excited!.  This is also my first 'host post' on a DT blog too, so I hope I get it right :)

Now I got quite carried away making spring baskets as they were such fun, and so easy to decorate by using just a few really gorgeous Cheery Lynn dies.  You still have plenty of time to make one in time for our challenge which ends on Sunday.


On this first basket I used: 

B136 - Anastasia Border for both the handle trim and all around the bottom of the basket.
B117 - Fanciful Flourish
D137 - Sweet Williams - A terrific die for making a gorgeous shabby flower!
D134 - Dimensional Small Leaves #2 - I added extra leaves behind the flowers, inked and curled the edges.
B162 - Lace Corner Deco B - Sticking 2 together to make the side decoration - these are so classy looking.


I inked the edges of all the components before sticking them down, as it gives a great finish, and just added some little chocolate eggs to make a lovely gift.

Second Basket:


To decorate this I used:

B133 - Lace Light Deco Border - Again for both the handle trim and the basket decoration.  I used double-sided snow-white pearl card for this, so it looks just as beautiful on both sides.

DL146 - Large Dragonfly w/Angel Wing - These are so delicate and fluttery.  I affixed them to the basket with white brads to stop them flying off ;) lol


B164 - Lace Corner Deco D  &  D133 - Dimensional Small Leaves #1 for the scrunchy flower at the top of the handle.  I love the way these leaves emboss!

Now I actually made 3 baskets for an Easter table display, and to give as gifts for my family, and on the 3rd basket (you can just see tucked behind in the below picture)  I used B149 - Cuties 1 for the border trim (this is a rolling flower die, but very versatile and such a cute border.  DL128 - Two of Hearts for the tag and trim.


I hope you find time to play along with our challenge, I cant wait too see your fab creations! :)  Thanks so much for visiting our challenge blog today, and you can also checkout our Cheery Lynn Designs Inspiration Blog for more amazing ideas this week too.

Alison - aka 'xtglx'

Tuesday, April 3, 2012

A Layout and a Basket

3:30 AM 9 Comments
Hello Cheery Lynn Designs Fans!!  I'm so excited to post my very first project with Cheery Lynn Designs!!

I created a couple of projects with several different dies but I wanted to share this layout with you first.  The photo is of my littlest grand daughter Adalyn and her very first pedicure.  She was only about 3 weeks old when her mom gave her first pedicure.  I just couldn't help but take a photo of it!  She is now almost 2 and has to have her toe nails painted at all times!  Funny how early they learn to be so girly!

For this layout I used the Fanciful Flourish Die, English Tea Party Doily, Exotic Butterflies Small #2 Pair of Ferns and the Small Lace Faerie Queen w/Angel Wing.

Please join me every Tuesday for new projects using Cheery Lynn's beautiful dies!! Don't forget to visit our challenge blog and play along, this weeks  challenge is a basket challenge just in time for Easter!  http://cheerylynndesignschallenge.blogspot.com/

 I played along with this weeks challenge.. here is my basket and the dies I used to create it. The handle is made with the Border Carnivale die.
Dragon Fly Small w/Angel Wing

Thanks for visitng the Cheery Lynn Blog today!  Be sure to check our blogs for inspiration and fun challenges, sure to inspire you to create everyday!!

Debbie

Monday, March 26, 2012

Cheery Lynn Designs Challenge 21 - Things with Wings

10:41 PM 1 Comments
This week our challenge at Cheery Lynn Designs is

Things with Wings

Here are the rules:
  • You MUST follow the theme and use at least one Cheery Lynn Designs die, of course, we would love to see more than one. 
  • You MUST add a link to your blog post in the InLinkz at the end of this post; no back posting, only new projects are allowed
  • You MUST link to our blog in your post
The winner will be chosen based on merit by Cheery Lynn Designs. They will receive a $20 coupon for shopping at the Cheery Lynn website. The challenge will end on Sunday night at 22:00 Eastern time.


Remember, you MUST use a Cheery Lynn Designs die to enter this challenge.

Monday, March 12, 2012

Cheery Lynn Designs Challenge 19 - Add a Flourish

3:30 AM 6 Comments
This week our challenge at Cheery Lynn Designs is  

Add a Flourish

Here are the rules:
  • You MUST follow the theme and use at least one Cheery Lynn Designs die, of course, we would love to see more than one. 
  • You MUST add a link to your blog post in the InLinkz at the end of this post; no back posting, only new projects are allowed
  • You MUST link to our blog in your post
The winner will be chosen based on merit by Cheery Lynn Designs.  They will receive a $20 coupon for shopping at the Cheery Lynn website.  The challenge will end on Sunday night at 22:00 Eastern time.

This is the last challenge for the DT call, you can read all the details here.  If you interested in trying out for our team, just add DT after your name in the InLinkz box.


Remember, you MUST use a Cheery Lynn Designs die to enter this challenge.

Copyright Statement


All content, including designs, pictures and words are the exclusive property of the author of each blog post. Information shared here is for inspiration only and may not be copied for publication, competition or profit. Thank you for your cooperation.

SOCIAL MEDIA 2


Follow Us @jointhemakersmovement


All content, including designs, pictures and words are the exclusive property of the author of each blog post.
Information shared here is for inspiration only and may not be copied for publication, competition or profit. Thank you for your cooperation.