Showing posts with label Daisy Strip. Show all posts

Tuesday, July 31, 2018

Whimsical Bee Card with Cheryl Walker

12:30 AM 1 Comments
 Hello everyone and Happy Tuesday to you all! Today I'm sharing a super sweet card I made using Cheery Lynn Designs darling dies. LOVE this super sweet Whimsical Bee die, and she works perfectly with the sweet Daisy strip die. I really enjoyed making this darling card. Of course I always seem to take forever choosing design papers.  I'm not sure why, maybe due to the fact that I own way too much of it.....LOL hehehhe that could be one reason, but I'm so funny about picking my design papers first, and doing all my layers, then cutting all my dies.

Anyway, I selected an OLD design paper I bought years back, and it's from All My Memories 2005.  I bought it in 2006 though, crazy right?  Well I bought a lot of it, as I really loved this collection, so I pulled it out and figured I would use the yellows and blacks in it, and leave out the reds and pinks. Next I had already picked out all the dies I wanted to use on my card. I love Cheery Lynn's flower strips, they are so easy to use, and make flower making super fast, so I made up the daisies.

Cheery Lynn Designs Dies used:
Whimsical Bee B800- Cut in black, and then added yellow card stock to the back , next I added some stickles to give some glitz to my sweet bee.
Flourish Frame B888- cut in white card stock, its behind the whimsical Bee
Daisy Strip B259- Cut in white, ran through machine just 1 time, and then dusted them in a yellow ink. I did use the hot glue gun to glue them together, and to add a white embellishment from Really Reasonable Ribbon to the center of each flower.
Flourish #3- was also cut in white and then dabbed with 2 different club scrap greens.
Page Tabs B567- was cut in the coordinating yellow card stock that was used to layer my card layers, then I stamped a sentiment from Lifes a Garden , Pink by design stamp set. I also added some black dots using a black pen.
Ribbons are from Really Reasonable Ribbon
 I really enjoyed spending some time crafting and making this card to share today. Hope you enjoyed my short post, and have a lovely week!
Hugs to all,
Cheryl

Wednesday, May 2, 2018

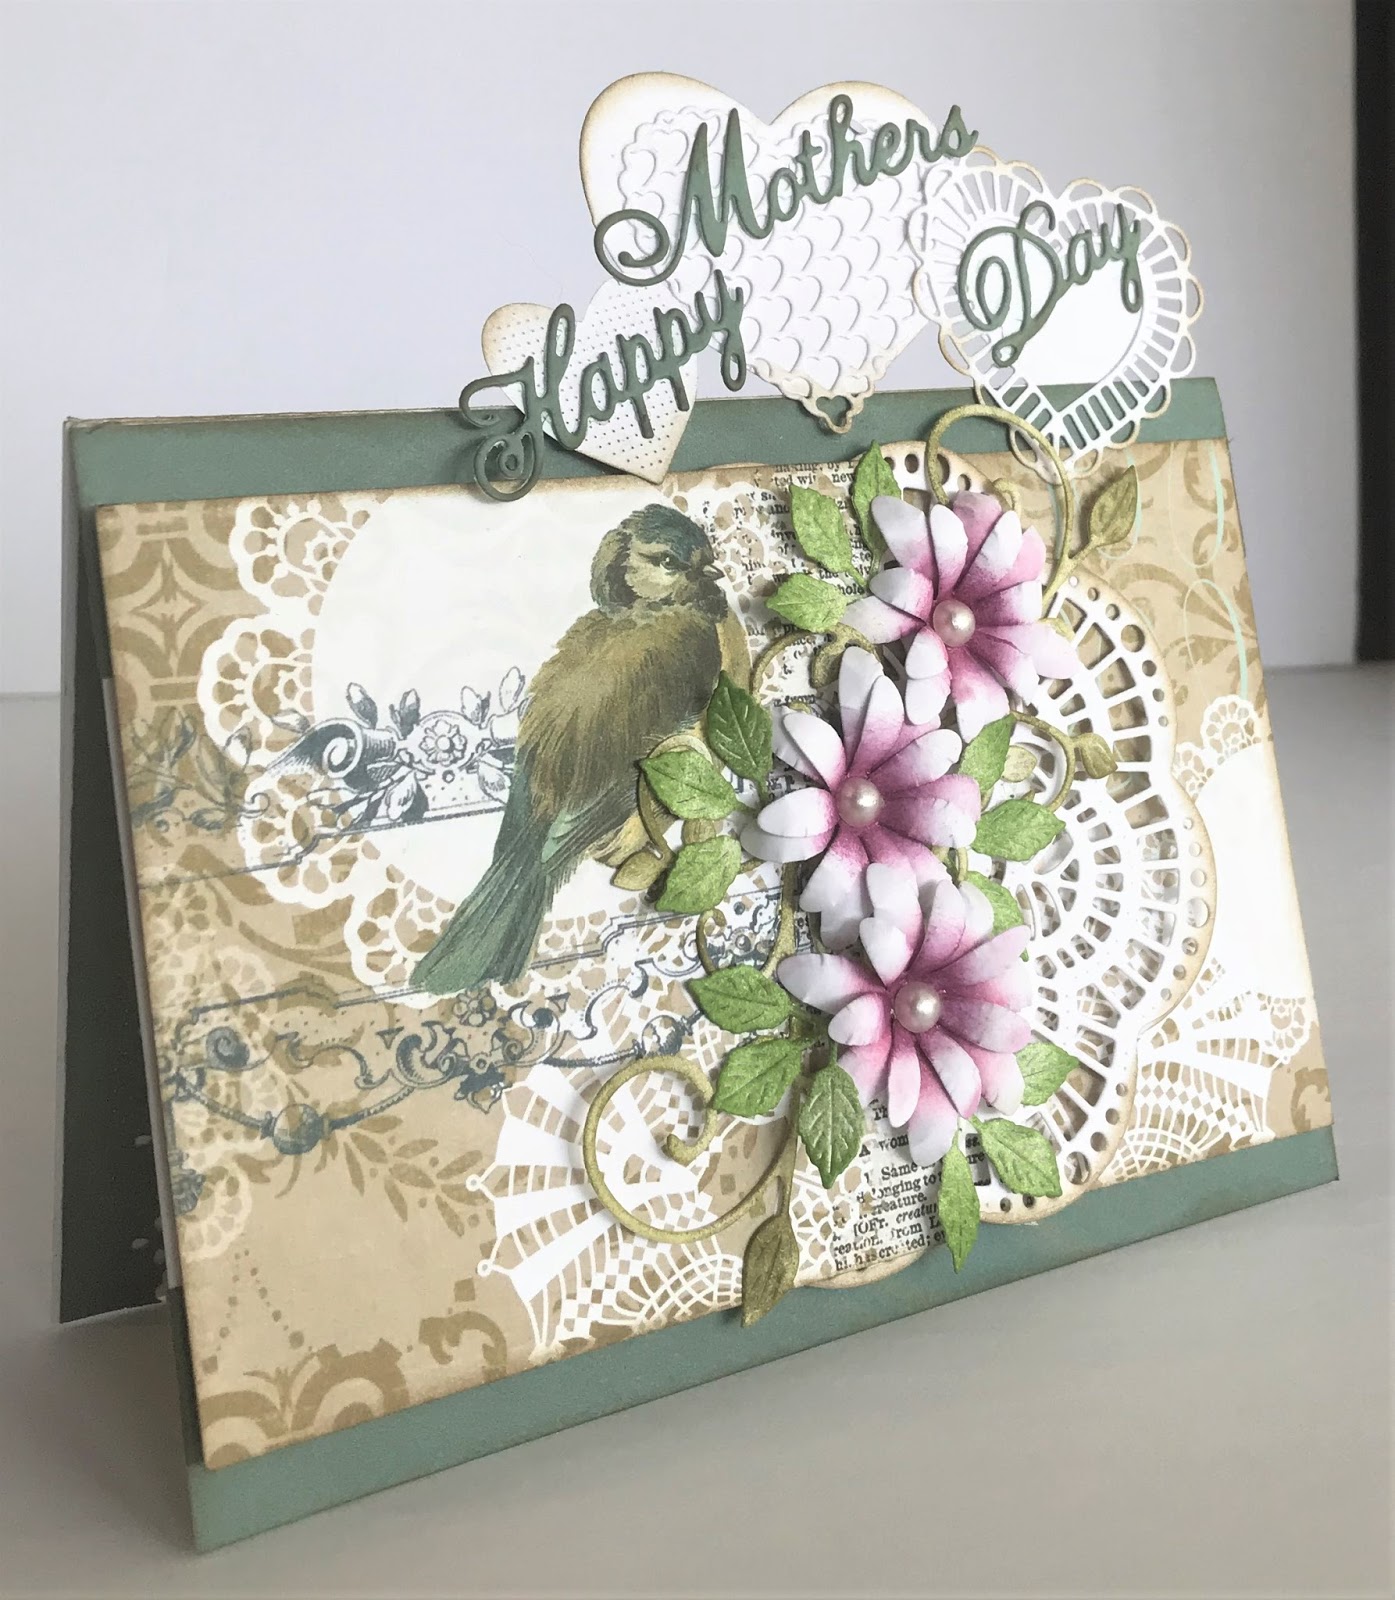
Happy Mother's Day

3:30 AM 2 Comments
A warm Hello to you. It's Debbie hosting the blog today from Debbie's Time Out. Thought I would get a head start on Mother's Day and create a Mother's Day card.


I started by creating a card base using the Pop Up Hearts die. I then covered the card base with some pretty pattern paper with a bird on.


I layer the Ambergris Doily in front of the bird and then created a flower arrangement using the Daisy Strip, Tea Rose small, Mini Fanciful Flourish Right and Mini Fanciful Flourish. Some leaves were added from the Tea Rose small. The Happy, Mother's and Day were layered onto the top of the hearts.

I hope everyone has a wonderful Mother's Day.

Thanks for visiting the blog today and for the comments you leave. They are appreciated.
Have a crafty day my friends.

Dies Used
Ambergris Doily w/ Angel Wing Die - DL241
Heart to Heart Doily 4 Piece Die Set - DL106
Daisy Strip 6 Piece Die Set - B259
Pop Up Hearts - 1 Piece Die Set - B933
Tea Rose small- 6 Piece Die Set - B435
Mini Fanciful Flourish Right Die - B291
Mini Fanciful Flourish Die - B117S
Mother's 2 Piece Die Set - B232
Happy 2 Piece Die Set - B226
Day 2 Piece Die Set - B236


Thursday, April 12, 2018

Your Wedding Day

3:30 AM 1 Comments
A warm Hello to you. It's Debbie from Debbie's Time Out hosting the blog today. 


For the base of this wedding card I have used the Window  and layered a pattern paper that reminds me of wallpaper behind it. To the top and bottom corner I layered the Victorian Romance Flourish which is so elegant. The bride and groom are from the Wedding Vows set. 


I created some larger flowers using the Daisy Strip and smaller flowers using the Tiny Flower Kit. The leaves were from the Tea Rose small set. The flowers and leaves were inked with distress inks. Pearls were added to the flowers and flourish on the corner.


Inside I used the Pop Up Birthday Cake  after cutting the candles off of it. I layered the Border Carnivale  along the top of the cake to cover were the candles were. This birthday cake makes a great wedding cake too.
I then cut and glued down the Alpine Flourish Doily and stamped the sentiment on it. 

It is always nice to make that special homemade card for a wedding.  So I hope I have inspired you into making a special wedding card. 

Thanks so much for visiting the blog today and for the comments you leave. 
Have a crafty day my friends.

Dies Used
Window B Die - FRM142
Victorian Romance Flourish Die - DL151
Wedding Vows Die - FRM138
Daisy Strip 6 Piece Die Set - B259
Pop Up Birthday Cake - 1 Piece Die Set - B931
Alpine Flourish Doily 2 Piece Die Set - DL282
Tiny Flower Kit 32 Piece Die Set - B376
Border Carnivale Die - DL129
Tea Rose small- 6 Piece Die Set - B435

Wednesday, April 11, 2018

Happy Shower with Lisa Blastick

3:30 AM 0 Comments

Hi, Welcome back for another new card for Cheery Lynn Designs. I originally was thinking about April showers and then I started to think about all the baby showers that are this month. So I combined the two into one card. I wanted to make it baby blues but with some girly accents. 


I colored the rain drops and then added a glitter pen for extra shine. I also did that on the flourishes too. In the centers of the flowers is teal gala glitz. Be sure to get this adorable umbrella for your collection because it is on clearance. 


CABD-87 Umbrella Clearance

Thanks again for stopping by today!
Have a great day!
Hugs Lisa 

Tuesday, April 3, 2018

Floral Arrangement

3:30 AM 1 Comments
A warm Hello to you.  It's Debbie hosting the blog today from Debbie's Time Out . Today I am going to share a card with you using some beautiful flowers and greenery from Cheery Lynn Designs..


For the base I matted a purple patterned paper with black cardstock. I cut one of the Nautical Wheeler Doily. The doily cuts out in two pieces. So I layered the large one onto the base first and then tucked the smaller one in behind on the top corner. This gave me a pretty base to layer my flowers and greenery onto.


I cut and layered some greenery onto the doily from the Fern Leaf,  Branch 2  and Olive Branches sets. The big center flower was created using the Daisy Strip . The smaller flowers were cut from the Tea Rose small and the Tea Rose Medium. All flowers were colored and then sprayed with water and shaped with a stylus. Some pearls and prills were added to the center of the flowers.


On the inside of the card  I used the Pop Up Best Wishes. These pop up cards are fun and easy to make. 

Thanks so much for visiting the blog today. I hope you find some time today to craft, create and relax. Have a crafty day my friends.

Dies Used
Pop Up Best Wishes Word - 1 Piece Die Set - B935
Nautical Wheeler Doily Die - DL180
Fern Leaf Die - B666
Branch 2 Piece Die Set - B466
Olive Branches 2 Piece Die Set - B147
Daisy Strip 6 Piece Die Set - B259
Tea Rose small- 6 Piece Die Set - B435
Tea Rose Medium - 6 Piece Die Set - B436

Monday, March 19, 2018

Colorful Thank You Card with Bonnie Garby

3:30 AM 0 Comments
Hi Cheery Lynn fans.  Bonnie from Make Time to Craft here with you today with a bold and colorful Thank You card featuring some pretty dies from Cheery Lynn Designs.
The wild and colorful Distress Ink background paper I created is a perfect backdrop for a bold white frame die.  It really shows off the detail of the die.  I also used some of the background paper I created for the Thank You sentiment which was backed with a turquoise layer for a shadow effect.
I also carried the paper through for some of the layers of the pretty flower to pull everything together.
The flower was created with the Daisy Strip for the petals and then I created the center using the center die from the Black Eyed Susan strip.  The leaves came from the Floral Bouquet kit.  Why not mix and match flower pieces to create even more options!

Cheery Lynn Dies used:

My card was topped off with a pretty bi-color bow created on my Bow-it-All V3.0 Tool using Hot Pink and Turquoise Delicate Stitched Satin Ribbon from Really Reasonable Ribbon.  The center of the bow was adorned with a heart shaped pearl embellishment.
Thanks so much for stopping by today.  I hope I've inspired you to pull out your flower dies and try mixing and matching some of the petals and leaves.  Happy crafting.


Saturday, February 24, 2018

Say it with Flowers by Julie Lavalette

3:30 AM 4 Comments

Hi Cheery Lynn Fans, it’s JULIE here today and I am sharing some more inspiration using another of our beautiful Mega Doilies on my card that measures approximately 8 x 8 inches square.


The Italian Flourish Doily comes in 3 sizes and on this card I have used 2 of them on my layers. Both were cut out in white cardstock and some Distress ink added to the edges. I like to not put glue on the edges of my Doilies, only adding some to the centre. I find this helps to put a little movement into the design and softens the look.


My Daisies have 4 layers on them with a little Distress ink and a Pearl added into the centres.  You will notice that two of the layers of petals are folding down the way and two folding up the way, this helps give stability to the flowers.


Happy Birthday was stamped with Archival ink and mounted onto a little cheesecloth and foam strips for extra dimension.


Finishing off with Pearl Strands, Accents of Pearls on my flourishes and a pretty double layered Butterfly.

Cheery Lynn Dies Used -
DL251 Horizon Coved Boutique Stacker Frames  

Thanks so much for stopping by today.

Crafty Hugs, 
Julie x

Sunday, February 11, 2018

Love and Cherub by Julie Lavalette

3:30 AM 2 Comments

Hi Cheery Lynn Fans, it’s Julie here and today I am sharing some inspiration using one of our fabulous Mega Doilies. These Dies are fantastic for scrapbooking with but look equally as good using as accents on cards for a WOW factor and cut beautifully. 


My card today measures approximately 8 x 6 inches and the border strip on my card is just over 2 inches. I mounted the same colour of cardstock to the inside and on my border strip which gives contrast and helps my Doily pop.


I cut into my paper using my heart Die. You can also use the heart border edge die to cut it out of the paper should you wish.


My flowers were shaped on my Embossing mat and shaded with Distress ink. I used small Pom Pom balls in the centres of my flowers which I coloured with Alcohol Ink to get my desired shade.


My sentiment was stamped onto my diecut adding a cherub which I made from a mould and paper clay. 


Finishing off my card with lots of Pearl Accents.

Cheery Lynn Dies Used -

Thanks so much for stopping by today.

Happy Crafting, 
Julie x

Wednesday, January 3, 2018

Cherish Each Passing Moment by Julie Lavalette

3:30 AM 0 Comments

Happy New Year, it's JULIE here today and I am sharing some Vintage inspiration using a selection of the beautiful Dies we have available.


Using Craft Consortiums Wild Rose paper pad I started by tattering a few layers of my papers and added onto my card with foam strips. I love the intricate details on my diecut frame to which I added some Frantage powders to give an elegant Shabby look to it.


My Flowers have all been built up with 4 layers, shaping with my fingers and adding sparkly gems into the centres, layering onto my flourishes and adding some tiny dried flowers for another detail.


Finishing my card off with a stamped fussy cut ticket, a lace ribbon and an embellishment. 

Cheery Lynn Dies Used :
Thanks for stopping by today and I hope you have a wonderful 2018.

Crafty Hugs, 


Julie x

Copyright Statement


All content, including designs, pictures and words are the exclusive property of the author of each blog post. Information shared here is for inspiration only and may not be copied for publication, competition or profit. Thank you for your cooperation.

SOCIAL MEDIA 2


Follow Us @jointhemakersmovement


All content, including designs, pictures and words are the exclusive property of the author of each blog post.
Information shared here is for inspiration only and may not be copied for publication, competition or profit. Thank you for your cooperation.