Showing posts with label Olive Branches. Show all posts

Tuesday, April 3, 2018

Floral Arrangement

3:30 AM 1 Comments
A warm Hello to you.  It's Debbie hosting the blog today from Debbie's Time Out . Today I am going to share a card with you using some beautiful flowers and greenery from Cheery Lynn Designs..


For the base I matted a purple patterned paper with black cardstock. I cut one of the Nautical Wheeler Doily. The doily cuts out in two pieces. So I layered the large one onto the base first and then tucked the smaller one in behind on the top corner. This gave me a pretty base to layer my flowers and greenery onto.


I cut and layered some greenery onto the doily from the Fern Leaf,  Branch 2  and Olive Branches sets. The big center flower was created using the Daisy Strip . The smaller flowers were cut from the Tea Rose small and the Tea Rose Medium. All flowers were colored and then sprayed with water and shaped with a stylus. Some pearls and prills were added to the center of the flowers.


On the inside of the card  I used the Pop Up Best Wishes. These pop up cards are fun and easy to make. 

Thanks so much for visiting the blog today. I hope you find some time today to craft, create and relax. Have a crafty day my friends.

Dies Used
Pop Up Best Wishes Word - 1 Piece Die Set - B935
Nautical Wheeler Doily Die - DL180
Fern Leaf Die - B666
Branch 2 Piece Die Set - B466
Olive Branches 2 Piece Die Set - B147
Daisy Strip 6 Piece Die Set - B259
Tea Rose small- 6 Piece Die Set - B435
Tea Rose Medium - 6 Piece Die Set - B436

Saturday, March 31, 2018

Celebrate Easter with Cheryl Walker

1:00 AM 1 Comments
Hello Crafty Friends, Cheryl here with a sweet Pop Up Easter Card designed for Cheery Lynn Designs using some super darling dies they carry. LOVE the sweet bunny and chicks together, aren't they just darling???!!!! I think I used 9 Cheery Lynn Dies on this one...hehehe I really had a lot of fun designing this card to share with you all!

On my card I started with cutting the sweet bunny out using design papers for her. Next I did distress her and her dress.  She is so cute, love her! I will use her on other cards, not just for Easter. She does have one of the Tiny Flowers made from the tiny flower die. The chicks were cut using white card stock and then colored in with 2 yellow Copic markers. I can totally see them cut in a yellow batik or some kinda 2 tone yellow print card stock, and then distressed, that would be so cute. I did add eyes using the Viva Pearl Pen in black. Also another flower on one of the chicks.

Greenery was cut using the Olive branches and Flourish #3 dies, and cut with a olive tone card stock. I added little flowers made using the Tiny Flower kit to the greenery. I also used a LOVE Heart from the Sweetheart Candy die.

The frame was cut using 2 different dies for my scenery and sentiment. I chose to use the beautiful Mirror Mirror Doily Frame die, and the Scandinavian Oval Doily. Sentiment is from ODBD.

Cheery Lynn Designs Supplies Used:
C182 Easter Parade (girl bunny)
B528 Chicks (2 used)
DL307 Scandinavian Oval Doily cut in white
DL286 Mirror Mirror Doily Frame(used only the 2 small dies for the sentiment)
B147 Olive Branches
CAFLRS-3 Flourish #3
B675 Sweetheart Candies
B376 Tiny Flower kit
B934 Pop Up Celebrate
Cheery lynn Big Sister Die cutting machine
Best Glue Ever
Mini Platform S192 
Full Size cutting platform set S180 

Other supplies Used:
Design Paper Heidi swapp paper pad
Ribbons and foam squares, Scotch Tape are all from Really Reasonable Ribbon
Viva Pearl pens,
Copic Markers
Sewing machine
AC yellow card stock
I want to wish you all a Blessed Easter and thank you so much for stopping by and taking a peek at my card for today!
Hugs to all,
Cheryl

Wednesday, February 28, 2018

Thanks 3-D Pop Up Card with Cheryl Walker

1:30 AM 0 Comments
 Hello Crafty Friends and Happy Wednesday to you all! I can't tell you how much I am LOVING the new Cheery Lynn 3-D Pop Up Dies, they are so much fun to work with. This one is the Thanks Pop Up that works for the inside of the card, and can also work for the outside of your card as well. I wanted to use it for the outside of this Thank you Card!

To start with I used white card base and cut the Thanks, then ended up taking scissors and cutting the top part off the thanks so it's all in the back. Super easy to do. Next I cut the pink in thanks and cut them out and glued to the Thanks. That is why they are pink now and the card base is white :)

All layers were done using the same pink and then some Crate Paper from the Random 6 x 6 paper stack. I used two doily dies on this and then the Beautiful Decorative Gift Envelope Die.  It's a 12 piece set and comes with all of the flowers, butterflies, birds and a leaf. I added a circle tag and stamped the sentiment on it. All the flowers have little pink pearls in the centers and the butterflies have a cream color pearl on them. Super fun card to make.  I had so much fun designing this one!

Cheery Lynn Designs Supplies Used:
Pop Up 3-D Thanks
B860 Decorative Window Gift Envelope
Olive BranchesB147
DL314 Quadrafoil Square Doily
DL280 Royal Scandinavian Doily
Best Glue Ever S165
Big Sister Die cutting machine
 Close up of the window and flowers with butterflies. I love the little flowers, they are so sweet. I did layer the bigger flower two times to give them a 3-D look. I also added a flower to the T and the bottom of the S in the photo below you can see.
Thank you for looking and have a lovely day!
Hugs to all,
Cheryl

Tuesday, February 20, 2018

Wedding 3-D Pop Up/Shaker Card with Cheryl Walker

1:30 AM 0 Comments
 Hello crafty friends and Happy Tuesday to you all! Today I have a super special wedding card to share using the NEWLY released Cheery Lynn 3-D Pop Up Dies and some past dies as well. Love how this wedding card turned out for today. I also did the inside as well :) I truly LOVE all these new Pop Up dies, and can't wait to share them all with you!

On the front of my card I chose to use the Celebrate Pop Up die, and cut it in white. Next I layered using some wedding design paper and black card stock. Each layer has sewing on it. I also used the quadrafoil-square-doily-die-set-DL314 cut in white, then layered with another layer.  On top of that I used the Vintage Tile die cut in black two times and layered. On top of that is the Wedding Cake Shaker piece, love it! I did layering on it as well using the Olive Branches, and the Tiny Flowers kit.

For the inside I cut some of the matching design paper and then used the Best Wishes Pop Up on that, then layered it on some grey card stock and placed inside my card.

Cheery Lynn Supplies Used:
NEW Pop Up Celebrate B934
NEW Pop Up Best Wishes B935
DL314 Quadrafoil Square Doily
Vintage Tile B886
B147 Olive Branches
B376 Tiny Flower Kit
K109K Wedding Cake Shaker Card Kit
Best Glue Ever
Big Sister Die cut and embossing Machine
Crafters Tool S122


 Here is the inside of my card. I like when the insides are done, as it helps to save time when going to give them, besides that they look complete :) LOVE these new pop up dies!!!
 It had been a while since I've used the Shaker dies and thought this card was perfect for the Wedding cake. The Shaker dies are so easy to use and love how everything you need comes in the kit!
Thank you for stopping by and have a lovely day! Please let me know what you think of my card today, as I always love reading your comments!

Hugs to all,
Cheryl

Tuesday, January 9, 2018

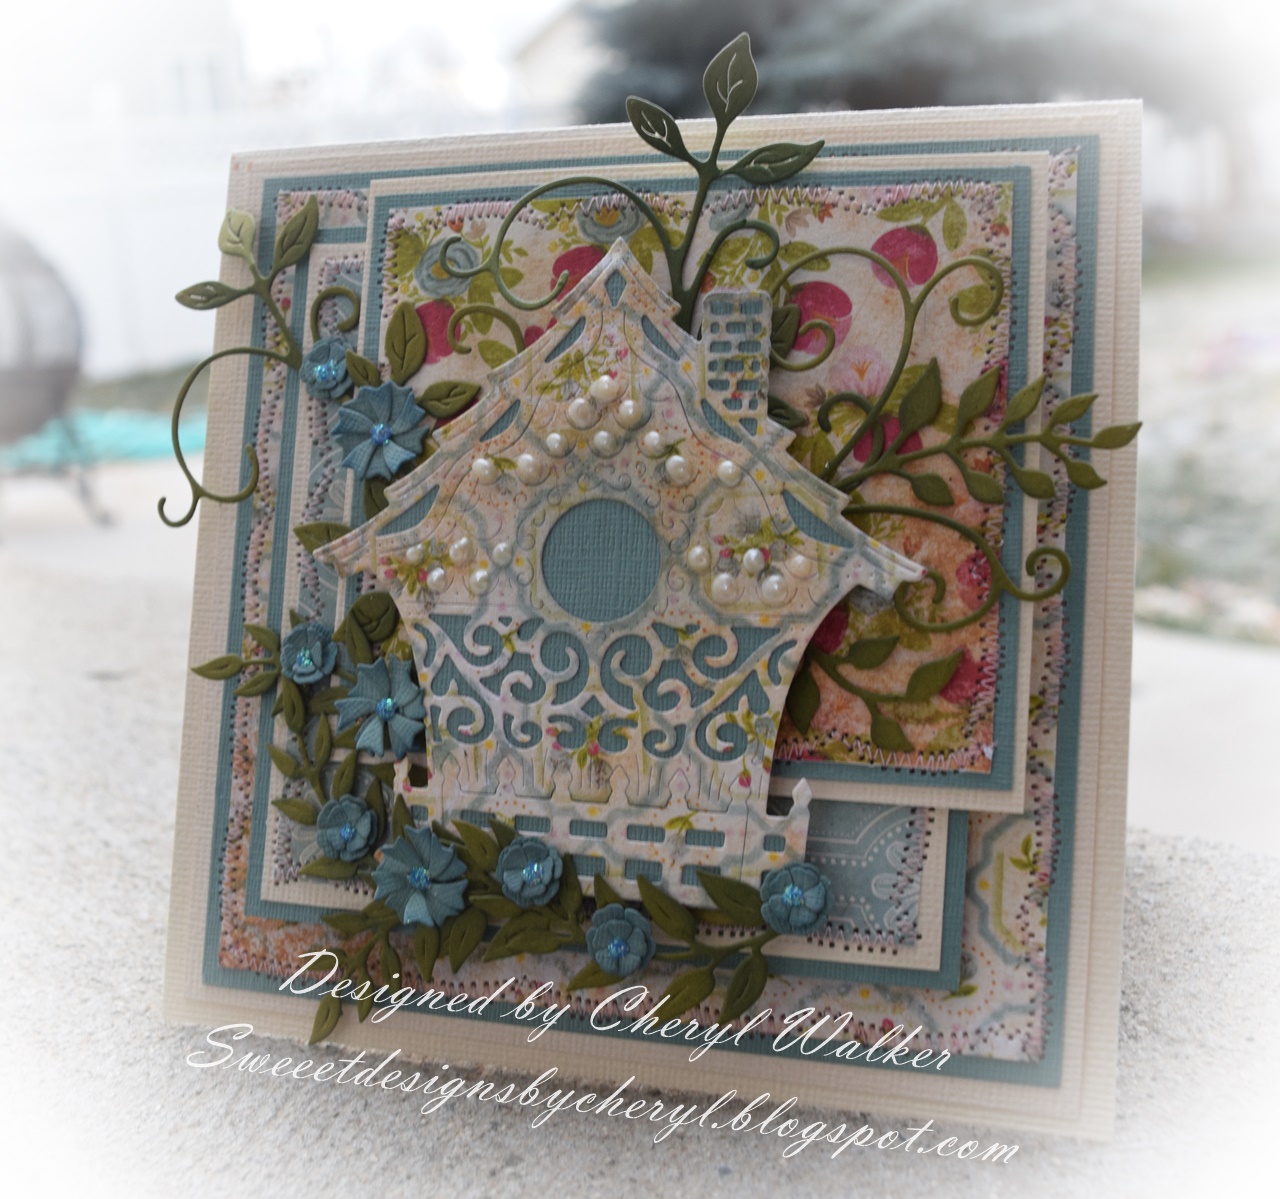
Fancy Bird House Card with Cheryl Walker

1:30 AM 0 Comments
Hello crafty friends and Happy Tuesday to you all!
Today I have a super sweet card I created using Cheery Lynn Dies, and some Vintage Lace papers. Love the Bird House, it's absolutely gorgeous! I decided to just distress it a little and add some Viva Pearls to decorate it a bit.

The card base is 5 3/4" x 5 3/4" and is a cream card stock. Next I added layers of the Vintage Lace design papers and card stock.

For the greenery I used Cheery Lynn's Olive Branches, Flourish #1, Flourish # 3, and Tiny Flowers kit for all the flowers. Love how small they are, and I think they go perfectly with this beautiful bird house. I did add some Stickles to the centers of each of the flowers, and distressed each flower using a blue ink.

The bird house was cut using the coordinating design paper, and then backed with the same blue card stock. I distressed the bird house using a blue ink, and did that lightly, as to not overpower the beauty of the birdhouse. Next I decided to add some pearl dots using the Viva Pearl pen.

Cheery Lynn Supplies used:


Other supplies:

Viva Pearl Pen
Stickles
Ink
Sewing
Bazzill card stock and design paper

I love the look of this card and the Shabby Chic/Vintage feel it gives. Super fun to create, as I always enjoy working with Cheery Lynn Dies! Hope you enjoyed my post for today!
Thank you for stopping by, and have a lovely day!

Hugs to all,
Cheryl Walker
Sweeetdesignsbycheryl.blogspot.com

Thursday, October 5, 2017

Autumn's Loveliest Smile Card by Amy Voorthuis

3:30 AM 0 Comments
Good morning Cheery Lynn Fans.
Autumn is upon us again and here where I live the weather is showing us all the beauty of it! Falling leaves and changing colors but also my least favorite part, the heavy wind and the rainy days. Today is a day like that and it's my day off work but it is a day to stay in bed under the warm covers....  For today I'd like to share an Autumn card with you all using almost all the leaf dies Cheery Lynn Designs offers.

Autumn's Loveliest Smile: 

For this card I used all Maja Design papers from different collections but mostly "Walking in the Forest"! All the dies I used where cut out a couple of weeks back but I never used them. I am hooked on Cheery Lynn's leaf dies because you can use them for every occasion and this time it's an Autumn card. It was really hard to take a picture because it is very windy today and I take all my pictures outside....and my card almost flew away haha. lol


Cheery Lynn Designs dies used:
CAFLRS-14 - Flourish #14
B241 - Rose Leaf Strip
B178 - Flourish Leaf Strip
B147 - Olive Branches
B146 - Pine Branches
B777 - Floral Bouquet Kit
B389 - Cattails and Reeds
SF-2 - Stacker Flower #2
B883 - Dusty Miller Frame Corner
B888 - Flourish Frame

Thank you so much for visiting the blog today!
I hope you enjoyed my post and I have inspired you to use your Cheery Lynn Designs dies. You could also visit my blog at Amy's Pretty Papers for more inspiration.
Have a wonderful day!

Monday, August 14, 2017

Songbirds by Julie Lavalette

3:30 AM 0 Comments

Hi everyone,  thanks for stopping by, its JULIE here today and I'm sharing some more inspiration using the fabulous new Vintage Dies.


My card has lots of layers using coordinating papers from Pion Design. I started by Die cutting my layers and adding Gilding Wax around the edges. This was to compliment my Gilded Birdcage and to give an opulent feel to my card.


You will also notice my diecut corners have had Gilding Wax rubbed all over them.


The corner of my paper was placed into my Die and cut to give a curved edge and I fussy cut around the bird and foliage, mounting in place with some Silicone Glue and a touch of Cheesecloth.


My centre layers I layered in place with foam tape for added dimension, adding some sweet birds onto my Birdcage for extra detail.


Finishing with a pretty Floral bouquet, some die cut feathers and bling.

Wishing you a lovely week.

Happy Crafting, 

Julie x

Cheery Lynn Dies Used :
LPC12 French Flair Pierce and Cut Tool

Tuesday, July 4, 2017

Forever Friend by Julie Lavalette

3:30 AM 0 Comments

Hi Cheery Lynn fans, its JULIE here today and I am sharing some Vintage inspiration on my latest Forever Friend card.


My papers used on this card are from Lemoncraft. I started by cutting out my Stacker Layers, sprinkling some copper embossing powder onto my paper and heat setting for a shabby feel. I tattered and inked my faux stitched layers, layering onto my card with my beautiful die cut Doily as an accent in the background.


My image was die cut out using my Stitched Circles adding copper embossing powder to the edge to frame it, adding an accent of cheesecloth and layering onto my die cut layers.


I have small Whimsy ticket stamps that I stamped with Archival Ink and shaded with Distress Ink, I die cut out and tattered the edges slightly with my scissors.


My flowers were shaped on my Embossing mat and once the glue was dry I added some Distress Ink to the edges for definition. Finishing my card with a touch of lace and pearls.

Cheery Lynn Dies Used :

Thanks so much for stopping by today and for all your lovely comments. 

Crafty Hugs, 

Julie x 

Copyright Statement


All content, including designs, pictures and words are the exclusive property of the author of each blog post. Information shared here is for inspiration only and may not be copied for publication, competition or profit. Thank you for your cooperation.

SOCIAL MEDIA 2


Follow Us @jointhemakersmovement


All content, including designs, pictures and words are the exclusive property of the author of each blog post.
Information shared here is for inspiration only and may not be copied for publication, competition or profit. Thank you for your cooperation.