Wednesday, October 31, 2012

Vintage Inspiration

3:30 AM 10 Comments

Hi and Good Morning everyone - Alison here today :)  We have a fab challenge theme of Vintage this week and already some really gorgeous entries so far.  Cheery Lynn have some beautiful and very elegant dies which are perfect for a vintage creation, and I really enjoyed making this style of card.
 
I started off with an 8 x 8 inch blank card base, so this is quite big.  I layered HOTP papers onto Kraft card and pale cream bazzill card, and the same cardstock was used for cutting all the dies. 
 
I used the wonderful Sophia's Heart doily die for the background and the border lace is the stunning Anastasia Border.  I added the Fanciful Flourish die to the side panel and then matted my vintage photograph using Oval scalloped and stacker dies.  I tucked  just one from the set of 3 Lace Deco Corners around the edges of the picture and added some pearls.
 
The bottom right hand corner uses Victorian Romance Flourish.  This was the first Cheery Lynn die I ever bought and still remains one of my favourites.  I made some baby's breath flower stems (these were soooo easy!), and the larger white flowers were again nicked out of my pot pourri bowl! :D lol.
 
All dies used on this card are:

Lace Corner Deco H
Sophia's Heart
Anastasia Border
Lace Corner Deco B
Fanciful Flourish
Oval stacker
Scalloped oval stacker
Exotic Butterflies Small #2
Exotic Butterflies - Small
Victorian Romance Flourish
Embellishment #2 - Baby's Breath
Hummingbird
Love
Rose Leaf Strip

I hope you find time to enter our challenge this week, I love looking at all the creative ways everyone interprets the challenges and uses these dies, its such a pleasure.  Dont forget, there is also daily inspiration from the other talented members of the DT over on our Cheery Lynn Designs Inspiration Blog, so check back often :)

Have a smashing week, and thanks so much for visiting today.

Alison - aka 'xtglx'

Merry Christmas Poinsettia

3:30 AM 8 Comments

I love the new Rose Leaf Strip die and created this beautiful poinsettia by die cutting the strip three times; for a total of six of each of the three size leaves.  How great to be able to cut all three sizes in one pass!  First, I trimmed off the stems.  Then using a small circle of card stock as a base, I built the flower from the bottom up; large, medium then small leaves.  I added three gold gems in the center.  The detailing and ease of molding the leaves is just incredible.


My card started with a white card stock base, 5 1/4" square.  I added a red panel 4 3/4" square and then mounted the fabulous Mexican Tile Pattern frame.  As I was assembling the card, I thought just the frame and the Sentiment #2 would make a lovely card by themselves.  I laid the sentiment die down on a piece of white card stock and traced around the outer edge.  Then hand trimmed the backing for the die.

Be sure to visit the Cheery Lynn Designs challenge blog for more inspiration and to join in on this week's Vintage challenge for a chance to win $20 to the store

Tuesday, October 30, 2012

It Started out as Vintage

3:30 AM 8 Comments
Good Morning Cheery Lynn Fans, Donna here with what started out as a Vintage card, the papers started out as Vintage, the image was vintage like, and then it suddenly became MODERN ART...don't ask me how either.......but I kind of like how it transformed itself......it's what BOB Ross would have called  "A Happy Accident"
So to create this "Happy Accident", I started off with a 5½ inch x 5½ inch brown cardstock, and added some vintage papers in teal and brown mix, I then cut out the Japanese Garden Lace Oval out of matching brown paper and cut out the angel wing of it using white corrugated cardboard, once I stuck the Garden Lace Oval to the angel wing, I then stamped out my image and colored it using Copics. I cut out one of the Lace corner dies and used it in the lower left hand corner from the H set. I also used a piece of the honeycomb frame to put behind the image in the upper right hand corner.

For the flower arrangements, I used a mix of Sunflower, folded in half and placed part way under the oval, some foliage consisting of the Olive branches, flourish leaf strip, flowers made out of the miniature and medium roses.

Here's a complete list of dies used to create my somewhat vintage/modern card

Don't forget our weekly challenge this week is Vintage style cards or other projects, where you have the chance to win a $20 shopping spree at Cheery Lynn Designs.

Thanks for stopping by

Monday, October 29, 2012

Cheery Lynn Designs Challenge 52 - Vintage

3:30 AM 6 Comments
This week our challenge at Cheery Lynn Designs is

Vintage

 Here are the rules:
  • You MUST follow the theme and use at least one Cheery Lynn Designs die, of course, we would love to see more than one. 
  • You MUST add a link to your blog post in the InLinkz at the end of this post; no back posting, only new projects are allowed
  • You MUST link to our blog in your post
  • You may only enter the challenge ONCE per week.
The winner will be chosen based on merit by Cheery Lynn Designs. They will receive a $20 coupon for shopping at the Cheery Lynn website. The challenge will end on Sunday night at 22:00 Eastern time.  And now to our inspiration for today......


Remember, you MUST use a Cheery Lynn Designs die to enter this challenge.

Boo To You!

3:30 AM 6 Comments
I realized I really haven't made too many Halloween projects this year, so I thought I better sneak one in while I still can. My flower was created using the leaves and petals from the Franipani set, built on a calyx from the Embellishment 2 set. My sentiment was created using a mix of fonts and words (you). The new Delicate Lace Script is my favorite font set ever! Such a perfect size.
The new challenge is up at the Cheery Lynn Designs Challenge blog, and it's one of my favorites! Vintage! So be sure to play along for your chance to win a $20 gift certificate.
Patterned Paper - DCWV: Witches Brew
May Arts Ribbon
Robin's Nest Dew Drops


Sunday, October 28, 2012

Silhouette in Black and White...

3:42 AM 6 Comments
Hello all you Cheery Lynn Fans.. welcome to Sunday I'm Tamara with your daily inspiration...
Today I'm going black and white as my theme.. 
Cheery Lynn Dies used 
Judy's Blooms (for extra leaves)

The flowers have been distressed using DI's in Black Soot.  I used an embossing tool to shape the leaves upwards. I like the effect of the stamens inside the flower and in the centre I have used a small velvet brad.  
I stamped the image using memories white ink and then embossed with Sweet Stamps white embossing powder.  I then used more black soot DI's over the image to give it a weathered look.

Here's a close up of one of the flowers I used a bit more black soot on the leaves..

Other Crafting goodies 
Stamps are from Sweet Stamps 
Paper - Kasiercraft 
Distress inks - Black Soot
Embossing powder 
Brads & Ribbon 
Nightfall core'dinations cardstock

Thanks for looking today, be sure to check out Cheery Lynn Challenge Blog to enter the competitions each week.  We also have inspiration from the amazing design team every day on both blogs  
Photobucket


Saturday, October 27, 2012

Love

3:30 AM 7 Comments
Hello! Jodi here today with a 12x12 layout for you. I finally got a chance to play with some fun dies new to my stash!

I started by cutting the Mega Tea Party Doily in half and placing the halves toward to top and bottom of my layout. I added the Border Carnivale amongst my background layers. To the top right corner you see the Pennant Die dressed up with the Lace Light Deco Border for a bit of added elegance. Lace Corner Deco B dresses up the left corner of the photo. Backing my floral cluster is the Garden Gate.
The large white flower is constructed with the layers of the Stacker Flower #3. I inked the inside of the flowers, and finished the edges with a light dry brushing of gold paint. Build a Flower Embellishment #2 was used to create the flower center, as well as the Baby’s Breath and small pink flowers. The edges of the Miniature Roses were also lightly brushed with the gold paint. Foliage from Build a Flower #2, Flourish Leaf Strip, and Rose Leaf Strip.
Isn’t the Bird Cage beautiful?! So many possibilities! Under the cage are branches, as well as Baby’s Breath and little pink flowers from Build a Flower Embellishment #2. The leaves are from Small Leaves #1 and Small Leaves #2. The Hummingbird flutters gently above the cage. Anastasia Border is tucked under the tear in the background paper.

Design sketch and papers are inspired by a from Quick Quotes.

There is still time to enter this weeks challenge for you chance to win the $20 shopping spree!
Thanks for stopping by!!


Friday, October 26, 2012

Fall Wagon

3:30 AM 10 Comments
It's Friday and I am thrilled to be back with another project to share with you this week!

Our challenge this week at Cheery Lynn Designs is All About Texture.  So with that in mind, I wanted to show you a really neat technique that you might way to try.  For my project, I started by inking up my Wicker Embossing Plate with distressed black ink and embossing my card stock.  I then used my Big Weaver die to cut the card stock into strips to resemble wood.  Once I had my strips cut, I then distressed the entire sheet with several different colors of distressed inks to give the appearance of wood that looked somewhat "aged." 

One of the great things about the Wickers and Weavers dies is that they are made so that there is no cut line at one end so that you can extend the die cut to the width of your paper.  This is also the case for both the new Expandable Tiny Borders and the new Expandable Quilling Strip Die.

For the supports on the wagon and the seat bench, I simply used my Big Wicker die but did not emboss this with the Wicker embossing plate, just a bit of distressing to give the feeling of old "faded" leather.


Here is the finished Fall Wagon


Here is a closeup to see the texture I created


This was such a fun project to do and it gave me the opportunity to use my Cheery Lynn dies in some different ways.  I hope this gives you some ideas when looking at your dies.  I think you will find there are some wonderful unexpected surprises contained within each and every one of them!

For this project I used the following:
B188 - Build a Flowers Embellishment #2
B240 - Fall Pumpkins
D133 - Small Leaves #1
D134 - Small Leaves #2
D135 - Large Leaves #1
D136 - Large Leaves #2
G18 - Wicker Embossing Plate
W102 - Big Wicker 1/4" Strips
W104 - Big Weaver 1/2" Strips

Also, don't forget to visit the challenge this week and put in your entry where the theme is All About Texture!

You have a chance to win a $20.00 shopping spree at Cheery Lynn Designs!

Of course, if you would like more inspiration please visit the other talented ladies from the Cheery Lynn Design Team.  I know you will be glad you did!

Have a Cheery Day!

Halloween Pumpkins - Table Decorations

3:30 AM 5 Comments
It is nearly Halloween!  We don't celebrate Halloween in Australia, though I do believe it is something that is fast catching on.  It would certainly be nice to experience Halloween, and certainly has an interesting story behind the occasion. 

So, to get into the 'theme' of Halloween, for Cheery Lynn Designs I have created a decoration of pumpkins, along with a small 'Boo' tag. Cheery Lynn Designs does have a 'Boo' die, but since we don't celebrate here I have not acquired it.  I hand wrote my Boo, but you can find the die 'here'.
These pumpkins are so easy to create and can be made in in a variety of sizes, easily, and quickly.  AND, would look absolutely fabulous created for a table setting.  I used the Circle Classic Silver Series  (middle size, for the larger one) and die-cut 8 circles - folding each circle in half, and pressing firmly with a score tool.  Hint:  It is easier to do the folding by hand rather than use a score board due to them being round - you really do have to be precise so they match up perfectly. 
Then...simply start adhering one half to the next half, and repeat till you have all affixed, except last one.  Before adhering last half circle together, break a kebab stick with your hands (muscles) to fit inside the length of the circles.  Place a strong adhesive into the middle of where all the half circles meet - place stick along edge of adhesive - keeping the torn, tattered end of the kebab stick at the top, and poking out of the soon to be pumpkin.  Affix last half circle closed, and hold firmly till adhesive has dried, for best results.  

The 'greenery' on the larger pumpkin is created with the Stacker Flower #4, and the smaller, the Stacker Flower #3. I used a crop-o-dile (any small round punch will work) to make the hole in the stacker flower larger to fit over the pumpkin stem, and adhered with a tiny smear of glue.  

The tendrils are created using the new release Expandable Quilling Strip.  The smallest strips on the die-cut were just wound tightly around the left over piece of kebab skewer. Apply a tiny dot of glue to one end, and neatly tuck under the stacker flower foliage.
The  Scare Me die consists of the wicked little tree and cat.  The cat reminds me of my cat Ms Malinki! LOL

... and before I sign off for another week, this weeks challenge is 'texture', to enter visit the Cheery Lynn Designs Challenge Blog... and don't forget to pop over for a visit and some wonderful inspiration from the Cheery Lynn Designs Blog.
Till next week...
Sandie
xxx
Supplies List:
Kebab Skewer
AC Cardstock
Crop-O-Dile
Helmar 450 Quick Dry Adhesive
Tag
Eyelet
Black Diamond Stickles

Thursday, October 25, 2012

Vintage card + tutorial - Kianel

3:30 AM 12 Comments
Hello dear Cheery lynn designs lovers,
Kianel here today with a vintage card and a tutorial.
Today i am showing you how to create a very elegant frame for any shape of the XL or little stackers that has inverted scallop option.
 The card is about 16x16cm. The base of the card is made using the Mini pearl french flair mega doily, biggest size. The paper i used is white and i then inked it and stamped it.
Using the XL french flair stackers, i cut size 4 in printed paper and placed it on white cardstock to cut a bit larger, for it to fit my Kaleidoscope shape.
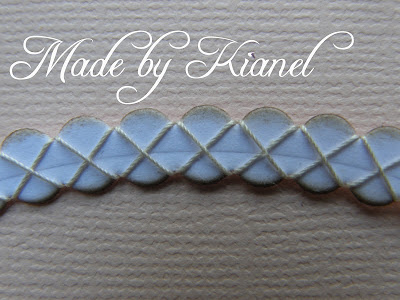
I added an elegant frame to decorate my image, using Little scalloped oval stackers and Little inverted scallop oval stackers (see the tutorial right under this project).
 I used the same idea for the expandable tiny borders that i decorated with thread too, having exactly the same design! Mini fanciful flourish, wreath strip, 3 butterflies from the mini dimensional butterflies set.
 I added a sentiment "Love", tiniest one in the top corner.
To build my flower, i used the Cherry blossoms that i inked and stamped with a text. I shaped it using embossing tool and placed a brad in the center. 
I added olive branches on the sides, a mini dimensional butterflies and a sentiment frame #1 for my text.
Dies from Cheery Lynn Designs, inks from Ranger and Colorbox, printed paper from MME, stamps from Cartoscrap / Stampabilities / Hampton Arts, embellishments from a french online store.

Let's now focus on this frame and i am going to show you how to make one easily:

All it takes to do it is  the Little scalloped oval stackers largest size and a smaller Little inverted scallop oval stackers. You can do that with the ovals, but also with the circle and the squares.

 First, cut a scalloped oval.
 Take the die that you will use of the inverted scallop die and mark the "highs" with a pen on the back of the die (don't hesitate to do that on several areas all around the die to make sure you align correctly before cutting (here is just to show you how that looks): that is to be able to put them in line with the "lows" of the scalloped die. Not sure i am making myself clear here but i guess you'll see what i mean on the next step, lol. Put the die in the middle and cut.
So here is what you get, pretty cool isn't it? Don't worry if it's not "perfect", you can hide the "wrong" parts with decorations later on. It takes several attempts to get the perfect one.
To make my frame elegant, i just used some cotton thread and laced it around the cut frame. First time i wind it around like that. (Just attach your thread with a tiny piece of double sided tape for the beginning and then just go through the frame).
And here is what you get after you went through the whole frame another time but in the other direction.
Now you just have to grab your stackers and give it a go as this is really cool!

 Don't forget to join our weekly challenge for a chance to win a 20$ shappoing spree and discover the marvellous projects of the challenge blog DT girls!
Have fun with your dies!
Love from France, Kianel.


Wednesday, October 24, 2012

Quilling with Cheery Lynn Designs

3:30 AM 9 Comments

Have you seen the new Expandable Quilling Strip Die from Cheery Lynn Designs?  I dug out my quilling tools and started cutting strips.  I only wanted to use the largest size of strips from the die, so I cut my paper 1/2 x 11 inches.  Positioned it over the larger strips and die cut it.


I trimmed the outer bits off and then repositioned the paper to finish cutting the strips.  It is really easy to line the original strips back up in the die and then run it through your machine.  Not knowing exactly what I was making I cut a large amount of red and green strips and quilled up the following.....


For my larger flower, I used size 2 on the Quilling Circle template; 3 for the smaller.  I was originally going to add quilled leaves but when I started assembling my card, I decided I wanted leaf die cuts.


Using my Scalloped Square Stackers and the coordinating Silver Square Stackers I created my card base and the DP background.  Next I added a Nautical Wheeler Doily and started assembling my poinsettias.  I used my Holly Leaves die around the petals and then added two Holly Corner embellishments.  I die cut the center medallion from the Nautical Wheeler Doily and added it below my sentiment which I die cut with my Scalloped Circle Stackers and matching Silver Circle Stackers.  Finished size is 6" square. 

Be sure to visit the Cheery Lynn Designs challenge blog for more inspiration and to join in on this week's Texture challenge for a chance to win $20 to the store

Tuesday, October 23, 2012

Going Dotty

3:30 AM 13 Comments

 
Hi and Good Morning :)  Alison here today and what wonderful entries we have had so far this week in our 'Texture' Challenge.  You still have plenty of time to join in, and you can link your entry here.
 
I really enjoyed making my card for this weeks theme, and was aiming for something fresh, light and delicate.  I usually have some kind of image as a focal point on my card, but the Celtic Heart die provided a perfect centrepiece.
 
I started off with a 6 x 6 inch blank card base and layered ice white pearl card and blue bazzil cardstock.  I then used the Dotted Swiss embossing plate on the pearl card for texture, and added the Border Carnivale and some dotty ribbon at the bottom.
 
The gorgeous Large Sunflower Doily is perfect for this size of card and creates a beautiful background to the stacked circles and Celtic heart centrepiece.  Finally I added Darling Daisies and the word LOVE from the new release sentiments.
 
All dies used on this card are:
 
 
I hope you find time to play along with the challenge this week, and I look forward to seeing more fab entries.  Dont forget, there is also daily inspiration from the other talented members of the DT over on our Cheery Lynn Designs Inspiration Blog.
 
Have a smashing week, and thanks so much for visiting today.
 
Alison - aka 'xtglx'
 

Halloween Once Again

3:30 AM 12 Comments
Good Morning Cheery Lynn fans....Donna here with what will probably be my last Halloween card of the season......I hope you like it, and can see what can be created using the fabulous Halloween dies from Cheery Lynn.

To create my card I made a criss cross card which is 6x6 in size. I've created a scene in the centre using a Saturated Canary image and used the Victorian Picket Fence behind the image, some bats from the Going Batty die set, and some cobwebs in the corners from the Lace Deco Corner set H.
I've also used the Spooky Tree on the front and inside of the card placing them back to back. I also created a little sign for my sentiment using the Scalloped Square die.
A closeup of the middle of the inside
Closeup of the tree on the inside and the sign with sentiment
Closeup of the left side inside with pumpkins and the tree. And all the trees have little bats in, which you can see if you look for their eyes.
What the card looks like partially closed....I love how the fence meets in the middle
A view of the front of the card, both sides, and the back of the card is just black.....

I hope you enjoyed looking at my creation. Going to miss making Halloween cards.....but it's time to move on to Christmas for a couple months...LOL

List of Dies Used

Don't forget to enter our weekly challenge......the theme this week is "All About Textures", a chance to use all those wonderful embossing dies from Cheery Lynn.


Monday, October 22, 2012

Cheery Lynn Designs Challenge 51 - Texture

3:30 AM 11 Comments
This week our challenge at Cheery Lynn Designs is

Texture

 Here are the rules:
  • You MUST follow the theme and use at least one Cheery Lynn Designs die, of course, we would love to see more than one. 
  • You MUST add a link to your blog post in the InLinkz at the end of this post; no back posting, only new projects are allowed
  • You MUST link to our blog in your post
  • You may only enter the challenge ONCE per week.
The winner will be chosen based on merit by Cheery Lynn Designs. They will receive a $20 coupon for shopping at the Cheery Lynn website. The challenge will end on Sunday night at 22:00 Eastern time.  And now to our inspiration for today......


Remember, you MUST use a Cheery Lynn Designs die to enter this challenge.

Copyright Statement


All content, including designs, pictures and words are the exclusive property of the author of each blog post. Information shared here is for inspiration only and may not be copied for publication, competition or profit. Thank you for your cooperation.

SOCIAL MEDIA 2


Follow Us @jointhemakersmovement


All content, including designs, pictures and words are the exclusive property of the author of each blog post.
Information shared here is for inspiration only and may not be copied for publication, competition or profit. Thank you for your cooperation.