Showing posts with label Butterflies. Show all posts

Thursday, September 8, 2016

Birthday Wishes Card by Amy Voorthuis

3:30 AM 0 Comments
Goodmorning everyone, 
I am very happy you are here with us, today I have a card to show you all. For this card I used the super pretty circle phrase "Birthday Wishes"! The phrases are so much to use on a card or even on a layout. For this card I used the pretty "Vintage Autumn Basics"collection by Maja Design....as most of you already know I am a sucker for the flower dies Cheery Lynn offers so on this card I used a couple of them. 

Birthday Wishes:
Lately I am all for blue colors I call it my blue phase lol! In the past I always used my pretty doily dies on my work and I don't anymore but I took them out yesterday and thought by myself Amy why don't you use them they add so much to a card and layout.....so you will probably see them more on my work from now on.

Cheery Lynn Design dies used: 
Thank you so much for visiting the blog today!
I hope you enjoyed my post and I have inspired you to use your Cheery Lynn Designs dies. If you love the Cheery Lynn Designs dies I used, you could always enter our bi-weekly challenge to win a $20 shopping spree.
This time it's challenge #237 "Lace - Real or Faux Theme" I can't wait to see your work! I always enjoy look at your works have a great weekend everyone.

Saturday, June 18, 2016

Life is Good by Eva Dobilas

3:30 AM 2 Comments

Hi there, this is Eva, and I am here today to share a super happy, full of life card with one of our newest die called Whimsical Life Is Good.

This card was so fun to create and I absolutely love this sentiment die!  It will be used a lot!  I could see this on canvas or layouts, or any other projects, or just a card like I made.  

To create this card I cut down an A2 size card base.  Then I cut a 1/4" smaller card front out of watercolor card stock as I wanted to paint a fun watercolor background.  To do that, I used Color Burst Watercolor Powders.  Then I die cut the sentiment out of black as I wanted it to be bold.  Finally I die cut one of the Small Exotic Butterflies #2 w/Angel Wings and painted them in and added them to my card and that is it!


And here are the dies I used to create this card with.

Hope you like this colorful card and can't wait to see your cards in our newest challenge!

Hugs,
Eva

Monday, May 2, 2016

Best Wishes by Eva Dobilas

3:30 AM 1 Comments

Hi there, this is Eva and today I have a pretty doily card to share with you.  I love to add gold elements to my card so that's what you'll see on this.

To create this card I have cut an A2 size card base out of turquoise card stock.  Next I cut down a Heidi Swapp resist paper and sprayed it with Lindy's Stamp Gang sprays. Than I die cut Alpine Flourish Doily out of gold mirror card stock and placed it on the card front.  Next I die cut a Mirror out of cream card stock and stamped my sentiment and the outline on it and added it to my gold doily.

Next I die cut a Small Exotic Butterflies #2 w/Angel Wings, using patterned paper for the intricate cut and watercolor card stock for the wing, which I sprayed with the Lindy's Stamp Gang sprays and glued them together and placed it on the doily to finish up my card.


Hope you like this little card and here is the list of the dies I used to create it with.


Thank you for stopping by and hope to see your cards in our current challenge!

Hugs,
Eva

Tuesday, January 12, 2016

A Colorful Happy Birthday to You

3:30 AM 1 Comments
Hi friends.  It's Bonnie from Make Time to Craft here today filling in for Amy.  We've had some really dreary weather in my area for a few weeks and I needed some color in my life so I went bold today.
I started out with scraps of red, orange, yellow, green, blue and purple card stock about 1-1/2" x 5".  I applied Stick It adhesive to the backs of all the pieces and then die cut each with the Border #3 die.  I then adhered all my pieces on to a panel of white card stock and then mounted that on an A2 sized top fold black card base.

Stick It adhesive is a wonderful adhesive for intricate die cuts.  You simply apply it to the back of your cardstock, die cut, peel off the backing and adhere it to your project.  Perfect for effortless, all-over adhesion.  The best part is that it doesn't 'grab' immediately, so there is a little time to make sure your die cut is exactly where you want it.  I use it on all my projects.
For the sentiment, I used the Rectangular Pierce & Cut Tool Lge Silver Pierce die.  If you don't have the size you need, you can often create one by partially cutting, flipping the die and line up the holes and cut the other half.  This really adds to the value of these sets!  
I then added some dimensional butterflies using the Small Exotic Butterlies #1 set and a pretty bi-color double loop bow made with gorgeous ribbon from Really Reasonable Ribbon.
Cheery Lynn Dies Used:

Be sure and stop by and check out the Cheery Lynn Designs Challenge this week.  The theme is Snowflakes and we'd love to have you play along for a chance to win a $20 gift certificate to the Cheery Lynn Designs store.

Tuesday, October 27, 2015

My Special Day Memory Book by Amy Voorthuis

3:30 AM 4 Comments
Good morning to you all.
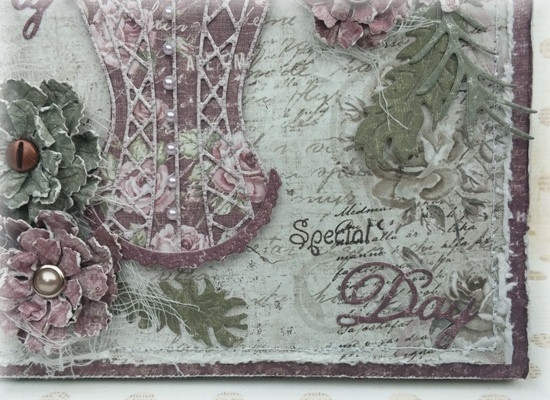
With the new October release, Cheery Lynn Designs came out with some amazing "Memory Book"dies in different sizes which I really love. Not that I am a great mini album maker but it makes it so much easier to start one. So today I'd like to show one I made it will hold my wedding pictures when I finish the inside as well. 

My Special Day: 
Last week I showed you a layout I made of little me. I just went along and used that paper line again on this memory book. In the future I'd like to make one for my husband too with different colors and more masculine of course. On the inside I have seven sheets to use and put my pictures on so that's going to be a challenge for me not using so many pictures one project hehe. 


Cheery Lynn Design dies used: 

I hope you like my memory book. Thank you so much for visiting the blog today. 
If you love the dies Cheery Lynn offers you could always enter this weeks "Anything Goes" challenge #208, because you could win a $20 shopping spree at the store. I can't wait to see your work.  

Love

Monday, September 14, 2015

Spread your Wings by Eva Dobilas

3:30 AM 2 Comments

Hello, this is Eva and I am here today to share a card with wings to participate in this week's challenge.  I love butterflies so this was super fun to work on.

To start out my card I cut a 5.5" size card base, than I cut a square using the Square Stitch and Cut Tool out of black card stock, than I cut a smaller of that die out of light blue card stock.  I also cut a square to fit on the card base out of white water color card stock and splashed it with blue and green water color.

Next I die cut the wings using the Small Exotic Butterflies out of watercolor paper and painted it with blue and green water color paint.  Than I die cut a Horizon Fishtail Banners out of watercolor paper and painted it in with yellow shades of water color paint and stamped my sentiment on it.

I placed my banner on the card, and the butterflies and added some pretty crystals to finish my card.


Here are the dies I used to create this card


Thanks for stopping by today and Good Luck to everyone entering our Weekly Challenge.

Hugs,
Eva

Monday, August 24, 2015

Dream the Impossible card by Eva Dobilas

3:30 AM 1 Comments

Hi there, hope you had a great weekend!  This is Eva here with an inspirational card. This week's challenge is Anything Goes, so I bet you all are going to upload some pretty cards!  For me just love all the pretty dies Cheery Lynn does, so I used quite a bit on my card.

To start our my card I created a 5.5" square card base using a light pink card stock.  Than I found a patterned paper I wanted to use and cut it down to the size I wanted and die cut the Royal Scandinavian Border Set out of black card stock and also die cut into the patterned paper and added gold glitter card stock under it to show through and laid it on my card front.

Than I die cut a larger Pierced Stacker #3 using cream card stock, and a Fleur De Lis Doily using light blue card stock.  Once again I die cut a smaller Pierced Stacker #3 using a light pink card stock and a Royal Scandinavian Tag 2 using cream card stock and stamped my sentiment on it and layered all on top of each other to create my focal point.

Than I die cut a Gardenia Strip using watercolor card stock and painted it in with water colors.  I die cut Rose Leaf Strip out of green card stock and Olive Branches using gold glitter card stock and finally one of the butterflies from the Small Exotic Butterflies #1 using patterned paper and also the gold glitter card stock for the bottom layer and added all that to my card.


Here is the list of items I used to create this card:


Thanks for stopping by today and Good Luck to everyone entering our Weekly Challenge.

Hugs,
Eva


Monday, August 3, 2015

Butterfly Wishes card by Eva Dobilas

3:30 AM 1 Comments

Hi there, this is Eva here today and I have a very summery card here with full of flowers.  As I thought of what I could create for this week's challenge, well, the first thing popped in my head is the abundance of flowers, so I thought I would create a pretty window scene.

To create my card I first started with an A2 size aqua color card stock and I layered a slightly smaller yellow card stock on top of it and I die cut an A2 Frames rectangle Scalloped using patterned paper.  Than I cut a Window A and I cut around it to cut it out and backed it up with aqua and green card stock to create a backdrop to it. I stamped my sentiment in one of the windows.   I die cut Baby's Breath Flower Kit using red card stock and added it to the top of the window as decorations.  I die cut, shaped and put together all my pretty flowers I listed below and added it to the bottom of the window and added some Ivy Strip.

As a final touch I die cut Mini Butterflies out of gold glittered card stock and added it to my card.


Here are the dies I used to create this card with:


Thanks for stopping by and good luck to everyone for entering our Weekly Challenge with a chance of winning a $20 spending spree here at Cherry Lynn Designs.

Hugs,
Eva

Monday, July 13, 2015

All White Card by Eva Dobilas

3:30 AM 2 Comments

Hi there, it's Eva here today and I have a white on white card to share with you in honor of this week's challenge.  I think it turned out quite pretty and hope you like it, too.

To start my card I created an A2 size card base and of course all card stock I used was white.  Next I die cut a A2 Frames Rectangular Scalloped, than one of the Alpine Flourish Doily and layered it on top.  Than I die cut a Royal Scandinavian Tag 2 and stamped my sentiment on it and layered it on top.

Than I cut 2 of the Judy's Bloom and built my flower and used the Leaf die for the bottom of the flower.  Next I die cut Olive BranchQuill & Ink and one of the Mini Butterflies W Angelwings and arranged them all around my card.  I also want to mention that I used Ranger Tea Dye ink to edge all my white cuts.


Here is the list of Cheery Lynn dies I used to create this card:


Thanks for stopping by and good luck to everyone for entering our Weekly Challenge with a chance of winning a $20 spending spree here at Cherry Lynn Designs.

Hugs,
Eva

Monday, July 6, 2015

Best Wishes by Eva Dobilas

3:30 AM 3 Comments


Hi there, hope you had a wonderful 4th of July weekend!  I am here today sharing a card with this week's challenge theme "In stitches". My card is using a few dies that have the appearance of stitches or you can actually stitch them as the holes are there for you to put thread through.

To create my card I die cut two of the largest French Flair - Scalloped LG Stackers Nesting Dies out of kraft card stock.  Than I die cut a smaller size French Flair Classic LG Stackers Nesting Dies using patterned paper.  Than I die cut the largest Pierced Stackers #3 using white card stock and I layered all of them on top of each other.  

I than die cut one of the Pierced Stackers #3 using patterned paper and stitched through the holes using white thread.  I die cut Royal Scandinavian Tag 1 using kraft card stock and I white embossed my sentiment.  Finally I die cut three Small Exotic Butterflies #1 out of three different color patterned papers and glued them together and put a button int he middle and added it to my banner.


Here is the list of dies I used to create this card:


Thanks for stopping by and good luck to everyone for entering our Weekly Challenge with a chance of winning a $20 spending spree here at Cherry Lynn Designs.

Hugs,
Eva

Wednesday, June 24, 2015

You Are Beautiful With Lisa Blastick

3:30 AM 1 Comments

Hi, It's another Wednesday with Lisa. Today, I'm sharing with you a new card for Cheery Lynn Designs. This week challenge is "anything goes" so I thought I would try to make a scenery in the summer. I used a Window, Ivy, Little Flowers, Butterflies, Fence, Grass, Clouds and A Little Bicycle. Whew! 
I haven't made a scenery card before, but I have seen many of them. Giving it a try myself, I can really appreciate all the love that goes into each tiny piece. 


There are 7 sets of red flowers diecut from the "Baby's Breath Flower Kit" I added liquid pearls in the center of the flowers. There are 4 "Ivy Flourishes" 2 layered on each of the top corners. The "Victorian Picket Fence' was cut to fit and 2 layers of "Grass Border" on top. They were also cut to fit the 5 x 6 card. The "Window A" was diecut in white and then glued to Kraft Cardstock. I then cut the window pieces out in a red patterned paper and then in the red cardstock for the windows. The red cardstock was crimped to represent window curtains. I then layered the top of the window with "Dutch Daisy Set" and finished it with a bit of black cardstock cut thin with scalloped scissors. 


The "Little Pink Bicycle" was cut 3 times in red, black and Kraft and layered on top of each other. I added 2 little clouds from "Clouds and Rain" and printed up the title from my computer. The tiniest butterfly from " Mini Dimensional Butterflies" was diecut in black cardstock, I added 5 of them to finish this summer card. 


Cheery Lynn Diecuts Used:


Thanks for stopping by today! Hope you enjoyed! 
Be sure to stop by Cheery Lynn Designs Blog and enter this week's challenge "anything goes" for your chance to win $20 at the Cheery Lynn Designs store
Have a great week!
Hugs, Lisa


Monday, June 22, 2015

Daisies and a Butterfly

3:30 AM 3 Comments

Sandy with you here today, filling in for Eva.  I have another floral card for you, this time showcasing my Daisy Strip die.  I die cut the Daisies twice out of white card stock and then added color with my Copic markers. Next, using a Stylus tool, I shaped the petals from the back side.  I layered 2 large and 2 small for the center flower and then 2 medium and 1 small for the other two flowers.  I added a bit of Spiced Marmalade Stickles to the center of each. 


I began with a 5 x 7 inch green card stock base, adding a DP panel 4.75 x 6.75 inches.  Using green card stock, I die cut my Tiny Bubbles border as well as two Double Scalloped Borders.  I used Spray Adhesive to attach them to my card.  I used my Rose Leaf Strip and both of the Mini Fanciful Flourishes for some greenery.  Using one of the butterflies from my Small Exotic Butterflies #2 w/ Angel Wings set, I created this beautiful butterfly.  I used white card stock and added color to the butterfly as well as the leaves.  

Be sure to enter the Anything Goes challenge for a chance to win $20 towards shopping at Cheery Lynn.
 
Cheery Lynn Designs dies used:

Monday, June 1, 2015

Thank you card by Eva Dobilas

3:30 AM 1 Comments

Hi there, this is Eva here today with a pretty card using our color scheme challenge from this week.  I first started my card with an A2 size card base and cut a slightly smaller patterned paper to layer on top of it.  Than I cut a larger A2 Frames Rectangular Scalloped using white card stock and layered it on top.

I die cut an Alpine Flourish Doily using aqua color card stock and layered it on top of the white panel.  Die cut two Chrysanthemum Strips to create my two flowers and one Tea Rose Medium and created my flowers. I also die cut a Mini Fanciful Flourish Right and a Mini Fanciful Flourish to create my floral element of my card.  

I die cut a Thank You #2 out of red card stock and added it to my card and finally die cut a Small Exotic Butterflies #2 out of yellow patterned paper and added that as a last touch to my card.


Here is the list of beautiful Cheery Lynn Dies I used to create this card:


Thanks for stopping by and good luck to everyone for entering our Weekly Challenge with a chance of winning a $20 spending spree here at Cherry Lynn Designs.

Hugs,
Eva


Monday, May 25, 2015

Anniversary card by Eva Dobilas

3:30 AM 2 Comments

Hi there, this is Eva and today I am sharing a pretty Anniversary card using gorgeous Cheery Lynn Designs dies.

To create my card base I used Horizon Rectangle Boutique Stacker Frames and die cut two of the largest dies out of kraft card stock.  I stamped it with a script background stamp.  I die cut a smaller Horizon Rectangle Boutique Stacker Frames out of white card stock to layer on top of the card base.  Than I die cut the Mirror Mirror Doily Frame out of aqua color card stock and the inside part of it out of white card stock and layered them on top of each other.  

To create the flower I die cut the flower our of the Build a Flower #3 and also used the Embellishments #3 for the inside of the flower and added a yellow pearl in the middle.  I die cut a Leafy Flourish and Olive Branches out of white card stock and using Ranger inks I sponged a little color on, which I did the same on the flower and strategically placed all of them on my doily.  

I die cut one Horizon Fishtail Banners and stamped my sentiment onto it and adhered it onto my doily with the flowers and finally I die cut of the butterflies from the Small Exotic Butterflies #2 out of gold glittered card stock and once again I added it to my doily.

As a final touch I added some white gesso on the edges of my card base.


Here is the list of gorgeous Cheery Lynn Dies I used to create this card:


Thanks for stopping by and good luck to everyone for entering our Weekly Challenge with a chance of winning a $20 spending spree here is Cherry Lynn Designs.

Hugs,
Eva


Thursday, April 2, 2015

Happy Birthday Card by Jenny Alia

3:30 AM 2 Comments

Hi, it's Jenny today with my very first post for Cheery Lynn Designs and I'm so excited to be here! 

I tend to use many of the same colors so I thought I'd try something a bit different and use yellows and oranges.  I began with the background by cutting the Princess Window from white card stock and gluing a slightly smaller piece of patterned paper to the back.  The window was then adhered with foam adhesive to a another piece of patterned paper cut with the largest Horizon Square Boutique Stacker Frame which was backed by a gray 5.5" square card.

The orange Large Roses and yellow Cuties 3 flowers were colored with glimmer mist and distress ink, shaped with paper shaping tools and glued with score tape to the Princess Frame.  I tucked leaves and flowers from the Flourish Leaf Strip and Dandelions into the arrangement and added the distress ink colored mushrooms underneath.


I cut the Small Exotic Butterfly 2 with blue patterned paper and darkened the edges with distress ink.  Happy Birthday was glued to the top of the Sentiment Tag 2 which was then popped up with foam adhesive.

Cheery Lynn Designs Dies
Sentiment Tag 2 -B425

Thanks for visiting today and be sure to check out this week's Back to Nature challenge for a chance to win $20 towards shopping at the Cheery Lynn Designs shop!

Hugs, Jenny

Tuesday, March 31, 2015

Vintage Butterfly

3:30 AM 5 Comments

Our challenge this week is Back to Nature.  Cheery Lynn has some fabulous butterfly, dragonfly, bird and various other critter dies so I thought I would play along.  I just love the new A2 frames that Cheery Lynn released; you can mix and match them with stunning results.  For my card I began with a base using the largest die from my A2 Frames Rectangle Scalloped Set of 7.  My next layer is the beautiful Fiona's Magic Mirror.  Next came the second largest die from my Dutch Daisy Boutique Stacker A2 Frame set of 4. I used the matching die from the A2 Frames set to trim it out.   And the last layer is the smallest die from my Lords and Commons Boutique Stacker A2 Frame set of 4; again trimmed out with the matching A2 Frames die.  Before assembling my card, I added some color with Antique Linen Distress ink.


Lastly I added the nature element from my Small Exotic Butterflies #2 with Angel Wings set.  I added more Distress ink and then using spray adhesive, glued the angel wing to the butterfly.  After gluing it down, I bent the wings up for some added dimension.  Finished card is 4.25 x 5.5 inches.  

Be sure to check out this week's Back to Nature challenge for a chance to win a $20 shopping spree at Cheery Lynn Designs. 

Monday, March 30, 2015

Thank you card by Eva Dobilas

3:30 AM 7 Comments

Hi there, this is Eva here today posting my first official post on the Cheery Lynn Designs Blog.  It brings me the joy to share a thank you card purely made with beautiful Cheery Lynn dies.  I can never create enough thank you cards as there is always so much to be thankful for.


I really enjoyed making this card with all the pretty dies.  To create my card I cut an A2 size card base using cream card stock.  I die cut the largest Deutschland Boutique Stacker out of Prima patterned paper, and layered it on top of the card front.

Than I die cut a smaller Deutschland Boutique Stacker out of another Prima patterned paper and cut off the edges to a rectangle to fit in the middle of the larger stacker and backed it up with red patterned paper, so it can show through the pretty doily stacker.  

I die cut the larger heart out the Two of Hearts dies out of Prima patterned paper and also die cut the word Thank you out of gold foil card stock and layered it on top of the heart die.  Finally I die cut a butterfly using one of the Small Exotic Butterflies #2 and die cut it's wing to contrast with it and added an orange color pearl in the middle.

Cheery Lynn Dies used:


Thank you for stopping by to see my post today and good luck to everyone entering our Back to Nature Challenge this week

Hugs,
Eva

Copyright Statement


All content, including designs, pictures and words are the exclusive property of the author of each blog post. Information shared here is for inspiration only and may not be copied for publication, competition or profit. Thank you for your cooperation.

SOCIAL MEDIA 2


Follow Us @jointhemakersmovement


All content, including designs, pictures and words are the exclusive property of the author of each blog post.
Information shared here is for inspiration only and may not be copied for publication, competition or profit. Thank you for your cooperation.