Showing posts with label Memory Book. Show all posts

Monday, November 23, 2015

Bon Appetit Recipe Book by Eva Dobilas

3:30 AM 0 Comments

Hi there, this is Eva here today.  With Thanksgiving just around the corner I thought I would share with you a recipe book created with one of our newest dies, the Memory Book A2 Scallops and Rings.  Can you imagine creating a recipe book with all your favorite recipes and give it as a gift to someone?  I think they would love it!

To create this recipe book I started out using the spine of the book and die cut it using the Memory Book A2 Scallops and Rings out of corrugated craft card stock.  Then I die cut my cover pages out of black card stock and my insert pages out of cream color card stock.  I die cut a smaller size of the Horizon Rectangle Boutique Stacker Frames out of cream color card stock and stamped my pretty background image on it.  I die cut the Bon Appetite out of a deep red card stock and placed it on the stamped panel, which I backed up with a light turquoise card stock to make it pop.  I added a little turquoise pearl on top. 

I also die cut one of the borders from the Royal Scandinavian Border Set out black card stock and added it to my spine as a decorative touch and finally tied it all together with a red seam binding ribbon.


Here is the list of items to create this fun recipe book:


Well, hope this inspires you a little to create some recipe books to give away as a gift!  Thanks for stopping by and hope to see your creations in this week's challenge.

Hugs,
Eva

Saturday, November 21, 2015

Baby Book by Julie Lavalette

3:30 AM 1 Comments

Hi Everyone, it's JULIE here today and I am sharing with you a decorated cover for a Baby Book using one of our fab new Memory Book dies. There are many different designs and Mike Dywan has kindly made a video to explain how you make these which you can view HERE.

I decided I wanted a semi hardback cover to my book so initially glued a sheet of paper to a lightweight GreyBoard and then die cut my spine and cover.


Next I die cut out single sheets of paper and glued to the inside of my front and back covers. The three layers together would have been too much for the die cutting machine to cut but took the two together with ease.


I rubbed ink around the edges of my die cuts before gluing together to form my book. I cut out the spine once again in white card and stamped the name Kirsty into the hearts and re- inserted them into the spine.


For my flowers I pressed a little ink onto the White Cardstock and then sprayed with a little water. I squeezed each petal into the finished shape shown and dried with my heat gun, then added a fancy pearl button to the centre.


My image was coloured with Copics and I added a little ink to the frame whilst my die was in place to leave a white border around it.


A view of the inside with blank white pages.


My Pennant die I cut out in patterned and white cardstock. I used the waste part of the White die cut to mount onto my flags for a double layer and used the little Hearts that had come out the border edge strip of my book, finishing off by stamping on the word Baby.

Cheery Lynn Dies Used :


Thanks for stopping by today and good luck to everyone entering our Weekly Challenge.


Julie x

Tuesday, October 27, 2015

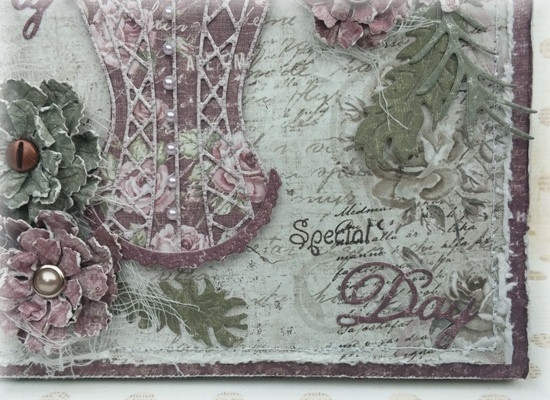
My Special Day Memory Book by Amy Voorthuis

3:30 AM 4 Comments
Good morning to you all.
With the new October release, Cheery Lynn Designs came out with some amazing "Memory Book"dies in different sizes which I really love. Not that I am a great mini album maker but it makes it so much easier to start one. So today I'd like to show one I made it will hold my wedding pictures when I finish the inside as well. 

My Special Day: 
Last week I showed you a layout I made of little me. I just went along and used that paper line again on this memory book. In the future I'd like to make one for my husband too with different colors and more masculine of course. On the inside I have seven sheets to use and put my pictures on so that's going to be a challenge for me not using so many pictures one project hehe. 


Cheery Lynn Design dies used: 

I hope you like my memory book. Thank you so much for visiting the blog today. 
If you love the dies Cheery Lynn offers you could always enter this weeks "Anything Goes" challenge #208, because you could win a $20 shopping spree at the store. I can't wait to see your work.  

Love

Monday, October 26, 2015

Home Made Adult Coloring Book by Eva Dobilas

3:30 AM 5 Comments

Hi there, this is Eva here today.  Did you see our Memory Book dies in our newest release?  Well, that gave me some ideas to create with.  I am sure you have also seen that Adult Coloring books are today's craze, so I thought why not make a home made one?  All you need is the Memory Book dies and some stamps and you are all set!  


So to create my book I die cut the binder part from the Memory Book A2 Scallops and Rings set out of light teal color card stock.  Then I die cut the cover pages out of black and since I was going to use watercolors.  I die cut the inside pages using water color card stock, however you can use plain white paper if you want a different coloring method, so you can decide on that.  

Then to decorate the outside of my book I die cut one of the dies out of the Coved Rectangle Scalloped LG Stackers Nesting Dies set from water color paper and heat embossed my stamps on it using black embossing powder and colored it in with watercolor.  I added a sentiment and finally a ribbon to tie my book together.

Finally I just created the inside of my coloring book using stamps that lend more toward a coloring book theme, so here are the pages I have in the inside of my little book.  I think this will make a perfect gift for any occasion and imagine making some of these for Christmas.  Possibilities are endless!


Hope you like this little book and it inspires you! :)

Items used to create this little book:


Thanks for stopping by and check out our challenge this week to play along!  Good luck to you all!

Hugs,
Eva

Copyright Statement


All content, including designs, pictures and words are the exclusive property of the author of each blog post. Information shared here is for inspiration only and may not be copied for publication, competition or profit. Thank you for your cooperation.

SOCIAL MEDIA 2


Follow Us @jointhemakersmovement


All content, including designs, pictures and words are the exclusive property of the author of each blog post.
Information shared here is for inspiration only and may not be copied for publication, competition or profit. Thank you for your cooperation.