Tuesday, January 31, 2012

Baby Boy, Brag Book

3:30 AM 8 Comments

Front Cover
Hi Everyone..  This week for Cheery Lynn Designs I have created a "Baby Boy, Brag Book".  I was reading a thread on a forum recently about how difficult it is to make a baby book for a boy, as you cannot add flowers.  Well, for me personally - I add flowers, I just make them "BLUE"!!

Due to the length of this post, I will not go into the nitty gritty details - just wondering if nitty gritty is an Australian saying, so will explain it means 'small details'. 
Close Up of Medium Rose
Above is a close up of the Medium Rose, which is constructed by rolling the middle, and building up in layers.  You can make them tight, open, or however takes your fancy. I will do a tutorial soon on how I do my roses, as it seems all of us DT girls do ours differently.

Page 1
The flowers on Page 1: The large flower with button, being made from the Cuties 4.  The smaller white flowers are from the Flower Chain Border (I just removed flowers from border), I included the medium sized Darling Daisies in the middle of each - they replicate stamens.  The tiny flowers are the inserts to the Snow Flake Edger Border die.  I really like those inserts, they could have 'many' uses when making flowers!

Page 2 below, I embossed the cardstock using the Black Eyed Susan Embossing Plate.

Page 2
Page 3
Page 3 and 4 (above and below) I have used the Cheery Blossoms and Dimensional Leaves.

Page 4
Page 5 (below) I used the Roses and Leaves Embossing Plate.  I love the beautiful detail I manage to get using the Cheery Lynn Designs Embossing Plates, in conjunction with the Embossing Kit!! The French Flair-Classic Series was used to create journaling areas.

Page 5

Page 6
Page 6 (above) includes the Medium Rose, constructed more in a flat manner and not 3 dimensional.  I just used an awl to round the leaves on a computer mouse mat. 

Page 7
Judy's Blooms, and the Stacker Leaves on Page 7 (above), I always double the layers of the die to create more volume.

Page 8
The flower on Page 8 (above) was created using the new release Fransesca Border die.  To create a flower like this, all you need to do is score at regular intervals over the whole die cut, and fold like a fan.  Adhere the two ends together with a strong adhesive, and push down to form flower - adhere to the smallest circle in the Scalloped Window Stackers Series.

Page 9
Another rose using the Cuties 3 on page 9 (above).

Page 10
Using Snowflake 6 to add a little character to my flower arrangement.  Snowflakes can be used in so many other creations, besides winter or Christmas!
Back Cover

Journal Tag
Dies Used:
B154 Medium Rose

Do not forget this weeks challenge, with the theme being "Sweethearts", all the details can be found "HERE".  You have a chance of winning a $20 shopping voucher!!!  

Have a great, and creative week...
Sandie

Monday, January 30, 2012

Cheery Lynn Designs Challenge 13 - Sweethearts

3:30 AM 7 Comments
This week our challenge at Cheery Lynn Designs is

Sweethearts

Here are the rules:
  • You MUST follow the theme and use at least one Cheery Lynn Designs die, of course, we would love to see more than one. 
  • You MUST add a link to your blog post in the InLinkz at the end of this post; no back posting, only new projects are allowed
  • You MUST link to our blog in your post
The winner will be chosen based on merit by Cheery Lynn Designs.  They will receive a $20 coupon for shopping at the Cheery Lynn website.  The challenge will end on Sunday night at 22:00 Eastern time.
 

On the bottom panel of my card I used Antique Linen Distress ink directly on the Hearts and Leaves embossing plate before embossing to give a more vintage feel.  This meant that I used the debossed side of the paper.  The top panel I embossed Petite Hearts so the hearts are raised.  The border across the center is the new Queen Anne's Lace.  After die cutting the Celtic Heart, I debossed the center fall out the same way I did the bottom panel.  I popped it up on the card for some dimension.  Using Miniature Rose, Medium Rose and Large Rose to create my rose, I then added a bit of Carmel Creative Inspirations Paint to give it a warm tint and more sparkle.  I was going for a very vintage mono-chromatic look.  I think it is kind of classy!  Finished size is 5.5" square.

Remember, you MUST use a Cheery Lynn Designs die to enter this challenge.

Cheery Lynn Designs Challenge 13 - Sweethearts

3:30 AM 8 Comments
This week our challenge at Cheery Lynn Designs is

Sweethearts

Here are the rules:
  • You MUST follow the theme and use at least one Cheery Lynn Designs die, of course, we would love to see more than one. 
  • You MUST add a link to your blog post in the InLinkz at the end of this post; no back posting, only new projects are allowed
  • You MUST link to our blog in your post
The winner will be chosen based on merit by Cheery Lynn Designs.  They will receive a $20 coupon for shopping at the Cheery Lynn website.  The challenge will end on Sunday night at 22:00 Eastern time.
 

On the bottom panel of my card I used Antique Linen Distress ink directly on the Hearts and Leaves embossing plate before embossing to give a more vintage feel.  This meant that I used the debossed side of the paper.  The top panel I embossed Petite Hearts so the hearts are raised.  The border across the center is the new Queen Anne's Lace.  After die cutting the Celtic Heart, I debossed the center fall out the same way I did the bottom panel.  I popped it up on the card for some dimension.  Using Miniature Rose, Medium Rose and Large Rose to create my rose, I then added a bit of Carmel Creative Inspirations Paint to give it a warm tint and more sparkle.  I was going for a very vintage mono-chromatic look.  I think it is kind of classy!  Finished size is 5.5" square.

Remember, you MUST use a Cheery Lynn Designs die to enter this challenge.

Dry Embossing Challenge winner

3:25 AM 4 Comments
The votes are in and the winner of our Dry Embossing challenge  and a $20 shopping spree at Cheery Lynn Designs is


and the winner of the $30 gift certificate to CutCardStock.com is

Random Integer Generator

Here are your random numbers:

   11 Chris Olsen 

Timestamp: 2012-01-30 04:06:29 UTC

Congratulations, Ladies.   Please contact me for your winning prizes.  And thank you to everyone who joined in on the challenge.  We hope to see you again.

Dry Embossing Challenge winner

3:25 AM 3 Comments
The votes are in and the winner of our Dry Embossing challenge  and a $20 shopping spree at Cheery Lynn Designs is


and the winner of the $30 gift certificate to CutCardStock.com is

Random Integer Generator

Here are your random numbers:

   11 Chris Olsen 

Timestamp: 2012-01-30 04:06:29 UTC

Congratulations, Ladies.   Please contact me for your winning prizes.  And thank you to everyone who joined in on the challenge.  We hope to see you again.

Sunday, January 29, 2012

Such a sweet puppy face

6:31 AM 2 Comments


Hello Cheery Lynn fans!

Today I made this layout of Mister Wilson with his cute puppy face..
I have used design papers from Prima Marketing.
Behind the picture I used the lovely French Pastry Doily I really love how detailed this doily is.. so beautiful!
I have used premade flowers, but also the lovely; Judy's Bloom
For the beautiful leave swirls I have used the; Victoria Garden Doily frame and then only used the lovely leaves.. arent they gorgeous?

Well thats it for now!
Dont forget this is the last day you can enter our weekly challenge, more details here

Hugs Marley!


Saturday, January 28, 2012

Embossing Adventures

3:30 AM 6 Comments

Hello! Jodi here with some embossing fun, inspired by this weeks challenge! I’ve created a simple, yet elegant card just by adding layers of dies. I started by cutting my base card using the Square Scallop Nesting Die, layering it with the Classic Silver Stacker Square. I just love that the Silver stackers are the perfect fit for the Nesting dies, taking out all the guessing work!


To create the lacy border, I cut two pieces from Francesca and placed the flat edges together. After adding a piece of satin ribbon, I topped it with the Flower Chain Border which I trimmed to fit. For a bit of interest, I added texture to my Classic Circle Silver Stacker layer using the Petite Hearts XL Embossing Plate before adhering to the Scalloped Circle Nesting diecut. Yes! It is okay to emboss your pattern papers too, just make sure your patterns compliment each other!


 I embellished my card using the smaller heart from Two of Hearts, topped with a Large Rose. I lightly brushed the edges of the petals with Shimmerz Paints before assembling the flower. I tucked leaves from Stacker Flower #1, along with Olive Branches in around the flower. Remember I said I had trimmed the Flower Chain Border to fit? I saved the remaining pieces and trimmed the excess chain from the leftover flowers, adding the flowers to the bouquet!

Thank you to all the ladies that have been participating in our challenges! I really enjoy visiting your blogs, and seeing your lovely work! If you haven’t joined in yet there is still time to enter this weeks challenge! Details here.

Friday, January 27, 2012

Top Secret Flower Tutorial

5:35 AM 12 Comments
Hello everyone in the bloggy world.  This is Jeannie from The Polka Cabana with yet another FLOWER tutorial for you!  Last week I had such a nice response to my rainbow flowers and quite a few of you said YES to my offer for a tutorial, so that is what I am going to share with you today.

I use inexpensive tissue paper for these flowers.


The first thing I do is to cut strips long enough to fit the CUTIES #4 die on.  I make them wide enough to cut 2 times from the paper. The stack is cut from the unfolded pack of paper.  I use the whole thickness (30 sheets deep) for the flowers.


Here is my big secret...my dye!  I'd love to use some sort of expensive dye, but I am a struggling artist after all and can't afford something like that.  I had this idea to take Kool-Aid packets and mix with a little bit of water and rubbing alcohol to make my own die.  Here you can see the bottles all mixed and lined up ready to go.


I have the papers on top of a cookie rack, which is on top of a cookie sheet, to catch any drips that might occur. I like to try to do 2 complete ROYGBIV patterns on the tissue paper.


Here you can see I have gotten all the dye on the paper, now they need to dry.  I put the, in the oven at 170 degrees for about 20 min.  But, I do not endorse this as I know paper in the oven...sounds risky!


Here the strips are all dry.


After I cut all my cuties, I like to stitch them to keep them together. ( I lengthen the stitch to make sure the machine does not destroy the flowers,)


When putting these together, whether you choose to stitch them like me, or glue them, it is imperative to have the petals of the 2 die cut strips lined up so that the bottom layer of petals show up in the gap of the petals in the top layer.  Below is a close up of what I am trying to say.


To assemble the flowers, I use these sticks that are about the size of toothpicks, without the pointy ends.


Apply hot glue to the tip of one of the sticks and roll the beginning of the flower around the stick...


...and hold there until the glue is dry.


Then just roll the flower up and secure with another drop of hot glue.


Next, cut the stick very as close as you can get to the base of the flower.


On a circle about 5/8 wide, have a big dollop of hot glue waiting and...


...glue the flowers to the circle.


After the glue is dry, I take a very soft toothbrush to fluff and separate the tissue paper layers.


Here they are all fluffed up.


When using these types of flowers, I like to have a nice crisp white background.


 I have only used the Cuties #4 flowers and the Dancing Doily Lace Border.


They make such a colorful presentation.


So, there you have it!  I kept my word and divulged my secret!  
I hope you have enjoyed my post today.
Be sure to check out our current Challenge.  This week our theme is
DRY EMBOSSING.  You can get all the details here.
I am off to pack, heading to Southern California for CHA! 
 I am so excited to be there with Cheery Lynn Designs.
This has been Jeannie from The Polka Cabana with today's post.


Thursday, January 26, 2012

How to Make a Layered Flower - with Kianel

7:07 AM 6 Comments
Hello Dear Cheery Lynn Designs Lovers!

Kianel here with you today sharing a little tutorial. That's right, no card today but i'm going to show you how to make a beautiful layered flower with the Cheery Lynn Designs stacker flowers. It is my first attempt so be indulgent now, ah ah ah!

It is just with Stacker flower #6 i made this one but you have plenty different models to choose from. The technique is the same for all of them and you can have great effects combining the different shapes together.

STEP1
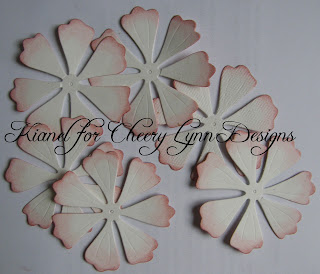
Cut out some flowers of the stacker flower #6. Count one flower per layer, so the more flowers you cut, the more layers you will get.

Here i decided to cut out my dies in a white paper that i slightly inked with distress "spun sugar" and added some "victorian velvet" on the borders to give more depth.

I haven't done it here, but you can any embossing plate to give texture to your flowers before gluing them together.

STEP2

Using a large embossing tool, smoothly go all over your flower to give it shape. You'll see that rolling on the center of the flower with an embossing tool will make the petals rise. So just play with that to obtain different "rising" states.


STEP 3

Glue 2 of your "embossed" flowers together, see the volume it already gives.


STEP 4
For the other layers, you'll cut all the petals separately , cutting them a little shorter for every layer.


STEP 5

Glue them in the center of your flower, one by one. Make as many layers as you want. Just think of alternating the petals to get a better effet.


STEP 6

Using the shortest petals, work the center of your flower. Again, have sevaral layers but think of alternating the petals.


 Here is one variation of the finished flower that i decorated with metal flower and a pearl.


Another variation i made was using a big pearl brad to cover the center.


Well, that's it for me today so i hope this will be useful to you!

Love from France, Kianel.

Copyright Statement


All content, including designs, pictures and words are the exclusive property of the author of each blog post. Information shared here is for inspiration only and may not be copied for publication, competition or profit. Thank you for your cooperation.

SOCIAL MEDIA 2


Follow Us @jointhemakersmovement


All content, including designs, pictures and words are the exclusive property of the author of each blog post.
Information shared here is for inspiration only and may not be copied for publication, competition or profit. Thank you for your cooperation.