Showing posts with label Butterfly. Show all posts

Thursday, May 19, 2016

Give Flight to Your Dreams by Corina Finley

3:30 AM 1 Comments
Hello!

Today, I have a card to share with you using the fab Cheery Lynn Design dies. I love creating cards with this colour combination, it works for so many different occasions. Also using the frame dies like the Chicken Wire on the base of a card easily gives depth to your card.
I used the Sweet ChristineTea Rose Medium and the Judy's Blooms with a center from the Embellishment #2 set. Added pearls to the centers and tucked in the Olive Branches and Wheat Heads for foliage. 

The stamped image was cut with the Circles Shape, layer on top of the Scalloped Circle and then on to the Horizon Circle Boutique Stacker Frame. The Horizon Circle was inked with Gathered Twigs Distress Ink and highlighted with a glitter pen.
The Butterfly was die cut from white cardstock and I used a blue Glimmer Mist Spray to add colour. I backed the Butterfly with a light Kraft sprayed cardstock. Layered up onto the Horizon Fishtail Banner and the stamped label trimmed from the Paris Signs 4 die. I added small pearls to the die cuts.
Dies used:
I hope you will play along in our Cheery Lynn Designs ChallengeYou could win a $20 shopping spree at the online Cheery Lynn Designs store.

Thank you for joining me today!
Take care,
Live, Laugh & Create

Monday, August 10, 2015

Back to Nature card by Eva Dobilas

3:30 AM 0 Comments

Hello there, it's Eva here again today and I have a Back to Nature themed card to share with you today.  It's not a secret I love butterflies and Cheery Lynn Designs knows how to come up with gorgeous butterflies, so here I am with a pretty butterfly card.

To create my card I cut an A2 size black card base.  Than I die cut a Cathedral Lace Frame using white card stock and cut it down to the size I needed and backed it up wit a patterned paper.  Than I die cut two different size Pierced Stacker #3 out of patterned paper and layered on top of each other and adhered it to my lace frame.  

I die cut a Whimsical Butterfly with Angel Wing out of gold glitter card stock and cut out the Angel Wing using patterned paper and glued them together.  I die cut a Thank You #2 out of black card stock and adhered it to the bottom of my card, than finally I added some bling to my butterfly.


Dies I used to create this card with:


Thanks for stopping by and good luck to everyone for entering our Weekly Challenge with a chance of winning a $20 spending spree here at Cherry Lynn Designs.

Hugs,
Eva

Monday, June 15, 2015

Sympathy card by Eva Dobilas

3:30 AM 2 Comments

Hi there, this is Eva and today I have a sympathy card focusing on kraft card stock.  To create my card I cut an A2 size card base using kraft card stock. I die cut the largest size Deutschland Boutique Stacker A2 Frame using white card stock and layered it on top of my card base to show the kraft through the edges.

Than I die cut an Alpine Flourish Doily using kraft card stock and white embossed my sentiment onto it using white embossing powder.  I die cut Whimsical Butterfly w/Angel Wing using kraft card stock and the angel wing out of vellum to layer the kraft part over it.  I adhered that on top of the Alpine Flourish Doily.  Finally I die cut a Shasta Daisy using light pink card stock to create my flower and to create my center of the flower I die cut the smallest Sweet Williams Strip using black card stock and Black Eyed Susan Strip using yellow card stock for the middle.  I saw a flower like this while I was walking I wanted to recreate it.  Just LOVE nature and it's beauty and was glad to recreate it.


I sure hope you like this pretty card and that you play along our challenge.

Here is the list of the Cheery Lynn Designs dies I used to create this card:


Thanks for stopping by and good luck to everyone for entering our Weekly Challenge with a chance of winning a $20 spending spree here at Cherry Lynn Designs.

Hugs,
Eva

Monday, June 16, 2014

A Krafty Romantic Card with Rhonda

3:30 AM 1 Comments
Happy Monday to you!  It's Rhonda here today to host the blog for you.

This week's new challenge is "Keep It Krafty", so I decided to use Kraft cardstock for the base of my card.  I wanted to create something a bit romantic, yet still somewhat suitable for a masculine recipient.

"Always" (A2 sized card)

I started with the base card, then my first layer I used the Lady Kate Edger. Next, I used my Horizon Coved Rectangle Boutique Stacker, then added the Coved Rectangle Scalloped Stacker using Foam squares for dimension. To create a bit of interest I used a Steampunk Corner in the upper left of those layers.


The trimmed and inked Horizon Fishtail Banner was added with foam dimensional squares as well, then the Sentiment Tag 2 was the perfect anchor for either a sentiment or embellishment. 

I opted to use the Dripping Butterfly as a focal point as I find it to be so very pretty!  To finish my card I then applied the "Always" rub-on sentiment directly to the paper above. (Notice the vellum cut of the Sentiments Tag 2?  The little Dandelions are another new favorite of mine, aren't they so cute?!!!

Cheery Lynn Designs dies used:
Lady Kate Edger - B278
Dripping Butterfly - DL266
Horizon Fishtail Banners - DL278
Dandelions - B453
Horizon Coved Rectangle Boutique Stacker Frames - DL251
Coved Rectangle Scalloped LG Stackers - XL11
Steampunk Corner - B437
Sentiment Tag 2 - B425
Margarita Border - B432

Please join us in our new "Keep It Krafty" challenge!  You could win a $20 gift certificate to the online store just for playing along.

Have a wonderful Monday everyone!
~ Rhonda

Monday, December 23, 2013

Let's Talk with Rhonda

3:30 AM 4 Comments
Happy Monday to you!  Rhonda here today to host the blog for you.

I was inspired by this week's new challenge theme, "Anything Goes" for my project. I really love the Dripping Butterfly die and built my card around this die. I find it to have so many uses, particularly for any kind of project that conveys emotion.


To mix things up a bit, I selected a 5" square card base in kraft. The Princesses Garden Window Frame was used and the layer behind it you can see the Dutch Scallop Square Frame peeking out.


I've listed my dies below for you in the layered order they appear on my card. I love how they all layered together to create such a pretty space for my Dripping Butterfly. I did add some Waterfall Stickles to my butterfly and some goosebumps bling as well.

I cut my Sophie's Heart Mini doily in half and attached behind the Scalloped Coved Rectangle.

Cheery Lynn Designs dies used:

We hope you have a little time this week to join us for our new challenge "Anything Goes"!  Such a fun way to play along using a Cheery Lynn Designs die and have a chance at a $20 gift certificate!!!

I do want to take a moment to wish each of you a very Happy Holiday to you and yours!!!

Saturday, October 26, 2013

Pretty Girl 8x8 Layout with Amy

3:30 AM 7 Comments
Hi everybody,
Are you all enjoying your week so far? Hope you are!
Today I want to share a soft layout with you all.
 I can't help myself those papers attract me the most.
I used two of the new releases on my 8 x 8 layout this time and a whole bunch more...
Pretty Girl
Cheery Lynn Designs dies used:
B373 - Siena Double Edge Border (new October release)
DL266 - Dripping Butterfly (new October release)

I added some golden gel medium (crackle paste) to make some damask pieces on my paper.
I layered four pieces off paper on my layout, the beautiful Siena Double Edge Border I cut in half to add on either side of my blue paper.
As for the flower centres I used some stamens white and light pink.
I have to tell you I'm in love with my Script die, it makes such pretty letters.
The Dream Catcher I split up and used the feathers as leaves and the upper part as a doily.
I hope you all like my layout and I hope I've inspired you to make one yourself maybe for our new
103 Vintage Challenge
You still have some time to enter and please do so because you could win a $20 shopping spree at the Cheery Lynn Designs online store
please don't forget to have fun.
Thank you so much for visiting our blog today,
 and everybody who entered the challenge good luck
Love

Wednesday, August 7, 2013

Step Card

3:30 AM 6 Comments


Hi and Good Morning everyone, Alison here today sharing a Step card created using the awesome template die by Cheery Lynn Designs.   Its absolutely brilliant!

I started  off with some 320gsm A4 white cardstock, and cut the main die shape.  I folded along the embossed lines and 'TaDa'.. it was magically transformed into a blank Step Card!

All the layering dies for decorating are included in the set, and so this is where the fun really begins.

I took 3 sheets of matching K&Co paper, and cut the back, front and side panels along with the bottom border.  I then layered these die cuts onto contrasting paper and card, creating a matt and layered effect.

I trimmed the bottom front border with the elegant Sophias Heart border, butterfly and pearls.  The side panels were decorated with the Ankara Lace Border.

I coloured a Crafts & Me digi image and matted onto coved rectangle and scalloped rectangle mats, and then placed onto the Horizon Coved Rectangle.

I stuck the gorgeous Cape Cod Doily onto the front panel and layered my image on top.

For a finishing touch I made 2 flowers from the gorgeous gardenia strip and added some beautiful Olive branches and leaves.

All dies used on this card are:

B348 - Step Card #1
DL250 - Cape Cod Doily
B339 - Gardenia  Strip
DL113AB - Small Exotic Butterflies
L-10 - Silver Stacker Coved Rectangle
XL-11 - Coved Scalloped Rectangle
B332 - Ankara Lace Border
B333 - Sophia'sHeart Border
DL251 - Horizon Coved Doily Stacker
B147 - Olive Branches
D133 - Dimensional Small Leaves


Thanks so much for visiting our blog today, and I do hope you find time to join us in our challenge this week, where we have an 'Anything Goes' theme!

Have a smashing week!


Sunday, July 28, 2013

Cheery Lynn Designs Challenge #91 Hot Time in the Summer

3:30 AM 2 Comments
Welcome to the Sunday Cheery Lynn Designs Challenge - now here on our Inspriation Blog! We look forward to you joining us each week for a chance to win a $20 store credit.  To see last week's winner, click here.

What fantastic entries we had last week for our Silver and Gold Challenge.  Thank you to all who entered. Every week the entire design team enjoys seeing your creations with our dies.  This week our challenge at Cheery Lynn Designs is

Hot Time In The Summer


 Here are the rules:
  • You MUST follow the theme and use at least one Cheery Lynn Designs die, of course, we would love to see more than one. 
  • You MUST add a link to your blog post in the InLinkz at the end of this post; no back posting, only new projects are allowed
  • You MUST link to this challenge in your blog post or on your gallery post
  • You may only enter the challenge ONCE per week.
The winner will be chosen based on merit by Cheery Lynn Designs. They will receive $20 towards shopping at the Cheery Lynn website. The challenge will end on Saturday night at 18:00 Eastern time.


And now to our inspiration for today......


captured the perfect summer day, filled with warm thoughts and gorgeous flowers.


Dies used:
Mexican Tile Pattern
Gardenia Strip
Holly Leaves
Flourish Leaf Strip
Wreath Strip
Miniature Rose
Sweet Williams Strip
Shasta Daisy
Embellishments 3
Exotic Butterflies 1
Circle Stackers


Debbie Brownmiller 
shared a card full of fun and sunshine.  I love how she created flowers to look like the sun, splashed on a pool of blue.


Dies Used:


Remember, you must use at least one Cheery Lynn Designs Die to enter this challenge.

Sunday, June 9, 2013

Awesome tip with Guest Designer Holly

3:30 AM 8 Comments


Hello again!  It's Holly Brown back for another guest designer post today.  I've done something a little different with this card.  It looks clean and simple, right?  Take another look at the red doily underneath the butterfly.  Do you see what I did?  :-)

The Cheery Lynn Designs dies that I've used on this card are:

French Pastry Doily
Small Exotic Butterflies #2 with Angel Wings

I used the whole French Pastry Doily even thought it looks like I only have half of it on here.  I made one cut from the outside edge to the center of the doily.  Then I put my doily on my trusty little Scor-Buddy and scored from the scallops in towards the center.  The doily was then accordian-folded into this little half-rosette that you see here.

This was my first time trying this idea with a doily, and I was thrilled to see that it worked.  Now if I want a full sized rosette, I can do this with two of the doily die cuts and glue them together.  Wouldn't that be fun??  I hope you enjoyed this card today.  I've got some more to show you, so come on back next week.

Friday, May 24, 2013

Poppy in more ways than one

3:30 AM 6 Comments

Today I'm sharing a great box with you that I created for Cheery Lynn.  I've also worked up a little tutorial for you so you'll be able to make one of these fun Explosion/Poppy Boxes yourself.  Have fun!!!  


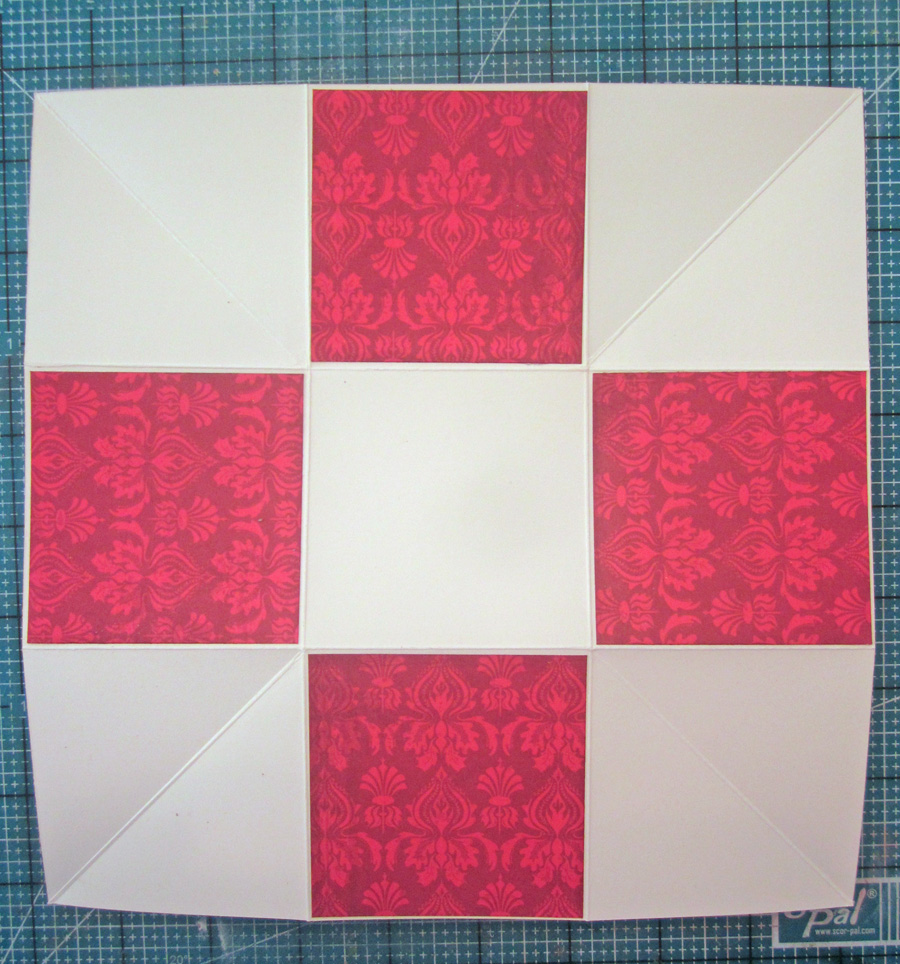
Step 1: Cut two 9 inch card stock squares, cut one 5 1/8" square card stock. Cut four 2 7/8" square designer paper, cut 8 2 3/4 square designer papers for interior.  


Step 2: Score one of your 9 inch squares at 3" and 6 ", turn your paper 90 degrees and score again at 3 " and 9". This will create a grid. You'll want to do this on both of your 9 inch card stock squares.


Step 3: Score each of your corner squares diagonally and fold. Fold inward as this is going to help create your box. TIP: I find using the 6" mark on my S
cor-pal makes this easy as there is a marking at the bottom of your Scor-Pal that will help ensure you have it lined up correctly. 

Step 4: Using strong tape
 apply your outside squares ( 2 7/8" ) to the base box.

Step 5: Cut four of your 2 3/4 squares in half and tape to inside of your explosion box along the ridges.


Step 6: On your second 9 inch square cardstock cut the outer corner squares off as shown above. Fold and crease.

Step 7: Tape your remaining square card stock pieces to the just cut cross/9 inch piece. You can also decorate the base center with designer card too.

Step 8: Score your 5 1/8" square at 1 inch on all sides. Cut a slit in where all the black marks are shown above. Fold and crease.


Step 9: Tape your flaps to the inside of the box top creating your top. Now the really fun part decorate as desired.

I created the lovely poppies using my Cheery Lynn Dies of course.  Here is a complete list of dies used on this box. 


Have a wonder, safe and blessed Memorial Day weekend and I'll see you next week.

Hugs, Lori 

Saturday, February 2, 2013

Orchid Tutorial

3:30 AM 8 Comments
Hello! Don't you just love the Winter Release dies at Cheery Lynn Designs?! I think the new Orchid is so beautiful! I created a simpler card because I really wanted the flower to stand out on it’s own.
I want to share with you how I assemble my Orchid. Remember, you can enlarge any photo just by clicking on it!
On the left I have arranged the dies in which I assemble them, on the right you see the my die cut petals in accordance with the dies. I’ve numbered the petals to make it a bit easier to follow along.
Once I have my petals inked it is time to shape them. I use a small foam block (from Stampin’ Up) and an embossing tool. I made a little clip of my process.

A close up of the shape of the center.
I’ve glued petals 2 & 3 to petal 1, overlapping 1 slightly.
Here you can see the curvature of the flower taking shape.
I’ve adhered petals 4 & 5 to the backside, angling slightly.
Holding the center in the curved position, I add a dab of glue to the end….I use Rangers Glossy Accents because it dries so quickly and has a strong hold.
I place the center so that it sticks straight out from the flower, just like the real flower.
Another angle so you can see the depth of the flower.
The flower completely assembled.
Please let me know if you have any questions, or if I can help in any way! I can’t wait to see your version!


To create the card, I started by cutting the base using the Scalloped Rectangle Reflections Mega die. The white matte was cut using the Mini Pearl Rectangle Reflections Mega die. I love that the Reflections dies have the added piercing and stitching, adding visual interest and texture. Next, I added the new Ankara Lace Doily, layering with a frame from Sentiment Frame #1. I chose to cut the matte, doily, and sentiment frame from the same color allowing the new Orchid to pop off as the focus. For a bit more texture, I tied a smaller Tag #1 to the flower. To the bottom I added the Best Friends Phrase, again cutting in white so not to take away from the flower. Gently resting on the sentiment is a Mini Dimensional Butterfly.
There is still time to enter this weeks challenge for your chance to win the $20 shopping spree! Details Here
Thanks for stopping by!

Saturday, December 1, 2012

Grandmother's Love

3:30 AM 6 Comments
Hello! Jodi here with a 12x12 layout.
I set the feel of the layout by adding the elegant Francesca Border around the base layer. Down the center, the Tiffany Border pops! Behind the photo is the gorgeous Mega Tea Party Doily.
The white flowers were created with the Frangipani,. Build a Flower Embellishments #2 was used for the flower centers, as well as the small pink flowers.
Build a Flower #2 was used to create the large rose. Miniature Roses can be found in yellow. The Exotic Butterfly Mini adorns the bouquets, while the Exotic Butterfly small #2 rests on the
Leaf and foliage dies used:
There is still time to enter this weeks challenge for your chance to win the $20 gift certificate!
Thanks for stopping by!!

Friday, November 30, 2012

Grandmothers Garden Tag

3:30 AM 6 Comments
8" X 3"
 This week for Cheery Lynn Designs, I have created a Large Tea Tag, which represents my Grandmothers garden. I have wonderful memories of my Grandma, and her magical, beautiful garden.
 This project has used a considerable amount of dies, so I will give a basic run-down and the rest can be found in the material's list.  The base of the tag was covered with the Chicken Wire Frame, using gold cardstock.  Sadly, gold never ever photographs well.   The larger flowers on the tag were created from the smaller of the two petals in the Cherry Blossom die. Other flowers are from the Build A Flower Embellishment #2, and the Darling Daisies.  So much foliage was used, including the Pair of Ferns, Olive Branches, and the Fanciful Flourish - most die-cuts were given a 'nip and a tuck' to fit, and then overlapped, for a more realistic appearance.
 The Victorian Picket Fence, was cut from chipboard, and inked with Tea Dye distress ink.  I neatly tucked in a fairy, as I was 100% positive there were fairies in my Grandma's garden!  The Spiderweb added a little more character to the tag, and I couldn't help but add a spider...

The challenge this week on the Cheery Lynn Designs Blog is Non-Traditional Christmas Colours (no red or green) - do call over for a visit, even if for the inspiration.
Till next week
Materials:
Cardstock
Chipboard
Tea Dye, Tim Holtz Distress Ink

Copyright Statement


All content, including designs, pictures and words are the exclusive property of the author of each blog post. Information shared here is for inspiration only and may not be copied for publication, competition or profit. Thank you for your cooperation.

SOCIAL MEDIA 2


Follow Us @jointhemakersmovement


All content, including designs, pictures and words are the exclusive property of the author of each blog post.
Information shared here is for inspiration only and may not be copied for publication, competition or profit. Thank you for your cooperation.