Wednesday, May 31, 2017

Sunflower Beauty with Cheryl Walker

1:30 AM 4 Comments

Hello everyone and Happy Thursday to all!
Today I have a beautiful card that I created using Cheery Lynn's beautiful dies. I absolutely LOVE this gorgeous sunflower die, and had fun making it 3-D!

To create my card I started with the sunflower design paper for my card layers. Next I chose to coordinate using Cheery Lynn's Sunflower die. It was cut using white card stock, then distressed using yellow inks. I also used an orange Copic to airbrush on the sunflower. It has 3 layers for the flower part. In the center I chose to use the wood sunflower button from the sunflower kit from Club Scrap. I did airbrush it in a brown, and added some Stickles to the center..LOVE it! I love how this card turned out for today's post. The green leaves were dusted using two green inks.

My layer for the sentiment was done using Cheery Lynn's Oval Classic, and the Pierced Stacker #2 set. The doily layered behind my sentiment layer is Cheery Lynn's Priscilla Doily.

The sentiments are from the Project Bin Stamps Autumn's Calling stamp set.

The ribbon is from Really Reasonable Ribbon - Moss Green Satin with Grosgrain Edge.


 I love this design paper and how perfect the sunflower die goes with it. Can't wait to create a layout using this beautiful die, and gorgeous design paper!

Thank you for stopping by!
Hugs to all,
Cheryl

Tuesday, May 30, 2017

Cheery Lynn Designs Summer Blog Hop Winner!

11:14 AM 2 Comments
This is the second post of the day. Be sure to scroll down to see the beautiful project that Maggi has shared with us today.

Thank you so much for hopping along with us this month on the Cheery Lynn Designs Summer Themed Blog Hop. We had so much fun and we hope you did too!! 

Don't you just LOVE the huge selection of Summer themed dies??!!


I hope you loved all the samples showcased by the design team.   I encourage you to hurry over to Cheery Lynn Designs NOW and order your favorites so you can get creating!

Now, on to our winner who will receive a $20 gift certificate to Cheery Lynn Designs.

 Our randomly selected winner is:
Random Integer Generator
Here is your random number:
4
Verna Angerhofer

Congratulations Verna. Please contact Judy by clicking here for your $20 shopping spree to Cheery Lynn Designs.  

Now if you didn't win, don't worry!! We will be 'hopping' again soon, so you'll have another chance to win! We hope you stop by and visit our blog often.

Imagine Card with Maggi

3:30 AM 0 Comments

Hi there Cheery Lynn fans, Maggi here to share a fun all occasion card today.  The word, imagine, brings so many thoughts to mind; I could use this card for a birthday, graduation, a fun hello card, the possibilities are endlesss!  

Cheery Lynn dies and the colorful cut-apart card from Graphic 45's World's Fair collection worked so well together to make this vibrant card.  I used design papers from the collection to die cut all the layers for my card.  It's a large card, about 5 1/2" x 7 3/8".  I began by layering the blue paper that I diecut with the Coved Rectangle Stitch And Cut Tool .  Next layer is the floral layer diecut with the Horizon Coved Rectangle Boutique Stacker Frame set.  Then a bright orange layer cut with Card Maker Rectangle Scalloped 6 Piece Die Set and finally the floral oval layer cut with Polynesian Sails Oval Die.


Of course, I had to add some flowers and these I made with the Bohemian Collection - Indie Bouquet - 6 Die Set.  They are so easy to make, I just cut 3 different flowers from the die set, gave the petals a twist with my tweezers to give the flowers some body and stacked and glued them.  Then I added some leaves from the Flourish Leaf Strip 5 Piece Die Set and that's it!


Cheery Lynn Designs dies used:


Thanks for joining us today!
Maggi Harding

Monday, May 29, 2017

Just for You by Bonnie Garby

9:41 AM 0 Comments
Hi friends.  Bonnie here today from Make Time to Craft.  Today I'm sharing a fun all occasion card featuring some of my favorite dies from Cheery Lynn Designs.
For the background of my card, I used some pretty design paper on the bottom and on the top I did a white on white layering using the pretty Lattice 2 die from Cheery Lynn Designs.  I love the subtle textured look you get with white on white.
I just love all the great sentiment dies that Cheery Lynn Designs offers.  They are so great to have on hand to use to whip up a quick card.

Cheery Lynn Dies used:

My card was topped off with a pretty bi-color bow created on my Bow-it-All Tool using Delicate Stitched Satin ribbon from Really Reasonable Ribbon.
Thanks so much for stopping by today.  Have a crafty weekend!

~ Bonnie ~

Sunday, May 28, 2017

Peace by Jenny Alia

3:30 AM 0 Comments

 Hello everyone, it's Jenny here today.  I hope you're enjoying the weekend and the extended holiday weekend if you're in the USA.  I was playing with color bursts on paper and instead of using the paper as a background I cut it with this beautiful paisley die.  


It cut so easily even though the paper was a little warped.  I used the same paper to cut the Peace die.  I thought the stitched rectangle worked well with the '60's vibe of the card.  I almost always add glitter or bling to my cards and this one was in need of a little more dimension so I glued purple rhinestones to the edge of the paisley. 

Cheery Lynn Dies

Thanks for stopping by the blog today!  
Hugs, Jenny

Saturday, May 27, 2017

Summer Vacation Begins NOW!!

3:30 AM 1 Comments
Hi friends.  Wouldn't it be nice if your summer vacation did begin now?  Hopefully it won't be too long until your vacation begins....  

Bonnie here from Make Time to Craft today to share another summer themed card with you.  If you have not yet hopped along in our Summer Themed Blog Hop, it's not too late.  Hop along and comment for your chance to win a $20 gift certificate to Cheery Lynn Designs.
A secluded desert island seems like the perfect vacation spot to me!  I would love to unplug and have a week (or six) with sun and silence..... mmmmmm.
My card started with a 5-1/2" square card base.  I then cut a smaller 4-3/4" square panel which I backed with white mulberry paper and then attached to the card base.  Next was a layer of printed cloud paper slightly smaller and I created an aqua paper using a couple of colors of distress ink to represent my ocean water.

I then cut my 'Message in a Bottle' island die set in two colors of green, brown and kraft and selected the different parts I needed from each color.  I inked the edges of the tree tops and island for more depth.  I stacked the different colors of green for the tops of the trees and then assembled the scene.  My adorable sun was cut in yellow and orange and stacked and adhered to create the layered sun.  I then placed the island in the center of the card over the ocean and added the sun to the top left corner.  

My digital sentiment was cut with the Nesting Doll Tag die and then I added a layer of aqua cardstock leaving a small border.  I added some natural burlap sting to the tag and adhered it to the bottom left corner.

Cheery Lynn Dies used:

I finished my card off with a little bow made withe natural, yellow and orange burlap sting from Really Reasonable Ribbon.
I hope you enjoyed my card today.  It's time to set aside a few crafty minutes for yourself and create your own summer projects.  Happy crafting!


Friday, May 26, 2017

La Parfumerie by Julie Lavalette

3:30 AM 0 Comments


Hi Cheery Lynn fans, its JULIE here and I'm sharing some vintage inspiration on my card today.


My Perfume Bottle die I cut out twice in patterned paper, I coloured in my gold elements with a Promarker. For the main body of the bottle I shaped it on my Embossing Mat to give it some dimension and added small dots of Silicone Glue in between the layers, finishing with a small Cameo from my stash.


My main image on my card was stamped using a Crafty Individuals stamp and Archival Ink which I layered on to my card with a touch of lace and pretty vintage styled flowers adding some Flowersoft into the centres.


To add some extra detail onto my card I added stitching around my floral layer, tattering at the edges and inking. I sprayed the paper in the corner and crushed it in a concertina fashion layering a touch of cheesecloth, lace and my small Doily behind.

Cheery Lynn Dies Used :

Thanks so much for stopping by today and for all the lovely comments you left on my blog on our Summer Blog Hop.


Crafty Hugs
Julie x

Thursday, May 25, 2017

She is a Happy Soul Always Tag by Amy Voorthuis

2:30 AM 0 Comments
Good morning lovely Cheery Lynn fans.
I hope you are having a wonderful day as we here in Holland are enjoying a day off due to a national holiday. We are planing on making this day as special as can be and we have some nice weather to go with it {almost 30 degrees}
I am so glad that summer is finally kicking in.....for today I would like to share a tag with you using some amazing Prima Marketing papers and dies by Cheery Lynn Designs!

She is a Happy Soul Always: 
This was a fun tag to make.  I am normally more of a soft color person, but this collection is awesome because I really like grey/black and pink together. First I cut out all the elements that I wanted to use on my tag to later on add them to my work.

For my flower centers I used metal embellishments/brads by two different companies. At the end I sprayed two different colors of my Lindy's sprays and added a flair to my tag which is designed by my friend Valerie.


Cheery Lynn Design dies used:
CASO-15 - Nesting Doll Circles #15
DL327 - Mandala Doily 2
B870 - Feathers
B307 - Sweet Williams Strip
SF-3 - Stacker Flower #3
B241 - Rose Leaf Strip

Thank you so much for visiting the blog today!
I hope you enjoyed my post and I have inspired you to use your Cheery Lynn Designs dies.
Have a wonderful day and almost weekend!

Wednesday, May 24, 2017

Happy Fathers Day by Debbie Brownmiller

3:30 AM 0 Comments
A warm Hello to you. It's Debbie back with you from Debbie's Time Out. Today I am sharing a Father's Day card with you.


For the base I embossed a foil paper with the Do it yourself Embossing Plate .  This is a very cool embossing plate to use on men and boy cards.


I then cut and layered the Frame Die  onto the embossed base.


The Frame Die   has these tools, nut, bolts and chain that cut out of the center of the frame. I cut the screwdriver in black and silver so I could layer the black handle part over the silver handle to give it a realistic look. I placed the Sentiment Tag 3 to print the sentiment on and layer the tools on. There is such great detail in all these die cuts which Cheery Lynn is so known for.

Thanks you for visiting the blog today and for all the comments you leave. I always enjoy hearing what you have to say. Have a crafty day my friends.

Dies Used
Do it yourself Embossing Plate - E137
Frame Die - CAFR18
Sentiment Tag 3 3 Piece Die Set - B426

Tuesday, May 23, 2017

Hope With Lisa Blastick

3:30 AM 2 Comments

Hello again! I sure hope everyone is enjoying the "Summer Blog Hop" with Cheery Lynn Designs
If you didn't see it yet be sure to check it out on the Cheery Lynn Designs Blog. Today, I'm sharing  another card expressing more summertime. When I think of summer, I think of the beach and everything nautical. 


I used 6 different die cuts...all from Cheery Lynn Designs. I just kept layering them all together....with a little extra help from pop dots! lol  Even better, this card is ready for that strong man in your life! I don't make too many manly cards....so this one will be just perfect!


Thanks so much for stopping by today!
Have a great week! 
Hugs Lisa                                                                                  

Monday, May 22, 2017

Cheery Lynn Designs 'HELLO SUMMER' Blog Hop

3:30 AM 15 Comments
Hello everyone and welcome to a fun Summer Themed Blog Hop at Cheery Lynn Designs!


We are a week away from Memorial Day here in the US which is the unofficial kick-off for Summer and I can hardly wait!!  Today we are showcasing 'Summer" and you will see some of the wonderful summer themed dies from Cheery Lynn Designs on fun summer themed projects made by our fabulous design team.  They always come up with such great ideas.

Be sure to head on over to the Cheery Lynn Designs website when you are done hopping to view the great collection of summer themed dies.

Now let's get hopping and see what our fabulous design team has created for us.
Here is our blog hop list.  If you get lost along the way, hop on back here and we'll get you back on track.  You can also visit each post directly from here and it will take you right to the correct post.

Cheery Lynn Designs Blog

Now be sure to leave some love on all the stops along the way.  Your comments are most appreciated!

Post Your Comments for a Chance to Win!

When you arrive back here at the end of the hop, please be sure to answer our questions below in a comment on this POST FOR A CHANCE TO WIN a $20 GIFT CERTIFICATE to Cheery Lynn Designs.

Questions


1. What are your favorite types of dies for summer themed cards?

2. Are you able to carve out a little crafty time in the Summer months?  (Cheery Lynn Designs has lots of great dies for CAS cards that you can whip up in a few minutes if necessary!)


3.  Any fun vacation plans this year?


Our winner will be selected on Tuesdsay, May 30th.  Be sure to stop back on Tuesday evening to see if you are our lucky winner.

Thanks so much for Hopping with us today.  Now head on over to Cheery Lynn Designs and start your shopping!!  Enjoy!

Sunday, May 21, 2017

Summer card with Maggi

3:30 AM 0 Comments


I used some great dies from Cheery Lynn Designs to make this fun  summer card.  My favorite color is red and I love this Summertime collection from Maja Designs.  


 I love all the flower dies that Cheery Lynn carries but this one, Judy's Blooms, is a favorite.  I stacked 3 blooms and topped with a pearl to make these lovely flowers.  I used patterned and solid papers to cut the blooms, I think that makes an interesting looking bloom!


Be sure and join in our blog hop tomorrow, we'll be showing lots of summer themed projects.  It all starts on the Cheery Lynn blog.  Thanks for stopping by!


Saturday, May 20, 2017

Window Shaker Card with Cheryl Walker

12:30 AM 2 Comments
Hello everyone, today I have a card I created for Cheery Lynn Designs Dies  using the beautiful new  Shutter Window shaker die kit  from Cheery Lynn, along with the Tea Rose small die. Love these shaker dies from Cheery Lynn as they are super fun and easy to create. Also love how the kit has absolutely everything you need in it to create these fun shakers.

The flowers I chose to use are Cheery Lynn Tea Rose small die.  I cut them out using white card stock, then dusted them with 2 different pinks. Next I added some mini beads for the centers. The leaves were dusted using a green ink from club scrap.

The window was created using some old old Crafty Secrets design paper. Love the pattern for the window. The little flowers for the shaker part were airbrushed using a pink Copic marker.

The sentiment is from The Project Bin Stamps called Spencer's Set. I stamped it in black, and then dusted the edges in the same pink as the flowers.

Ribbon is satin from Really Reasonable Ribbon.

I hope you enjoyed my post for today, and thank you for stopping by!

Hugs to all,
Cheryl

Friday, May 19, 2017

Spring Birthday by Laurie Schmidt

12:30 AM 1 Comments

Hi everyone!

 Laurie here from Stamping Up North sharing a Birthday card today. It seems I am always in need of Birthday cards, especially in the spring. Spring makes me think of flowers, so I decided to use the Floral Bouquet Kit for this card. 


I started out with Cheery Lynn's Lattice #2...such a pretty background pattern. I cut it out in black and backed it on some grey paper, adding some pink flowers from the Floral Bouquet die set. The centers have enamel dots, and the leaves are from flourish #13. I stamped a small sentiment on the bottom in black.


I am always amazed at the awesome detail in Cheery Lynn dies!


Here's a list of dies I used for this card:

Lattice #2 CAFR22

Flourish #13 CAFLRS13


Thanks for stopping by!

Thursday, May 18, 2017

All Occasion Dahlia Card

4:30 AM 1 Comments
Hi there...Cherry here at the Cheery Lynn blog.  I have a simple little card to share.  Some times I like to leave a card without a sentiment so it can fit any occasion.
 I used the 3D dahlia flower stackable for my main focal point.  I added buttons to the top of them and used the Build a flower #1 Petals/leaves for my leaves.
 From here I added details from the curls and swirls embossing folder  at the bottom as a border.
That is it for me.....Thanks for visiting the Cheery Lynn blog! Cherry

Cheery Lynn Dies-

Wednesday, May 17, 2017

For Someone Special by Jenny Alia

3:30 AM 0 Comments

Hi crafty peeps!  I recently bought a few sheets of glitter paper and wanted to try cutting flowers.  I used my new Big Sister machine and despite the thickness of the glitter paper the flowers and sentiment cut beautifully.


I used a few of my newer dies on this card.  I just love the pierced detail on these Mehndi Botanicals, they are so fun!  I cut the flower three times and layered it before adding the rhinestone center.  I also double layered the For Someone Special die to add more contrast so it would stand out against the Chevron background.  The Chevron frame was cut out of black paper and adhered to a white background.  I added pink behind it and then glued it to the front of a white card.

Cheery Lynn Dies

Thanks for stopping by the blog today!  
Hugs, Jenny

Tuesday, May 16, 2017

Floral Birthday Card with Bonnie Garby

3:30 AM 0 Comments
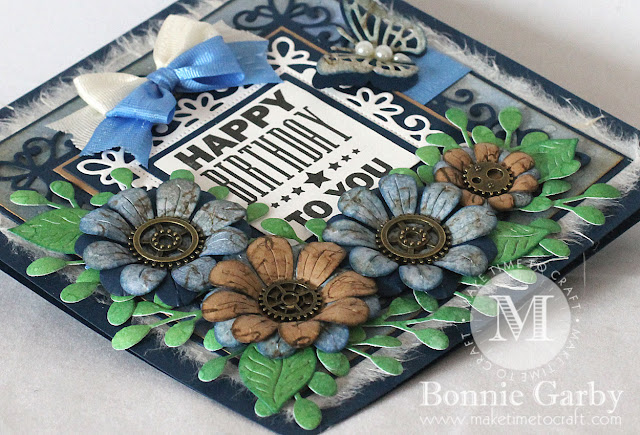
Hi there Cheery Lynn die lovers.  Bonnie from Make Time to Craft here today to share a pretty floral birthday card using one of my favorite flower die sets from Cheery Lynn Designs.
I have lots of layer on this card, but I think it's pretty easy to see from the photo how the layers were assembled.  I just love the Square Frames die for square cards.  

My blue/tan background paper was made using Distress Inks spritzed with water.  My flowers and foliage were created with the Floral Bouquet die set which is such a versatile flower set.  I used some of the same paper from my background for the blue flower petals along with some dark blue and kraft color cardstock.  The layers were also inked with an old script stamp for some additional interest.  The flowers and foliage were cut and then shaped with a stylus and foam pad.  The flowers were layered and finished off with some cool metal gear embellishments from Really Reasonable Ribbon.  I added a pretty butterfly to the right side of the card to balance things out.

Cheery Lynn Dies used:

My card was finished off with a pretty bi-color double-loop bow made on my Bow-it-All Tool using Ivory and Capri Blue Delicate Stitched Satin Ribbon from Really Reasonable Ribbon.
I hope my card today inspires you to pull out some of your favorite dies from Cheery Lynn Designs and create your own pretty floral card.  Happy crafting!

~ Bonnie ~

Copyright Statement


All content, including designs, pictures and words are the exclusive property of the author of each blog post. Information shared here is for inspiration only and may not be copied for publication, competition or profit. Thank you for your cooperation.

SOCIAL MEDIA 2


Follow Us @jointhemakersmovement


All content, including designs, pictures and words are the exclusive property of the author of each blog post.
Information shared here is for inspiration only and may not be copied for publication, competition or profit. Thank you for your cooperation.