Thursday, February 28, 2013

A Little Bit Shabby Chic & A Farewell

3:30 AM 16 Comments
Hello my Thursday friends, it's Diane here with you again today...
this is my last post as a guest designer for Cheery Lynn Designs
and I want to thank everyone that came to visit and left me a comment here..
I really appreciate it!!
Also, I would like to mention that I had many requests for a tutorial
of how I made the fox tail lilies from last week.....
I have a tutorial on my blog if interested...
 
 
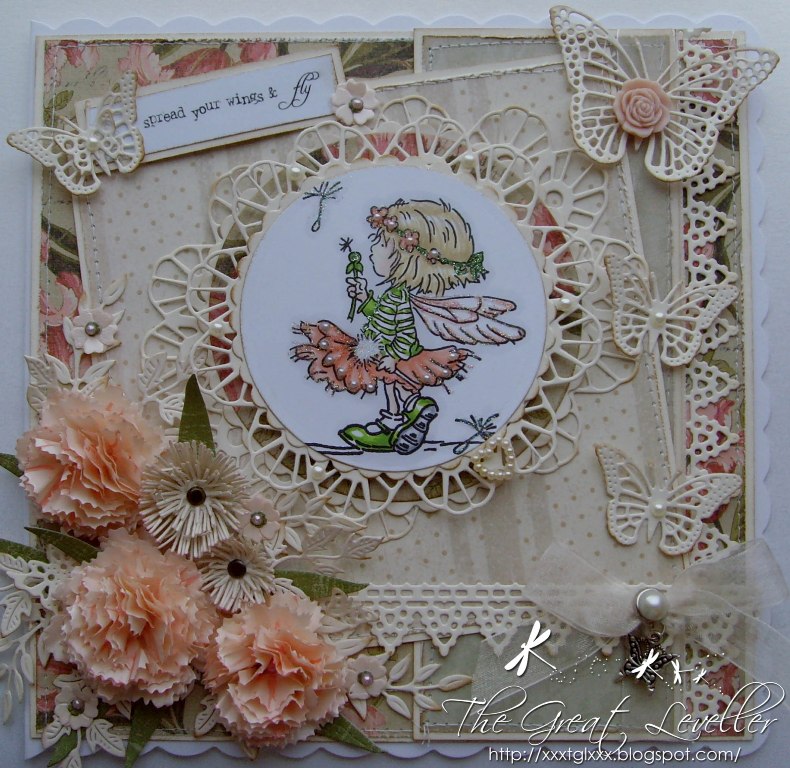
For todays project I went a bit "shabby chic" with an Easter egg...
I started with a Martha Stewart paper mache egg that can be filled with treats...
 
 
It was painted a cream color, then added a tissue paper ruffle around it
with begonia flowers made from crepe paper......
the egg is gorgeous sitting out for Easter...
 
 
I also made a card with calla lilies made from the same crepe paper...
the crepe paper is wonderful for the flowers, as it is easy to shape....
 
 
the dies used for the egg are
 
the dies used for the card are
 
Also don't forget
you could win a $20 gift to the Cheery Lynn Designs store 
by entering a card at  the challenge blog HERE....

Wednesday, February 27, 2013

Spread Your Wings

3:30 AM 12 Comments

 
Good Morning fellow crafters and bloggers! :)  Well yesterday was a beautiful spring day here in Scotland, and I am sooooo ready for some sunshine!
 
My card today was featured in a recent issue of  Scrap & Stamp Arts Magazine showcasing the versatility of Cheery Lynn Dies, and in particular creating your own flowers.  This fits in with our new challenge theme this week and what better excuse to add a little spring and summer to your projects than with some pretty hand-made paper blooms.
 
This card is 8 x 8 inches (so quite a big size) and I hand-stitched and layered K&Co papers onto some 300gsm cream cardstock.  The image is matted onto 2 layers of the gorgeous Italian Flourish Doily die with the back layer cut in half and elongated to create a different look.  I then added a couple of strips of my favourite Lace Light Deco Border and some beautiful butterflies before creating and arranging the floral spray.


As you can see I made some really pretty and very delicate Carnations using lots of layers of pearly apricot paper.  This paper was almost tissue thin and so was really quick to cut lots of layers and to scrunch up in a carnation shape.  I think there are approximately 20 - 25 petals to each flower and they are backed with a couple of layers of the Sweet Williams die to make them look really full and rounded.  I used a brad to hold the layers together and once assembled I coloured in some lines to give a variegated effect to the petals.
 
I created the fringey flowers using BAF#1 and the tiny buttercups were from the Embellishment set.  I thought they complimented the dandelion image :)
 
I finally added some leaves, pearls, pearl brad, and an organza bow with a charm for a finishing touch.
 
All dies used on this project are:


I hope you find time to join us this week as I love to see hand-made flowers, and you still have plenty of time left to enter.  Dont forget there is also gorgeous, and fresh inspiration daily from the rest of the talented DT over on our Cheery Lynn Desings Inspiration Blog.
 
Thanks so much for visiting our blog today and have a smashing week!


Medallion Flower and Butterflies

3:30 AM 10 Comments

Sorry for the delay on my post today, Mother Nature wreaked havoc on my internet service last night.  I love snow but I am ready for Spring.  So with that in mind, I created this fun butterfly card.

I began with a piece of blue card stock 5.5 inches square adding a a white panel and then another blue panel and finally a white panel to which I added texture using my Large Rectangle Stitcher Plate.  I added another blue panel and then a white panel embossed with my Flutter By's embossing plate.   To this panel I added two Butterfly In die cuts to create a frame. 


Now came the fun part, assembling my flower and medallion for the center.  Starting at the bottom, I layered, Sophie's Heart Mini in blue and French Pastry Tiny in white.  Next came the flower portion which was created with Daisy Strip, Darling Daisies in blue and finished with some spikes from Embellishments #1 in white.  I used my embossing tool and embossed a line down the center of each petal and then pinched them up for some dimension.  The final steps were the addition of two butterflies from the Small Exotic Butterflies #1 in blue and some Viva Decor Pearl Pen accents. 

Be sure to visit the Cheery Lynn Designs challenge blog for more inspiration and to join in on this week's Die Cut Flower challenge for a chance to win $20 to the store. 

Cheery Lynn Dies Used:

Tuesday, February 26, 2013

Flower Power

3:30 AM 8 Comments
Today's card for Cheery Lynn Designs Inspiration Blog is focusing on the various flowers you can make with the variety of dies Cheery Lynn makes and sells.
I'll give a complete list of the dies used at the end of the post.
I've created a lovely floral arrangement using just a few of the dies available, as well as the Victorian Fence die, a flourish and butterfly and some cute things with wings. I've also used the Lattice Die as a background behind the image and a lovely spider web corner die. Sentiment is computer generated and the image is a Elizabeth Bell rubber stamp. Papers from Bearly Mine Designs Vintage set. Flowers and leaves have been painted with Twinkling H20's
Closeup of my Flower Arrangement

Don't forget we have the challenge this week of "Flowers" and you could be in for a chance to win a $20 gift certificate to the Cheery Lynn Designs store.

Dies used to create the flowers

Other Dies Used

Thanks for stopping by and have a wonderful day

Monday, February 25, 2013

Cheery Lynn Designs Challenge 69 - Die Cut Flowers

3:30 AM 8 Comments
This week our challenge at Cheery Lynn Designs is to use

Die Cut Flowers

 Here are the rules:
  • You MUST follow the theme and use at least one Cheery Lynn Designs die, of course, we would love to see more than one. 
  • You MUST add a link to your blog post in the InLinkz at the end of this post; no back posting, only new projects are allowed
  • You MUST link to this challenge in your blog post or on your gallery post
  • You may only enter the challenge ONCE per week.
The winner will be chosen based on merit by Cheery Lynn Designs. They will receive $20 towards shopping at the Cheery Lynn website. The challenge will end on Sunday night at 22:00 Eastern time.

Before we get to today's team inspiration, I want to welcome our newest member to the Cheery Lynn Design Team..... Debbie Brownmiller.  She was doing such a great job in our weekly challenges that Bj invited her to join us.  And now to our inspiration for today......


Remember, you MUST use a Cheery Lynn Designs die to enter this challenge.

Half Window Card Tutorial

3:30 AM 6 Comments
Today, I've got a tutorial to share with on on how to make a beautiful Half Window Card using a technique with your Angel Wings.


Supplies:

Cheery Lynn Designs Dies: 
Scor-Pal
Scor-Tape
Fancy Pants - Home for Christmas collection
Core'Dinations - Signature Series Graphic 45
 Clearsnap Ink


Cut a piece of cardstock 6" x 12". Score at 3" and 6".  Fold as shown.


Cut patterned paper to add to the card base.
 (2)  2 7/8" x 5 3/4"
(2) 5 3/4" x 5 3/4" : Set one of these to the side. 
Ink the edges of the paper. Use Scor-tape to adhere the panels to the base, but on the first panel, do not put the tape along the edge that will have the cut.


 Take the angel wing die (this is an outline die, that matches a fancy doily die, but has one edge that is not a cutting edge).  Tape the angel wing along the scored/folded line. **If I want to hold something temporarily in place with tape, onto pretty patterned paper, I stick the tape to my skin a couple of times, before adhering to the paper, to make it less sticky and to decrease the chance of messing up my patterned paper.

This is what your card will look like after you run it through your die cutting machine.


When I added my doily on top of this, I wanted to have a consistent cream background underneath, so I cut a full circle with the angel wing (make the first cut, line the up so that it completes the circle, tape in place and cut).  Then I matched this up with the half circle, glued in place, then added the doily on top. This will be the inside portion of the card.


Take the second piece of designer paper  5 3/4" x 5 3/4" and lay it on top of the front, to see where the doily fits.  Tape your angel wing to the patterned paper, and using the two step method, cut a full circle from this piece of paper.  Then line it up on the front and attach.


Add your second doily to the front. Embellish as you please.


I love how this card looks like it's flipping around when you open it and hope that you will give it a try.  

Sunday, February 24, 2013

Ohh La La - French Flair

3:30 AM 4 Comments
Hello all you Cheery Lynn Fans, Tamara here and welcome again to your Sunday inspiration.  This week I have a Shaped Easel card to show you made using Cheery Lynn French Flair Stackers.  For the card and the base I used the biggest stacker then went down two sizes to create the layered effect.  

I used the scalloped circles to make this cheesecloth flower.. The stamp is a new one from Lilly of the valley and the sentiment is from Whimsy stamps.. 

Here is a close up of the mini and medium roses that I have shaped using an big balled embossing tool the centres are Candi (legless brads). Around the edges I used the wreath leaves. 

The inside view, using the scalloped circle  and silver classic circle stackers using them together they create the prefect layer effect. 


Here's a closer look at the cheesecloth flower

The flower in the background you can see the flower that I created using the build a flower stamens..
Don't forget to check out Cheery Lynn's Challenge blog where there is a new challenge very Monday.
  
Photobucket


Saturday, February 23, 2013

Boy oh Boy!

3:30 AM 4 Comments
Hello!  Those of you that know me know how much I love to add texture to my projects, and what better way than by embossing plates!
The little critters on the Turtles and Frogs Embossing Plate are sooo cute!! After embossing, I brushed on a little chalk to emphasize the textured pattern. The Celtic Chain Border is the perfect boyish accent!

Dies Used:
Turtles and Frogs Embossing Plate
Celtic Chain
Birthday
Scalloped French Flair Stacker Nesting Die
Classic French Flair Silver Stacker
Scalloped Circle Stacker Nesting Die
Classic Circle Silver Stacker
Mini Pearl Rectangle Reflections Boutique
Scalloped Rectangle Reflections Boutique

There is still time to enter this weeks challenge for your chance to win the $20 shopping spree! Details here
Thanks for stopping by!

Friday, February 22, 2013

Upright Diamond Fold Card

3:30 AM 6 Comments
Hi Everyone,

Today I want to share with you a fun fancy-fold card which I have anxious to try. Given our challenge theme this week is to create a Shaped card (anything but square) I thought I would give it a whirl and try to put my own little twist on it.


The card is called a Upright Diamond Fold Card and since I could only find instructions out there in Metric I have created my own and am sharing them with everyone.

Here is a closer view of the inside:


And, there is the list of dies used for this project:

B162 - Lace Corner Deco B
B248 - Hugs Mix and Match
B263 - Tags 4
B266 - Tiny Things With Wings
B280 - Orchid
DL128 - Two Of Hearts
DL238 - Sophie's Heart Mini Doily
XM-8 - Oval Scalloped

You still have time so I hope you can fit in some "crafty" time over the next few days to visit the challenge this week and put in your entry! With your entry you will have a chance to win a $20.00 shopping spree at Cheery Lynn Designs!

Have a Cheery Day!

Copyright Statement


All content, including designs, pictures and words are the exclusive property of the author of each blog post. Information shared here is for inspiration only and may not be copied for publication, competition or profit. Thank you for your cooperation.

SOCIAL MEDIA 2


Follow Us @jointhemakersmovement


All content, including designs, pictures and words are the exclusive property of the author of each blog post.
Information shared here is for inspiration only and may not be copied for publication, competition or profit. Thank you for your cooperation.