Showing posts with label Stitching Plates. Show all posts

Monday, July 8, 2013

May Sunshine and Laughter Brighten Your Days

3:30 AM 4 Comments
 It seems like the rain is never going to stop here, so I loved the sentiment that I used for this Upright Z-fold card.  This project uses a couple of different techniques, so I'm going to break them down for you, so you can make your own.

For the background paper, I took a patterned paper, and ran it through my machine with an embossing plate.

I used a brayer to apply  watermark ink over the top , and sprinkled it with clear embossing powder and heat set the powder. 

I repeated the brayering and embossing two more times to build up a thick layer of embossing powder.


I inked over the surface with the dark brown ink, and then used a paper towel to remove the ink off of the embossed areas. 

I set this to the side, and started the card base by cutting a strip of cardstock 4 1/4" x 11.  I placed the paper with the long side along the top fence of my scoring boardl, and scored at 5 1/2" and then flipped the paper, and scored at 2 3/4".  Fold the base so that you have a small "tent" to the front of the card.

I adhered the embossed paper to the back panel of the card.   I took a strip of gold paper 4 1/4" x 2 3/4" and used the City Girl Edger to cut decorative borders on each side.  A added a scrap of the embossed paper to the center of this panel and adhered to the bottom of the card. 

For my image panel, I cut brown cardstock 3 1/4" x 4 1/4" and covered it with the French Lattice Small.  I used the Coved Rectangle and Coved Rectangle Stitching Tool for my sentiment.  The stitching tool allows me to make perfect stitches around my border. I adhered the bottom of this whole panel to the base of the card.


The original directions for making this type of card relied on a tab on the back panel to tuck the front panel behind, to make it stand up, but I created a different method.  I glued a lace Corner to the back of my brown panel, and sat my card on the table, and used a Crop-a-dile to punch holes to line up with the opening in my fancy corner die.  I then ran ribbon through the holes in the card and laced it through the die cut and tied my bow.  This keeps the card standing upright, and can be untied to flatten the card for mailing. 

For the flowers, I used the Shasta Daisy Strip.  I inked the edges with a dark yellow chalk ink.
  Then, I cut a small circle into a scrap of paper to make a template, and placed it over each flower, lining up with the center.

I spritzed into the opening with tdye ink spray.  This kept the splatters just to the center of my flower.


I assembled the flowers and added some greenery to finish the card.

Cheery Lynn Designs Dies:

Monday, June 24, 2013

Summer Flowers with Cheery Lynn Designs

3:30 AM 5 Comments

The official first day of summer was last week, so to help celebrate - I have a summery card to share with you.

The flowers were made with the Shasta Daisy die, and Build A Flower 2 Embellishments for the centers. They are very easy to put together - in fact, I made all of these flowers with only 2 cuts from the daisy die.  I also used the new and improved Silver Stitching Tool on my oval (I know it's hard to notice it on the picture - but there is stitching around the edge.) Such a great way to make perfect stitches.

This is the last week to enter the Summer Blast with Cheery Lynn to win an eBosser - but we will have another contest in July, so be sure to watch for that.  This is also the last week that our challenges will be found on the separate challenge blog - starting June 30th, you will find them starting on Sundays on the inspiration blog.  This week the challenge is Wonderful Weddings. Show us your best creation using CLD and you could win a $20 gift certificate!

Cheery Lynn Designs Dies

Wednesday, February 27, 2013

Medallion Flower and Butterflies

3:30 AM 10 Comments

Sorry for the delay on my post today, Mother Nature wreaked havoc on my internet service last night.  I love snow but I am ready for Spring.  So with that in mind, I created this fun butterfly card.

I began with a piece of blue card stock 5.5 inches square adding a a white panel and then another blue panel and finally a white panel to which I added texture using my Large Rectangle Stitcher Plate.  I added another blue panel and then a white panel embossed with my Flutter By's embossing plate.   To this panel I added two Butterfly In die cuts to create a frame. 


Now came the fun part, assembling my flower and medallion for the center.  Starting at the bottom, I layered, Sophie's Heart Mini in blue and French Pastry Tiny in white.  Next came the flower portion which was created with Daisy Strip, Darling Daisies in blue and finished with some spikes from Embellishments #1 in white.  I used my embossing tool and embossed a line down the center of each petal and then pinched them up for some dimension.  The final steps were the addition of two butterflies from the Small Exotic Butterflies #1 in blue and some Viva Decor Pearl Pen accents. 

Be sure to visit the Cheery Lynn Designs challenge blog for more inspiration and to join in on this week's Die Cut Flower challenge for a chance to win $20 to the store. 

Cheery Lynn Dies Used:

Wednesday, May 30, 2012

Cheery Lynn Designs Floral Basket and Card

3:30 AM 10 Comments

Well, as you can see I played with my Cheery Lynn Designs Build a Flower die set to decorate this basket that I created with my Scalloped Coved Rectangle Stackers dies.  I added texture to the basket with my Large Rectangle Stitcher Plate.  Using my Oval Stackers and Scalloped Oval Stackers I die cut the brown frame to which I added my  Lattice 2 die.  I added a white panel behind this which I also textured with my Stitcher plate.  Next came the flowers.  The large flowers on the left are made with the Build a Flower petals with stamen centers.  The flowers on the right are made with the flower base as well as stamens.  I added some Flourish Leaf Strips as well as leaves from the Dimensional Leaves Large 2 set. 


Here is another card where I have paired my flowers with the Spring Flower Burst Doily.  Using my Horizon Coved Rectangle Mega Doily dies, I created the panel behind the doily as well as the center panel behind the sentiment (cut with Scalloped Circle Little Stackers dies).  Finished size is 6" square.
Be sure to visit the Cheery Lynn Designs Challenge blog for more inspiration and to join the For the Grad challenge. You can enter for a chance to win a $20 coupon for shopping at the Cheery Lynn website.

Friday, December 23, 2011

All Occasion Card

4:08 AM 4 Comments
On my last post when I had made the Tussie Mussie, I really loved using the Wittle Weavers for weaving the base.  I knew this week I wanted to use the Wittle Weavers again, but this time I used them on my card background.


The creme and blue papers are woven together and then I used the Stitcher Plate to create the stitched look.


I love flowers so much and I never tire of creating them.  It is fun finding new ways to make them.
For the rolled up looking flower, I took the Wittle Wicker and cut strips of the blue and red papers.
Then I glued the strips together and wound them around a button to create the rolled flower.  The flower with the petals is made from our brand new Medium Rose.  The accordion flower is made with the leftover scraps I had from cutting out the ZIG ZAG RIC RAC.


Other dies I used were the Lace Edger and the Tropical Flourish.


The teddy bear is done on shrink film and is and adorable digital stamp from Whimsy Stamps called Teddy's house.  It is removable to use as a decoration/ornament etc.
That does it for my project today!  I truly look at it and smile.
I never tire of making things and I hope you never tire of the things I share.
My wishes to all you are to have a wonderful holiday, enjoy your family and loved ones as we all celebrate this beautiful season.
Merry Christmas everyone!
This has been Jeannie from The Polka Cabana with today's post.

Remember we have a new challenge up.  Please join us for the TIS THE SEASON challenge.
The winner will be chosen based on merit by Cheery Lynn Designs.  They will receive a $20 coupon for shopping at the Cheery Lynn website.  The challenge will end on Sunday night at 22:00 Eastern time.
Click HERE for all the details.

Friday, August 19, 2011

Cheery Lynn Designs & Core'dinations go Native!

3:34 AM 20 Comments
Today I am paying tribute to my heritage. I am Native American and part of the Navajo tribe.
I was inspired to focus on some Navajo designs for today's post.
Here are 2 of my favorite images I found that my cards today are based off of.


Where do I begin to tell you what Core'dinations paper and Cheery Lynn Designs dies I used?


For my paper I used paper from the Core'dinations Whitewash and Vintage Collections.


As for dies, I used the Fanciful Flourish as a mask for the card base and sprayed some Turquoise Tattered Angels Glimmer Mist to create that beautiful background. I then took as assortment of dies and cut and or embossed all the detail for my "pottery" vase. The pottery base was embossed with the Burble/Cheesecloth Embossing Plate. I used the following dies, listed in order from the bottom of the vase and working my way up. Japanese Lace, Wittle Wicker, Border Carnivale, Ribbon Eyelet w/Piercing, Pennant, Japanese Lace, Border Carnivale, Daisy Chain and Heart Chain.


For my lettering, I used the Optimistic 1/2" dies. Ya'at'eeh means HELLO in Navajo.


I did a lot of sanding on these cards, I mean a lot. Core'dinations has a wonderful tool called the Sand It Gadget which makes sanding pretty painless. I do want to pass a top secret Polka tip onto you however. If you have narrow pieces or small pieces like I do in today's cards, lie the Core'dinations paper "sanding needed" side facing up on a piece of fine sandpaper. You can see in my photo below I have all my pieces on the sandpaper, the Sand It block is pictured towards the back. By placing your pieces on top of sandpaper and then using the Sand It Gadget, your pieces will stay put! The sandpaper underneath works like velcro not allowing the paper to move while you sand. You still want to hold the pieces in place while sanding, but trust me this works like magic!


For this card I mostly used paper from the Core'dinations Black Magic Collection.


I cut paper in 4 different colors with the Dottie's Ric-Rac die. I cut pieces from both sides of the paper and then intertwined them together.


The yellow frame is the Japanese Frame. I also used the Stitcher plate on the black background to give it texture.


I used tons of extras on this to make it special. I used twine, hot fix silver studs, jewelry findings, glass beads, silver charms ribbon and silver string.


What do you think? So colorful, don't you agree?


I hope you enjoyed seeing my cards today!


I might have to mail these to my Grandma...look at her, isn't she adorable?

Now be sure to hop on over to the Core'dinations blog and see what their DT has made with the Cheery Lynn Designs dies....
Have a Fabulous Friday and a great weekend.

Monday, July 18, 2011

Your Biggest Fan

3:30 AM 4 Comments
Good Monday Morning blog readers!! It's Tanisha here with a colorful card that I created using Cheery Lynn Design dies and one of the new CHA releases from Bella Blvd.

I combined the Folding Fan, for a play on words, with the Scalloped Diamonds border and a Stitcher Plate, for texture on this card.

I really wanted the fan to stand out, so I cut it from cardstock and black paper and then layered them together. I love a little bling (what girl doesn't), so I decorated the scalloped border with gems and then added stitching around the perimeter of the card.

You can see the texture created with the stitcher plate here.

Tanisha

Friday, July 8, 2011

Trio of Cards

12:30 AM 4 Comments
Every once in awhile I do my projects for a blog post and I want to explode with excitement because I am so happy with how my things turned out!
This is one of those times.

I was challenged to use dies I have not used in awhile..well I decided to use a die I have never used before! The die is called: FISH.

Here is phase 1 of my card: I could have stopped here, what do you think?

Initially I was going to have fish strung across the front, but it covered up the beautiful abstract background I had just made.

So I settled for enhancing and complimenting the background instead.

Using wire and glass beads, I kept with the ROYGBIV color scheme and created this mini masterpiece.

I just love how this turned out!

I had all these ideas for this simple die, so I kept going.

I have a blast looking up different quotes for cards I have in mind.

This one I came upon quite by accident. I was having my 16yo help look up fish quotes and I did not like any he was finding, so I told him never mind and let him know he was "Off the hook," and well I laughed out loud, because I thought hey..I can make a card with that!

Remember on my 1st card I said I had the idea to string the fish along the front?

Well, this is what I meant. See how they would have covered the whole background of the 1st card?

This would be a fun card to make for a friend having a bad day.

Nice bright colors to cheer someone up and this is what the inside says:

Amazingly, I only used a couple of dies with these cards. The FISH die is a fun die as it has that outline that can stand alone. There are many other dies like this. To see them all, here is the link, they are called LAYERING CHARMS:
I hope I was able to show you how fun this simple die can be, go and check out the other shapes in this family of dies.

This has been Jeannie with THE POLKA CABANA with today's cards.

Dies used on today's cards:


Wednesday, April 20, 2011

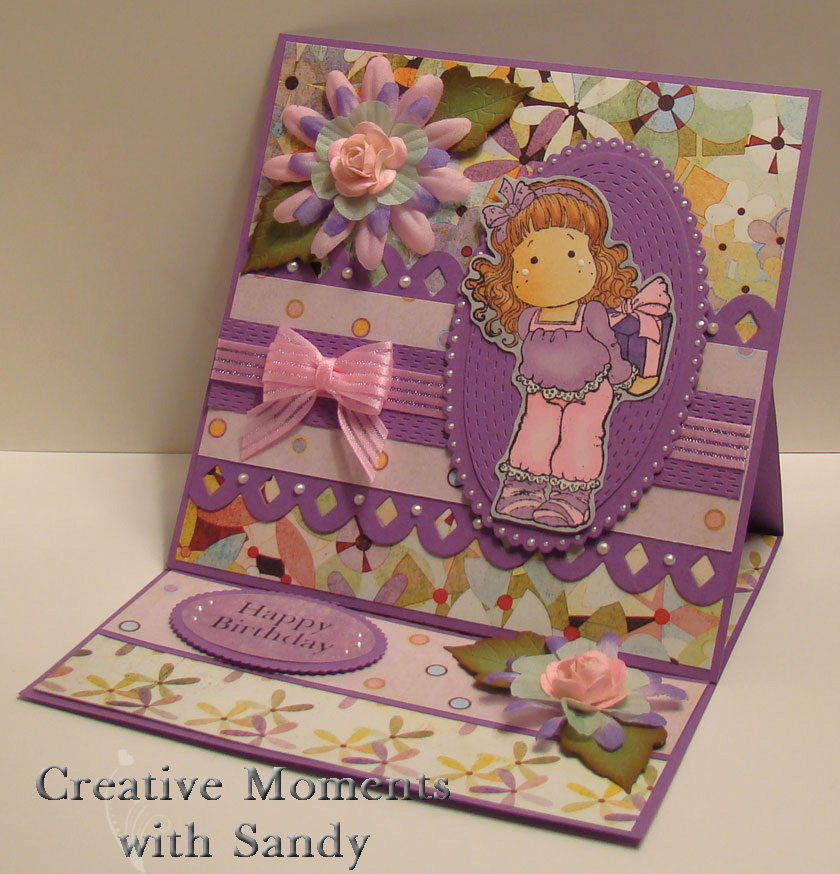
Happy Birthday Easel card

3:30 AM 4 Comments

Here is a cute birthday easel card I made for a friend using Magnolia's Tilda.  I stamped her onto Cryogen white paper with Memento Tuxedo black ink, colored her with Copics and trimmed her out. I used my Cheery Lynn Scallop Oval Stacker Nesting die and Oval Stacker Nesting die for the panels behind Tilda.  I used my Cheery Lynn Oval Stitcher Plate to add some texture to the plain oval behind Tilda. For the horizontal piece on the front of the card, I used my Cheery Lynn Frills and Hearts border die.

For the sentiment panels, I used my coordinating Cheery Lynn Scalloped Oval and Oval Little Stackers dies. I die cut the fabulous leaves using my Cheery Lynn Dimensional Leaves small #2. I added some Distress ink to the edges of the leaves for some interest. 

Once I got the card done, I realized it would not fit into an envelope so I had to create a box for the card. To decorate the front, I again used my Cheery Lynn Scallop Oval Stacker Nesting die and Oval Stacker Nesting die  All sentiments are computer generated.  The wonderful DP is from Basic Grey's Kioshi collection.  Finished size is 6" square.

Copyright Statement


All content, including designs, pictures and words are the exclusive property of the author of each blog post. Information shared here is for inspiration only and may not be copied for publication, competition or profit. Thank you for your cooperation.

SOCIAL MEDIA 2


Follow Us @jointhemakersmovement


All content, including designs, pictures and words are the exclusive property of the author of each blog post.
Information shared here is for inspiration only and may not be copied for publication, competition or profit. Thank you for your cooperation.
