Saturday, December 31, 2011

Happy New Year!!

2:30 AM 6 Comments

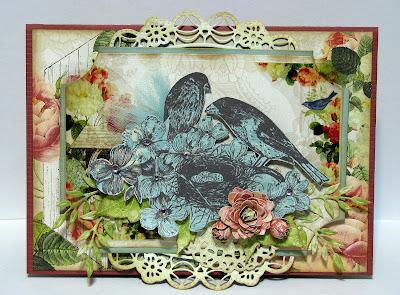
Hello! Jodi with a card featuring the Classic Coved Rectangle, Silver Stacker Coved Rectangle and the Polynesian Sails Oval.

I cut the Oval doily in half and positioned it just around the top and bottom of the Coved Rectangle diecut. The large flower is two layers of Cuties #2. By embossing and scrunching 3 layers of the Miniature Rose, I created the little flower buds. The foliage consists of Olive Branches and leaves from Small Leaves #2. The gorgeous mini doily under the flowers comes from the center of the Polynesian Sails Doily die. Two beautiful dies for the money! A definate bargin!!


You still have a little time to enter this weeks challenge for your chance to win one of the gift certificates!
I want to take this time to thank you so much for your wonderful comments and never-ending support! Wishing you a safe, and happy 2012!
Friday, December 30, 2011

Celebrate Dad

3:30 AM 5 Comments
Hello! Jodi here today sharing a masculine card focusing on mixing basic shapes.


I started by cutting my stamped image with the Classic Square Silver Stacker and layering it on the Scalloped Square Nesting Stacker. I then chose to layer atop the Classic French Flair Silver Stacker and Scalloped French Flair Nesting Stacker Die. The Border Carnivale is perfect for dressing up masculine cards.


The swag consists of several layers of Pine Branches and Olive Branches, topped with leaves from the Small Leaves #2 set.
Check out this weeks challenge for your chance to win a $20 gift certificate from Cheery Lynn Designs. We also have a wonderful sponsor, Mo Manning from Mo's Digital Pencil , giving away three $5 shop credits to her store. Check out the details here.

Thursday, December 29, 2011

Joint venture with Whimsy Stamps - Kianel

3:45 AM 6 Comments
Hello dear Cheery Lynn Designs lovers!
Kianel here with you today and i really hope that you had a good christmas time!
I am here today to show you a card i made for the joint venture Cheery Lynn is having with Whimsy stamps. The theme was winter and frost so i used the adorable "winter faerie" stamp from Whimsy stamps and grabbed my Cheery Lynn designs dies to make this card.
 Here i used a different base that is called coved rectangle which really makes me think of a book. and take a look at that amazing flower border which is absolutely perfect when combined with small pearls. To make my background i used white paer and distress inks that i sprayed with Creative Inspirations paints to give some shimmer. I die cut the snow flake dies on a paper and used the remnant part as a mask. The dies themselves i used as embellishments all over the card, covering them with shimmer paint. Under the sentiment, you can see a remnat part of the XL heartland of America die.
List of the dies i used:

You can find my DT mates' creations in the last Whimsy stamps' magazine pages 39-45 by clicking here.
Don't forget our weekly challenge going on right now with a chance to win a 20$ shopping spree available at the store!
  Weekly Challenge
I wish you all the best for the new year, happy scrapping and see you next year!
Love from France, Kianel.

Wednesday, December 28, 2011

Bathing Beauties Tags

6:30 AM 4 Comments

 Hi again everyone.  Well this week is the second instalment of my Bathing Beauties series.  I have made three tags that I hope you enjoy.  I will just be quick in this blog as there are are a few photos that I would like to share with you.


For the first tag I started off with the French Pastry Doily.  From there I used the Olive Branches and added a Miniature Rose.  For the bottom flower I used the small insert doilys from the Heartland America Doily Large and the Heartland America Doily Extra Large, and added the Stacker Flower Leaves.  I quite like the way this flower came out.


For the second tag I used Judy's Blooms and the Miniature Rose for the flowers and again the Olive Branch for the leaves.  All the flowers and leaves were in the tags were inked and stickled!


I know they all seem the same but it is a series and also since I am new this is pretty much all my dies!!!  So please forgive me until I build up my "stash" and you will see some fantastic projects coming your way!


For the third tag again the Miniature Roses and Olive Branch.  I like how all the tags are different but all the same at the same time, I hope that sounds right!  The Pair of Ferns adds that finishing touch and presto the tags are all done.


For all the tags I used some fringing that was white to start of with.  I inked over the top to achieve the brown stained look and then added the beads below.  From somewhere in my stash are the beads at the top of the tags and it all came together.


I hope you like this second instalment and look forward to presenting the last in this series.  I also hope this has inspired you to have a go with these fantastic dies.  They are so easy to use and give such stunning results.
If you would like to enter the challenge to win a $20 voucher, come on over to the Cheery Lynn Designs blog and read all about it.

Thanks for stoping by Celeste


Tuesday, December 27, 2011

Large Oval Vintage Tag

3:30 AM 4 Comments
Tag measures 7 X 9 inches

Christmas is over for another year, and I do hope you all had a wonderful time with loved ones.  Now, New Years is just around the corner....

Today, I want to show you a vintage, oval tag I created for Cheery Lynn Designs. This oval shaped tag could easily be transformed into a photo/memory booklet, or made to hang on a wall, showing off precious photographs. 

The base for the tag was cut from the XL-8 Oval Scalloped Stacker Series, and my actual photograph was cut from the L-7 Classic Oval Silver Series, and then framed in the most intricately beautiful, DL136 Japanese Garden Lace Oval Frame.  The largest backing piece was embossed using the PS107 Stitcher Plate, then lightly sanded for that distressed look, using Core-dinations cardstock.
To decorate, I used the inside greenery from the Japanese Garden Lace Oval Frame, and teamed it with the B147 OliveBranches.  The Olive Branches were cut into various sizes and weaved in and amongst the roses, and upwards to frame the photograph. 

I formed three B155 Large Roses, curling the petals up tightly and adhering for the centre and then built the petals little by little around the centre of the rose.  Some of the petals were curled inwards, and others outwards.  There are certainly ‘many’ ways to create roses, from these beautiful dies, and of course are available in three various sizes.  

To complete the tag, I used Creative Inspirations paint to highlight different areas, especially the roses, as well as Tim Holtz distress inks on edges.  Prima porcelain roses and pearls were adhered, and some of my vintage guipure lace and silk ribbon which I hand-dyed in variegated colours to match, were used to complete my project.
Mike has completed a great video, do check it out on the Cheery Lynn Designs Website“Detailed Dies CuttingWorkshop”, well worth viewing, especially when dealing with the beautiful and intricate detail of the dies available through Cheery Lynn Designs... And do not forget this weeks challenge also, which can be found by clicking “here” – the theme this week is ‘Celebrate’.  Just remember, you can create anything you wish, but you have to use at least one Cheery Lynn Designs die in your creation, though more is welcomed for your chance to win a $20 voucher, and also Mo's Digital Pencil has 3 vouchers for other winners!

I want to take this opportunity to wish everyone a Happy New Years, may 2012 bring much joy, lots of laughter, and good health to all... till next year ...

Dies Used:


Monday, December 26, 2011

Cheery Lynn Designs Challenge 8 - Celebrate

3:30 AM 6 Comments
This week our challenge at Cheery Lynn Designs is

Celebrate

Here are the rules:
  • You MUST follow the theme and use at least one Cheery Lynn Designs die, of course, we would love to see more than one. 
  • You MUST add a link to your blog post in the InLinkz at the end of this post; no back posting, only new projects are allowed
  • You MUST link to our blog in your post
The winner will be chosen based on merit by Cheery Lynn Designs.  They will receive a $20 coupon for shopping at the Cheery Lynn website.  The challenge will end on Sunday night at 22:00 Eastern time.

In addition we have a guest sponsor this week. Mo Manning from Mo's Digital Pencil is giving away three $5 shop credits to her store.  Winner's will be chosen by Random.org.


For my card I began with Cheery Lynn Designs new Daisy Lace Frame, this is so beautiful, it is almost a shame to cover it up.  I added a Flower Chain Border down the edge.  I chose Mo's End of Summer image for my card, I thought it worked perfectly will all the flowers in the dies.  The sentiment is from Lily of the Valley; I die cut it out with my Scallop Window Stacker.  I added some yellow Viva Decor Pearl pen accents to the flowers and I was done.  Finished size is 5 x 7 inches.

Remember, your MUST use a Cheery Lynn Designs die to enter this challenge.

'Tis the Season challenge winner

3:25 AM 5 Comments
The votes are in and the 'Tis the Season Challenge winner of a $20 shopping spree to Cheery Lynn Designs is


And the winner of the $10 voucher to Di's Digi Downloads is 

Random Integer Generator

Here are your random numbers:
5 
Timestamp: 2011-12-26 06:29:03 UTC
That means #5 Holly is the winner.
 
Congratulations, ladies.  Please contact me for your winning prize   And thank you to everyone who joined in on the challenge.  We hope to see you again.

Sunday, December 25, 2011

Happiest Christmas Ever

3:30 AM 3 Comments
All of us at Cheery Lynn Designs want to wish everyone a very Merry Christmas and a Happy New Year.  We thank you for all your support this past year.  It has been a wonderful time and we look forward to even more amazing dies from Cheery Lynn Designs in 2012 and fabulous creations from our talented design team.  


I am filling in again for Marley this week, we wish her a speedy recovery.  For my card today, I started with this great paper from the Basic Grey Wassail collection.  I created a card base of 5.75 inches and then using my Scalloped Rectangle Card Maker dies, I created the a couple of panels.  I added  Border Carnivale and a French Pastry Doily and then went in search of something to put in the middle.  This circle sentiment from Just Rite Stampers fit perfectly.  I die cut it out with my Little Stacker Circle Nesting die.  Next came the flowers created from Miniature Rose and Medium Rose dies, Holly Lace Flourish and Leaf.  The final step was to add some Viva Decor Pearl Pen accents.

Today is the last day to enter this week's 'Tis the Season challenge.  If you are in the crafting mood, you still have a bit of time.

Saturday, December 24, 2011

Vintage Angel

3:30 AM 6 Comments
Happy Holidays! Jodi here with a couple fun ideas for you! First, I want to share an ornament I created. I wanted an old, vintage looking angel for my tree. I remember seeing some made from doilies and decided to try my own.

Using pages from an old book, I cut the body from English Tea Party Doily, and the arms are the small center doily from Polynesian Sails Oval. After gluing them in cone shapes and attaching together, I created the wings by scrunching the center of the Italian Flourish doily.
Once the angel was complete, I embellished her with the Miniature Rose and leaves from Small Leaves #2.

I had so much fun putting my angel together that I decided to make a larger version with the daycare kids. They love when I get the machine out and let them cut out their own dies! For their angel, we used the Mega Tea Party doily for the body. The arms are the Italian Flourish Doily. The largest die from Scalloped Window Stackers became the head. I think the parents enjoyed seeing the kids’ projects as much as the kids enjoyed making them!

Here is a picture of my angel next to one of theirs so you get an idea of the difference in size of the regular dies compared to the mega doily.


I also created a card for you!

Rather than cut out the snowflake, I opted to emboss the die Snowflake #2 unto Coredinations cardstock, placing the die slightly off the edge of the paper. I sanded the embossed details of the die for a fun texture. Once the snowflake was prepared to my liking, I lined up my die from Classic Circle Silver Stacker and cut out a circle containing the snowflake, and layered on top of the Circle Scallop Nesting Die. In the middle of the card lies the Classic Coved Rectangle Silver Stacker, layered with the Classic Coved Rectangle Nesting Die, using Lace Light Deco Border to dress up the bottom. Lastly the Classic French Flair Silver Stacker layered on the Scalloped French Flair Nesting Die creating the card shape.

There is still time to enter this weeks challenge for your chance to win one of the lovely prizes!

Thank you for taking time to stop by on this busy day!
Wishing you a wonderful weekend filled with lots of love and laughter!

Friday, December 23, 2011

All Occasion Card

4:08 AM 4 Comments
On my last post when I had made the Tussie Mussie, I really loved using the Wittle Weavers for weaving the base.  I knew this week I wanted to use the Wittle Weavers again, but this time I used them on my card background.


The creme and blue papers are woven together and then I used the Stitcher Plate to create the stitched look.


I love flowers so much and I never tire of creating them.  It is fun finding new ways to make them.
For the rolled up looking flower, I took the Wittle Wicker and cut strips of the blue and red papers.
Then I glued the strips together and wound them around a button to create the rolled flower.  The flower with the petals is made from our brand new Medium Rose.  The accordion flower is made with the leftover scraps I had from cutting out the ZIG ZAG RIC RAC.


Other dies I used were the Lace Edger and the Tropical Flourish.


The teddy bear is done on shrink film and is and adorable digital stamp from Whimsy Stamps called Teddy's house.  It is removable to use as a decoration/ornament etc.
That does it for my project today!  I truly look at it and smile.
I never tire of making things and I hope you never tire of the things I share.
My wishes to all you are to have a wonderful holiday, enjoy your family and loved ones as we all celebrate this beautiful season.
Merry Christmas everyone!
This has been Jeannie from The Polka Cabana with today's post.

Remember we have a new challenge up.  Please join us for the TIS THE SEASON challenge.
The winner will be chosen based on merit by Cheery Lynn Designs.  They will receive a $20 coupon for shopping at the Cheery Lynn website.  The challenge will end on Sunday night at 22:00 Eastern time.
Click HERE for all the details.

Thursday, December 22, 2011

Cards - Kianel

3:45 AM 6 Comments
Hello dear Cheery Lynn designs lovers!
Kianel here with you showing you  2 cards i made lately using my wonderful dies. I wanted to show you that not only can you combine any flower die you have with premade flowers but also make your own flowers with terrific rose dies from Cheery Lynn designs. Either way, the result is just stunning! Just check all the flowers that Cheery Lynn designs carries in the floral shoppe, endless possibilities!!!

Here is a card with the combination made for a birthday and using the colors of the season:
 I used the english tea party doily as a base for my stamp. All dies have been covered with Creative Inspirations paints. Under the white roses you can see the little flower of the cherry blossoms and the big one is used under the circle sentiment.
 List of the dies i used on this card:
And another one showing you handmade flowers with the help of the fabulous small, medium and large rose dies.
 here is a close up of the flowers i made out of dies. Under the flowers, i used pieces of the inside part of the nautical wheeler and made fans out of them.
 list of the dies used:

Well, just don't forget our weekly challenge happening here for an opportunity to win a 20$ shopping spree available at the store.
Have a nice week and take care, love from France, Kianel.

Wednesday, December 21, 2011

Bathing Beauties

3:30 AM 4 Comments
Hello everyone, it's Celeste here again to share with you my latest project.
It is the first in a series of three projects that I have been working on.  I hope you like it!


This first project is an 8x8 layout.  I first found this paper and it gave me the idea to use the French Flair-Classic LG Stackers in addition with using the French Flair-Classic - Silver Stackers .  I nestled  these two together and then popped my picture in the middle, whilst surrounding the picture with the dies.


were all cut out, inked, stickled  and put under to create the greenery.


Up on the top left hand corner I made two small flowers using the  Miniature Rose die combined with the Stacker Flower #1 Leaf.  These too were inked and stickled.


Finally I added a Small Dragonfly with Angel Wings to the top right hand corner.  I was originally going to leave this space alone, but when I looked more closely it felt like it needed something.  After playing around I found the dragonfly and I think it looks perfect!

Thanks for joining me today and I hope you come back next Wednesday to see the next installment of my Bathing Beauties series.

Don't forget to check out this week's challenge.  You could be in the running for a $20 voucher just by producing a piece of work using these amazing dies.

Thanks for stopping by Celeste

Tuesday, December 20, 2011

Flower Gift Box and Gift Tag

3:30 AM 6 Comments
This week’s creation is a gift box and tag, decorated using an array of Cheery Lynn Designs flowers, foliage and borders. The box itself measures 7 inch square, so a great size for an arrangement of flowers...and perfect to host a pile of chocolates inside.
For the centre flower, I used ‘all’ of the stacker flowers (each stacker flower was cut twice – all up 10 layers) and built lots of dimension through fluffing the petals up.  The centre was created using the Large and Medium Rose.  All in all, to build the larger flowers in this arrangement, I did not stick to one die; each flower has mixed dies to make one flower.  

I totally adore the little tiny daisy like flowers made from the Darling Daisies die. These die cut flowers can be built up into many different sized flowers, just by combining the different sizes.
I used “Dazzling Diamonds” glimmer mist over my whole project, which left the most glorious shimmer to the whole project – including the gift tag.  This can be seen more so if you enlarge the flowers.  Dazzling Diamonds is such a pretty glimmer mist to use on 'any' project, as it does not over-power in colour - just adds a shimmer affect.
The new release French Flair DoilyStacker was used as a base of the arranagement, along with the Large SunflowerDoily.
The borders used around outside of the box are the Anastasia and Border Carnival dies. Ribbon was used to finish, and a bow added.
The challenge theme for this week is “Tis the Season”, you can view all the challenge details by clicking “Here”... and may even win the $20 voucher, and this week there is also a guest sponsor "Di's Digi Downloads" who is offering a $10 store voucher as well.  I am looking forwards to seeing the entries...
And before I sign off for the week, I want to wish all the Cheery Lynn Designs customers and fans, a "Merry Christmas"... and may 2012 be a healthy, prosperous and creative year 
for all.
Till next week...

Dies Used:

Copyright Statement


All content, including designs, pictures and words are the exclusive property of the author of each blog post. Information shared here is for inspiration only and may not be copied for publication, competition or profit. Thank you for your cooperation.

SOCIAL MEDIA 2


Follow Us @jointhemakersmovement


All content, including designs, pictures and words are the exclusive property of the author of each blog post.
Information shared here is for inspiration only and may not be copied for publication, competition or profit. Thank you for your cooperation.