Wednesday, August 31, 2016

Blessings Harvest Greeting Card by Ginny Nemchak

3:00 AM 0 Comments

Hey there Paper Peeps! Well we are starting to have a few cooler days and a bit of crispness to the air. Fall is just around the corner and it's one of my favorite times a year. Beautiful Fall wreaths full of richly colored leaves are an iconic seasonal decoration and is the inspiration for this card.
I started with a card base in the A2 size cut from chocolaty cardstock. I knew the leaves would create a lot of contrast and texture so I kept the background papers fairly neutral.
 I used the Fall Leaves die to create a nice pile of leaves to assemble a generously filled in circle.  Inks and Stickles add detail to the leaves. This Blessings sentiment block is a nice contrast to the dark background.
I layered the wreath on to a French Pastry die cut from crisp white cardstock. An additional smaller French Pastry Tiny Doily die is centered over the wreath and given dimension  with chipboard spacers behind. It's topped off with a metal rimmed mailing tag , wooden clothespin and beautiful bow of hand dyed silk.
Bending and shaping the individual leaves before securing gave the wreath a lovely full and dimensional look.
~Cheery Lynn Dies Used~
 
Okay that's all for me. Wishing all of you a happy and productive day with lots of time to be creative : ) G


Tuesday, August 30, 2016

Sweet Love Card by Amy Voorthuis

3:30 AM 2 Comments
Good morning lovelies.
All back in the scrapping game again....as came home a little sick from my vacation. So I haven't been making anything for a while but it's to hard to resist those beautiful Cheery Lynn Design dies. This time I went for a simple card, in my perspective anyway. I used just plain cream card stock and for the dies I used the pretty "Vintage Romance"collection from Maja Design. 

Sweet Love: 
When I saw a cute card {a shaker card} somewhere online, I thought how "fun" that would be to make myself. I made one like ages ago when I first began to make cards and that is probably nine years ago.....oh wow I am getting old. This time I went with the B675 - Sweetheart Candy hearts to fill up my shaker part. 

Cheery Lynn Design dies used: 

Thank you so much for visiting the blog today!
I hope you enjoyed my post and I have inspired you to use your Cheery Lynn Designs dies. If you love the Cheery Lynn Designs dies I used, you could always enter our bi-weekly challenge to win a $20 shopping spree.
This time it's challenge #236 "Doilies Theme" I can't wait to see your work! I always enjoy look at your works have a great week everyone.

Monday, August 29, 2016

Best Wishes by Eva Dobilas

3:30 AM 0 Comments

Hi there, this is Eva ad I am here with a Best Wishes card today.  To start out my card I created a card base by cutting two of the largest Square Scalloped LG Silver Stackers dies out of cream card stock.  Next I die cut a smaller Square Scalloped LG Silver Stackers out of kraft card stock.  Next I die cut a Mexican Tile Pattern Die out of light blue card stock and added it to the kraft scalloped square.  Next I die cut a smaller a Square Scalloped LG Silver Stackers out of cream card stock and than I die cut a Best Wishes Sentiment Square Die out of kraft card stock and added it on top of the cream scalloped square and added it to the Mexican Tile die.

Finally I die cut a Sakura Flower Die out of water color card stock and painted it with water color card stock.  I cut it into pieces to arrange it the way I felt it fit the card.


Hope you like this little card and here is the list of the dies I used to create this card with:


Thanks for stopping by and hope to see your creations in our newest challenge!

Hugs,
Eva


Sunday, August 28, 2016

Ombre Hello Card by Gloria

3:30 AM 2 Comments
Hello and good morning Cheery Lynn Fans! My name is Gloria Stengel from Scraps of Life Blog and I am back again with my last guest post. (It is a sad day, indeed!)


I decided to give you a taste of Clean and Simple today, which is a newer style that I have been exploring lately. I am in love with the look of ombre, so I am giving you a "double ombre" card!

I used four shades of distress ink to create the blue panel. Once all the ink was blended well, I sprinkled on some water to create droplets. The blue is just stunning! To contrast, I used four shades of orange distress ink to make another ombre panel from which to cut the feathers.


I used the Chicken Wire Die to cut the chicken wire shape from white cardstock. I sniped some bits of the frame away with scissors to get this pattern. I cut the feathers twice from the orange ombre panel that I created. I used foam adhesive to stack the Feathers in the upper left corner. I tied on a loopy bow from black twine.


I cut the Hello die from a scrap of black cardstock and glued it to the card. I tucked two feathers next to the sentiment.


I love the stunning blue and orange combination, grounded by black and white! The beauty of this type of card is that you can sit in front of the TV and color ombre panels all day long, and then die cut Cheery Lynn shapes out of the panels all night long!

Thanks for looking! And a huge thank you to Cheery Lynn Designs for having me as the August Guest Designer. I had an absolute blast! 

Remember, the winner of the current challenge will be chosen randomly. They will receive $20 towards shopping at the Cheery Lynn website. The challenge will end on Wednesday afternoon August 31st at 15:00 Eastern time. We will also showcase the Top 3 picks from our Design Team.


~ Gloria Stengel: Scraps of Life

Cheery Lynn Dies Used:

Happy New Year by Jenny Alia

3:29 AM 1 Comments

Hello Cheery Lynn fans, it's Jenny here hosting the blog today.  I created a New Year's card using only three dies.  The new Happy New Year die makes such a graphic, bold statement on projects that I didn't need to add a lot to this card.  I began by cutting the Happy New Year die in a silver metallic paper and then again in black.  I offset the two die cuts and glued them together, sandwiching a little bit of blue card stock under the hats.  


Then I created the background by taking an A2 sized top fold card and adding a layer of black, then a layer of blue and then a white layer cut with the Lattice Circle Frame background die.  After the layers were assembled I played around with the Pierced Star dies, cutting the centers out using smaller star dies from the set. I added two rhinestones last after popping the sentiment up with foam adhesive for dimension.  

Cheery Lynn Dies

Thanks for stopping by the blog today!  Make sure to join in our current Doilies challenge for a chance to win a $20 gift certificate to Cheery Lynn Designs.

Saturday, August 27, 2016

Birthday Wishes Card with Bonnie Garby

9:04 AM 3 Comments
Hi friends.  Bonnie from Make Time to Craft here today for Jenny.  Today I'm sharing a pretty pink and brown birthday card created with some of my favorite Cheery Lynn Designs dies.
This beautiful Quadrafoil Square Doily is up there in my top all time favorites list.  Isn't it gorgeous?!

You know I'm also in love with making beautiful handmade roses and today I used the wonderful Medium Tea Rose die.  I cut the layers in brown and tan and I inked the tan layer with an old script background stamp for texture and also inked the edges.  I then shaped the layers and assembled.
Cheery Lynn Dies used:
My bow was created with Turftan Brown Delicate Stitched Satin from the August Ribbon Club Assortment from Really Reasonable Ribbon.  The center was tied with Pink Burlap String.
Thanks so much for stopping by today. Don't forget, we have a great Doilies themed challenge going on. We'd love to have you enter for a chance to win a $20 gift certificate to Cheery Lynn Designs.

~ Bonnie ~

Friday, August 26, 2016

Happy Turkey Day by Julie Lavalette

3:30 AM 1 Comments

Hi everyone, it's JULIE here today and I am excited to be sharing another card with you using dies from our latest release. This card measures 8" X 8" to give you an idea of the size.


For my Autumn/Fall foliage I cut out several leaves in White cardstock. I used Distress Sprays on them to get all the different shades. I layered onto corrugated card that had been sprinkled with some Frantage.


My Sunflowers were coloured with Distress inks and micro beads added to the centres.


My hazelnuts I double layered the base area and added a crackle glaze onto the nut area and once dry added a little Distress ink to highlight the cracks.


My berries were also coloured with Distress inks and two layers of Glossy Accents were added letting it dry in between.


I added my doily to the centre and arranged all my foliage and flowers gluing everything in place and finishing with my cute Turkey.

Thanks so much for stopping by today to see my card. I hope you feel inspired to make a card with  the Autumn/Fall Leaves die and why not incorporate it into our Current Challenge - Doilies Theme. Love to have you join in the fun with a chance of winning a $20 shopping spree here at Cheery Lynn Designs.

Cheery Lynn Dies Used:

Happy Crafting, 

Julie x

Thursday, August 25, 2016

25th Anniversary by Debbie Brownmiller

3:30 AM 0 Comments
Hi there. Glad to see you here . It's Debbie from Debbie's Time Out with you today. There was a die set just release by Cheery Lynn Designs with the Christmas release which I have featured today. It is the Christmas Bell 7 Piece Die Set . I always like to see if I can come up with ideas for using dies aimed for a certain season and make it work for something totally different so it is more versatile. So I took these Christmas bells and used them for this 25th anniversary card.


For this card I used purple and white for my base and then popped and layered the  Historic Barcelona Square Boutique Stackers Frame  onto it. I really think the design in this frame is so elegant for a anniversary card.


Just look at all that beautiful detail in these bells and bow. I cut but didn't pop the pieces out as I wanted more of a embossed look. For another look I could have popped out the pieces and layered another color behind the bells.


Here I have cut the Cherry Blossom Branch Die  in silver to match the bells and 25th and popped it up.


The 25th is cut from the Delicate Lace Script and layered onto the smallest of the Historic Barcelona Square Boutique Stackers Frame . This Delicate Lace Script comes with two dies. One with all the upper case letters and the other die with the lower case letters and numbers. These numbers were the perfect style for this anniversary card.

That is it for this time but I would like to invite you to join the CLD bi-weekly challenge
@ http://cheerylynndesigns.blogspot.ca/search/label/challenge for your chance to win a $20.00 store credit. I always look forward to seeing your creations.

I thank you for visiting the blog today and for the comments you leave. I enjoy hearing what you have to say. Have a wonderful crafty day.
                                                Debbie
Dies Used
 Historic Barcelona Square Boutique Stackers Frame 3 Piece Die Set - DL288
Christmas Bell 7 Piece Die Set - B846
Cherry Blossom Branch Die - B775
Delicate Lace Script 2 Piece Die Set - FS171

Wednesday, August 24, 2016

A Friend is Someone Who Knows the Song in Your Heart with Bonnie Garby

9:13 AM 0 Comments
Hi friends.  Bonnie here today for Christina.  I'm sharing a card with a somewhat simple design today and using some of my flower stash.  I hope you'll forgive me that the colors in the rose are not an exact match to the rest of the paper.  They seemed much closer in color before the card was assembled....
I've been on a kick trying to use up some of my beautiful artist paper stash and the lovely light blue mulberry paper in the background of this card is another example. 

The gorgeous roses were made using the three sizes of rose die offered by Cheery Lynn Designs.  The roses are my absolute favorite flower dies.  I cut the petals in two different colors, inked the turquoise petals with an old script stamp for some texture and inked the edges.  I shaped the petal with a foam pad and stylus and the handle of an old paint brush and assembled.


Cheery Lynn Dies used:

The sentiment is a stamp from Quietfire Design and the bow is made with two colors of blue Delicate Stitched Satin Ribbon from Really Reasonable Ribbon. 
Thanks so much for stopping by today. Don't forget, we have a great Doilies themed challenge going on. We'd love to have you enter for a chance to win a $20 gift certificate to Cheery Lynn Designs.

~ Bonnie ~

Tuesday, August 23, 2016

Vampire with Lisa Blastick

3:30 AM 2 Comments

Hi, I'm sharing today with you a super fast clean and simple card using some the the new release from Cheery Lynn Designs. The "vampire" is adorable! It's not a spooky one, so it is great to use for children cards too. The sentiment is from the "witch's skirt". 


The "bat family" I used purple cardstock to match the patterned paper in the background. The "circle" was used to represent a large moon. The pierced holes on the circle gives it a little bit more characteristic.  Minutes to make! Enjoy! 


Cheery Lynn Designs Dies Used:

Thanks for stopping by today and be sure to check out this week's challenge for your chance to win $ from the Cheery Lynn Designs store!
Have a great day!
Hugs Lisa 

Monday, August 22, 2016

Shabby Chic Bells Christmas Greeting Card by Ginny

3:00 AM 2 Comments
Shabby Chic Bells Christmas Greeting Card Cheery Lynn Ginny Nemchak Polly's Paper Studio
Hey there Paper Peeps. Ginny here to share a softly colored and shabby inspired Christmas greeting card created with the fabulous Cheery Lynn Design dies.
Shabby Chic Bells Christmas Greeting Card Cheery Lynn Ginny Nemchak Polly's Paper Studio


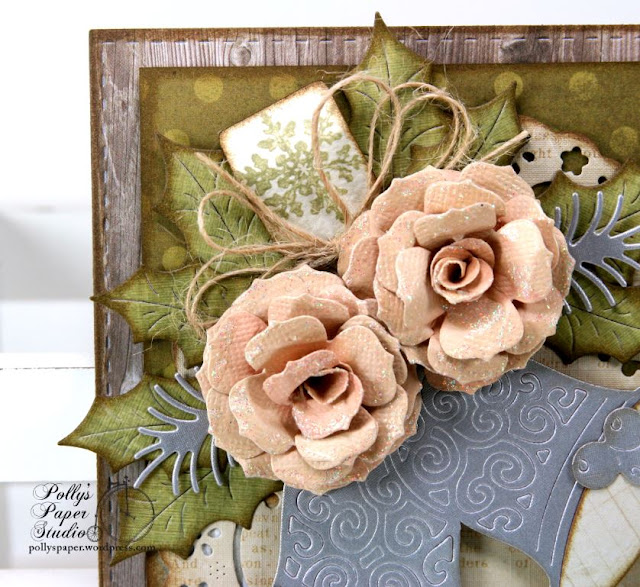
 I used the Rectangle Stitch and Cut die to create a background with the wood grain patterned paper then layered on a green and very subtly polka dotted pattern.  These gorgeous flowers were created with the Gardenia Strip and given a little inking and glitter to give them a frosty appearance.  The Christmas Bell was cut from silver cardstock with my very old cutting plate so I could keep the inside pieces from falling out. Once cut I added an additional piece of solid cardstock on the back to secure the pieces and trimmed it out. Once secure I was able add spacers behind the bells for dimension.  To fill out the arrangement I tucked in a sweet little snowflake stamped tag with twine.
Shabby Chic Bells Christmas Greeting Card Cheery Lynn Ginny Nemchak Polly's Paper Studio
The Swedish Spring Oval Frame is a lovely backdrop for the bells and an additional small flower arrangement. I couldn't resist adding a layer of shabby style grey striped paper.


~Cheery Lynn Design Supplies~

Okay that's all for me. Wishing all of you a happy and productive day with lots of time to be creative : ) G

Sunday, August 21, 2016

Halloween 8x8 Page Layout by Gloria

3:30 AM 3 Comments
Hello and good morning Cheery Lynn Fans! My name is Gloria Stengel from Scraps of Life Blog and I am back again with another guest post!

I had a great time creating handmade flowers for my project. I love making my own flowers because I can chose the colors and textures to match my project!
I adore the images in this paper collection, and I wanted to showcase all the purples and greens. I also wanted to participate in the current Cheery Lynn challenge (Challenge #236 - Doilies). I cut the doilies first, just to see how they would fit the 8 1/4" x 8 1/4" size I chose for my project. I cut the French Pastry Doily twice out of textured ivory cardstock. The doilies look better than the "real" doilies you buy in a pack! I love that I can cut them out of any thickness or color of paper!
I used the Small GardeniaMedium RoseFlourish Leaf Stripand Mini Fanciful Flourish dies to create my flower and leaf clusters. I cut all the elements from textured cardstock. I don't think I have ever made flowers from a cardstock with this much texture before! They turned out very well! There is a doily behind those flowers, but I sort of covered it up with the lovely foliage!
I love the detail on the leaves and vines! Perfect for my pumpkin-y page. I added a chipboard number, colored with black ink.   
Thanks for looking! I will be back on August 29th with a new project! 

Remember, the winner of the current challenge will be chosen randomly. They will receive $20 towards shopping at the Cheery Lynn website. The challenge will end on Wednesday afternoon August 31st at 15:00 Eastern time. We will also showcase the Top 3 picks from our Design Team.


~ Gloria Stengel: Scraps of Life

Cheery Lynn Dies Used:

Saturday, August 20, 2016

Thinking of You with Bonnie Garby

8:48 AM 1 Comments
Hi everyone.  Bonnie from Make Time to Craft here with you today to share a quick and easy card you can put together rather quickly with beautiful dies from Cheery Lynn Designs.
I had a beautiful piece of purple marbled momi paper in my stash and I didn't want to cover too much of it, so I went with a simple sentiment die and added the dragonfly to the bottom.
For the sentiment, I applied a piece of Stick It Adhesive to the back of a piece of white cardstock and then cut it out.  I peeled the backing off and adhered it to a piece of the momi paper.  Then I layered it on the lavender and dark purple cardstock and added a piece of torn mulberry paper to the bottom.

For the dragonfly, I applied a piece of Stick It Adhesive to a piece of white cardstock and then cut with the dragonfly die so the adhesive would be on the top.  I cut the dragonfly again in grey and cut the wings off.  I adhered the dragonfly body to the center and then I added some white glitter to the wings.

I built the center panel layers as you see and then I added a piece of Regal Purple Delicate Stitched Satin from Really Reasonable Ribbon behind the sentiment before I added it to the card front.  I then created a double-layer bow with the same ribbon for the top of the card.  Then adhere the dragonfly to the bottom and you are done.

Cheery Lynn Dies used:

Thanks so much for stopping by today. Don't forget, we have a great Doilies themed challenge going on. We'd love to have you enter for a chance to win a $20 gift certificate to Cheery Lynn Designs.

~ Bonnie ~

Friday, August 19, 2016

Cheery Lynn Designs August Blog Hop Winner!

10:30 AM 3 Comments
This is the second post of the day. Be sure to scroll down to see the beautiful project that Eva has shared with us today.

Thank you so much for hopping along with us this month on the Cheery Lynn Designs Blog Hop. We had so much fun and we hope you did too!! We'll be hopping on the 15th of each month, so be sure to mark your calendars and join us again next month.

Don't you just LOVE all of the fantastic flower dies that Cheery Lynn Designs offers??!!
I hope you loved all the samples showcased by the design team. Thanks so much for the wonderful feedback. I encourage you to hurry over to Cheery Lynn Designs NOW and pick up your favorite flower dies so you can begin working on your own paper flower stash!

Now, on to our winner who will receive a $20 gift certificate to Cheery Lynn Designs.

 Our randomly selected winner is:
Random Integer Generator
Here is your random number:
11
Samantha Cook

Congratulations Samantha. Please contact Judy by clicking here for your $20 shopping spree to Cheery Lynn Designs.  

Now if you didn't win, don't worry!! We will be 'hopping' each month so you'll have another chance to win soon! We hope you stop by and visit our blog often.

Copyright Statement


All content, including designs, pictures and words are the exclusive property of the author of each blog post. Information shared here is for inspiration only and may not be copied for publication, competition or profit. Thank you for your cooperation.

SOCIAL MEDIA 2


Follow Us @jointhemakersmovement


All content, including designs, pictures and words are the exclusive property of the author of each blog post.
Information shared here is for inspiration only and may not be copied for publication, competition or profit. Thank you for your cooperation.