Showing posts with label Rectangle Pierce and Cut Tool. Show all posts

Friday, July 13, 2018

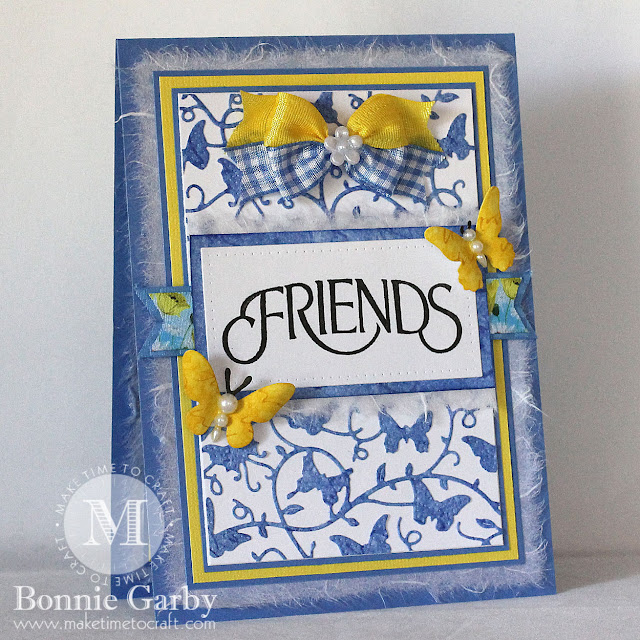
Friends Greeting Card with Bonnie Garby

3:30 AM 0 Comments
Hello die cut lovers!  Bonnie from Make Time to Craft here with you today sharing a pretty note card featuring some gorgeous dies from Cheery Lynn Designs.
My card today is my version of CAS.  Yes, I know there are lots of layers, but it's still a clean look.  This is as 'CAS' as it gets for me.  <smile>
I created the paper for the butterfly die cut with a couple shades of blue Distress Ink.  It gives it just a bit of added interest.  The background butterfly and vine die cut is actually a border die.  It's a long thin border and it worked perfectly for this card when I cut it in half and stacked it with the sentiment in the center.  It's always good when you can find an alternate use for a die.  It makes it worth twice as much!


My card was topped off with a pretty bi-color bow created on my Bow-it-All V3.0 Tool with ribbon from the July Ribbon Club Assortment from Really Reasonable Ribbon.  The center of the bow is adorned with a pretty flower shaped pearl embellishment.
Thanks so much for stopping by today.  For more information on the other products I used on my card, please visit my Make Time to Craft Blog.


Monday, June 25, 2018

Nautical Thank You by Jenny Alia

3:30 AM 0 Comments

Hi friends!  I'm back today sharing a new card.  I seem to be making simpler looking cards lately with less layers and I'm always looking for a way to spice them up.  I love the way CAS cards look when done right but I struggle with them.


This card was made by using the Chevron die as a stencil.  I used different colors of ink sponging  gradually from lighter to darker. Then I mounted the frame I cut using the Rectangle Pierce & Cut die. I cut the center out of the rectangle using the next smaller die in the set.  Thank You was cut twice and glued together for a little more substance.  One of the seahorses was mounted with foam tape for dimension.  The shells were cut out of a cream cardstock.  The main design was then glued to a light blue card.

Cheery Lynn Dies

Thanks for stopping by the blog today!

Wednesday, June 13, 2018

Sending Birthday Wishes Floral Card with Bonnie Garby

3:30 AM 1 Comments
Hello and Happy Wednesday.  Bonnie here from Make Time to Craft today sharing a pretty floral birthday card created with pretty dies from Cheery Lynn Designs.
My card today showcases the gorgeous Sakura Flower die.  I cut the die three times using different colors of Distress Ink Papers that I created.  The green is the base and then I fussy cut the flowers out of the purple paper and then the flower centers from the pink paper.  Then I layered and adhered them to the main panel of the card.  I stamped the sentiment in the bottom right corner and added a butterfly to the bottom left.  In order to balance things, I added three ribbon loops to the bottom right.

Cheery Lynn Dies used:

I finished my card off with a pretty bi-color bow created on my Bow-it-All V3.0 Tool using ribbon from the June Ribbon Club Assortment from Really Reasonable Ribbon.  The center of the bow was topped with a pretty heart shape pearly embellishment.
Thanks so much for stopping by today and happy crafting!


Tuesday, January 3, 2017

Happy New Year by Julie Lavalette

3:30 AM 1 Comments

Hi Cheery Lynn friends, it's JULIE here and a Happy New Year to you, I hope it's a wonderful year for us all.
Today I am sharing my inspiration with the fun 2017 Shaker Die and have added the sentiment that comes with it. This die would also look amazing recording any special memory for this year, a special birthday, the birth of a baby and a graduation to name a few.


I added the Happy New Year confetti into my shaker along with a mix of micro beads and added a shadow layer to 2017 to make it pop.


Thanks so much for stopping by today and I hope you feel inspired to making a shaker card, Cheery Lynn have a brilliant selection of these dies you can check out HERE.
Until next time,

Crafty Hugs, 
Julie x  

Monday, November 14, 2016

Happy Winter by Julie Lavalette

3:30 AM 8 Comments

Hi everyone, hope you had a lovely weekend. It's JULIE here today and I'm sharing some inspiration with my Festive Winter card, so let me share my tips on this card with you.


I started by mounting a couple of Stacker Layers together to form the frame of my card adding Stickles around it. My Icicles I also added a little Stickles onto the white cardstock and let it dry. Once dry I used Iced Spruce Distress Ink at the tips of my Icicles and finished with a layer of Glossy Accents for an icy look.


My sentiment and snowflake were heat embossed with two shades of Silver embossing powder. 


The Fir trees are die cut from the versatile Camping Set, I also shaded with Iced Spruce and I ran a glue pen along the embossed areas and added an extra fine glitter for added sparkle.


My reindeer were also shaded with Distress Inks adding some sparkle onto them in the same way I did my trees. I do love how you can add the extra sparkle onto the embossed areas.


To finish my card I used a Snow Writer Pen adding onto my trees and as a layer of snow on the ground. Whilst still wet I added some clear Glass Glitter for extra sparkle.

Thanks for stopping by today and good luck to everyone entering our Bi-Weekly challenge.

Crafty Hugs, 

Julie x
Cheery Lynn Dies Used-

Wednesday, August 24, 2016

A Friend is Someone Who Knows the Song in Your Heart with Bonnie Garby

9:13 AM 0 Comments
Hi friends.  Bonnie here today for Christina.  I'm sharing a card with a somewhat simple design today and using some of my flower stash.  I hope you'll forgive me that the colors in the rose are not an exact match to the rest of the paper.  They seemed much closer in color before the card was assembled....
I've been on a kick trying to use up some of my beautiful artist paper stash and the lovely light blue mulberry paper in the background of this card is another example. 

The gorgeous roses were made using the three sizes of rose die offered by Cheery Lynn Designs.  The roses are my absolute favorite flower dies.  I cut the petals in two different colors, inked the turquoise petals with an old script stamp for some texture and inked the edges.  I shaped the petal with a foam pad and stylus and the handle of an old paint brush and assembled.


Cheery Lynn Dies used:

The sentiment is a stamp from Quietfire Design and the bow is made with two colors of blue Delicate Stitched Satin Ribbon from Really Reasonable Ribbon. 
Thanks so much for stopping by today. Don't forget, we have a great Doilies themed challenge going on. We'd love to have you enter for a chance to win a $20 gift certificate to Cheery Lynn Designs.

~ Bonnie ~

Saturday, August 6, 2016

New Year Bells by Julie Lavalette

3:30 AM 7 Comments

Hi Cheery Lynn fans, it's JULIE here hosting the blog and today I am showcasing some more dies from our fabulous new release on my Festive card. In Scotland as the time changes from one Year to the next at midnight we associate this with hearing bells and fondly name it "The Bells". So I decided to combine the Happy New Year with The Christmas Bells onto my card.


My Happy New Year was layered twice for a shadow effect adding on my party hats which had been embossed with Red Tinsel Embossing Powder. Finishing with some snow accents using a Snow Writer pen and Glamour Dust for added sparkle.


I sprinkled a scattering of Frantage on my Holly Leaves, shaded my Berries with Distress inks adding Glossy Accents for a realistic look. My bells were shaded in two colours of Gold Pens adding a little Archival ink to give them an aged feel. I layered up with foam tape for some extra dimension. I also think the bells would look amazing on a Wedding card.

Cheery Lynn Dies Used :
Thanks for stopping by today to see my post and I do hope you get some Creative Time over the coming week to enter our Current Challenge - Back to Nature, with a chance of winning a $20 shopping spree here at Cheery Lynn Designs.

Have a lovely weekend, 

Crafty Hugs, 
Julie x


Copyright Statement


All content, including designs, pictures and words are the exclusive property of the author of each blog post. Information shared here is for inspiration only and may not be copied for publication, competition or profit. Thank you for your cooperation.

SOCIAL MEDIA 2


Follow Us @jointhemakersmovement


All content, including designs, pictures and words are the exclusive property of the author of each blog post.
Information shared here is for inspiration only and may not be copied for publication, competition or profit. Thank you for your cooperation.
