Saturday, December 31, 2016

Happy New Year to All!

3:30 AM 1 Comments
Hi friends.  Bonnie here today from Make Time to Craft to wish you all a Happy New Year!!
Have you been loving the NEW Shaker Card Dies and kits as much as I have?  They make it so easy to create a shaker card and the little shaker pieces are fantastic.  
I created my shaker and this time rather than have the shaker sit on top of the card, I used foam to back the top half of the card as well so it would be flush.  I always take the extra time to color the sides of the foam too.  It make the finished card look that much nicer. 

I topped the card off with a pretty bi-color bow created with silver and gold glitz ribbon from Really Reasonable Ribbon and finished the center off with a pretty embellishment.

Cheery Lynn Dies used:

Now don't think that just because it's New Year's Eve now that this kit/die has no value any more.  What about a new baby born in 2017, graduation, scrapbook pages, etc.  I see lots of opportunity to continue to use this die though 2017.

I want to wish everyone a Happy, Healthy and Crafty New Year!


Friday, December 30, 2016

Joy Bell Card with GD Cherry Nelson

3:30 AM 0 Comments
Hi there Cheery Lynn peeps!  How was your Christmas?   Cherry here for my final post as guest designer here on the blog.  I know Christmas has come and gone but I have one more holiday card to share.   It is my last guest post here this month.  I have had so much fun playing with these wonderful dies.  I used the Shaker bell die again, this time using it to frame out this sweet little bird image.  I topped the bell off with greenery from the Joy to the World wreath dies.  I also used this set for my simple sentiment.  I just snipped off the the rest of the sentiment and used the Joy.
I also used the Swedish Spring oval frame die and the ornament #1 die layered at the top and bottom for interest. 
 A different color combination of gold and green.....kinda like it!!  Always fun to break out of your norm.  Here it is all finished.
Hope you have enjoyed!  I know I have really enjoyed hanging out at the Cheery Lynn blog! Bring on the new year!!!   Cherry

Cheery Lynn Dies used:

Other supplies:
Really Reasonable Ribbon

Thursday, December 29, 2016

Happy New Year card!

3:30 AM 1 Comments

Maggi here to wish you a very Happy New Year with a fun shaker card.  It sure is hard to believe that 2016 is almost gone.  Cheery Lynn released a whole set of shaker card kits last month and they are so fun! There are shaker sets for so many occasions, take a look here.

I used the New Year 2017 Shaker Die Set to make this card.  It comes with the dies you need to cut 2017 and Happy New Year as well as  the fun shakers inside that say Happy New Year.  Aren't they so cute?  I also added in rhinestones for some sparkle.

 I decided to go for the BIG Bang and added a Champagne Bottle Shaker  too!  I used some gold embossing paste behind the champagne shaker to add a little gold to the card.  The inside of the bottle shaker is a gold glittery paper that unfortunately, did not photo very well.  I used Cheery Lynn's champagne shakers inside the champagne bottle.  These come in the Champagne Bottle Shaker Kit , but you can just buy the shaker pieces too.

I made the flowers with the Floral Bouquet Kit 8 Piece Die Set using 3 of the large flower diecuts and 2 of the smaller flower diecuts.  Then I used Stickles to give the flowers lots of sparkle.

New Year 2017 Shaker Die Set - K102

Thanks for stopping by.  I am wishing you the happiest of New Year's and most importantly health and happiness forever.

Maggi

Wednesday, December 28, 2016

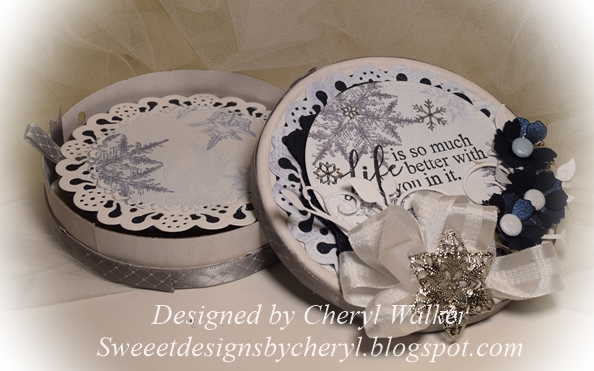
Winter Photo Box with Cheryl Walker

4:30 AM 0 Comments
Good morning crafty friends!!!
Today I have a super fun project created for Cheery Lynn using a Laughing Cow container to create a photo box. You know those containers from the grocery store that have cheese in them, well I try to keep them to use normally for candy or gift cards. These are super easy to make and look so beautiful when completed.  I thought this one would be neat to hold photos.
To decorate this one, I cut out a blue circle and then the Priscilla Doily for the top.  Next I used the Stacker #3 and another smaller circle for the sentiment area. I then stamped my sentiment and popped up the circle and the stacker frame.

Flowers and Flourish -
Flourish #8 cut in white.
Tea Rose Flowers cut in shimmer blue with brads in centers.  I also used a few wreath branches for the flowers.
For the inside photo mats I chose to cut out 4 Priscilla doilies and 4 Cheery Lynn Horizon Circles.  Then on the back I used 8 circles in 2 different sizes.

Cheery Lynn Dies Used:

I hope you enjoyed my photo box for today! Please let me know what you think, as I always love reading the wonderful comments!

Hugs to all,
Cheryl

Tuesday, December 27, 2016

Happy New Year Layered Tag by Ginny

3:00 AM 0 Comments
 
 
It's almost time to ring in the new year Peeps and I'm pretty excited about the new adventures that await in 2017. I created this sweet tag with a vintagy bingo image on layers of Nesting Ovals and topped of with Gardenia's.
I cut these Gardenias from salmon colored cardstock then shaped them and finished the edges with heat set embossing powder. There's also flourish leaves and spiral stamens.
 
 Using spacers between the layers adds a lot of depth. The tag is topped off with perfectly coordinating ribbons and a pretty pearly resin rose.

~Cheery Lynn Designs Dies Used~


Wishing all of you a happy healthy and blessed Holiday and New Year! G

Monday, December 26, 2016

Happy New Year! by Jenny Alia

3:30 AM 0 Comments

Hello, it's Jenny here today on the blog with you.  I hope you are all enjoying the holidays with family and new crafting goodies.  I've been making more step cards lately and thought with the upcoming New Year it was the perfect time to share this one with you.


The base of the card is a black step card made with the Step Card #3 die.  I cut rectangles out of white and blue-green patterned card stock to brighten up the card.  The Champagne Bottle is one of the fun new shaker dies.  I can't seem to get enough of these, they make creating shakers a breeze.  The Mini Happy New Year and Mini Champagne Bottles inside are also some of the new accessories that come in the shaker kits.


I cut the Champagne Bottle Shaker and the Happy New Year die out of silver glitter paper.  It is so sparkly in person but the photos unfortunately don't do it justice.  The Happy New Year die was matted on a piece of white paper cut with the Rectangle Scalloped A2 Set and then backed with another rectangle of card stock colored with distress ink to match the flutes from the Celebration Die.

Dies & Shakers

Thanks for stopping by the blog today and best wishes for a Happy and Healthy New Year!

Sunday, December 25, 2016

Season's Greetings Card by Amy Voorthuis

3:30 AM 0 Comments
Merry Christmas Everyone, 
I want to wish every follower on this blog a wonderful Christmas & a fantastic New year! Enjoy the time spend together with your loved ones.   
Today it's my turn again on this lovely blog, and for today I made a 10 minute Christmas card with non traditional Christmas colors. 
I can't believe 2016 is almost coming to an end, me for instance can't wait to start 2017 with all the new adventures on it's way. 

Season's Greetings: 
I just took out all my doily dies and picked out a golden oldie. The pretty Celtic Fire die I cut this die out of white card stock and placed it on a black background then I made some pink flowers to add on my card. I also added some pink and black treat to make a little bow. And on the Pierced Banners I stuck a word sticker saying to complete my card.   

Cheery Lynn Design dies used:

Thank you so much for your time to visit our blog today on this special day! I will gladly see you back in the next year......be careful with the fireworks.  

Saturday, December 24, 2016

Wishing you a Happy Christmas by Julie Lavalette

3:30 AM 0 Comments

Happy Christmas to all our Cheery Lynn fans, it's JULIE here today and I am sharing a Vintage styled Festive card using one of the beautiful Cardmaker Dies. I do love the intricate lace look to these dies and how they make a quick and very effective background to a card.


Once I cut mine out I tattered the edges for a shabby feel and pressed the edges into my embossing ink pad and heat embossed some Red Tinsel powder. Layering onto my other cardstock layers and adding some Glass Glitter to the edges for sparkle.


My Snowflake Doily was also heat embossed with Red Tinsel and cut in half and layered behind my Sentiment tag which had also been tattered at the edges, mounting on Noel.


My Poinsettia was cut in cream cardstock inking at the edges, adding micro beads to the centre finishing with a little Liquid Snow and Glass Glitter, mounting onto my glittered Holly Leaves.


Cheery Lynn Dies Used:

Thanks so much for stopping by today and wishing you a wonderful Christmas filled with precious memories.

Crafty Hugs,
Julie x

Friday, December 23, 2016

Last Minute Christmas Card by Debbie Brownmiller

3:30 AM 0 Comments
Hi It's Debbie From Debbie's Time Out. It is close to Christmas and you need one more card . Need a quick one? Well here it is.

Some snowflake paper matted onto black and a winter scene in the center make a super quick base. I picked three dies to fancy up this card. The tree on the bottom is one of the dies from the Merry Christmas w/ Tree Sentiment  set.


Along the top I layered the Icicles Border . The snowflake is one of the snowflakes from the Snowflake Set 2 set. The Merry Christmas sentiment is from the Merry Christmas w/ Tree Sentiment . Now how quick is that. Between the wintery scene and the Christmas sentiment it really has a feel of a Winter Wonderland Christmas to it. I hope this will give you some ideas when you need a quick card.

Thanks to everyone for following me thru this last the year on this blog, for the comments you have left and for cards you may have shared thru the challenges. I always enjoy seeing your designs too. You all inspire me too.

I want to wish you all a very Merry Christmas and all the best for 2017.  Enjoy the festivities my friends.

Dies Used
Merry Christmas w/ Tree Sentiment 2 Piece Die Set - B477
Icicles Border Die - B472
Snowflake Set 2 2 Piece Die Set - B635

Thursday, December 22, 2016

Introducing Two New Design Team Members for the Cheery Lynn Design Team

3:35 AM 4 Comments
I am extremely pleased to welcome two new design team members to the Cheery Lynn Designs Team.  We will be saying good-bye to Ginny for now as she has a bunch of family obligations coming up but you may see her pop back in from time to time.  Best wishes to Ginny.

Now it is with great pleasure that I introduce you to our new designers.

Laurie Schmidt
Hi! I'm Laurie from Stampin' Up North and I live in Northern Minnesota. I started paper crafting about 10 years ago when my hubby and I became empty nesters and I was looking for a new hobby. One stamp led to another...and you know the familiar story....I was hooked! I love to spend the long, cold, snowy Minnesota winters in my craft room making cards. I love using dies, and would say my style is clean and layered. I'm so excited to be joining the design team at Cheery Lynn!


Cherry Nelson
Hello my name is Cherry Nelson.  I am a 4th generation Oregonian and am a country girl.  I pretty much live out in the middle of nowhere and would not change it for the world.  I have been creating in some capacity for as long as I can remember.  My love for handmade came from my Mama who always made my doll clothes and sewed the sweetest things for me.  My favorite thing to do is turn on music or an old movie and while away the hours in my little craft room.  I am so excited to be a part of this great group of girls and Cheery Lynn Designs!  

Welcome to both of them and they will begin posting in January.  
Happy Holidays to everyone!

Cheery Lynn Designs Challenge Taking a Break

3:31 AM 3 Comments
The Cheery Lynn Designs Challenge is taking a break from challenges for a while.  Thanks to all who have participated over the years.

Today I'm sharing one last holiday card with you featuring some of my favorite dies from Cheery Lynn Designs.  This card design can easily be used for any occasion by changing up the sentiment and color combination.
My card design is pretty basic.  My card base is a 5-1/2" square.  Then I built up layers topping it off with the Duetschland Square Doily.  The sentiment was stamped and then cut with the Pierced Stacker #2 die.  My flowers were created using the Small and Medium Tea Rose dies using two colors of cardstock.  The ivory cardstock was inked for more interest.
The card was finished off with a double loop bow using Vintage Christmas Plaid Ribbon from Really Reasonable Ribbon.

Cheery Lynn dies used:

Thanks so much for stopping by today.  For more information on other products used on my card, please visit my Make Time to Craft Blog

~ Bonnie ~

Cheery Lynn Designs Challenge #244 Winners

3:30 AM 2 Comments
What wonderful entries we had last week for our Red & Green themed challenge.

 Our randomly selected winner is:
Random Integer Generator
Here is your random number:
5

VA's Creative Clutter
Congratulations Verna. Please contact Judy by clicking here for your $20 shopping spree to Cheery Lynn Designs.  Be sure to grab the winner's badge from the right sidebar for display on your blog.  

Our Top 3 Picks for Challenge #244 in no particular order are:

Pretty Paper Pearls

Simply Handmade

Viktoriya Sosedskaya

Great job!  Be sure to grab our Top 3 badge from the right sidebar for display on your blog.

Thank you to everyone who joined in on the challenge.  Have a wonderful holiday season!

Wednesday, December 21, 2016

Bah Humbug! with Lisa Blastick

3:30 AM 0 Comments

Hi everyone! I hope everyone is getting ready for the holiday season since it is just around the corner! 
I recently received this sheep die cut from Cheery Lynn Designs. I have seen some adorable stamps with sheep and BAAAAAHHHH Humbug. I thought I would make the sheep Scrooge! LOL
(I really love the holidays, but this is the perfect card for that Scrooge you might know?)

I added the hat from "skeleton" and the scarf from "gingerbread family" The fun "holly" was cut in green and then the leaves colored with copic markers. 


I can't stop using the stitched squares, ovals, rectangles and circles. So if you don't have them in your collection it is certainly a must!!! 
I love the layered "poinsettia" too. Ive used it so many times over so many years of Christmas cards. I added a white pearl in the center for contrast. Lastly but not least, the fun "alphabet" for the title. I will say at first it looked a bit smaller but.....the font works wonderfully on a card! Not too big and not too small. 

There are some pearls on the top of the hat and of course my favorite google eyes!  I free handed the grumpy frown and eyebrows with a fine tip black marker.


Hope you enjoyed! 
Thanks for stopping by today and be sure to check out this week's challenge for your chance to win some $ at the Cheery Lynn Designs store! 
Happy Holidays! See you next year!
Hugs Lisa 

Tuesday, December 20, 2016

Christmas tree card with GD Cherry Nelson

3:30 AM 0 Comments
Hi there Cheery Lynn peeps!  Cherry  here again guesting on the blog.  Can you believe Christmas is just days away?  I have another Christmas card for you today.  This time using the Christmas Tree shaker die.  I cut it out three different times using different but matching papers for uniformity.  I wanted my middle tree to be my focal point so I used foam adhesive to add dimension to it. 


 I added buttons and jingle bells to each one but added the Christmas lights swag two piece die set to the middle to make it special.  Instead of using the "light bulbs" from the set though I used the hearts from the Ornament #1 die.  Which I also used at the bottom and the top of my card paired with the "negative" space from inside the Swedish Spring oval frame die


I added a bit of seam binding as well for softness and color and my card was done! I love this non-traditional color combination.  Pinks, aquas, and reds. 


Hope you enjoyed today's card!  Cherry

Cheery Lynn Dies used:

Other supplies used:
 Really Reasonable Ribbon

Copyright Statement


All content, including designs, pictures and words are the exclusive property of the author of each blog post. Information shared here is for inspiration only and may not be copied for publication, competition or profit. Thank you for your cooperation.

SOCIAL MEDIA 2


Follow Us @jointhemakersmovement


All content, including designs, pictures and words are the exclusive property of the author of each blog post.
Information shared here is for inspiration only and may not be copied for publication, competition or profit. Thank you for your cooperation.