Sunday, March 31, 2013

Honey, Honey - Shabby Chic

3:07 PM 5 Comments
Hello Cheery Lynn Fans, Tamara here. So sorry I'm a little late with my inspiration today, but better late than never. 
I'm going through a purple faze at the minute, can't seem to get enough.. lol 
I decided to try my hand at the shabby chic style and came up with this card. Unfortunately the photograph's haven't come out every good as the weather today is rather dull..  

I will list and link all Cheery Lynn Dies used at the end of the post so all you have to do is click..lol 

The border on the side is a favourite of mine and seem to reach for it all the time, its called the Frills and Hearts banner and is simply divine.  I used a crimp machine to create that cardboard effect and then applied white paint. 
The smaller border on the other side of the card is the part of the frills and hearts border that you would normally throw away but I think its to pretty so in actual fact you get two borders for the price of one.  You will find that with Cheery Lynn Dies you can sometimes use the positive and negative cuts..     

Here is a close up of the Cutie Fringe flower and the metal butterfly that I heat embossed with Shabby Chic Fantage embossing powders.. 

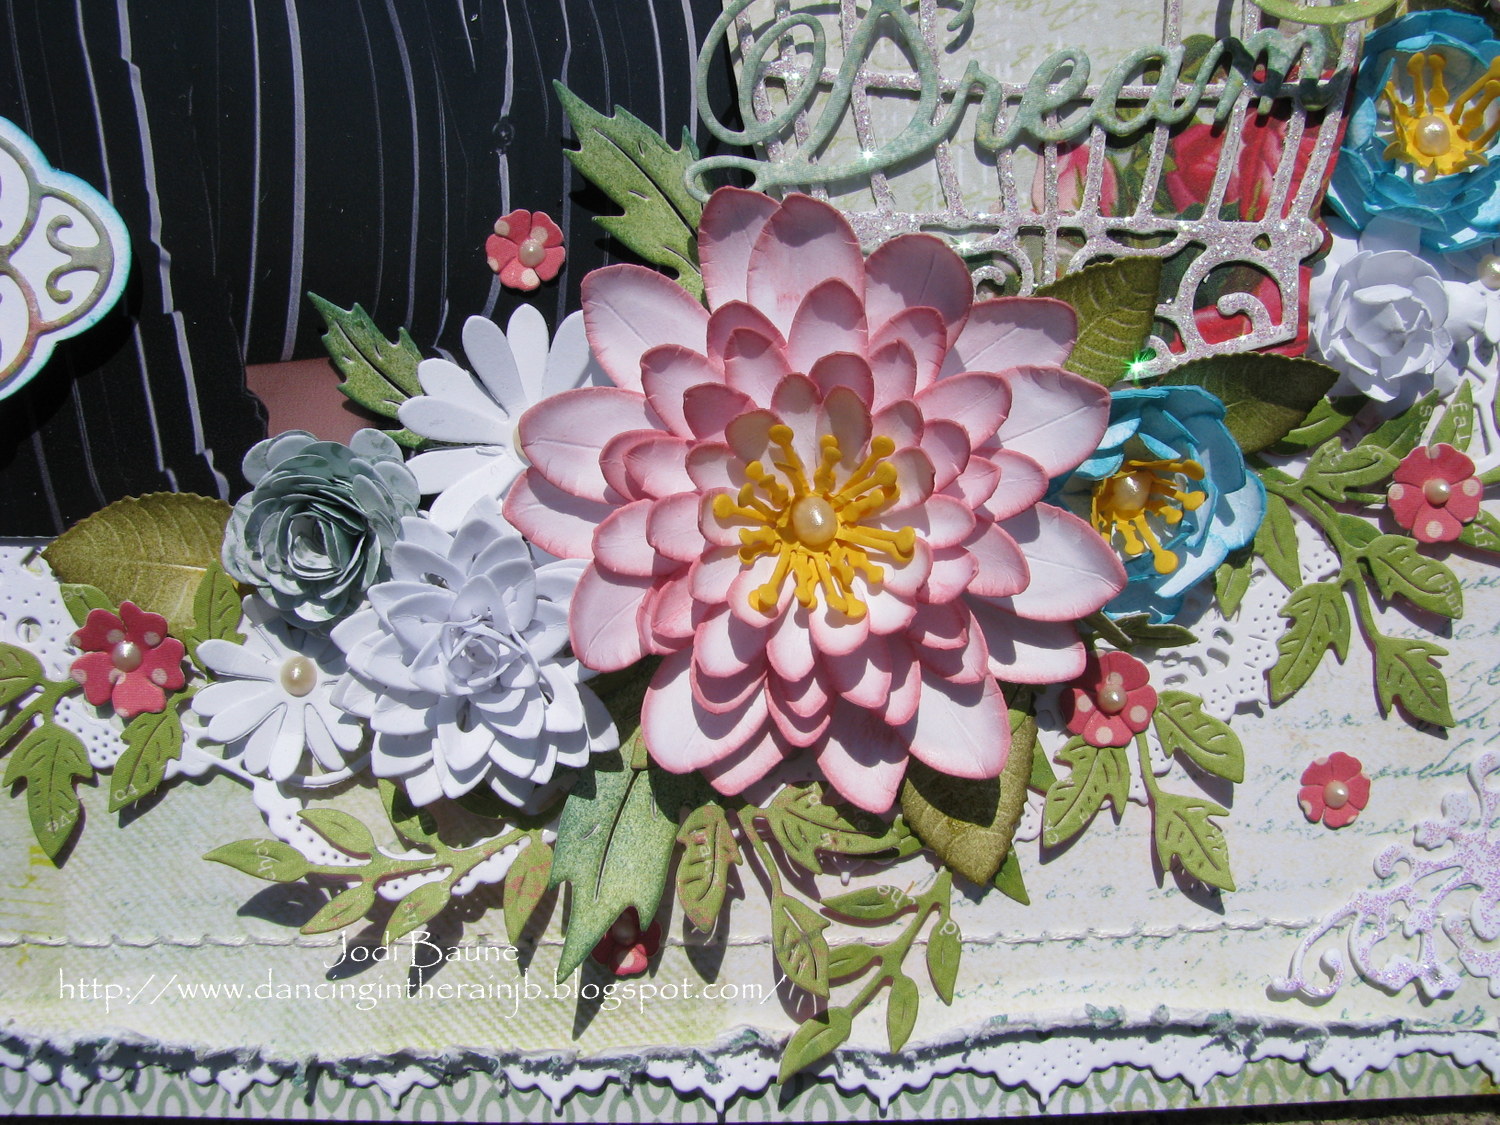
I absolutely adore these new daisy strip flowers and the Rose leaf strip is also one of my favourites.. I have also used the Tiny things with wings die for the cute little bumble bee, see if you can spot it between the flowers.  I have again embossed using Fantage embossing powers. On the corners I embossed one of the corner dies and believe me when I tell you they look like metal.. 


Don't forget to head over to the Challenge blog and join in this week's challenge but you better be quick as it ends later today.  If you missed it don't worry a new challenge theme starts tomorrow and the theme will be... "Back to Nature" and your chance to win $20 coupon to spend in the Cheery Lynn Store.
 photo BlogSigniture20131_edited-5.png


Saturday, March 30, 2013

Flowers, 'n Doilies, 'n Butterflies! Oh my!

3:30 AM 10 Comments
It is with great sadness, that Jodi will be leaving this week.  We are hoping to convince her to come back to us in the Fall.  Please leave her some love, letting her know how much you have enjoyed her creations.

Hello! Today’s layout features a few of the stunning doily dies from Cheery Lynn Designs, and well as an assortment of their flower dies. 


Such a sweet array of flower dies to chose from, and so many different flowers can be made from each die! 


Cheery Lynn puts such exquisite detail in each of their dies… it never ceases to amaze me!! 


Dies used: Sentiment Frame #1

There is still time to enter this weeks challenge for your chance to win the $20 shopping spree! Details Here
Thanks for stopping by!

Friday, March 29, 2013

Let's Celebrate

3:30 AM 10 Comments

Hi Everyone and a very Happy Easter Weekend to you!

The theme this week at Cheery Lynn Designs is "Celebrate" and with that in mind I want to show you my version of a 3D cupcake that I made.  Best of all the cupcake is fat-free!  How great is that!


As a bonus it opens to add some sweet treats just in case you would like to enjoy a little guilty pleasure! : )


Here's a list of the dies used for this project:


There is still time so I hope you can visit the challenge this week and put in your entry.  As mentioned, the inspiration theme this week is Celebrate!  As always, your entry gives you the chance to win a $20.00 shopping spree at Cheery Lynn Designs!

Have a Cheery Day!


Mini Treat Box Tutorial...just in time for Easter

3:30 AM 6 Comments


Hi everyone, it's Lori here with you today. It's always fun to create dimensional paper projects and I hope you'll find this one handy for any holiday, though I have designed it for Easter.  Here is an easy tutorial to help you create this project.  

Step One: Cut your cardstock to 11 x 6 5/8.  Cut two pieces of designer paper 2 1/2 x 3 7/8 and two 2 x 3 7/8 and one piece 3 1/2 x 4 inches.  Lastly cut one piece of card stock to 3 1/4 x 3 3/4 and one 2 7/8 x 2 1/2.  


Step Two: On the main piece of cardstock score at the 2 1/2 , 5 1/4, 7 3/4 and 10 1/2 longwise.  For the 7 3/4 and the 2 1/2 scores you'll need to move your paper over to the first 1/8 of an inch line as shown in the picture below ( this will actually be scoring at 2 5/8 and 7 7/8 inche but there aren't lines for those measurements).  For the 1/4 and 1/2 inch mark be sure it's lined back up on the edge.  


Step Three: Turn your paper and score 2 1/2 


Step Four: Cut your lines upward on the smaller section and cut away the last little strip as shown on the picture below
  

Step Five: Lay your designer paper out and adhere to the base


Step Six: On one of the larger panels tape down a die cut ( I used the crosses set)  Of course you can use any shape here you would like. 


Step Seven: Apply thin  tape around the cut out and apply a clear sheet of acetate.  

TIP: You can purchase acetate sheets but I use many of my packing supplies from various products and recycle. 


Step Eight: Score your 3 1/2 x 3 3/4 designer paper a 1/2 inch around all side and cut slices as shown in the picture below.  We are forming the lid. 


Step Nine: Glue your solid card stock that is 2 7/8 x 2 1/2 to the inside of your lid.  This will give it some strength.  Then punch two holes on the sides of lid to run ribbon through.  


Step Ten: Glue tabs with Scor-Pal tape to create the lid. 


Step Eleven: Score your last piece of card stock that is  3 1/4 x 3 3/4  , 1/2 inch around and create another lid as above.  Take your ribbon and some wide scor-pal tape and adhere to the bottom of the lid.


Step Twelve: Push down into the box and this will hold your ribbon in place.  Run your ribbon through the lid holes and top your box.  Your now ready to embellish your box. 


Detail of Handmade Flower on Box 


Here is a complete recipe of Dies that I used on this project: 

Thursday, March 28, 2013

3D Easter card and a tutorial - Kianel

5:32 AM 6 Comments
Bonjour to you dear Cheery Lynn friends,
Hope you're well, This is Kianel here with you today for another card i made in 3D and also a small tutorial to adorn your stackers, hope it will be useful to you.
So here is the card :


For this card i used the following dies :
-        B255 Cutie fringe 1 (to make the body of the round bush)
-        B264 Build a flower #3
-        B149 Cutie 1 (to make the lace around the oval card)
-        B119 tropical leaves
-        Circle classic small stackers (to cut the honeycomb paper)
-        D138 Mini dimensional butterflies


To make the pink bush i used a classic small circle stacker that i placed on my honeycomb paper at only half of the size. When you open the paper afterwards you get this cool bowl. I then added 2 Cutie fringe borders, one up and one down, to build the body of my bush, I like the cool effect it gives!

And here comes a little tutorial on how to use Cutie fringe borders as laces to adorn your stackers :
Step 1:
Cut out 2 Cutie 1 and ink them as you wish

Step 2 :
Flip them between every petal as an accordeon (flip the first one in and the second one out and so on...). It will give the border the needed “lightness” (really not sure of the word there, sorry…) to be shaped around the stacker.

Step 3 :
Sew around your stacker like on the picture and you get a beautiful lace ! Have fun !

Dies are from Cheery Lynn Designs. Stamps, printed paper and honeycomb papers are courtesy of Magnolia. Cardstock is from Bazzill. The image is watercoloured with Distress inks.

Don't forget our weekly challenge for a chance to win a 20$ shopping spree.
love from France, Kianel.

Wednesday, March 27, 2013

Celebrate You!

3:30 AM 11 Comments


Hi and Good Morning everyone, Alison here today sharing a card inspired by this weeks challenge theme of 'Celebrate'.   What better excuse do you need to create something beautiful for the special people and times in your life.
 
Now, the DT at Cheery Lynn were presented with some wonderful Magnolia goodies recently, and I just couldnt wait to use this little sweetie! :)  I used a 6 x 6 blank card base, and stitched Magnolia papers onto white bazzil cardstock, and then set about my favourite part of card-making - die cutting!
 
I added the Celtic Heart and Fanciful Flourish to the base of the card, and then cut 2 strips of the Anastasia Lace Border layering them together and topping off with some pale blue ribbon.  I cut the really gorgeous Kiwi Spirit Doily (this matches the Anastasia border perfectly) and added my image slightly off centre.  The flowers were made from the Cutie Fringe borders, 2, 3 and 4 and I dipped these in some glitter for a bit of sparkle.   I decorated the border with the Two of Hearts and a butterfly, and I added some tiny forget-me-not type flowers to the flourish. 
 
All dies used on this card are:
 
B188 - Embellishment #2 - Tiny blue forget-me-not type flowers
 
I hope you find time to join in this week, and I look forward to seeing more gorgeous entries!  Dont forget there is also daily inspiration from the other talented members of the DT over on our Cheery Lynn Designs Inspiration Blog.
 
I hope everyone has a smashing week, and thanks so much for visiting today.


Clean and Simple

3:30 AM 5 Comments

Sandy, here with you today.  Sometimes it is nice to make a clean and simple card without all the fancy embellishments. That is what I have created today.  I love long/tall cards.  This one is 4 x 9.25 inches and fits in a business envelope.  Using just the center drop out from my Mexican Tile Pattern die, I die cut three white squares which I mounted onto pink, then black card stock.  This is what the complete die looks like.....


The outer blue frame cuts as one piece and the inner white square is another.  I simply cut my card stock 2.75 inches square, centered it on the die and cut it out.  For the center flower, I used my Stacker Flower 4, cutting it three times and then gluing them together so the petals are staggered.  I added a bit of curl to the ends of the petals for some dimension.

Be sure to visit the Cheery Lynn Designs challenge blog for more inspiration and to join in on this week's Celebrate challenge for a chance to win $20 to the store.

Cheery Lynn Designs dies used:

Tuesday, March 26, 2013

Celebration Time at Cheery Lynn

3:30 AM 6 Comments
Good Morning Cheery Lynn Fans, Donna here with the card I made following this week's challenge of "Celebrate"
I've used a Sassy Cheryl image called "Avery Celebrates with Cake", colored with Copics, and cut out using the Grey Classic Circles laid on top of the Nautical Wheeler Doily in blue, then laid onto a scalloped circle cut out of  kraft cardstock. The blue paper and the blue cardstock behind were cut out using the scalloped squares.


I've used the Celtic Heart which I cut out of white cardstock and also kraft cardstock, and mixed the two together, the sentiment is a mix of Birthday and Wishes from the Best Wishes set of 2. Flowers were created using the Daisy Strip, the darling Daisies and the spiky type flower was created using the Embellishment #1. Tiny butterfly from the Mini Dimensional Butterflies and the Mini Flourish. Pearls were created using a Viva Decor Pearl Pen.

List of Dies Used
Best Wishes (set of 2)

Don't forget you have the chance to win a $20 shopping spree at Cheery Lynn Designs when you enter our challenge - "Celebrate"


Copyright Statement


All content, including designs, pictures and words are the exclusive property of the author of each blog post. Information shared here is for inspiration only and may not be copied for publication, competition or profit. Thank you for your cooperation.

SOCIAL MEDIA 2


Follow Us @jointhemakersmovement


All content, including designs, pictures and words are the exclusive property of the author of each blog post.
Information shared here is for inspiration only and may not be copied for publication, competition or profit. Thank you for your cooperation.