Showing posts with label Icicles Border. Show all posts

Thursday, January 11, 2018

Warm Winter Wishes with Lisa Blastick

3:30 AM 1 Comments

Hello! Baby Its Cold outside this January! So I'm sending Warm Winter Wishes from Arizona and with Cheery Lynn Designs! Since the holidays are over now...I wasn't quite ready to make some Valentine cards...so I decided to make something perfect for the month of January. 


Lots of cool blues and layering of die cuts. The "Snow Bear" is a recent die cut with Cheery Lynn Designs. He is just adorable! I layered all three of the "Banners" on top of each other. The sentiment "winter" is the smallest of the two and I placed it on top of the "pierced circles"The "icicles" are on the inside. Love the "snowflakes" too...very detailed and delicate. 


Thanks for stopping by today! 
Keep Warm! 
Hugs Lisa 

Sunday, December 24, 2017

Merry Christmas by Julie Lavalette

3:30 AM 0 Comments

Hi everyone, it's JULIE here and Happy Christmas to all our Cheery Lynn fans. Today I'm sharing some last minute Christmas inspiration for a fairly quick card to make should you have forgotten someone last minute or are in need of a Gift Card.


My card has all been cut out in glitter card for lots of sparkle. My Icicles have been drop shadowed with silver glitter card under the white glitter card to make them 'pop' from the white background. I also drop shadowed my sentiment.


My whimsical car I cut out in white card and then cut out my elements in glitter card trimmed the sections I wanted and glued on top of the white card, adding a couple of gems onto the wheels.

Cheery Lynn Dies Used -
LSC1 Silver Stitch Stackers

Wishing you a wonderful festive season with precious memories.

Crafty Hugs, 
Julie x

Saturday, November 25, 2017

Winter Wonderland by Julie Lavalette

3:30 AM 0 Comments

Hi Cheery Lynn fans, its JULIE here today and I am sharing some Festive inspiration on my latest Wintry card.


My Icicles and Snowflakes have all been cut out of white glitter card for a nice frosty feel and added onto my tattered layers, you will also notice I tucked some of my Snowflakes between layers.


My Poinsettias I added a snowflake into the centres along with some sparkly Stamens. My Holly flourish was cut into sections and placed around my flowers and the pine branches were heat embossed with a sparkling Embossing powder.


Finishing my card with lots of sparkle and small polystyrene snowballs.

Cheery Lynn Dies Used:
C146 Snowflakes 

Thanks so much for stopping by today and Happy Thanksgiving Weekend to all our American friends.

Crafty Hugs,
Julie x

Sunday, October 22, 2017

Let It Snow With Lisa Blastick

3:30 AM 2 Comments


Hi! Is it snowing yet by you? Well here in the valley of the sun it is just beginning to cool down...meaning 80's....lol Today I wanted to share another new card using some more fabulous die cuts from Cheery Lynn Designs


I die cut foam with "let it snow" so it pops off the card. The "wreath" I die cut once in green. I thought about cutting it out again but I thought it speaks for itself. 


The "icicles" and "winter neighborhood border" I added some liquid appliqué to give it a realistic snow look.


Thanks again for stopping by today. 
Have a great week. 
Hugs Lisa

Tuesday, October 3, 2017

Merry Christmoose by Julie Lavalette

3:30 AM 0 Comments

Hi Cheery Lynn Fans, it's JULIE here today and I'm sharing a fun Christmas card with you all using a few of the new Dies from the Fall and Winter release.


I started by cutting out my Aspen Tree Die in White Cardstock and Heat embossed some white glitter powder for a glistening snow effect, adding touches of grey Archival Ink to the edges for definition. This was mounted onto corrugated card which I had heat set sprinkles of Frantage onto for more snow, placing my moon between the layers.


My icicles were cut out in white glitter card and a layer of Glossy accents onto them. My sentiment was drop shadowed to make it pop.


My super cute Moose was cut out in Kraft card using a fineliner pen to highlight the embossed areas. I added Ink to the edge of his cream antlers and a sparkly festive scarf.

Thanks for stopping by today and I hope you manage to have some creative time this week.

Crafty Hugs, 

Julie x

Cheery Lynn Dies Used -
M4 Circle Classic

Monday, November 14, 2016

Happy Winter by Julie Lavalette

3:30 AM 8 Comments

Hi everyone, hope you had a lovely weekend. It's JULIE here today and I'm sharing some inspiration with my Festive Winter card, so let me share my tips on this card with you.


I started by mounting a couple of Stacker Layers together to form the frame of my card adding Stickles around it. My Icicles I also added a little Stickles onto the white cardstock and let it dry. Once dry I used Iced Spruce Distress Ink at the tips of my Icicles and finished with a layer of Glossy Accents for an icy look.


My sentiment and snowflake were heat embossed with two shades of Silver embossing powder. 


The Fir trees are die cut from the versatile Camping Set, I also shaded with Iced Spruce and I ran a glue pen along the embossed areas and added an extra fine glitter for added sparkle.


My reindeer were also shaded with Distress Inks adding some sparkle onto them in the same way I did my trees. I do love how you can add the extra sparkle onto the embossed areas.


To finish my card I used a Snow Writer Pen adding onto my trees and as a layer of snow on the ground. Whilst still wet I added some clear Glass Glitter for extra sparkle.

Thanks for stopping by today and good luck to everyone entering our Bi-Weekly challenge.

Crafty Hugs, 

Julie x
Cheery Lynn Dies Used-

Sunday, October 16, 2016

Carolers Christmas Greeting Card by Ginny Nemchak

3:00 AM 0 Comments
Hey there Paper Peeps! Happy Sunday to you. It's my day to share some Christmas inspiration and I've created a sweet little greeting card with carolers, snowflakes and blingy embellishments. I've started with an A2 sized card base and layered on patterned papers.  The Oval Stitched die cut makes the perfect frame for the vintage image.
I've got several dies cut in crisp white for a wintry scene. The Neighborhood Border  creates a base with the Icicles nestled underneath.  To complete the arrangement there's Snowflowers topped off with blingy accents and glitter for a frosty finish.
The Southern Charm Valance had a fabulous edge border that was easy to fussy cut and helps to balance the arrangement on the bottom.  A simple bow with pearly center is a nice finishing touch and hides where the die cut was joined in the center.
~Cheery Lynn Designs Dies~
Ribbon trims and embellishments from Really Reasonable Ribbon.
Okay that's all for me. Wishing all  of you a happy and productive day. : ) G

Monday, July 25, 2016

2016 Fall & Winter Holiday Release Part 1 - Winter & Christmas with Debbie Brownmiller

3:30 AM 15 Comments


A warm hello to you. It's Debbie from Debbie's Time Out hosting the blog today.


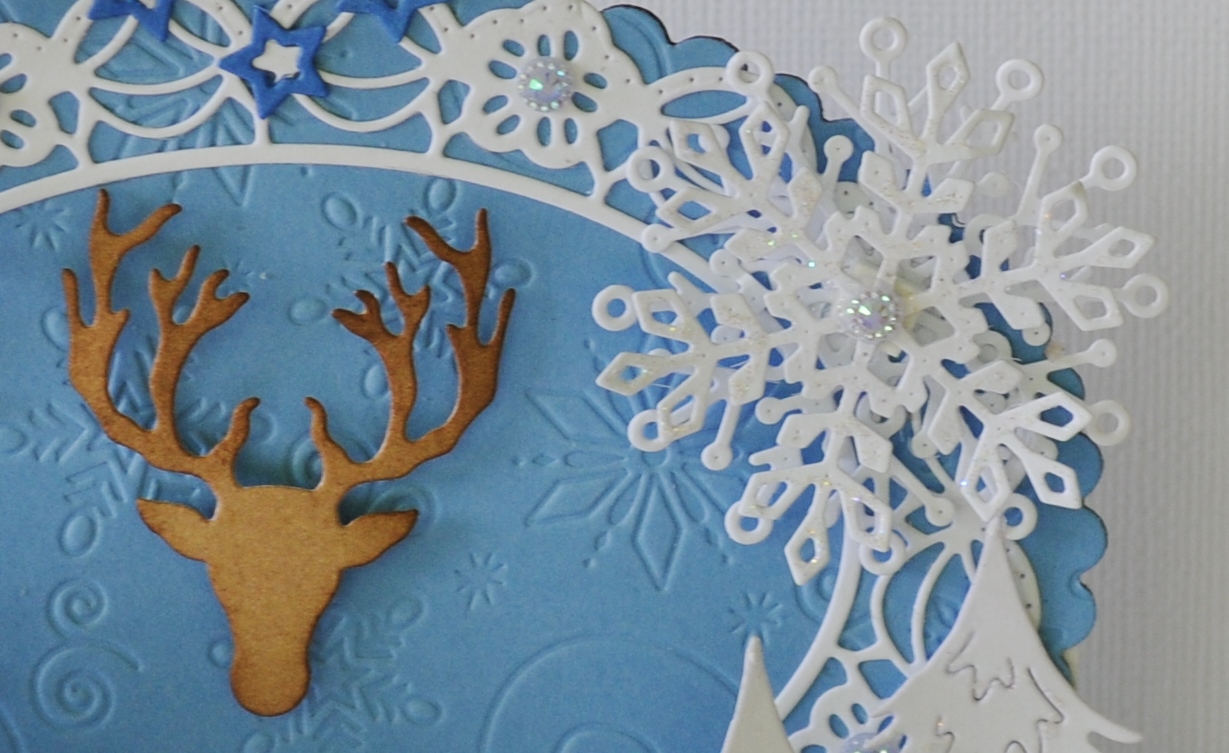
Cheery Lynn Designs has just release some wonderful new Christmas dies. I am featuring this new Fancy Reindeer 7 Piece Die Set  which is one of them . They are so nicely detailed.


My base is a Bendi Fold which really enables you to get a lot of layers and dimension. I layered the Oval - Scalloped LG Stackers Nesting Dies and Polynesian Sails Oval and added it to the top of the card for more shape and background. I embossed all the card pieces  with the Snowflake Flurries  before assembling it.


Here you can see all the detail on the Fancy Reindeer . I layered the Icicles Border along the curved part of the card. The trees are from the Camping Die Set . They make awesome winter/ Christmas trees too. The Happy Winter sentiment is from the new Winter Holiday Word 6 Piece Die Set. I cut up one of the  Dancing Snow Flurries into pieces and layered it here and there.


The reindeer head was layered to the center of the oval piece. And the Snowflake Set 2 where layered together and layered onto the top.

I invite you now to come join our current Christmas in July challenge for you chance to win a $20.00 store certificate. I would love to see your creations.

Thanks for visiting today.  Be sure to leave a comment today and every day between July 22nd and August 3rd.  One lucky person that leaves a comment on the selected day will win a $20 gift certificate to Cheery Lynn Designs.  Have a crafty day.
             
 Debbie
Dies Used

Saturday, July 23, 2016

2016 Fall & Winter Holiday Release Part 1 - Winter & Christmas with Lisa Blastick

3:30 AM 18 Comments

Hi everyone! Welcome back! Today, I'm sharing with you our new release with Cheery Lynn Designs! It is called 2016 Fall and Winter Holiday Release and it is in 4 part series. This is Part 1 Winter and Christmas. 


This box card is 2 x 3 inches and it's a nice small size to mail off for the holidays. The main colors are white, red, green and teal. On the "St. Nick" and "trees" from the "camping set" I placed some liquid appliqué to give it the appearance of fluffy snow.


There are 3 inserts.  I placed the trees in the back, and then one more tree on the first insert, the "St.Nick" on the middle insert and then "Presents" from "whimsical Christmas" on the front insert. 


The two sets of the smallest "poinsettia strip" were used with a pearl in the center. The holly leaves are part of the new release "feliz navidad".  On the top are "icicles" to finish of this box card. 


Cheery Lynn Designs New Dies Used:

Cheery Lynn DesignsOlder Dies Used:

Thanks for stopping by and be sure to check out more fun new release from our design team! 
Also don't forget this week's challenge for your chance to win $ at the Cheery Lynn Designs store! 

Be sure to leave a comment today and every day between July 22nd and August 3rd.  One lucky person that leaves a comment on the selected day will win a $20 gift certificate to Cheery Lynn Designs. 

Have a great day! 
Hugs Lisa 

Wednesday, January 13, 2016

Peace with Lisa Blastick

3:30 AM 2 Comments

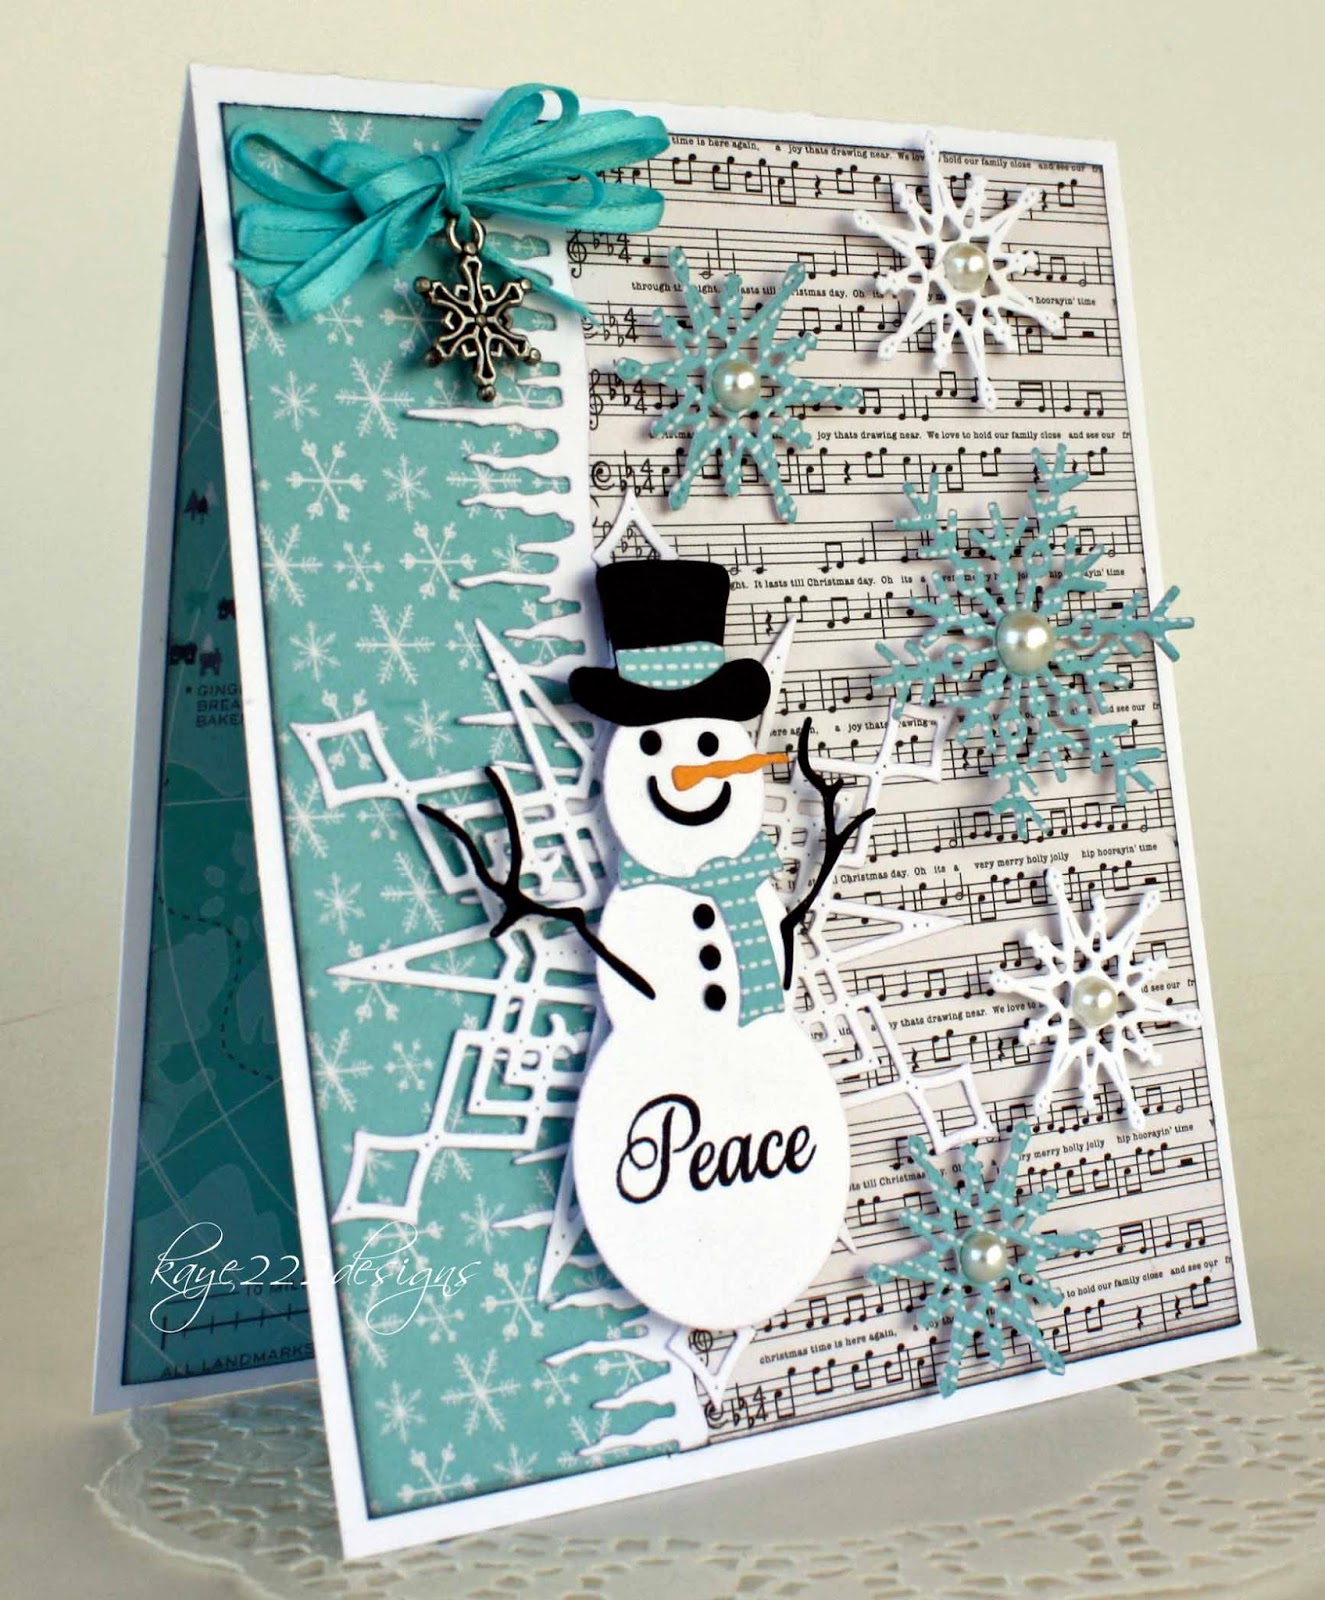
Hi everyone! Its Lisa back again this week sharing with you a new card for Cheery Lynn Designs! It was inspired by this week's challenge "snowflakes" and from Pinterest.  I just love the "frosty the snowman".  He is super cute and you can match up his hat and scarf to any papers. The "icicles" border is much longer than on my card 5x 6, so it is a beautiful die to use for scrapbooking too. 


I made a triple layered bow for the top with a little snowflake charm. The big "snowflake delight" I placed behind the "frosty" and then I used 2 different sets of "snowflowers and snowflakes" on the side with pop dots and pearls in the centers.  Lastly, I stamped Peace on the bottom snowball of "frosty".


DL226 Snowflowers Set 2

Thanks for stopping by today and be sure to check out this week's challenge "snowflakes" PLUS the new release coming up this Friday, Jan 15th!
Have a great day! 
Hugs Lisa

Saturday, December 26, 2015

Winters Day by Julie Lavalette

3:30 AM 1 Comments

Hi everyone, it's JULIE hosting the blog today. Hope you all have had a lovely Christmas Day and Santa left you some new craft goodies. In Scotland it is unusually very mild for this time of year and no signs of snow yet, so I decided to make a Wintry Scene onto my card.

I started with a greyish blue cardstock and scattered some chunky white Embossing Powder on it to give a snowy effect. Next, I tattered and shaded the edges with Distress ink. 
My Tree and Icicles I applied the same technique as I did on my Wall Hanging last week which you can see HERE.


My Winter Sign I die cut out in black cardstock and fussy cut a layer in white cardstock distressing around the edges and gluing onto my sign, adding the word Winter and some more white embossing powder.


Finishing off my card with accents of Flower Soft snow.

Thanks for stopping by today and good luck to everyone entering our Weekly Challenge.

Cheery Lynn Dies Used:


Crafty Hugs, 

Julie x


Saturday, December 19, 2015

Christmas Morning by Julie Lavalette

3:30 AM 1 Comments


Happy Christmas to everyone, it's JULIE here today. This week I have made a mixed media wall hanging with my inspiration coming from thinking Santa has delivered all his presents and is now relaxing whilst his washing dries. You may want to grab a cuppa while I take you through all the techniques and photos.


Starting off with a piece of corrugated card I ripped back the paper to reveal the corrugation in parts. Next I applied a layer of Gesso with a baby wipe and added some Crackle Paint to the edges. Once dry I rubbed over some Distress ink to highlight the cracks. I then scattered embossing powders over my Cardboard in lots of frosty colours and sparkles to give the effect of a snowy scene and depth within a Forest from the corrugation. I just wish cameras would pick up all the sparkle !


Now to the fun part with my dies. I cut out my birch tree 4 times, inking down one side of the birch tree with Distress ink. On the other side I shaded with a Versamarker Pen and applied some White Embossing Powder. You will now see the difference between the inked tree to the one with added snow.


Building them up I wanted my trees to look slightly different on each side so I now layered extra branches behind the main tree, notice the difference between the two trees.


The Icicles had Glitter Embossing Powder added in a frosty shade with a little ink added to the drips, finally I added some Glossy Accents.  This gives the look of the ice melting.


My little wildlife animals were all shaded with Distress Ink and  Black Liquid Pearls added into the centre of their eyes. I also highlighted the tiny details that Cheery Lynn are fab at putting into their dies, with a Fine Liner Pen.


Santa's Laundry - First I coloured the areas I wanted red with a Copic Pen. Next I rubbed over my die cut with my Anti Static bag and then I used my Versamarker Pen over the red and applied a Red Sparkle Embossing Powder to make Santa's clothes glisten. I repeated the process on the white areas of the jacket using a White Puff Embossing powder. His underwear was shaded with Distress Inks and once again I highlighted all the details with a Black Fine Liner Pen. The washing line was coloured with Copics.


My Christmas Lights once again were heat embossed with different colours. Once built up I added a fine black line between the baubles and wiring, this gives an illusion of depth.


Finishing off with my Happy Christmas Sign and Holly which has all been heat embossed with different shades.


A final tip before I finish ... Should you not have a large range of colours of Embossing Powders in your stash, colour your die cut with Copics and add Clear Detail Powder or Sparkly Clear Powder. This is how I got the effect on my grass using Copics.

Cheery Lynn Dies Used -
Thanks everyone for your continued comments and Good Luck to everyone entering our Weekly Challenge. I hope you feel inspired to try some Mixed Media with your dies.

Crafty Hugs,

 Julie x

Copyright Statement


All content, including designs, pictures and words are the exclusive property of the author of each blog post. Information shared here is for inspiration only and may not be copied for publication, competition or profit. Thank you for your cooperation.

SOCIAL MEDIA 2


Follow Us @jointhemakersmovement


All content, including designs, pictures and words are the exclusive property of the author of each blog post.
Information shared here is for inspiration only and may not be copied for publication, competition or profit. Thank you for your cooperation.