Showing posts with label Polynesian Sails Oval. Show all posts

Thursday, June 14, 2018

My Rainbow by Julie Lavalette

3:30 AM 0 Comments

Hi Cheery Lynn fans it’s JULIE here and this week I challenged myself to make a clean and simple styled card. This is something I find very hard to do as I always want to add more details within my design. So I guess this is probably as minimalistic as I can manage and I hope you like it and feel inspired to also step out of your comfort zone too.


I started by die cutting my smallest square in my stitched stackers in colours of the rainbow to compliment my stamped sentiment, adding my small Doily which was cut in half and placed in the centre.


My next layers were all added with foam strips for added dimension along with a few flowers to sit on my cloud. Adding a final touch of some squiggly lines around the edge of my card.

Cheery Lynn Dies Used:

Thanks for stopping by today and I hope you have a lovely weekend.

Crafty Hugs, 
Julie x.

Tuesday, May 15, 2018

Friendship by Julie Lavalette

3:30 AM 0 Comments

Hi everyone, it’s JULIE here today and I am sharing some inspiration using the new Retro Television from our latest release.


I chose kraft card and a patterned paper that gives my card a Fifties feel to it. My TV was shaded with Distress ink at the edges adding a Tim Holtz Chit Chat sticker and a Photo Booth picture onto the TV.


Adding a Sweet Christine flower and a Doily in white cardstock to pop my design.

Cheery Lynn Dies Used:
B943 Retro Television Die Set 
LSC16 Rectangle Stitch and Cut Tool 

Thanks for stopping by today.

Crafty Hugs,
Julie x

Thursday, March 22, 2018

Happy Easter with Cheryl Walker

1:30 AM 0 Comments

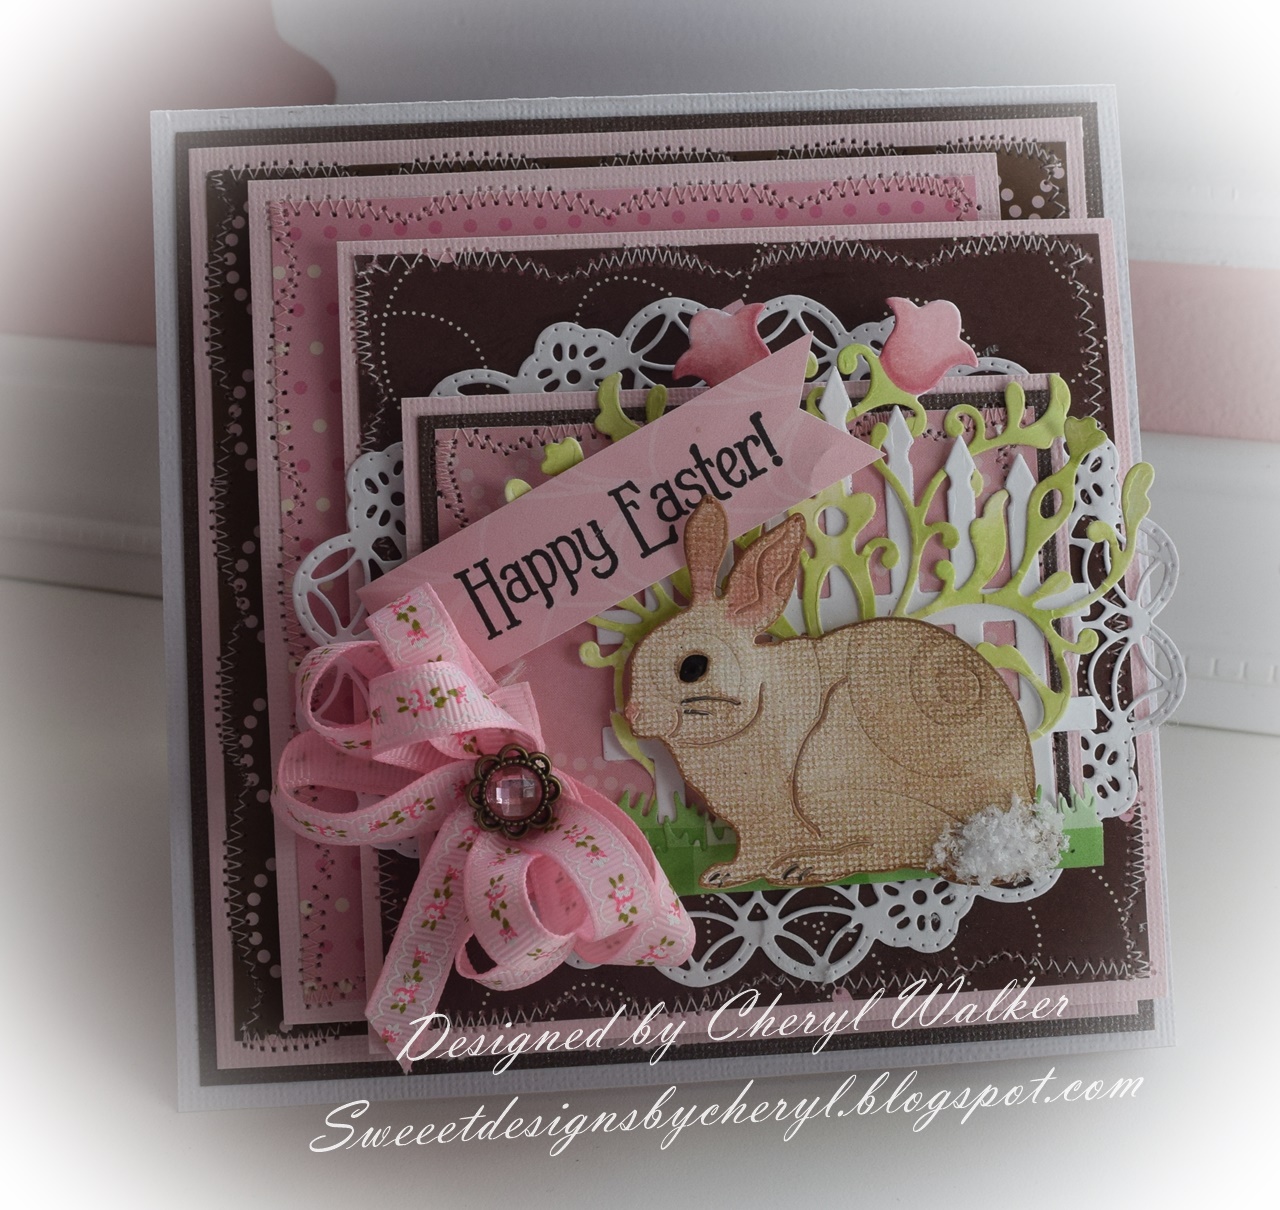
Hello everyone and Happy Thursday to you all! Today I have a sweet Easter card made with Cheery Lynn's Beautiful Dies.  I love the bunny dies, they are super cute and fun to work with as well.

On this card I chose the Bunnies for Easter, they are a perfect! I used just the one, and he was cut using a white card stock that came embossed with swirls.  I think its Bazzill, I just came across a stack of this card stock and thought it would look cute. I also wanted to use the beautiful Ornament #7 die, and I colored it with Copic markers, as it was cut out in a white card stock. I'm in love with the ornament dies Cheery Lynn has and need to add a few to my Wish List! The Garden Gate Die was a perfect match for this sweet bunny...heheheehe.  I also used the grass border cut out once and then cut it apart to layer for behind the bunny.  For my sentiment I cut a pink coordinating design paper. I also used the Polynesian Sails Oval for behind all the top layers.  It was cut in white card stock.

I love making the cutesy Easter cards, they are so much fun  to design :) I do hope you enjoyed my post for today :)

Cheery Lynn Supplies Used:
Ornament #7 CAS07 there are also others to choose from

Thank you so much for stopping by and have a lovely day!
Hugs to all,
Cheryl

Sunday, September 10, 2017

Vintage Easel Card

3:30 AM 1 Comments
Hello Cheery Lynn fans!  Maggi here with a vintagy easel card.  I love to make easel cards but I like to give them a twist by giving the front a nice shape like this scalloped oval.  I used Cheery Lynn's Oval Scalloped LG Stackers Nesting Dies 6 Piece Die Set to do that.  I love how nice the oval card front looks sitting up against the rectangular base.

 
I used Photoplay papers and ephemera from the French Flea Market collection to make this card. You know the connection...Paris...fashion, perfect collection to use with the Antique Dress Forms dies from the recently released Veriloquent Vintage Collection.

Next I added the Polynesian Sails Oval Die to add a pretty doily effect.  Then I tucked in some ephemera, the bird cage and "enjoy today" card from the paper collection.

To finish my card off, I made some pretty flowers with the Floral Bouquet Kit 8 Piece Die Set backed with leaves cut with the Flourish #14 2 Piece Die Set.  

Cheery Lynn Designs Dies Used:


Thanks for visiting today, I appreciate it!
Maggi Harding

Tuesday, May 30, 2017

Imagine Card with Maggi

3:30 AM 0 Comments

Hi there Cheery Lynn fans, Maggi here to share a fun all occasion card today.  The word, imagine, brings so many thoughts to mind; I could use this card for a birthday, graduation, a fun hello card, the possibilities are endlesss!  

Cheery Lynn dies and the colorful cut-apart card from Graphic 45's World's Fair collection worked so well together to make this vibrant card.  I used design papers from the collection to die cut all the layers for my card.  It's a large card, about 5 1/2" x 7 3/8".  I began by layering the blue paper that I diecut with the Coved Rectangle Stitch And Cut Tool .  Next layer is the floral layer diecut with the Horizon Coved Rectangle Boutique Stacker Frame set.  Then a bright orange layer cut with Card Maker Rectangle Scalloped 6 Piece Die Set and finally the floral oval layer cut with Polynesian Sails Oval Die.


Of course, I had to add some flowers and these I made with the Bohemian Collection - Indie Bouquet - 6 Die Set.  They are so easy to make, I just cut 3 different flowers from the die set, gave the petals a twist with my tweezers to give the flowers some body and stacked and glued them.  Then I added some leaves from the Flourish Leaf Strip 5 Piece Die Set and that's it!


Cheery Lynn Designs dies used:


Thanks for joining us today!
Maggi Harding

Wednesday, May 10, 2017

Mother Card with Cheryl Walker

1:00 AM 1 Comments

Hello everyone.
Cheryl here with a card I made for Mother's Day using the beautiful Cheery Lynn Designs Dies.  I LOVE this Gardenia Strip die as it makes the most beautiful flowers ever! I dusted these a soft blue to coordinate with the design paper I used. The Leaves are Cheery Lynn's Rose Leaf Strip and are absolutely gorgeous as well. I dusted them with a green, love that these make it so easy to dust.  Below is a list of all Cheery Lynn dies used on today's card.

Cheery Lynn Dies used:

My card has 3 layers of design paper panels. I added the Quadrafoil Doily to the 2nd layer, then added my 3rd layer over it. Next I thought the Polynesian Sails Oval would be perfect for my sentiment, and it worked out perfectly on this card. I then added the oval, and my Gardenia's, and leaves. For the centers of my flowers I chose to use pearls. Lastly I added a satin bow, with a pearl center.

I hope you enjoyed my post for today! Thank you for stopping by and have a lovely day!
Hugs to all,
Cheryl

Saturday, April 29, 2017

Beautiful Gardenias with Cheryl Walker

12:30 AM 1 Comments
Hello everyone, Cheryl here with a card I created using Cheery Lynn's Beautiful Dies. I had so much fun creating this beauty, and LOVE working with Cheery Lynn Dies, as they make is super easy and fun to create.

On my card for today I chose to use 5 different dies, and I will list them below for you :) I LOVE LOVE LOVE this Gardenia Strip die, and I really enjoyed creating my flowers. The Rose Leaf strip was fun as well. I ended up distressing the leaves, and because of the way Cheery Lynn created these beautiful leaves, it made distressing them easy and I think they turned out BEAUTIFUL!
I love to layer, so I chose to use Cheery Lynn's Large Oval Stitch and Cut Tool to begin the layering on my sentiment layer. Next I used the Polynesian Sails Oval Doily, and then I used the Oval Classic.

I made 2 bows using Really Reasonable Ribbon satin ribbon, and then glued them under my sentiment layer. My card came together super fast, as super easy! LOVE that!

Cheery Lynn Dies Used:
B339 Gardenia Strip
B241 Rose Leaf Strip
DL153 Polynesian Sails Oval Doily
LSC-7Oval Stitch and cut tool
M-7 Oval Classic

The stamp set is the Project Bin's 'fun is good set', and design paper is Club Scraps 'Cherry Blossom'.
Pearls are from my stash, and sewing was done on the machine with pink thread. 


I hope you enjoyed my post for today, and thank you for stopping by!

hugs to all,
Cheryl

Monday, July 25, 2016

2016 Fall & Winter Holiday Release Part 1 - Winter & Christmas with Debbie Brownmiller

3:30 AM 15 Comments


A warm hello to you. It's Debbie from Debbie's Time Out hosting the blog today.


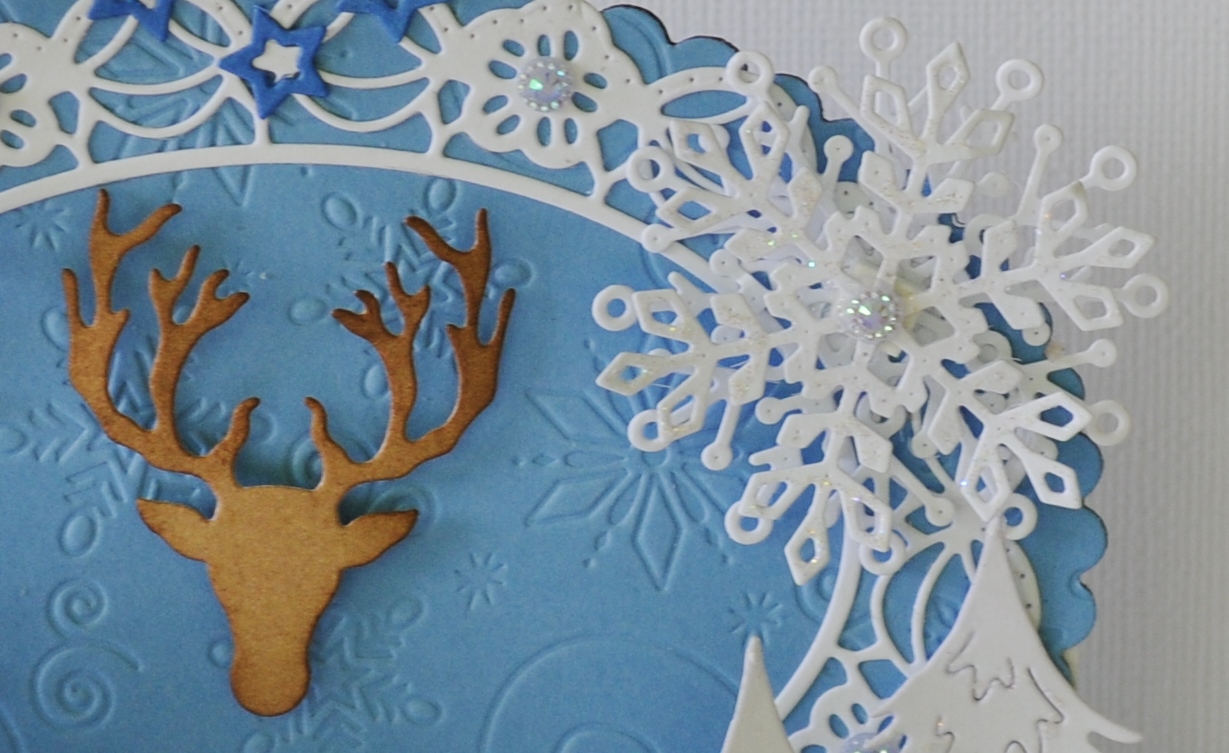
Cheery Lynn Designs has just release some wonderful new Christmas dies. I am featuring this new Fancy Reindeer 7 Piece Die Set  which is one of them . They are so nicely detailed.


My base is a Bendi Fold which really enables you to get a lot of layers and dimension. I layered the Oval - Scalloped LG Stackers Nesting Dies and Polynesian Sails Oval and added it to the top of the card for more shape and background. I embossed all the card pieces  with the Snowflake Flurries  before assembling it.


Here you can see all the detail on the Fancy Reindeer . I layered the Icicles Border along the curved part of the card. The trees are from the Camping Die Set . They make awesome winter/ Christmas trees too. The Happy Winter sentiment is from the new Winter Holiday Word 6 Piece Die Set. I cut up one of the  Dancing Snow Flurries into pieces and layered it here and there.


The reindeer head was layered to the center of the oval piece. And the Snowflake Set 2 where layered together and layered onto the top.

I invite you now to come join our current Christmas in July challenge for you chance to win a $20.00 store certificate. I would love to see your creations.

Thanks for visiting today.  Be sure to leave a comment today and every day between July 22nd and August 3rd.  One lucky person that leaves a comment on the selected day will win a $20 gift certificate to Cheery Lynn Designs.  Have a crafty day.
             
 Debbie
Dies Used

Sunday, June 5, 2016

Let Life Surprise You by Julie Lavalette

3:30 AM 6 Comments

Hi everyone, It's JULIE hosting today and I am showcasing the wonderful new Rooster and the Floral Bouquet Kit which has beautiful flowers and amazing foliage dies in the set.

As you can see I decided to turn my Rooster into a Weather Vane, so let me take you through my steps.


In this photograph I had embossed the two middle sections and the right hand rooster on my mat to fluff out the feathers. Layering them onto my flat die cut rooster. 


I finished off with a complete Rooster on the top Layer.


This photograph shows the elements I cut out from the Ships Compass, you will see I also cut the letter 'S' so I could have it in a different position on my Weather Vane. I also painted a Barbecue Skewer with Black Gesso and used two arrows from my fun with arrows set trimming the point off one and the tail part off the other.


I then hid my join behind the Barbecue Skewer.


My floral arrangement I added Glossy accents to my Berries and my yellow flowers have Flowersoft in the centres.


I finished my card off with steampunk corners, touches of bling and small dried cream flowers.

Thanks so much for stopping by today and the continued comments you leave, I love reading them. You still have time to enter our Current Challenge - Lots of Layers to win a $20 shopping spree here at Cheery Lynn Designs. Good luck to all entering.

Cheery Lynn Dies Used :
B770 3D Rooster
B661 Fun With Arrows (Set of 9)
B395 Ships Compass
B188 Embellishment #2
B437 Steampunk Corners (Set of 2)
B466 Branch (Set of 2)
DL153 Polynesian Sails Oval
XL15 Rectangle Scalloped LG Purple Stackers Nesting Dies(Set of 6)
LSC16 Rectangle Stitch and Cut Tool 


Crafty Hugs, 
Julie x

    Friday, March 20, 2015

    Spring to Follow Card by Corina Finley

    3:30 AM 3 Comments

    Hello Fellow Cheery Lynn Fans! 

    Corina here with you today to share my Cherry Blossom Card.

    I used Cheery Lynns lovely intricate dies, Cherry Blossom pattern paper, white cardstock, ink and silver embossing powder to create this card.

    I first cut my card base and matte out of white cardstock. I inked the matte with pink ink and adhered it evenly on the card base. Next came the Cheery Blossom pattern paper cut to the same size as the French Lattice Small die which is glue on top.


    I then cut the Polynesian Sails Oval doily from white cardstock. I trimmed an oval panel from the Cherry Blossom paper 1/8" larger than the center hole of the doily. I glued to the back of the doily center and used pop dot to raise the doily to the center of the card.

    The Horizon Fishtail Banners is cut from white cardstock, stamped and embossed in silver. My sentiment was stamped closer to the right side.


    I  created Cherry blossoms for this card using the Cherry Blossom die set, the stem/branch from the Embellishment #2 set, white cardstock and ink. I cut, inked, and formed my branch with blossoms. I am very happy with the way they turned out!

    Dies Used:

    Cherry Blossom - B129

    Polynesian Sails Oval - DL153

    Horizon Fishtail Banners (3 Dies) - DL278


    I hope you will play along in our weekly Cheery Lynn Designs Challenge 176 - Celebrate. You could win a $20 shopping spree at the online Cheery Lynn Design Store.

    Thanks for joining me today!

    Take care,

    Live, Laugh & Create

    Thursday, March 12, 2015

    Lattice and Trellis with Rhonda

    3:30 AM 4 Comments
    Happy Thursday to you, it's Rhonda here today to host the blog and share a project.

    Cheery Lynn has some gorgeous frame dies and I particularly like the Lattice background. I also really love the Trellis die, it always adds a bit of charm to your project.


    I started with a white cardstock A2 base, then cut the Lattice Frame from light kraft cardstock and adhered. Next I cut the Polynesian Sails Oval in a pretty blue, then attached. The next layers are the Horizon Oval Boutique Stacker (medium) followed by an Oval Scalloped LG Stacker.

    The Trellis was cut from kraft cardstock, as well as two different frames from the Sentiment Frame #2 set which I added a rub-on sentiment to. The top sentiment frame is adhered with foam dimensional dots so the Add A Flourish and foliage could be tucked in.    


    The florals were arranged and a few smaller flowers were added from the Tiny Flower Kit. Some gems in a variety of colors finished the card along with a tiny bow.

    Cheery Lynn Designs Dies Used:

    Be sure to join us in our Easter challenge this week, you can find all of the details here. You could win a $20 gift certificate just for playing along. You can't win if you don't play!

    Thanks so much for stopping on over today! 

    Saturday, March 7, 2015

    Vintage Easel Card by Julie Lavalette

    3:30 AM 9 Comments

    Hi Everyone, It's Julie here today and I am sharing with you how to cut an easel card using your dies. Let me talk you through my photographs.     
                          

    My card was folded in half. Notice how I have placed my die slightly off the edge of my card so it doesn't cut my fold when I run through my die cutting machine. I next placed the die to the opposite end and cut. I now had my shaped card.


    My topper was cut to form the top of my easel card in white and patterned paper for the top and bottom part. You will also see in the second photo how my folded card looks opened up. My layers were glued together to form my easel card.


    My doily was double heat embossed for a smooth finish and some bling added into the centre of the flowers.


    Love these little butterflies for an accent. I double layered them and added a touch of bling to the centre.


    My Rose was cut out of white cardstock and a little Frayed Burlap Distress ink added. This was then mounted onto my bow with a few leaves, my corner die and little butterflies.


    Finally a side on view of my finished card. Good luck to everyone entering our Weekly challenge where you could be the lucky winner of a $20 spending spree here at Cheery Lynn Designs.

    Cheery Lynn Dies Used :

    See you all next week.

    Julie xx 

    Friday, February 27, 2015

    Happy Thoughts Card by Corina Finley

    3:30 AM 4 Comments

    Hello....Happy thoughts coming your way....from me to you!

    Corina here with you today, to share my Spring inspired card!

    The vibrant floral pattern paper, sentiment word paper and white cardstock was the starting point. I die cut these papers with the French Flair Stacker die set.

    I then added the Polynesian Sails Oval Doily on top of the French Flair Stacker. I stamped my sentiment on a white Coved Rectangle Stacker die cut and matted it on a Scalloped Coved Rectangle Stacker die cut. I then placed it in the center but slipped it under the left side of the Polynesian Sails Oval Doily.


    I cut the Mega Fanciful Flourish from white cardstock and inked with Evergreen Bough Distress ink and sprayed with Goosebumps clear texture spray. I created two Chrysanthemum Strip flowers and used Spun Sugar Distress ink on one and worn lipstick ink on the other.

    My new favourite "filler" flower is the dandelions die. I tuck a few here and there as a "Baby's Breath" style of flower.

    I could not resist adding beading to the inner circle of the Polynesian Sails Oval Doily. I thing that this touch adds elegance to the card.


    Dies used:

    Dandelions (Set of 2) - B453


    I hope you will play along in our weekly Cheery Lynn Designs Challenge 173 - Anything GoesYou could win a $20 shopping spree at the online Cheery Lynn Design Store.

    Thanks for joining me today!

    Take care,

    Corina Finley
    Live, Laugh & Create

    Monday, September 15, 2014

    Patriotic Page with Rhonda

    3:30 AM 3 Comments
    Greetings and welcome to the Cheery Lynn Designs blog!  It's Rhonda here today to host the blog.

    I made a patriotic page today featuring a photo of Mt. Rushmore that I took when we were on vacation this summer. There was something so patriotic and majestic about seeing the monument in person.


    I started with an 8x8 piece of white cardstock and used Fancy Corners #4 on the corners. Next, I used the Scalloped Rectangle and aligned it to cut a 7x7" square. (This is one of the Reflections Boutique dies.) At the top I used a Victorian Romance Flourish as a hanger type of element in between my layers. Lace Heart Square is next.


    I had some pieces left from my project last week, so you will see the Foliage Embossed white cardstock and French Lattice on top, tucked under the Southern Charm Valance on the right.


    To anchor my photo I used the Polynesian Sails Oval, then layered a medium Horizon Oval Boutique Stacker with foam squares. The photo is then attached with foam squares. This gives me a lot of area to layer my cuts. On the bottom you'll see a snip of Sophia's Heart Border, another piece left over from a previous project. 

    Layered on the right are the Quills and a Wheat cluster, topped with the Star and Birds of Earth and Sky. To the left of that is a Branch. There are Cloud cuts layered under the photo and one attached with foam squares. 

    Cheery Lynn Designs Dies Used:
    Fancy Corner Cuts #4 - B431
    Scalloped Rectangle - DL199
    Lace Square Heart - DL189
    Polynesian Sails Oval - DL153
    Clouds and Rain - B320
    Stars (Set of 3) (Utility) - QF120
    Horizon Oval Boutique Stacker Frames - DL252
    French Lattice Small - FRM132
    Foliage Embossing Plate - E127
    Victorian Romance Flourish - DL151
    Sophia's Heart Border - B333
    Wheat Heads (Set of 2) - B388
    Quill and Ink Pot - B369
    Southern Charm Valance - B454
    Birds of Earth and Sky - B349
    Branch (Set of 2) - B466

    Please join us this week for our all new challenge "Things with Wings".  You could win a gift certificate for $20 to the online store just for playing along! You can't win if you don't play. 

    Thanks much for stopping on over to the blog today.  It's always a pleasure to see you visit and read your lovely comments.
    ~ Rhonda

    Copyright Statement


    All content, including designs, pictures and words are the exclusive property of the author of each blog post. Information shared here is for inspiration only and may not be copied for publication, competition or profit. Thank you for your cooperation.

    SOCIAL MEDIA 2


    Follow Us @jointhemakersmovement


    All content, including designs, pictures and words are the exclusive property of the author of each blog post.
    Information shared here is for inspiration only and may not be copied for publication, competition or profit. Thank you for your cooperation.