Showing posts with label Best glue ever. Show all posts

Tuesday, June 19, 2018

Retro Rocket Card with Cheryl Walker

1:30 AM 0 Comments

Hello Crafty Friends and Happy Tuesday to you all! Today's card features the Retro Rocket die from Cheery Lynn Designs, and a few other fun dies as well.  I thought it would be cute cut out in some of the coordinating design papers I used on my card layers.

To start with, I used a 5 1/2 x 5 1/2" white card base. Next I took some blue scrap card stock pieces and used them for my layering with the design paper pieces. The design paper pieces are also scraps, and I believe they are from the Pebbles Americana Stack.  I layered the Cheery Lynn Pierced Banners using red card stock and the same design paper, and then did the Nesting Doll circle in blue, with a white circle die. I did distress the white circle using red ink and a dabber. The Rocket was cut in another design paper from the stack, and then I colored the pieces that went on it with Copic markers. The rocket was also distressed using red and blue inks on the edges. I did add some Stickles as well. Now the moon is done with a GLOW in the DARK glitter, fun huh!?

Lastly I added a double bow using the Really Reasonable Ribbon May Ribbon Club assortment, and one of their sweet embellishments.

All layers were popped using RRR foam squares. Also I added sewing in red thread.

Cheery Lynn Designs Supplies Used:
Retro Rocket
Pierced Banners
Circle Die
Nesting Doll Circles #2
Best Glue Ever
Big Sister Die cutting machine

Other Supplies:
Really Reasonable Ribbons and embellishment
Glow in the dark glitter
Stickles
Pebbles paper stack
Sewing
Copic markers
Club Scrap ink
Tim Holtz ink


Hope you enjoyed todays card, and thank you so much for stopping by!
Hugs to all,
Cheryl

Monday, April 30, 2018

Picture Perfect LOVED card with Cheryl Walker

1:30 AM 1 Comments
Hello crafty friends and Happy Monday to you all! Feels good to be back in my craft room crafting.  I have been trying to get everything organized, and that seems to take awhile. Anyway, I created this sweet card for today using one of the New Release Dies from Cheery Lynn Designs. I LOVE this darling camera, it's called Picture Perfect, and thought it would be super cute with a sentiment on the bottom part of where the photo normally is.

For the card base I chose white card stock, and it measures 5 1/2" x 5 1/2".  Next I found this sweet deign paper in one of the paper stacks I have, and did 3 layers of it. I did add some sewing as well. The camera was cut using another design paper from this same paper stack, and love how it turned out. I added some bling to the camera, as I thought it would be cute. The photo part was also cut using three design papers, and then white. I think it turned out sweet.

I did add the darling Cheery Lynn Designs Sophia's Heart Mini Doily behind the camera . Lastly I added some more bling to my card and a big bow.

Its nice to be back in a clean almost fully organized craft room. I still have some more organizing to do, as Ive been doing a little each day :) 


Cheery Lynn Designs Supplies Used:
Picture Perfect Die Kit
Sophia's Heart Mini Doily
Best Glue Ever
Crafters Tools
Big Sister Die cutting machine
Metal Snippers
tweezers


Thank you for stopping by and hope you have a wonderful week!
Hugs to all,
Cheryl

Thursday, April 19, 2018

Classic Car Card with Cheryl Walker

1:30 AM 0 Comments


Hello Crafty Friends and happy Thursday to you all! Today's super sweet card was designed for Cheery Lynn Designs using their new release called " Let's Go RETRO".  LOVE this release, it's absolutely darling!  For my card today I chose to use the Classic Car die, and I love how it turned out, as it's so cute! All the dies in this release are so cute, if you haven't seen the dies in the release you will want to go check them out!

Classic Car die- was cut using a shimmery white card stock, and then dusted with a pink distress ink. Next I colored in the grey with a Copic marker, and then the darker pink for the lights. The steering wheel and mirror were colored with a black Copic marker and so were the tires.

Flourish & Tiny flower kit- I had a white flourish already cut and ready for me to color.  Then I cut out the pink flowers in the same white shimmer card stock and dusted them to match. For the centers I used the Viva Pearl pen.

Paris Sign- Cut in a grey card stock.  The Cool Cat was cut in white and dusted lightly in pink.

The design paper came from the paper stack called Forever & Always stack. I used it to create my 3 layers and the grey card stock in Bazzill shimmer card stock, it's absolutely beautiful in person, photos don't show it as well. Each layer has sewing in pink. I should have added some gems to the headlights but forgot, and had my photos all ready to go. Next time I will have to add some :)

Cheery Lynn Designs Supplies Used:
B376 Tiny Flower Kit
CAFLRS-8 Flourish #8
B549 paris Signs 3
B944 Classic Car die Set
B946 Retro Rhetoric Die set
Best Glue Ever
Metal Snippers 
Big sister die cutting machine
Crafters Tools
Thank you for looking and have a lovely day!
Hugs
Cheryl

Tuesday, April 10, 2018

Feline Good Card with Cheryl Walker

1:30 AM 0 Comments
 Hello Crafty Friends and Happy Tuesday to you all! Today I have this super darling card made with Cheery Lynn's DARLING dies, I just LOVE this Small Cat die, and the Mirror Mirror Doily frame I used for my sentiment. Well I love it all....hehehee.  I always love using fancy frames, and this Cheery Lynn die is perfect!


To start with I cut my Small Cat out using the coordinating Graphic45 design paper, how perfect this kitty is, she goes perfectly with the design paper. I did add some distressing, Viva Pearl pen for an eye, nose, and on the ears and tail. Next I distressed her using red ink.

Flowers on cat- I used the Tiny Flower Kit Die, and cut out some flowers to go along with my kitty. The greenery is the Flourish #8 Die, and I just cut a piece of it, and colored it green. All pieces were glued using the Best Glue Ever found at Cheery Lynn Designs, LOVE this glue, it's honestly a must have to any crafters collection!

Frame- I have to say this is one of my NEW favorites, not that its newly released, but new to my collection...hehehe.  It's perfect for layering, I will get a lot of use out of this one for sure. I used it to cut out a brown doily frame, it's dark brown.  Then I used the other 2 dies to cut coordinating design paper for my sentiment frame. All 3 pieces come in this die set, love that too! Stamp is from The Project Bin.

Heart-Sweetheart candy die was used for this. Cut in coordinating design paper. This die is perfect to use all year round.

Butterfly In- used for the corner, it's so pretty and comes out of the die so smoothly. Love that about Cheery Lynn's dies, they come out so easy, no poking and trying to get the delicate pieces out.

I did add some sewing in a coordinating color to each layer. and lastly I added a bow was made with Really Reasonable Ribbon Satin, for my embellishing on my card :)

Cheery Lynn Supplies Used:
B205 Butterfly In
B675 Sweetheart Candy
DL286 Mirror Mirror Doily Frame
OR01 Small Cat
Flourish #8
B376 Tiny Flower Kit
Best Glue Ever
Big sister Die cutting machine
Mini platform
Crafters Tools
Thank you so much for stopping by and have a lovely day!
Hug to all,
Cheryl

Thursday, March 22, 2018

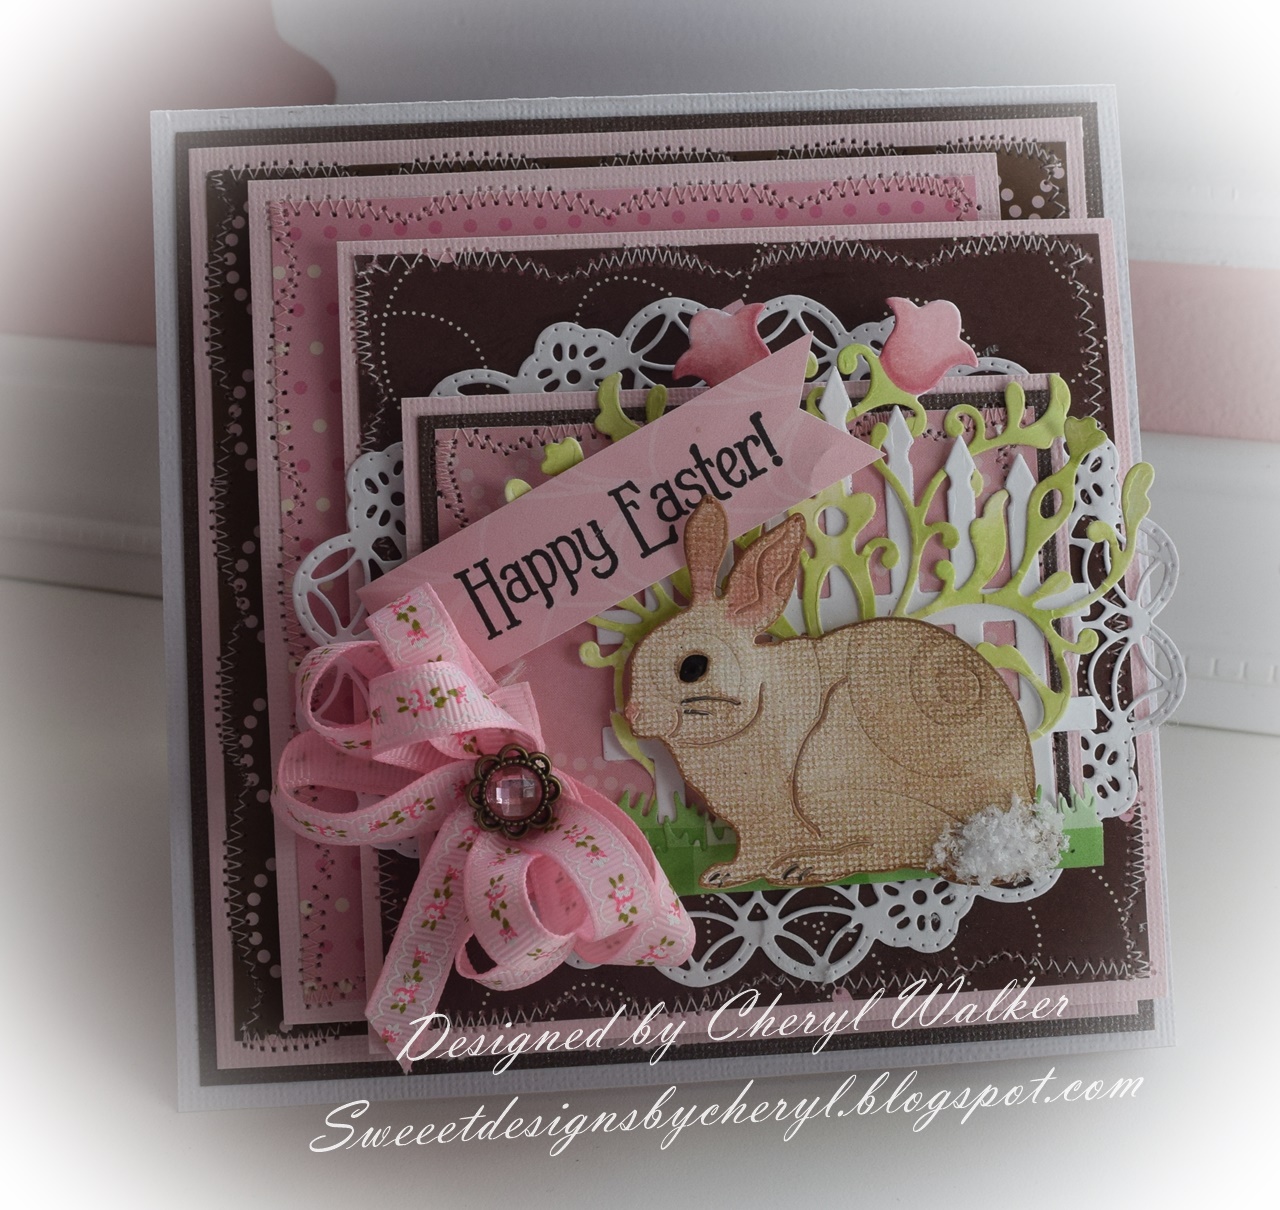
Happy Easter with Cheryl Walker

1:30 AM 0 Comments

Hello everyone and Happy Thursday to you all! Today I have a sweet Easter card made with Cheery Lynn's Beautiful Dies.  I love the bunny dies, they are super cute and fun to work with as well.

On this card I chose the Bunnies for Easter, they are a perfect! I used just the one, and he was cut using a white card stock that came embossed with swirls.  I think its Bazzill, I just came across a stack of this card stock and thought it would look cute. I also wanted to use the beautiful Ornament #7 die, and I colored it with Copic markers, as it was cut out in a white card stock. I'm in love with the ornament dies Cheery Lynn has and need to add a few to my Wish List! The Garden Gate Die was a perfect match for this sweet bunny...heheheehe.  I also used the grass border cut out once and then cut it apart to layer for behind the bunny.  For my sentiment I cut a pink coordinating design paper. I also used the Polynesian Sails Oval for behind all the top layers.  It was cut in white card stock.

I love making the cutesy Easter cards, they are so much fun  to design :) I do hope you enjoyed my post for today :)

Cheery Lynn Supplies Used:
Ornament #7 CAS07 there are also others to choose from

Thank you so much for stopping by and have a lovely day!
Hugs to all,
Cheryl

Saturday, March 10, 2018

Birthday Pop Up Card with Cheryl Walker

1:30 AM 0 Comments

Hello crafty friends and Happy Saturday to you all! Today's Cheery Lynn Pop Up 3-D card is done on the outside and the inside, as I've used 2 of the NEW 3-D pop up dies for this. I also combined some of Cheery Lynn's other dies for my card. I am LOVING these 3-D Pop up Dies that Cheery Lynn Designs came out with, they are super fun to use!

To start with I used the Party! Pop up as the outside of the card. It can be used both on the inside and outside. I then added some of the sweet Pebbles design paper to the PARTY! to coordinate with the card layers. Next I cut out the dress form, oval, and frame all using the coordinating design paper in this line. Each front layer is sewn to give a bit of embellishing. I lastly added a Taffeta Bow to the front.

Cheery Lynn Supplies Used:
Pop Up Party B932
Pop Up Birthday B938
Antique Dress forms B882
Pierced Stacker #2 XL-20
M-7 Oval Classic-sm silver stacker layers 8
Best Glue Ever
Big Sister Die and Emboss machine
Crafters Tools S122
 For the inside I used the Happy Birthday Pop Up and just colored it with coordinating colors.  Super easy and fun! I should have added sewing to the inside but forgot.

Thank you for stopping by, and please let me know what you thought of my card for today :)
Hugs to all,
Cheryl

Wednesday, February 28, 2018

Thanks 3-D Pop Up Card with Cheryl Walker

1:30 AM 0 Comments
 Hello Crafty Friends and Happy Wednesday to you all! I can't tell you how much I am LOVING the new Cheery Lynn 3-D Pop Up Dies, they are so much fun to work with. This one is the Thanks Pop Up that works for the inside of the card, and can also work for the outside of your card as well. I wanted to use it for the outside of this Thank you Card!

To start with I used white card base and cut the Thanks, then ended up taking scissors and cutting the top part off the thanks so it's all in the back. Super easy to do. Next I cut the pink in thanks and cut them out and glued to the Thanks. That is why they are pink now and the card base is white :)

All layers were done using the same pink and then some Crate Paper from the Random 6 x 6 paper stack. I used two doily dies on this and then the Beautiful Decorative Gift Envelope Die.  It's a 12 piece set and comes with all of the flowers, butterflies, birds and a leaf. I added a circle tag and stamped the sentiment on it. All the flowers have little pink pearls in the centers and the butterflies have a cream color pearl on them. Super fun card to make.  I had so much fun designing this one!

Cheery Lynn Designs Supplies Used:
Pop Up 3-D Thanks
B860 Decorative Window Gift Envelope
Olive BranchesB147
DL314 Quadrafoil Square Doily
DL280 Royal Scandinavian Doily
Best Glue Ever S165
Big Sister Die cutting machine
 Close up of the window and flowers with butterflies. I love the little flowers, they are so sweet. I did layer the bigger flower two times to give them a 3-D look. I also added a flower to the T and the bottom of the S in the photo below you can see.
Thank you for looking and have a lovely day!
Hugs to all,
Cheryl

Tuesday, February 20, 2018

Wedding 3-D Pop Up/Shaker Card with Cheryl Walker

1:30 AM 0 Comments
 Hello crafty friends and Happy Tuesday to you all! Today I have a super special wedding card to share using the NEWLY released Cheery Lynn 3-D Pop Up Dies and some past dies as well. Love how this wedding card turned out for today. I also did the inside as well :) I truly LOVE all these new Pop Up dies, and can't wait to share them all with you!

On the front of my card I chose to use the Celebrate Pop Up die, and cut it in white. Next I layered using some wedding design paper and black card stock. Each layer has sewing on it. I also used the quadrafoil-square-doily-die-set-DL314 cut in white, then layered with another layer.  On top of that I used the Vintage Tile die cut in black two times and layered. On top of that is the Wedding Cake Shaker piece, love it! I did layering on it as well using the Olive Branches, and the Tiny Flowers kit.

For the inside I cut some of the matching design paper and then used the Best Wishes Pop Up on that, then layered it on some grey card stock and placed inside my card.

Cheery Lynn Supplies Used:
NEW Pop Up Celebrate B934
NEW Pop Up Best Wishes B935
DL314 Quadrafoil Square Doily
Vintage Tile B886
B147 Olive Branches
B376 Tiny Flower Kit
K109K Wedding Cake Shaker Card Kit
Best Glue Ever
Big Sister Die cut and embossing Machine
Crafters Tool S122


 Here is the inside of my card. I like when the insides are done, as it helps to save time when going to give them, besides that they look complete :) LOVE these new pop up dies!!!
 It had been a while since I've used the Shaker dies and thought this card was perfect for the Wedding cake. The Shaker dies are so easy to use and love how everything you need comes in the kit!
Thank you for stopping by and have a lovely day! Please let me know what you think of my card today, as I always love reading your comments!

Hugs to all,
Cheryl

Friday, December 29, 2017

Fancy Reindeer card with Cheryl Walker

1:30 AM 1 Comments
Hello Crafty friends ,and happy Friday to you all!
I hope you had a very Merry Christmas, and got to spend it with your family and friends. This is my last Christmassy card for 2017, gonna miss making them, as I always enjoy making Christmas cards every year.


So for my card today I chose to use Cheery Lynn's Fancy Reindeer, Tree from the Camping set, and holly & berries from the Christmas Bell set, all listed below with links. Love how they all work together on my card. On the tree I colored with copics, and then added some stickles. All die cuts were colored using copic markers, love the look they give to my card.


Cheery Lynn Supplies Used:
B779 Camping Set (Tree)
B843 Fancy Reindeer
B846 Christmas Bell (Holly & Berries)
DL314 Quadrafoil Square Doily
Best Glue Ever
Big Sister Die cutting machine

Thank you for looking and have a wonderful weekend! Hope you all have a Happy New Year!
Hugs to all,
Cheryl

Saturday, December 9, 2017

Merry Christmoose with Cheryl Walker

1:30 AM 0 Comments

Hello everyone and Happy Saturday to you all! Today I have a simple Christmas card designed for Cheery Lynn Designs called Merry Christmoose..hehehe, isn't he just too cute!!?? This card took less than 25 minutes to create, as it's just the one layer, and then die cuts, so super easy to create!

The moose and wording were all cut out in white card stock then colored with Copics. I glued them together using the Best Glue Ever that Cheery Lynn carries. Next I cut my Quadrafoil Square Doily out in red card stock, and then used the LPC4 Circle Pierce and Cut tool die for the white and distressed it using ink.

I glued ribbon on to the one layer, and then added my die cuts using foam tabs by Really Reasonable Ribbon. The Ribbon and embellishment are also from RRR.

Card measures 6" x 6"

Cheery Lynn Designs Supplies Used:
B923 Merry Christmoose 6 piece die set
LPC4 Circle Pierce and Cut
Quadrafoil Square Doily
Best Glue Ever
Big Sister die cutting machine


I love when you can create super cute and easy cards, and this one turned out pretty cute I think. The design paper I used is Club Scraps Scandinavian Christmas.

Thank you for looking and have a lovely day!
Hugs to all,
Cheryl

Wednesday, November 29, 2017

Olive You 12" x 12" Layout with Cheryl Walker

2:30 AM 0 Comments
Hello everyone and Happy Wednesday to you all! Today's layout is using Cheery Lynn's beautiful dies to adorn this page. I love the Sweet William Flowers on this, they are pretty simple to make, as all I did was distress them and then glue them using the Best Glue Ever from Cheery Lynn.

For the page itself I used the Club Scrap Trattoria collection for all card stock and design papers. Next for the corner brackets I used Cheery Lynn's Dusty Miller Framed Corners B883 

The flowers were done using Cheery Lynn's Sweet William Strip and the red card stock from the Trattoria kit. I did distress each flower using Club Scraps Hybrid Ruby ink for the petals, and then added some pearls from Really Reasonable Ribbon to each. The greenery behind the flowers are cut with Cheery Lynn's Flourish #8 and Club Scraps Green card stock. The flowers were put together using Cheery Lynn's Best Glue Ever.

For the little Olive You tag -
I cut it using Cheery Lynns Dutch Daisy Tag and brown card stock. Next I used the same cream card stock that I cut the French Pastry Mega Doily with for my tags sentiment.


Cheery Lynn Supplies Used:
French Pastry Mega Doily
Cheery Lynns Dutch Daisy Tag
Cheery Lynn's Best Glue Ever
Cheery Lynn's Flourish #8 
Cheery lynns Sweet Williams Strip
Cheery Lynn's Dusty Miller Framed Corners B883 
Big Sister Cutting Machine 

I hope you enjoyed my post for today! Thank you so much for stopping by, and have a lovely day!
hugs to all,
Cheryl

Thursday, November 9, 2017

Merry Christmas Tag with Cheryl Walker

1:30 AM 1 Comments
 Hello Crafty Friends and Happy Thursday to you all!
Today I have a super fun and easy Christmas tag to share, and if you like fast and easy, then this one would be perfect!

All layers are cut out in white, I used 4 dies, and will list them below. I then just glued the Mandala Doily 1 to the Royal Scandinavia Doily, and then popped the Dusty Miller Square to them using foam tabs.  I did the same with the Mirror tag, after stamping my sentiment of course. The sentiment was stamped in black ink. The holly and berries were colored using Copic markers.  I did use a white on white design paper for those, that is why you see a print. Love the look it gives though.

The tag takes less than 10 minutes to make, and if you prep enough for more tags, it will go by even faster. I think these are perfect for Christmas gifts. Last year I did at least 1 for each person.

Cheery Lynn Supplies Used:
DL280 Royal Scandinavia Doily (used for the base of my tag)
DL326 Mandala Doily 1
B884 Dusty Miller Square
CABD74 Mirror 
B846 Christmas Bell 7  (for holly and berries)
S165 Best Glue Ever
Big Sister Die cutting machine

Other supplies:
Really Reasonable Ribbon Satin and foam squares
Stamp by JustRite Designs

Thank you so much for looking and have a lovely day!

Hugs to all,
Cheryl

Monday, October 30, 2017

Happy Halloween with Cheryl Walker

1:30 AM 0 Comments

Hello everyone and Happy Monday to you all! Today I have a super cute Halloween card I made using several dies from Cheery Lynn Designs.  I love how they look, and how they turned out.  All were colored using Copic markers, except the ghost and fence.

I used this darling design paper Tricks and Treats from Pebbles. Next I layered with a purple and black card stock, then did sewing with an orange color thread. The Happy Halloween was cut using the Cheery lynn die B905 Happy Haunts and then colored using an orange ink.  I did add some black dots to all the letters, I thought it gave them some contrast. Next I colored the pumpkins using all Copic markers, 2 oranges, 3 greens, and a tan color. Next the twisted tree was cut in white, and then colored with Copic brown. The Wrought Iron fence was cut using black card stock. I glued everything using my favorite glue, Best Glue Ever, and it is! You just have to try to keep it off your hands....hehehehe.  I used foam squares for the ghost.

Super fun and fast card to make, as I haven't been feeling so well, so this need to be quick.

Cheery Lynn Designs Dies & Supplies Used:
B905 Happy Haunts
B827 Fall Pumpkin Patch
B904 Twisted Tree
B885 Wrought Iron Fence
Big Sister Machine
Best Glue Ever


Thank you for stopping by and have a lovely day, and a Happy Halloween!

Hugs to all,
Cheryl

Monday, October 9, 2017

Creepy Halloween Card with Cheryl Walker

1:30 AM 0 Comments
Hello crafty friends and Happy Monday to you all! Today's card was created for Cheery Lynn Designs using their DARLING dies! I LOVE these Friendly Felines, as they are super cute and fun to color up. I also used some other dies as well on this card for today.

My card measures 6" x 6" and I used a dark grey for the card base, then orange for the layers too. The design paper is super sweet and perfect for Halloween. It's the Pebbles TRICKS and TREATS paper stack. On each layer I used a lavender thread to do the sewing on the machine. Each Feline was distressed using inks and put together using one of my favorite glues from Cheery Lynn called "Best Glue Ever".  I did use a Copic on the middle kitty, and then distressed his face, tail and legs. I also added some white gel dots for fun.

My sentiment is from The Project Bin and was stamped in a purple ink, and then I distressed the circle using the die for the frame and then distressing.  That is why it has two shades. Circle was cut using Cheery Lynns LPC4 Circle pierce and cut die set. Then I also used two dies behind it.  They are B888 Flourish frame cut in a black and white coordinating design paper. Then I cut the DL314 Quadrafoil Square Doily using a grey card stock.

All dies were cut using the Big Sister die cut machine.

Ribbons and embellishment are from Really Reasonable Ribbon. Layers were done using foam tabs for 3-D look.

Cheery Lynn Supplies Used:

This is my sweet kitty Gizmo who loves being in the craft room with his momma! He is new to our family, we just got him about 3 weeks ago, and he is adjusting fine....hehehehe


Thank you for looking and have a wonderful day!
hugs to all,
Cheryl

Copyright Statement


All content, including designs, pictures and words are the exclusive property of the author of each blog post. Information shared here is for inspiration only and may not be copied for publication, competition or profit. Thank you for your cooperation.

SOCIAL MEDIA 2


Follow Us @jointhemakersmovement


All content, including designs, pictures and words are the exclusive property of the author of each blog post.
Information shared here is for inspiration only and may not be copied for publication, competition or profit. Thank you for your cooperation.