Showing posts with label corset. Show all posts

Sunday, December 4, 2016

Lady Steampunk by Julie Lavalette

3:30 AM 1 Comments

Hi everyone, it's JULIE here today and I do hope you are having a lovely weekend preparing for the forthcoming Festivities. I thought it would be nice to share a card using the fantastic Steampunk dies that Cheery Lynn make.  I love the versatility of these dies and have fun making them look grungy, masculine or giving them a feminine shabby look. So let me take you through the details on my card.


My Steampunk corners, cogs and butterfly wings were all heat embossed with Frantage powders, tucking accents of cogs behind my paper layers with touches of lace and cheesecloth.


My corset was mounted onto patterned paper and trimmed around the edges. I repeated this process cutting out the bust area only and glued in place on top of the corset with silicone glue to add dimension. The belt was made using the Hinges die adding a little thread. I finished my corset with lace edges and some bling then mounted onto my Butterfly.


My roses and leaves were cut in coordinating paper to compliment the roses on my paper.

Cheery Lynn Dies Used:

Thanks so much for stopping by today and I hope I have inspired you to make a Steampunk card or layout.  Good luck to everyone entering our Bi-Weekly Challenge .

Crafty Hugs,

Julie x

Saturday, April 30, 2016

Vintage Corset by Julie Lavalette

3:30 AM 4 Comments

Hi everyone, it's JULIE here today hosting. I am sharing a card with you this week with quite a lot of techniques on it. So let me take you through all my stages.


Layering my die cut corners behind my layer of card gives a different look to our corner dies.


I used my stitched rectangle as a guideline, counting the stitches, to die cut out my patterned strip evenly, holding down with a little tape. I worked from the outside on both sides towards the centre. This way I new my card would have even spacing.


I measured in between my gaps and added strips of paper with foam tape which I tattered at the edges. My centre strip was ever so slightly wider than the rest so I balanced this by adding my cream Anastasia border.


I cut my Nautical Wheeler doily in half and offset onto my stamped image which had also been tattered at the edges and a scattering of Frantage added.


My corset was cut out 3 times in different patterned paper and reinserted in to the negative spaces. I curved the edges at the top and bottom to give my corset a 3D effect adding my angel wing lace finishings and a few sparkly gems.


Adding some splashes of paint and some shabby flowers to finish. 


Thanks so much for stopping by today and I hope you get a chance to join in our Current Challenge which is Mothers Day. We all look forward to seeing your beautiful entries.

Cheery Lynn Dies Used:


Crafty Hugs,


Julie x

Tuesday, October 27, 2015

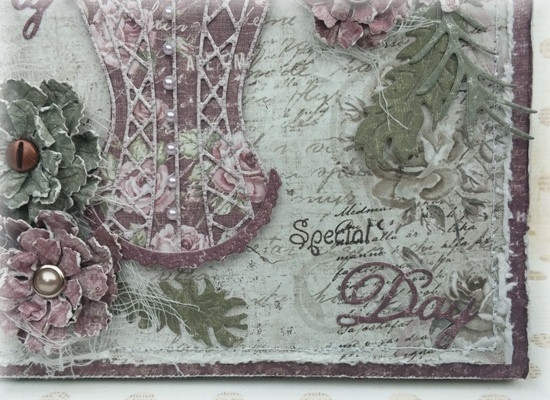
My Special Day Memory Book by Amy Voorthuis

3:30 AM 4 Comments
Good morning to you all.
With the new October release, Cheery Lynn Designs came out with some amazing "Memory Book"dies in different sizes which I really love. Not that I am a great mini album maker but it makes it so much easier to start one. So today I'd like to show one I made it will hold my wedding pictures when I finish the inside as well. 

My Special Day: 
Last week I showed you a layout I made of little me. I just went along and used that paper line again on this memory book. In the future I'd like to make one for my husband too with different colors and more masculine of course. On the inside I have seven sheets to use and put my pictures on so that's going to be a challenge for me not using so many pictures one project hehe. 


Cheery Lynn Design dies used: 

I hope you like my memory book. Thank you so much for visiting the blog today. 
If you love the dies Cheery Lynn offers you could always enter this weeks "Anything Goes" challenge #208, because you could win a $20 shopping spree at the store. I can't wait to see your work.  

Love

Monday, August 12, 2013

Save the Date

3:30 AM 6 Comments


Hi Cheery Lynn Designs fans!  I really love the Steampunk Corset die, but today decided to show you a project using this die in a more traditional way.  I used it, along with the Mega French Pastry Doily, to create a wedding dress - as the focal point for this Save the Date card.  You could use this same idea for princess dresses, proms - all kinds of ways!  I added Xyron Magnet tape to the back so this could go on a refrigerator.

Use the largest die from the Coved Rectangle Stackers to cut the gold base.   Cut the Heart Coved Rectangle Doily Stacker to cut the next layer.  Add to the base and machine stitch around the edge for decorative purposes. Die cut the fanciful flourish and flowers and place on the base as shown.  Die cut the letters and arrange the letters over the flourish.  Die cut the smallest Heart Coved Rectangle, and add the date.  Adhere to the top of the card with foam adhesives.  Die cut the corset from the gold, and the matching lace embellishments from the cream.  Assemble as shown and add pearls for the buttons.  Die cut the mega doily and cut in half.  Accordion pleat the doily and attach to the back of the corset using  Double Sided Tape.  Apply to the bottom right corner of the card with  foam dots.  Add a strip of  Magnet tape to the back. Finish with a lace bow.

Cheery Lynn Designs Dies


You will notice that I used my favorite Cheery Lynn Designs font - the Delicate Lace Script.  This fits in perfect for this week's challenge - fun with letters.  Be sure to play along for your chance to win a $20 store credit.  Also, remember, we are having an open design team call, through August 26th.

Copyright Statement


All content, including designs, pictures and words are the exclusive property of the author of each blog post. Information shared here is for inspiration only and may not be copied for publication, competition or profit. Thank you for your cooperation.

SOCIAL MEDIA 2


Follow Us @jointhemakersmovement


All content, including designs, pictures and words are the exclusive property of the author of each blog post.
Information shared here is for inspiration only and may not be copied for publication, competition or profit. Thank you for your cooperation.