Wednesday, July 31, 2013

Boo!

3:30 AM 10 Comments


Hi and good morning everyone, Alison here today sharing a Halloween card made using some of the new release dies from Cheery Lynn and also a couple of older dies too.

I started off with a 6 x 6 inch blank card base, and layered black bazzil card, silver card and and glitter paper. 

I then added the stunning and delicate spiderweb mesh border (which cuts like dream), and matted and framed my image onto the gorgeous Celtic Square Stacker.

I placed on top of my image the super-cute Witch's Laundry... this is such FUN! and for a finishing touch added a few bats and the sentiment Halloween.

All dies used on this card are
B322 - Spider Web Mesh Border
DL259 - Celtic Square Frames
L-1 - Silver Square Stackers
B334 - Witch's Laundry
B344 - Halloween
A194 - Going Batty

Thanks so much for visiting our blog today and dont forget there is still plenty of time to enter this weeks challenge of  'Hot Time in the Summer' and check back often to see more wonderful inspiration from the rest of the very talented DT!

Have a smashing week,


Tuesday, July 30, 2013

A Stitched Card from Jean

3:30 AM 4 Comments


 BJ received some lovely cards from Jean, that we would like to share with you over the next several weeks.  You may not notice at first, but Jean has added beautiful tiny stitches around the tag. And I love the trellis with all of those pretty flowers.
In case you missed it, we are having a design team call.  You can find all of the details here.

Monday, July 29, 2013

Design Team Call and Another Steampunk Card

3:30 AM 10 Comments

Hello, dear Cheery Lynn Designs fans! I hope I will be starting your week off great, not only with another Steampunk designed card, but also some news that will have many of you quite excited!

Now, for the BIG announcement!

Extra, Extra Read all about it… here’s the latest scoop from the creative world.
Now is the time that all Cheery Lynn Design lovers have been waiting for - It’s your golden opportunity to become one of our elite Design Team Members. Cheery Lynn Designs dies are known worldwide for their intricate detailed designs that cut clean and sharp.  From ornate doilies to realistic handmade flowers, Cheery Lynn Designs is an innovative leader in the die cut industry.  We’ve not had an open call in some time, so here’s your chance to WOW us with your most creative projects.  


DT's Swag and Perks
  • A monthly $50 wholesale (retail $100) allotment of your choosing on non-release months.
  • Release months - receive a variety of assigned dies.
  • Wholesale pricing ( 50% discount) for any additional personal die purchases.
  • Occasional product swaps with other vendors.
  • Weekly feature of design team work on blog.
  • Compensation for projects published in print magazines where Cheery Lynn Designs are the focus.
  • The company name must be mentioned in the article/supply list.
  • Bio listed on Design Team Blog.
  • Cheery Lynn Design Team Blinkie
  • Membership into private design team Facebook group where we have fun and share.
      Expectations of our Designers
  • Weekly posting of a new project with linked supply list and short write up. This is to be on the DT blog and also personal blog.
  • Participate in quarterly release.
  • Leave assigned amount of comments for our weekly challenge entries.
  • All projects are the property of Cheery Lynn Designs.  Periodically designers are asked to mail in projects and will be reimbursed for shipping charges. 
  • Be able to take clear and detailed photographs of all work.
  • Videos and tutorials are not required but are always welcomed.
  • Promote Cheery Lynn Designs via social media (Facebook, Pinterest, Twitter and other sites).
  • Be creative, have fun and enjoy our team.

Eligibility Rules
  • Submit three projects featuring Cheery Lynn Dies to CLDDesignTeamCall@aol.com by August 26, 11:59 pm EST.
  • Designers from around the world are welcome to apply but please note all write ups and communication must be in English.
  • Write a short bio telling us about yourself and why you feel you would be a perfect fit for our team.
  • Design team experience is not a must but if you have a resume of prior and or current design teams please send.
  • You may not serve as design team member or guest designer for any other competing die company, unless dies are manufactured by Dies Direct. If you have questions on this please feel free to email and ask.
·       
         Announcement of new design team will be released on the blog September 2 with the new 6 month term starting October 1, 2013.

We look forward to seeing your best projects and learning more about you.
 
Insiders Tips:

While we enjoy seeing scrapbook layouts and beyond the page projects occasionally, we find cards and tags are best suited for trade shows and displays. 

One way that is sure to impress is use only handmade flowers.

Make sure the dies are the star of the show.

Now on to my card....I created the background paper using our DIY Embossing plate, and spritzed it with mists to make it a little more grungy.  The flowers combined the new Gardenia strip die along with the miniature rose die for the center.  The Lock and keys aren't really a part of our Steampunk line, but I thought that they looked great with all of the gears.


The challenge this week is Hot Time in the Summer and we would love to have you play along for your chance to win a $20 store credit! 


Cheery Lynn Designs Dies

Sunday, July 28, 2013

Cheery Lynn Designs Challenge #91 Hot Time in the Summer

3:30 AM 2 Comments
Welcome to the Sunday Cheery Lynn Designs Challenge - now here on our Inspriation Blog! We look forward to you joining us each week for a chance to win a $20 store credit.  To see last week's winner, click here.

What fantastic entries we had last week for our Silver and Gold Challenge.  Thank you to all who entered. Every week the entire design team enjoys seeing your creations with our dies.  This week our challenge at Cheery Lynn Designs is

Hot Time In The Summer


 Here are the rules:
  • You MUST follow the theme and use at least one Cheery Lynn Designs die, of course, we would love to see more than one. 
  • You MUST add a link to your blog post in the InLinkz at the end of this post; no back posting, only new projects are allowed
  • You MUST link to this challenge in your blog post or on your gallery post
  • You may only enter the challenge ONCE per week.
The winner will be chosen based on merit by Cheery Lynn Designs. They will receive $20 towards shopping at the Cheery Lynn website. The challenge will end on Saturday night at 18:00 Eastern time.


And now to our inspiration for today......


captured the perfect summer day, filled with warm thoughts and gorgeous flowers.


Dies used:
Mexican Tile Pattern
Gardenia Strip
Holly Leaves
Flourish Leaf Strip
Wreath Strip
Miniature Rose
Sweet Williams Strip
Shasta Daisy
Embellishments 3
Exotic Butterflies 1
Circle Stackers


Debbie Brownmiller 
shared a card full of fun and sunshine.  I love how she created flowers to look like the sun, splashed on a pool of blue.


Dies Used:


Remember, you must use at least one Cheery Lynn Designs Die to enter this challenge.

Saturday, July 27, 2013

Something different

3:30 AM 6 Comments
Hey everyone!

Jenn here, back with my last week as guest designer.  Hope this finds everyone doing well and enjoying a warm, sunny weekend wherever you are!

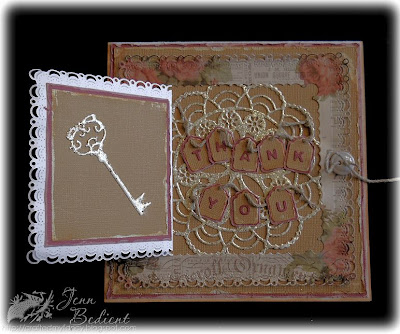
I was right last week- my new dies arrived with plenty of time to play with for this week's post; super fast shipping.  I managed to come up with a card that is... well, on the different side I guess.  I'm not too sure how I ended up with it but I rather like it.  I hope you do too!

I used the new Gardenia Strip; however, instead of using the center pieces of the flower I added in a little bling and tucked it into two sets of the new Dainty Bows that I heat embossed with Shabby Green Fran-tage.  The lock was also heat embossed, except with Shabby White Fran-tage.  Notice the two buttons that are tied?  Just open it up :)

While playing around with the Horizon Square Boutique Stacker Frames, it hit me to make a flap with the new Cape Cod Doily underneath.  A little extra spot on the front of the card to use more of our favorite Cheery Lynn dies!  It does still open at the bottom like a regular card as well.  I think I may play around with the closure more on the next one.  If I had known this is what it would lead to I probably would have used ribbon tucked under the papers.

With that, I bid everyone a farewell but looking forward to seeing all the fabulous creations in blog land.  Thank you for the lovely comments along the way- much appreciated!  Be on the lookout for the guest designer next month.  Looks like we're in for some fabulous inspiration!

Dies used:


Friday, July 26, 2013

Just can't get enough

3:30 AM 10 Comments

I can't stop using the new black eyed susan die...I love it.  I'm not sure if I'm more in love with the flowers or that darn cutie that comes with it and makes every flower, well....perfect.  I really love the way each die on this card pops all on its own.  The small French lattice is stunning, but so is the flower cluster and then it's all pulled together with the Alison's ribbon. 

 
Here is a complete list of all the dies used with a link so you can stock up and start creating yourself. 
 
 
See you next week,
Lori

Thursday, July 25, 2013

With the Tip of my Hat...

3:30 AM 9 Comments
Hi there,

Although I am bidding you a very fond "Adieu" today, I wanted to take the opportunity to leave you with a "TON" of inspiration!... it's just my small way of saying a big thank you for all of your lovely support over the past many months : )

Today I am going to share with you not 1not 2, but 3 OTP (off the page) projects to get your creative mojo going, so hang onto your hat!  You will see what I mean by that in a moment... : )
To start today's inspiration off, I wanted to share with you this pretty table-top decoration that holds a battery operated votive candle.  For this project I wanted to feature some of my most favorite Cheery Lynn dies.  If you don't already have these dies in your inventory, you really should run out and get them!


a closer look at the detail on the front.  The inside was lined with clear vellum so I could attach the gorgeous Wedding Vows frame.  Wouldn't this make a lovely centerpiece if you were hosting a special anniversary party or any gathering for that matter by simply just substituting the sentiment.


and here is a closer look at the Roses made from Cuties 3 to adorn the top.


Finally, I tried to get a picture to show you how it looked with the lights dimmed, so pretty!


Here's a list of the dies used for this project:


For my second project, how about some "His and Hers" Steampunk Hats?


here is a closer look at my "his" version and of course, I had to add a couple of funky flowers LOL!  The flowers were made using the Sweet Williams Strip.


and finally here is a closer view of  my "Girly" Steampunk hat.


Here's a list of the dies used for this project:


And now for my final project...I was thinking about the lovely summer weather we have been enjoying and since I am on the "hat" theme I wanted to create my version of an elegant Garden Party Hat.  I hope you like it : )  It is up there as one of my favorites so far!  The hat is actually quite tiny measuring just shy of about 6 inches.


and best of all the flowers!  The New Release Gardenia Strip was used to make these beauties.  This is definitely another die, if you don't have already, you really need to add to your collection of Cheery Lynn dies.  I guarantee you will love it!


Here's a list of the dies used for this project:


I hope you can find some time to visit the challenge this week and put in your entry where the theme is Silver and/or Gold.  With your entry you will have a chance to win a $20.00 shopping spree at Cheery Lynn Designs!

And for one final time, I wish you all a very Cheery Day!
joann sig 2

Wednesday, July 24, 2013

Matchbox Giftbox

3:30 AM 6 Comments


Hi and Good Morning, Alison here today :)  I hope everyone is having a great week so far!

This week I wanted to show you how quick and easy it is to make a gorgeous wee gift box out of the Cheery Lynn Designs matchbox dies.

I used the largest Matchbox Die set for this gift box, and cut out 2 pieces in matching double sided 12 x 12 patterned paper.  I assembled the box quick and easily, as all the folds are embossed and it just all falls into place so well! :) 

I then decorated the sides of the box with  Sophias Heart border, and the Forever sentiment.

 
The top of the box is decorated with the matching Sophias Heart Mini Doily, and I made the flower from one of the new release floral strips Gardenia.  I held this together with a pearl brad and added some olive green leaves cut from the Rose Leaf Strip.
 
 
This was such a lovely gift box to make, and so easy too, I can see lots of uses for this die and all the other sizes to make a set!
 
All dies used are:
 
 
Thanks so much for visiting our blog today, and I hope you find time to enter our challenge this week where our theme is Silver and/or Gold.
 
Have a smashing week,


Tuesday, July 23, 2013

A Card from Jodi Baune

3:30 AM 8 Comments


 We have missed Jodi Baune on our design team and are thrilled to be able to share a card from her today.  Jodi's flower arrangements on her projects are always breathtaking - and this is no exception.   Thank you so much Jodi, for letting us share your gorgeous creation!

Monday, July 22, 2013

Good Things Are Going To Happen

3:30 AM 9 Comments
 Did you enjoy seeing all of the new release from Cheery Lynn Designs? It's a great release, and I just can't get enough of it!  So I've got a shaped card to share with you today, that highlights the great new Doily Stackers that we added this go round.  I am going to be using these all of the time!

I also used the new Gardenia Flower Strip to make these gorgeous flowers.  I am working on a video now to show you 3 different techniques for shaping this flower - from simple to advanced.  For these, I used a wet shaping technique with mists from Lindy's Stamp Gang, as well as their 2-tone embossing powders. The centers were made with the cuties fringe that is part of the Black Eyed Susan Strip (and it's just really fun to use!)

 Cheery Lynn Designs Dies

I know summer can be a very busy time of the year, but don't forget to play along with the Cheery Lynn Designs Challenge. Each week a winner is chosen to win a $20 store credit.  The theme this week is Silver and/or Gold.

Sunday, July 21, 2013

Cheery Lynn Designs Challenge #90 Silver and/or Gold

3:30 AM 5 Comments
Welcome to the Sunday Cheery Lynn Designs Challenge - now here on our Inspriation Blog! We look forward to you joining us each week for a chance to win a $20 store credit.  To see last week's winner, click here.

What fantastic entries we had last week for our Beautiful Borders Challenge.  Thank you to all who entered. Every week the entire design team enjoys seeing your creations with our dies.  This week our challenge at Cheery Lynn Designs is

Silver and/or Gold


 Here are the rules:
  • You MUST follow the theme and use at least one Cheery Lynn Designs die, of course, we would love to see more than one. 
  • You MUST add a link to your blog post in the InLinkz at the end of this post; no back posting, only new projects are allowed
  • You MUST link to this challenge in your blog post or on your gallery post
  • You may only enter the challenge ONCE per week.
The winner will be chosen based on merit by Cheery Lynn Designs. They will receive $20 towards shopping at the Cheery Lynn website. The challenge will end on Saturday night at 18:00 Eastern time.


And now to our inspiration for today......


created a snowy, wintery scene combining her patterned paper and Cheery Lynn Designs new Winter Neighborhood Border.  The Lace Corners in gold really make this a festive card.


Dies used:
Winter Neighborhood Border
Debbie Brownmiller 
also created a Christmas project with the Winter Neighborhood Border - but her's represents a night scene, by using black cardstock. I also love how she cut the border apart to create a different landscape.


Dies Used:


Remember, you must use at least one Cheery Lynn Designs Die to

Saturday, July 20, 2013

Book/ Shadowbox Card

3:30 AM 8 Comments
Hey everyone!

Jenn here, back again with another week of guest designing.  Thank you so very much for all your comments the past two weeks- they really mean a lot!

I am so impressed with all the gorgeous creations from the DT showcasing all the new dies.  They all did such a wonderful job with their projects, didn't they?  The new dies are all so lovely, I had such a hard time deciding which ones I wanted! I would not be surprised if they are here in time for me to play with by my post next week.  One thing I absolutely love about ordering directly from Cheery Lynn is how super fast my order ships.  

This week while looking around for inspiration, I found some really pretty cards that I wanted to give a try.  I have seen them called book cards or shadowbox cards.  I also have a few border/edger dies that I haven't used yet which I thought would work perfectly for this type of project.  Here is my first go (lots of pictures):


This is the front of the card, the ribbon on the side is to tie the two covers closed. 


This was taken from a different angle, to show the dimension of the flowers.


Here is a close up of the flowers.  I've used the Daisy Strip, Shasta Daisy Strip and Chrysanthemum Strip.  There is also some different foliage (list at bottom), a bark heart and some flower buds that my darling toddler brought to me to add in lol!


 This is the inside of the card- the shadowbox portion.  As you can see, I've been playing around with bits and pieces again :)  The only problem I have with that is I tend to forget which dies I've used pieces from!  Doesn't the Felicity Doily look a bit like a lace sun?  So pretty.  I've also used another Daisy Strip, but this time I folded the petals in half lengthwise before shaping the rest of the way.


 And lastly, here is a picture of the inside cover.  I chose this paper out of the bunch because of the lined section which will give me a spot to write my sentiment/message once I decide what to use the card for.

That's it for me this week- wishing everyone a fantastic weekend!

Dies used:
Front:

Inside:


Friday, July 19, 2013

Winner Winner Chicken Dinner + a great card!!!!!

3:30 AM 4 Comments
Hi everyone, I know you have all enjoyed this great release week and all the fun projects that our design team created.  We had so many comments on our posts, it really pleased us that you loved the new release.  Now it's the time to announce our first winner of the bicycle steampunk die for comments left.....drumroll please............

Congrats to JENNIFER SCULL.  

Please email beadz@bellsouth.net with your mailing address and we'll get your new die right out to you.  

Now onto my project for today, I hope you enjoy. 


Dies Used: 

Be sure to pin it to win it with our current contest still going on Pinterest.  Winner will be next week, so jump in the fun.  

See you next Friday!

Lori 

Thursday, July 18, 2013

Pink Zinnias and a Fancy Fold

3:30 AM 3 Comments
Hi there and Welcome Back!  I hope that everyone has enjoyed the Blog Blitz featuring Cheery Lynn Designs New Release : )

Today I want to show you a different twist on a card I did a while ago called a Pop-up Book Card.  I struggled with a name to call this but I am thinking I will call it a Multi-Framed Pop Out Fold and I think you will be surprised just how easy it is to create it.  I will provide some instructions at the bottom of this post but first, here's a bit of eye candy!


with a closer look at the detail:


and the best part, here is the inside : )  Included are a couple of tags so you have a place where you can write your own personalized message.  These are great to use as bookmarks as well.


and once again, a closer look at some of the detail:


To create this card simply follow the steps below (I based this on a pop-out card so here are the dimensions I used):

1.  Cut a piece of DP 11.5 x 6 for the front.
2.  Cut another piece of DP 11.25 x 5.75 for the inside.
3.  For the Pink Frames on the inside I took the 2 smallest XL-10 - Coved Rectangle-Classic LG Stackers Nesting Dies and placed them inside one another to cut my frame.  (Tip - Use a tiny piece Blue Tack which is a pressure sensitive adhesive between the dies to keep the 2 dies positioned the way you want them).  I cut this 8 times.
4.  Next using the largest of the 2 dies you used in step 3, cut 4 pieces of White for the centers.
5.  Glue 1 frame to each of the White pieces for a total of 4.
6.  Now for the fun part, I cut small strips of paper and scored them so I could make the pop-out portion.  I took 2 of the White framed pieces and between them attached 2 empty frames.
7.  Behind the 2 White framed pieces I attached another frame but cut the top off first so that I could use them as pockets to hold the tag inserts.
8.  Center and attach the piece you created to the card and simply attach the other 2 White framed pieces to the pop-out piece in the center of the card.

Here's a quick peek at the dies used to create the inside pieces before they were assembled.


Here's a list of the dies used for this project:

B261 - Tags 2
B332 - Ankara Lace Border
B333 - Sophia's Heart Border
D138 - Mini Dimensional Butterflies w Angel Wings
DL250 - Cape Cod w/Angel Wing
DL251 - Horizon Coved Rectangle Boutique Stacker Frames
XL-6 - Circle - Inverted Scallop LG Stackers Nesting Dies
XL-10 - Coved Rectangle-Classic LG Stackers Nesting Dies

Be sure to visit the challenge this week and put in your entry where the theme is Beautiful Borders.  With your entry you will have a chance to win a $20.00 shopping spree at Cheery Lynn Designs!

Hope to see you back again tomorrow for your "daily dose" of inspiration!

Have a Cheery Day!

Copyright Statement


All content, including designs, pictures and words are the exclusive property of the author of each blog post. Information shared here is for inspiration only and may not be copied for publication, competition or profit. Thank you for your cooperation.

SOCIAL MEDIA 2


Follow Us @jointhemakersmovement


All content, including designs, pictures and words are the exclusive property of the author of each blog post.
Information shared here is for inspiration only and may not be copied for publication, competition or profit. Thank you for your cooperation.