Showing posts with label Beth Moore. Show all posts

Saturday, July 23, 2011

Garden Gate Thank You Card with Cheery Lynn Designs

3:00 AM 1 Comments
Today is the last post from design team member, Beth Moore.  Due to personal reasons, she has decided to resign from the Cheery Lynn Designs design team.  Her simple, yet elegant style will be missed on the blog.  Please join me in thanking Beth for all her hard work for Cheery Lynn over the past 8 months.  We wish you the best of success in the future.

Cheery Lynn Designs Rectangle Card-Makers Stackers Nesting Dies paired with Scalloped Rectangle Card-Makers Stackers Nesting Dies create the perfect backdrop for this sweet and simple Thank You card. 


For a bit of rustic charm, I cut Kraft cardstock with the darling little Garden Gate die and wrapped it up into a bow with pink and white Baker's Twine that coordinated perfectly with the pastel colors in my patterned paper.  I wanted the sentiment to really stand out as the focal point for this card, so I chose to stamp in onto cream cardstock cut with one of the larger French Flair Classic Large Stackers Nesting Dies from the set and popped it up with dimensional foam to really make it stand out against the garden gate. I love the gorgeous embossed border that is created when cutting with the French Flair Classic Large Stackers Nesting Dies, especially if you use the "Cuttlehug" Large Metal Adapter Plate.  With my Big Shot, I've found that if I use the metal adapter plate in my stack it alleviates the need to first cut and then emboss and instead does it with one easy step with most dies.

Be sure to visit the Cheery Lynn Designs blog each and every day for more inspiration using Cheery Lynn Designs Magical Dies!

Sunday, July 17, 2011

Celebrate with Cheery Lynn Designs Dies

3:00 AM 3 Comments
For today's "Celebrate" card, I paired Cheery Lynn Designs Rectangle Card-Makers Stackers Nesting Dies cut from coordinating patterned paper with Scalloped Rectangle Card-Makers Stackers Nesting Dies to create a cheerful backdrop for for the pennant banner and flower. 


To create the banner, I layered die cuts from the Pennant Die cut from cream cardstock and patterned paper and adhered them to the cardfront. As a focal point, I added a flower cut from yellow and green cardstock using Judy's Blooms die. Finally, I added a stamped sentiment onto cream cardstock cut using the Large Silver Stackers Nesting Dies.

More examples of how I used the perfectly sized Card-Makers Stackers Nesting Dies to create pretty and professional-looking projects are here, here and here.

Monday, July 4, 2011

Live for Today with Cheery Lynn Designs

3:30 AM 5 Comments
I paired Cheery Lynn Designs Rectangle Card-Makers Stackers Nesting Dies cut from smokey black and cream cardstock with daisies cut from patterned paper using the Darling Daisies die to create this elegant and inspirational card with matching envelope. 


The perfectly sized and beautifully embossed edge that is achieved by using Cheery Lynn Designs Card-Makers Stackers Nesting Dies is featured on the Vintage Cream cardstock that the sentiment is stamped on, as well as the Smokey Shadow cardstock that backs the sentiment. These dies help make professional looking cards so quick and easy that they are a must-have item for all card makers no matter what your skill level may be.

To highlight both the sentiment and the envelope, I cut daisies from the Cheery Lynn Designs Darling Daisies die and adhered black rhinestones to each for added glamour. Gently folding each petal of the daises together adds extra dimension to the flowers on this project. 

More examples of how I used the perfectly sized Card-Makers Stackers Nesting Dies to create pretty and professional-looking projects are here, here and here.


Supplies Used for this Project:
Cardstock: Papertrey Ink: “Smokey Shadow”, “Vintage Cream”
Patterned Paper: Sassafras: “Ellie’s Tale” Wee Bundle
Stamps: Papertrey Ink: “Through the Trees”
Ink: Tsukineko Memento Ink: “Tuxedo Black”
Embellishments: Imaginisce: Hot Pack Compact “Black”
Dies: Cheery Lynn Designs: “Card-Makers Stackers Nesting Dies” and "Darling Daisies"
Other Tools: Sizzix: Big Shot Die Cut Machine, Imaginisce: I-Rock Tool and dimensional foam tape.

Saturday, July 2, 2011

Enjoy the Moment with Cheery Lynn Designs

3:30 AM 6 Comments
I'm excited to share my project with you today because it combines some of my most favorite basic (must-have) dies from Cheery Lynn Designs as well as one of my favorite color combinations... Lemon Yellow and Gray! This project features die cuts from Rectangle Card-Makers Stackers Nesting Dies, French Flair Dies, the Dotted Swiss Embossing Plate, and a cut from the Pair of Ferns die. (I apologize in advance that the embossing is difficult to detect in this photograph - but it is there on the large piece of yellow cardstock!)


To recreate this card...
  1. Create a 4 1/4 x 5 1/2 inch card base from gray cardstock.
  2. Cut a piece of yellow cardstock to 4 x 5 1/4 inches, emboss with Dotted Swiss Embossing Plate and adhere to card front.
  3. Die cut piece of  patterned papper using Rectangle Card-Makers Stackers Nesting Dies and adhere to a piece of gray cut from the next larger size Rectangle Card-Makers Stackers Nesting die; adhere to card front with dimensional foam tape.
  4. Die cut Pair of Ferns from smokey black cardstock and adhere one fern to card front (save the other for another project).
  5. Die cut piece of gray cardstock from French Flare die and stamp with sentiment then adhere to a piece of yellow cardstock cut from the next larger French Flare die; adhere to card front with dimensional foam tape.
  6. Adhere rhinestone.
Hope you Enjoyed this Cheery Lynn Designs Moment....and be sure to stop back in at the Cheery Lynn Designs blog every day for more inspiration from the Cheery Lynn Designs Design Team!

Saturday, June 25, 2011

Bright and Cheeryful Belated Birthday Wishes with Cheery Lynn Designs

3:30 AM 6 Comments
Today I want to share this bright and cheeryful Belated Birthday card featuring dies from Cheery Lynn Designs.  It seemed only fitting to create a "sunny" card given that it is Summer here where I'm at (always happy news when you live in Michigan!).


To create this project you'll need these Cheery Lynn Designs dies, the Lattice 1 Die/Embossing Plate, Judy's Blooms and Rectangle Card-Makers Stackers Nesting Dies. I really appreciate how the Stackers Nesting Dies fit so neatly onto the Lattice 1 Die creating the perfect framed background for this card.

Instructions:
  1. Create a 41/4 x 5 1/2 inch card base from yellow cardstock.
  2. Die cut piece of blue cardstock using the Lattice 1 die and adhere to card base.
  3. Die cut piece of patterned paper from Rectangle Card-Makers Stackers Nesting Dies and adhere to piece of yellow cardstock cut from one size larger Rectangle Card-Makers Stackers Nesting Dies; adhere to card front.
  4. Die cut Judy's Blooms from both yellow and blue cardstock, assemble flower and adhere to card front.
  5. Cut banner from yellow cardstock, stamp with sentiment, score ends of banner to fold in as shown on card and adhere with dimensional foam tape.
  6. Adhere rhinestone to flower.
Hope you have a bright and sunny day and don't forget to visit the Cheery Lynn Designs blog again for more inspiration from the Cheery Lynn Designs Design Team!

Saturday, June 18, 2011

New Border Carnival from Cheery Lynn Designs that will make you Swoon!

3:30 AM 10 Comments
This week we are showcasing the newest Cheery Lynn Designs dies officially released on June 15 and for my card today I am giving top billing to the new Border Carnival die that just makes me swoon (and I bet it will do the same to you as well!). I am not afraid to say that this is my new FAVORITE... look at the beautiful detail on this border! It is so beautiful in fact that I wanted it to be featured on this card, so I left things very simple.


Important Note:  This border dies comes packaged on a piece of cardboard and I have a little secret for you... if you go ahead and leave the die attached to the cardboard and then add a Cuttlehug to your stack as well... it will cut like BUTTER... seriously all those little pieces from the intricate details will simply fall out when you pull the die from the paper. 

 
Instructions:
  1. Create a 4 1/4 x 5 1/2 inch top fold card from dark blue cardstock.
  2. Cut a piece of patterned paper to 4 x  5 1/4 and adhere to card base.
  3. Die cut two Border Carnivals from white cardstock, trim to size and adhere to card front.
  4. Die cut Silver Stackers Oval Nesting Die from white cardstock and stamp with sentiment.
  5. Die cut Scalloped Oval Nesting Die from dark blue cardstock and adhere to back of sentiment oval; pop up on card with dimensional adhesive.
  6. Adhere Glam Rocks with I-Rock tool.

 
That's all for today, but be sure to visit the Cheery Lynn Designs blog every day for more inspiration from the Cheery Lynn Designs team!

Saturday, June 11, 2011

More Selective Embossing with Cheery Lynn Designs

3:30 AM 4 Comments
A few weeks ago I showed you a new technique that I learned to selectively emboss your card front using Cheery Lynn Designs Embossing Plates, and Card-Maker's Stackers.I loved the technique so much that I wanted to do yet another card for you today using this same technique. 

For this card, I used the Fleur de lis and Card-Maker's Stackers Rectangles to create my Selective Embossed card front.  This card also features the Scalloped Diamonds Border, Sweet Williams and the leaves from Judy's Blooms.


To recreate this card:
  1. Selective Emboss the front of a 4 1/4 x 5 1/2 inch card made from white cardstock. (See tutorial right here.)
  2. Die cut border and adhere to side of card as shown (trim as needed to fit).
  3. Die cut Sweet Williams from light and dark purple cardstock and adhere together.
  4. Die cut leaves from green cardstock using Judy's Blooms die and adhere to cardfront.
  5. Adhere flower to leaves on card front and adhere pearl to flower.
  6. Stamp sentiment.


Thanks so much for stopping by the blog today and remember to visit each and every day of the week for more inspiration from the Cheery Lynn Designs Design Team!

Wednesday, June 1, 2011

Gratitude for All You Do with Cheery Lynn Designs

3:30 AM 4 Comments
Today I have a quick and easy card... that's filled with COLOR and cute flowers too from the Cheery Lynn Designs May release, Darling Daisies. I also used the Small Oval Classic Silver Stackers Nesting Dies, the Scalloped Oval Nesting Dies and the Scalloped Diamonds Border.


To recreate this card...
  1. Create a 5 1/2 x 4 1/4 top fold card from yellow cardstock.
  2. Cut a piece of patterned paper 5 1/4 x 4 and adhere to card front.
  3. Die cut a piece of coordinating patterned paper using the Scalloped Diamonds Border die; adhere to card front.
  4. Die cut Darling Daisies from patterned paper and green cardstock, assemble and adhere to card.
  5. Die cut Silver Stacker Oval from white cardstock and stamp with sentiment; adhere to yellow cardstock die cut using the Scalloped Oval and pop up on card with adhesive foam.
  6. Die cut and adhere Darling Daisies to Ovals as shown.
  7. Adhere rhinestones to Daisies.
Remember to stop back at the Cheery Lynn Designs blog every day for more inspiration using Cheery Lynn Designs Dies and Embossing Plates!  And don't forget about the Butterfly challenge, please join in on the fun for a chance to win a $50 or $25 shopping spree to Cheery Lynn Designs.  The challenge will end on June 4th.

Saturday, May 28, 2011

Selective Embossing with Cheery Lynn Designs Embossing Plates

3:00 AM 7 Comments
Before I get started with today's post, I just want to remind you that the

Cheery Lynn Designs Butterfly Challenge, ends June 4th

So you still have time to enter our Butterfly Challenge for a chance to win one of two shopping sprees to Cheery Lynn Designs!  We can't wait to see what you create!

Okay, so with that said, a few weeks ago I saw this great tutorial by Erin Lincoln where she selectively embossed part of her card front.  After watching her tutorial, I thought I'd give the technique a try with my Cheery Lynn Designs Dotted Swiss Embossing Plate and one of the small Rectangle Card-Maker Stackers dies.

I started with a 4 1/2 x 5 1/2 inch top-fold card and slid the top over the embossing plate and laid it down on my die cut machine like shown below (using an emboss stack). I then laid the Card-Makers Stackers Rectangle die down CUT SIDE UP (please, please make sure it is CUT SIDE UP so you don't ruin your embossing plate!!!). Position the second die (CUT SIDE UP) where you want it to show up on your card front.


Then you are simply going to fold down the top of the card like so...


Then lay the embossing pad over that, finish your embossing stack and run it through your machine. After which you'll have a finished card front like this... (p.s., I used a different embossing plate on the one pictured below as it photographed better since the card is white).


Ta-da!  Now you have the perfect place to stamp your sentiment... and add a beautiful Cheery Lynn Designs flower like the one I created here using the newly released Judy's Blooms.


I know I am going to use this technique again and again!  I'd love to hear if you try this on your next project... and if you do, please leave a comment with a link to your project so I can check it out!

Don't forget to visit the Cheery Lynn Designs blog every day for more inspiration using your Cheery Lynn Designs dies and embossing plates!

Saturday, May 21, 2011

Thinking of you and Exotic Butterflies too...

3:30 AM 6 Comments
All week long the Design Team here at Cheery Lynn Designs has showcased the newly released Exotic Butterfly dies. I just had an opportunity to look back through the designs featured this week and I have to say that I am totally AMAZED at the projects created by the other members of the Design Team, from the adorable Butterfly Magnets created by Tanisha to the gorgeous decorated frame by our Design Team Leader Sandy... well, I can't imagine that you all haven't already hopped on over to the Cheery Lynn Designs store to buy up some of these perfectly yummy dies!  Kianel used them for masks right here to make beautiful background paper, Liz made this most adorable layout that features a butterfly net and Irit showcased the butterflies beautifully using her vintage style for both a card and a layout right here.  I can hardly wait to see what Jeannie will create as well. (Note: I prescheduled my post, so Jeannie's isn't actually up yet, but I'm betting she rocked the butterfly dies as well.)

Tomorrow will be a BIG EXOTIC BUTTERFLY day here at the Cheery Lynn Designs blog too... and you are NOT going to want to miss it, so be sure to take some time to visit us some time during your day (our big event involves a prize too!).

For my project this week, I chose to showcase a couple of the Small Exotic Butterflies  (the perfect size for cards and other smaller-scale projects) along with the new Fanciful Flourish and Heart Chain Border. I also used two of the Large Oval Scallop Nesting dies and two of the Large Silver Stackers Nesting Dies, as well as the Damask Embossing plate to complete this project.


That's all for today... and don't forget to visit again tomorrow for our big event!

Saturday, May 14, 2011

Wedding Card Made Easy with Cheery Lynn Designs

3:30 AM 5 Comments
The wedding season is just around the corner so I thought it would be fun to show you how you can create a Tuxedo inspired card for the Bride and Groom with ease when you use Cheery Lynn Designs Dies and Embossing plates

To create this card you'll need the following supplies: Black and White cardstock, Crystal Gems (mine are are Imaginisce Hot Rocks from the Crystal Compact), a Corner Chomper, the newly released Cheery Lynn Designs Pair of Ferns die and the Cheery Lynn Designs XL Dotted Swiss Embossing Plate (I know the dots are hard to see in this photo but they are there in all their glory I was just having issue balancing the white in Photoshop!) as well as the second to the largest CardMakers Stackers Nesting dies. You'll also need, black ribbon (also hard to see due to the light issues), a sentiment stamp and black ink (I used Memento in Tuxedo Black).

Featured Die: Newly Released Pair of Ferns

  • Create a 4 1/4 x 5 1/2 cardbase from white cardstock.
  • Cut a piece of white cardstock with the second to largest CardMakers Stackers Nesting dies and emboss with Dotted Swiss XL Embossing plate; trim corners with Corner Chomper.
  • Cut a piece of black cardstock 4 x 5 1/2 and adhere to back of embossed white cardstock; wrap bottom of piece with black ribbon and adhere to cardbase.
  • With black cardstock die cut Pair of Ferns die with die cut machine two times, discard one die cut and trim one shorter than the other two.
  • Arrange Fern die cuts off center on front of card as shown and adhere to card as shown.
  • Stamp sentiment on white cardstock with black ink and trim two corners with Corner Chomper; adhere on top of black ribbon.
  • Add Crystal Hot Rocks with Imaginisce I-Rock tool.
You can see more examples of some Clean and Simple cards I created using Cheery Lynn Designs dies right here and here, and you can see new inspiration examples from our entire Cheery Lynn Designs Design Team each and every day by visiting the Cheery Lynn Designs blog.

Saturday, May 7, 2011

Combine Cheery Lynn Designs Dies to Create a New Die Cut

3:30 AM 27 Comments
As if Cheery Lynn Designs weren't already versatile enough, I just wanted to show you today how it is possible to combine Cheery Lynn Designs Dies to create a new die cut for your next papercraft project. I love how combining the dies makes it possible to get a whole new look (which means lots more designing power for your buck ...and you just gotta love that!).

For this project, I paired two newly released dies from Cheery Lynn's Designs to create a floral centerpiece that really stands out. First, I die cut the Fanciful Flourish die from Ripe Avocado cardstock. The die looks like this...

Fanciful Flourish
Even on its' own, this die cut is gorgeous... but I really envisioned my project with layers of flowers too, so I chose the newly released Darling Daisies die cut that looks like this...

Darling Daisies
Then I die cut several pieces of Red Poppy cardstock so that I had a nice little pile of various sizes of red flowers (for this project I chose not to use the stems from the die, because I wanted to add them to the Fanciful Flourish cut). I created double layers with the flower cuts and adhered them together. Then I added a little gem to the center of each flower (with the I-Rock and a few Hot Rocks), so that I could end up with a finished project that looks like this.

Fanciful Flourish combined with Darling Daisies Die Cuts
Creating this card got me pondering other ways to combine Cheery Lynn Designs dies to create different looks using the same dies... in fact, we'd love to see examples of how you combined your dies to create a new die cut, and when you do, why not leave a comment here with a link to your project so we can visit your blog (or gallery) to see what you created too!

Thanks so much for stopping by today and don't forget to visit the Cheery Lynn Designs blog every day for more inspiration from our Design Team at the Cheery Lynn Designs blog.

Don't forget that one lucky person leaving comments on every post Sunday May 1st through Sunday May 8th will win a
$25 shopping spree at Cheery Lynn Designs.
What a great way to start your new die collection!

Saturday, April 30, 2011

Masculine Card with Cheery Lynn Designs Dies

3:30 AM 5 Comments
Can you believe that it is the last day of April already... spring is in full swing where I am at in Michigan (finally!) and that alone makes me feel so happy... but add to that the chance for me to stop in here at the Cheery Lynn Designs blog to share another card I created using Cheery Lynn Dies and I'd say life is pretty darn good right about now (not to mention the fact that it is also SATURDAY..yay!).

When I was putting together my thoughts about what I wanted to create today, I decided it was high time we tackled another masculine card. I don't know about you, but for me, creating cards for men is far more challenging than creating cards intended for a female recipient. 

For today's card you'll need a set of three stamps that are small enough to use together (these are DarkRoom Door stamps), a sentiment stamp, some Core'dinations cardstock, (I used Irish Mint from the Chocolate Box Collection), the Core'dinations Sand-It Gadget, the second, third and fourth dies from the Rectangle Cheery Lynn Designs Card-Maker's Stackers collection, Cheery Lynn Designs Lattice 1 die, Rustic White cardstock, ribbon (mine are from Papertrey Ink) and Baker's Twine (from Kraft Outlet). You will also need, ink (I used Ranger Archival in Coffee), and your favorite tabletop die cut machine.


Here's how to recreate this masculine card:
  1. Create 4 1/4 x 5 1/2 card base from Rustic White cardstock
  2. Cut a piece of Irish Mint cardstock to 4 x 5 1/4; emboss with Lattice 1 die and lightly sand to achieve the worn look.
  3. With the fourth die from the CardMaker's Stackers Rectangle die, die cut piece of Rustic White cardstock and adhere to embossed Irish Mint Cardstock; wrap with ribbon and Baker's Twine and adhere to card base.
  4. With the second die from the CardMaker's Stackers Rectangle die, die cut piece of Rustic white cardstock and stamp images as shown.
  5. With the third die from the CardMaker's Stackers Rectangle die, die cut piece of Irish Mint cardstock and adhere to back of stamped cardstock; adhere to card front with Pop Dots to add dimension.
  6. Stamp sentiment on piece of Rustic White Cardstock and adhere to card front as shown.
Cheery Lynn Designs CardMaker's Stackers dies make it so easy to create perfectly spaced layers with a cleanly embossed edge for your cards and other papercraft projects as well.  More examples of how I've used the CardMaker's Stackers dies for cardmaking are here, here, and here . Other examples of how I used the Lattice 1 die are here.

I hope you have a wonderful weekend and be sure to stop in at the Cheery Lynn Designs blog every day for more inspiration from the entire Cheery Lynn Designs Design Team!

Saturday, April 16, 2011

Mixed Paper French Flair Die Cut Card

3:30 AM 3 Comments
You know that saying, "Imitation is the best form of flattery" well if that is true, then today I'm sending that flattery to the very gifted Julia Stainton. I don't know her personally (and I hope I have the right one...as I looked her up on Google!).  At any rate, there is a card in the May/June 2010 issue of Papercraft Magazine entitled "The Carriage Awaits" that she created that REALLY spoke to me... I mean, really, really.  I loved her card so much that I decided to CASE it (if you look that acronym up it means to either Copy and Steal Everything or Copy and Share with Everyone)... either way... I did it.

Thank you so much for the inspiration Julia as I had such a GREAT time creating my version of that card and I FINALLY used a stamp set I bought almost a year ago... a BIG plus. Add the use of that stamp with my MOST FAVORITE dies from Cheery Lynn Designs and I've got a card that I am totally lovin' on today thanks to Julia's creative brilliance! (For the record, I think her card was more of a wedding theme... not so much baby). At any rate, it is just too bad I don't know a SINGLE PERSON to give it to right now...so I'll have to stow this one away (with the other million or so cards I've made) until someone has a baby on the way!

In the meantime however, I want to share information on how I created the mixed paper die cut using Cheery Lynn Designs French Flair Large Stackers Nesting Die! I typically make sure that the projects I create for my Saturday posts here at the Cheery Lynn Designs blog incorporate more than just one product from Cheery Lynn Designs... but today is an exception to that rule kinda in that I used only the French Flair (although from two different sets).  The reason, is that I wanted to show you how FANTASTIC the French Flair die looks when you layer both patterned paper and cardstock to create the cut.


The photo below gives you a closer look at the mixed patterned paper die cut and you just gotta love that embossed edge from the Cheery Lynn Designs French Flair die too!


Cheery Lynn Designs full body dies make it very easy to get this mixed paper look with the die.

Directions:
  1. Create a 5 x 5 inch cardbase from Kraft Cardstock and ink edges with white ink.
  2. Stamp sentiment at bottom of cardbase as shown.
  3. Cut a piece of scrap paper approximately 4.5 x 4.5 inches (I used white cardstock for this).
  4. Cut strip of pink and white gingham pattened paper and adhere to bottom of scrap cardstock.
  5. Cut strip of aqua cardstock, punch or cut a border onto cardstock and adhere on top of scrap cardstock (slightly overlapping gingham cardstock)
  6. Cut strip of aqua patterned paper and adhere at top of scrap cardstock slighly overlapping aqua cardstock.
  7. Place the scrap cardstock with layered paper face down onto French Flair die and tape to scrap cardstock then run through tabletop die cut machine (die face up) (note: I taped the paper onto the die and ran it back and forth in my machine a couple of times due to thickness of paper and to ensure a nicely embossed edge).
  8. Adhere Ric Rac as shown and Adhere die cut to card base.
  9. Die cut small French Flair die (large enough for your image) and stamp image of buggy onto die cut.
  10. Color buggy with Copic Markers and ink edges.
  11. Tie twine around mini clothespin and clip onto edge of image die cut.
  12. Adhere to card using Pop Dots for added dimension
  13. Tie bow and adhere to card.
  14. Layer flowers and adhere together with glue gun.
  15. Adhere flower to top of bow.
 There you have it, a beautifully layered French Flair die cut to add to your next project!

Cheery Lynn Designs Dies Used:
French Flair Classic LG Stackers Nesting Dies, French Flair Little Stackers Nesting Dies

Visit my blog for a detailed list of the supplies used to create this card and be sure to check back in again tomorrow for more inspiration from Cheery Lynn Designs!

Saturday, April 9, 2011

An Apple for the Teacher

3:30 AM 4 Comments
Before we know it, school will be out for the summer (yay!), so now is the perfect time to start creating a card or two for that special teacher that put up with taught your child all year...don't you think? :-) To create today's card, I paired the new Apple Orchard Extra Large Embossing Plate with the darling little Apple Orchard 2 x 3 inch die.

Beth Moore
Directions to create this card:
  • Create 4 1/4 x 5 1/2 inch cardbase from white cardstock
  • Cut patterned paper to fit front of cardbase and adhere.
  • Cut Core'dinations Whitewash Collection (Grandma's Rocker) to 4 x 5 1/2 inches and emboss with Apple Orchard XL Embossing Plate.
  • Lightly sand top of embossed cardstock with Sand It Gadget.
  • Adhere embossed cardstock to card front.
  • Cut piece of patterned paper 2 1/2 x 4 1/4 inches and die cut with Scalloped Diamond border.
  • Adhere to cardfront.
  • Wrap card with ribbon and tie into bow.
  • With 2 x 3 inch Apple Orchard die, die cut 2 apples from red cardstock (discard worm or save for another project). 
  • Color stems of apples with dark brown Copic Maker of choice.
  • Cut small piece of scrap white cardstock and adhere behind apple highlight. Adhere this apple on top of second apple with Pop Dots to create a dimensional shape.
  • Adhere apple to card front as shown.
  • Die cut scrap piece of Core'dinations (Grandma's Rocker) with Little Stackers Nesting Dies Scalloped Oval.
  • Die cut scrap piece of white cardstock with coordinating Silver Stackers Nesting Dies Oval and stamp with sentiment.
  • Adhere sentiment to Scalloped Oval die cut off center slightly to create a "shadow-look" and adhere to card front.
I do hope you enjoy your weekend and be sure to stop back in tomorrow and every day for more inspiration from the Cheery Lynn Designs Design Team.

Saturday, April 2, 2011

Card-Makers Stackers Nesting Dies

3:30 AM 7 Comments
Cheery Lynn Designs Card-Makers Stackers Nesting Dies help make perfectly spaced rectangles for cards and I know I've said it before (but it's worth repeating)... I just love the embossed edge they create on the die cut paper too! The Lattice II die coupled with the Card-Makers Stackers Nesting Dies made creating this masculine card quick, easy and fun too, despite the fact that creating masculine cards often poses a challenge for me.


Directions to Create This Card:
  1. Create a 4 1/4 x 5 1/2 inch card base from white cardstock.
  2. Using the Lattice II die, die cut a piece of red cardstock and adhere to card base.
  3. Using three differently sized Card-Makers Stackers Nesting Dies, cut one rectangle from three different coordinating patterned papers. (note: for this card, I adhered each of the patterned papers to a piece of white cardstock that I cut from the same size die to make them rigid for popping up on the card with Pop Dots for added dimension).
  4. Wrap coordinating ribbon around two smallest rectangles and adhere.
  5. Adhere rectangles of patterned paper using Pop Dots as shown on card.
  6. Die cut red cardstock circle from Classic Circle Little Silver Stackers Nesting Dies and adhere to ribbon.
  7. Die cut white cardstock from Classic Little Stackers Nesting Dies, stamp sentiment and adhere to red circle with Pop Dots.
Other supplies used:
Cardstock, Stamp and Ribbon: Papertrey Ink
Patterned Paper: Cosmo Cricut
Ink: Ranger

Don't forget to visit the Cheery Lynn Designs blog every day for more inspiration using Cheery Lynn Designs Magical dies!

Saturday, March 26, 2011

Wish BIG with Cheery Lynn Designs and Core'dinations Cardstock

3:30 AM 2 Comments
I simply adore how beautifully the new Silver Stackers dies (silver in color) combine with Cheery Lynn Designs Stackers Nesting dies (purple in color) to create perfectly spaced layers for papercraft projects.  They make creating cards so fun and easy and today, I'm going to show you how to use Cheery Lynn Designs Classic Circles to create this clean and simple masculine card.

For this project I used both the Circle Classic Large Stackers Nesting Dies and the Silver Stackers Circles to create the large circle for the middle of this 5 x 5 sqaure Birthday card and the Small Classic Circles Nesting Dies and Silver Stackers to create the small layer circle under the button.


Directions:
  1. Create a 5 x 5 cardbase with Core'dinations Whitewash Collection cardstock.
  2. Sand edges of cardbase with Sand It Gadget
  3. Cut 4 3/4 x 4 3/4 square of patterned paper (I used Cosmo Cricut's new patterned paper from the Salt Air collection) and adhere to cardbase.
  4. Die cut Core'dinations cardstock from the second largest Classic Circles Large Nesting Dies and sand edges.
  5. Die cut patterned paper from the second largest Silver Stackers Classic Circles dies and adhere to larger circle and then cardbase.
  6. Cut piece of Core'dinations cardstock to fit front of card and emboss with XL Damask Embossing Plate. Sand embossed image with Sand It Gadget.
  7. Stamp sentiment and adhere to card front as shown.
  8. Die cut Core'dinations cardstock from second largest Small Classic Circles Nesting dies.
  9. Die cut white cardstock using Small Silver Stackers Classic Circles Nesting dies (2nd largest die in set) and adhere to larger circle with Pop Dots and card front with adhesive tape.
  10. Stamp wreath onto white circle.
  11. Tie button with twine and adhere to circle.
  12. Attach Imaginisce Hot Rocks with I-Rock tool.
 Note: Stamps are from Papertrey Ink

Thanks for stopping by the Cheery Lynn Designs blog today!

Saturday, March 19, 2011

Little Stackers Nesting Dies Flower Tutorial

3:30 AM 7 Comments
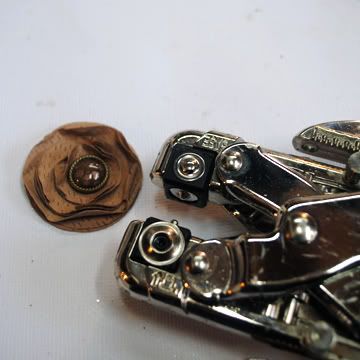
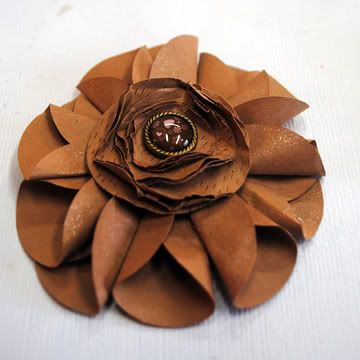
I recently learned a new paper flower techinque using Lunch Bag Kraft paper from Aphra Boyler's tutorial right here.  I loved her flower design but wanted to tweek it just a little bit so that I could incorporate my beloved Cheery Lynn Designs dies to re-create my own flower for this little Easter card.

Flower Created Using Cheery Lynn Designs Little Stackers Circle Nesting Dies

Supplies and Tools you will need to create this card include:

Little Stackers Circle Nesting Dies (the first three smallest dies in the set) 
Paper Towel
Hole Punch
Decorative Brad
Tattered Angels Glimmer Mist (Antique Linen)
Green Cardstock (for leaves), Pink and Rustic White Cardstock for card base mats
Easter Graphic printed on Rustic White Cardstock from The Graphics Fairy

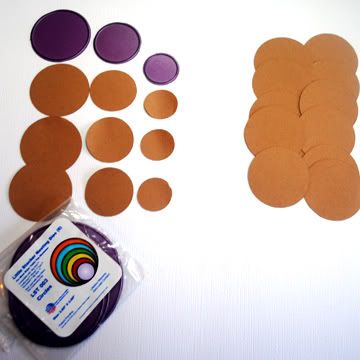
From Kraft lunchbag cardstock, die cut three each of the smallest circles from the Little Stackers Circle Nesting Dies. Also die cut another 13 circles of the third from the smallest circles of the Little Stackers Circle Nesting Dies.


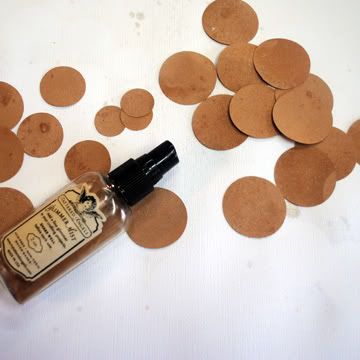
Lightly mist all the circles with Tattered Angels Antique Linen Glimmer Mist and blot dry with a paper towel.


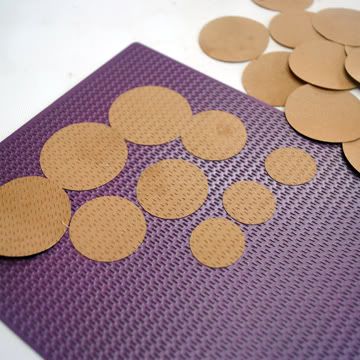
To create flower center, emboss three each of the first three smallest Nesting circles using the Large Rectangle Stitcher Plate.


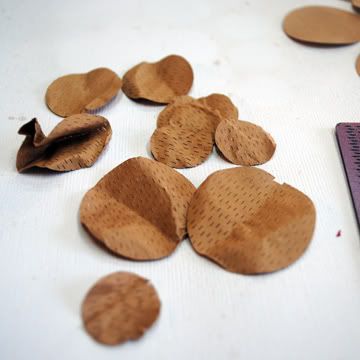
Crumple up circles into balls and then straighten them and layer on top of each other with the largest toward the bottom of the stack.


Punch hole through entire stack of circles (in the center) and attach a decorative brad to hold them all together.


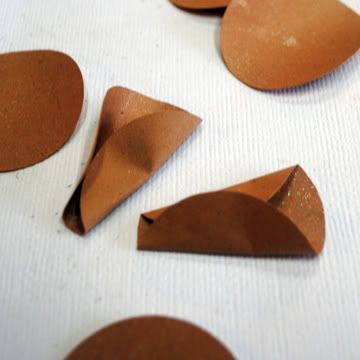
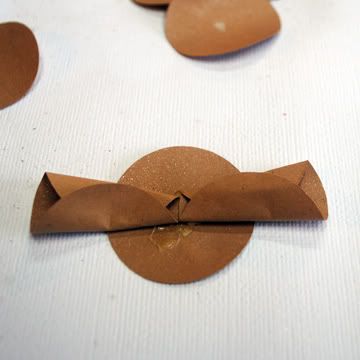
Set aside flower center. Use one of the other 13 circle die cuts as your flower base and roll each of the other 12 circles into cones. Attach to the circle base with glue.


Attached the cone petals with glue as shown until the entire base circle is covered in cone petals.


Adhere flower center to petals with glue.


Hold flower in palm of hand and squeeze to scrunch up flower petals and add more dimension.


Pull and arrange layers until you are satisfied with the way the flower looks and attach to your next project as desired with Dimensional Leaves die cuts.


For the card base I cut a 5 1/2 x 4 1/4 inch card base from Kraft Cardstock and added mats of Pink and Rustic White cardstock that I cut using the Card Makers Stackers Nesting Dies (the first two largest dies in the set). I adhered the flower and an Easter themed graphic from The Graphics Fairy to complete the card.

Join us again here at the Cheery Lynn Designs blog for another great product featuring your favorite Cheery Lynn Designs dies.

Friday, March 4, 2011

Stitching and Piercing Plates at Cheery Lynn Designs

3:30 AM 5 Comments
Cheery Lynn Designs recently introduced a whole group of new and exciting dies during the 2011 Winter CHA in California, including Wickers and Weavers, Layered Stackers, Doilies, as well as our new Stitching and Piercing plates. Today my project focuses on using the new Stitching plates to add dramatic texture to your next papercraft project.


The Stitching and Piercing plates are a unique new product for papercrafters. They are used just like any thin metal die and emboss or die cut. Both Pierce and Stitch plates will cut through the paper (if used as a die cut) and are excellent for using to assist with hand-stitching your project. For fine threading we suggest you use the Piercing plates and for thicker threading material we suggest you use the Stitching plates.

While I am known to pull out my sewing machine now and again for use in my papercrafts, I have never been one to hand stitch anything (let alone paper) as much as I adore those projects that feature that technique. This is one of the reasons that I love the Stitching and Piercing plates. While they are a fantastic resource to assist with your hand-stitching you can also create your own threadless stitch or pierce patterns by embossing your cardstock using the rubber embossing pads, or you can use the plates like a die cut and really add dramatic texture to your project like I did when I created this gift tag.


I used the Large Square Stitching Plate on all of the cardstock I used for this project. I ran the cardstock and tag through my Big Shot just like any thin metal die I would be cutting with.  For this project I used some of the cardstock cut with the Stitching place face up and some face down, this created some added interest to the project, because the "look" of each side of the cardstock is just a little different after cutting it with the Stitcher plate. (For this project, I used the backside on the Kraft Cardstock and tag and the front side of the Cream and Rustic Cream cardstock I used.


After running the tag through my Big Shot with the Stitching Plate, I stamped it with a swirls-style background using a light brown ink (Stampin' Up Crumb Cake). I stamped the bird image directly on top of that with a cream ink (also Stampin' Up). I added both Kraft and Rustic Cream cardstock to the tag after die cutting it with the Scalloped Diamonds Border. To create the flowers I simply adhered the large and small petal on top of one another from the Poinsettia2 die. I love the fact that you can create flowers year-round with that die simply by altering what parts of the die you use and what color cardstock you cut. Next I added a small strip of cardstock at the top of the tag (I love how the stitching really stands out on that cream cardstock!), topped it with a sentiment and added a bit of bling with some Imaginisce Glam Rock and my I-Rock tool. Some ribbon tied up with twine finished off this tag that is filled with texture and dimension thanks to the Stitching plates I used... without having to thread a needle!

Enjoy your weekend and remember to stop by often, we have new projects posted for your inspiration daily right here at Cheery Lynn Designs blog!

Saturday, February 26, 2011

"Lattice" Impress You with Cheery Lynn Designs Embossing Plates

3:30 AM 5 Comments
For the past week all of Cheery Lynn Designers have shown you some fun and unique ways to keep your projects from falling flat by using our Grunge and Embossing plates to add dimension to your next papercraft project. Today I have the pleasure of showing you another project that I hope will inspire you to spend a bit of time in your craft room this weekend creating with Cheery Lynn Designs dies and embossing plates.


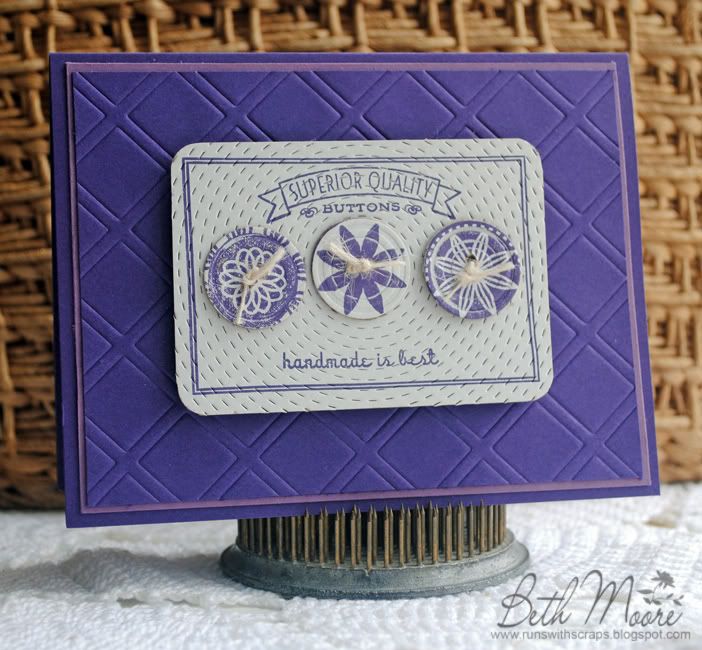
One of the things that I absolutely love about the Lattice2 die that I used to create the background of this card is that you can use it to die cut your paper (by running it through your machine like you would any other die template) like the cards I showed you in this post right here, or you can use it to emboss (by running it through your machine like an embossing plate with your embossing pads) like I've done with this card I am showing you today. Dies like the Lattice2 and Lattice1 from Cheery Lynn Designs give you so much more for your money because they can be used to emboss or cut... imagine the endless design possibilities made easy with just one die! These Lattice dies are also the perfect size to fit the front of an A2 card exactly and I love that, although today, I trimmed the die cut down a bit to layer it under a lighter shade of purple to add a touch more color to this clean and simple card.


I recently got some new stamps that I knew blended perfectly with the beautiful Dimensional Buttons3. To highlight them for this card, I used a pre-cut piece of chipboard (these ATC size pieces of chipboard come white on one side and brown on the other), and cut three of the larger buttons from one of the chipboard cards. Afterwards, I sorted through my supplies to find a few small "round" stamps that would fit the front of each of the buttons and stamped them for added color and interest. I rounded the edges of another piece of the pre-cut chipboard with my Corner Chomper and ran it through my Big Shot with the Large Round Stitcher Plate  (that's what creates that gorgeous circle faux stitched look on the white chipboard).  I stamped the chipboard piece, tied up the buttons with some twine and then added them to the chipboard. I then adhered the button card to the front of the Lattice2 embossed card front using some Pop Dots for even more dimension. 

Thank you for stopping by the Cheery Lynn Designs blog today, be sure to visit the store to see the entire line of Embossing and Grunge plates available for your next papercrafting project.

Copyright Statement


All content, including designs, pictures and words are the exclusive property of the author of each blog post. Information shared here is for inspiration only and may not be copied for publication, competition or profit. Thank you for your cooperation.

SOCIAL MEDIA 2


Follow Us @jointhemakersmovement


All content, including designs, pictures and words are the exclusive property of the author of each blog post.
Information shared here is for inspiration only and may not be copied for publication, competition or profit. Thank you for your cooperation.