Saturday, August 31, 2013

MAGIC CARD

3:30 AM 6 Comments
Hi and Good Morning everyone,

It's Judy here today sharing my final card as Guest Designer for Cheery Lynn for the month of August.   Where has this month gone to!  I have had a ball making these cards, Thank you so much to Bj and Michael, Lori and all the DT for inviting me and making me so welcome.

I have been wanting to have a go at making one of these Magic Cards for simply ages and followed a Tutorial I found Tutorial online.  There are several Tutorials to be found.   My only problem was trying to photograph it, it was so very difficult.


The gorgeous image created by Sylvia Zet for Wee Stamps is centralised onto the inside uppermost panel and edged with the fabulous Felicity Tiny Doily DL143  
after first inking them very lightly with Tim Holtz Distress ink.  The image I have coloured with Copics.

The inside edges are edged with the Anastasia Border B136  and I have added a touch of copic in pink to tinge them

The two side panels have been edged with the gorgeous Dancing Doily Lace Border - DL134

Turning to the inside we have two panels here with a top fold crease dividing.  The lower panel contains a criss cross type pocket which is edged with Dancing Doily Lace Border - DL134.  There is a separate detachable insert bearing two gorgeous heart dies.  First we have  Two of Hearts- Dl128 and then we have  Heart to Heart Doily - DL106 which has been layered and finally finished off with the lovely  Darling Daisies - A196 .  These are fabulous, and a real must to the wishlist,  and the leaves come with the set.  I find myself reaching for these more and more.

The uppermost panel has the gorgeous  Felicity Doily - DL239  (Love this!) centralised onto the Memory Box papers.


And finally we come to the side panels.  The flowers formed into a sort of daisy chain are made up using the Darling Daisies - A196  and their leaves after first inking with Tim Holtz Distress Inks.   


Cheery Lynn  dies used:  

Felicity Tiny Doily DL143  
Anastasia Border B136   
Dancing Doily Lace Border - DL134
Two of Hearts- Dl128
Heart to Heart Doily - DL106
Darling Daisies - A196
Felicity Doily - DL239   
  
Image created by Sylvia Zet 
Items from stash

I do hope you find time to pop over to the Cheery Lynn Blog 
where there is lots of very talented inspiration to be had, plus a fabulous Challenge too.

I have had a fabulous time - Thankyou!

Judy x 

Friday, August 30, 2013

Vintage Christmas

3:30 AM 4 Comments


Today's Cheery Lynn card is one that I have just fallen in love with.  First I'm using the latest Christmas collection from KaiserCraft, St. Nicholas.  It has such a great vintage feel that compliments my style of card perfectly and really goes nice with my die cuts.


I love the way the handmade poinsettias show their veins from the die.  It adds to the realistic look of the flowers.  Cheery Lynn Dies make it so easy to just layer and layer and come up with some fantastic creations. 

Here is a complete list of all the dies used on this card, so you can create your own.  Have a great weekend and I'll see you next week.

Hugs, Lori  


Thursday, August 29, 2013

Guest spot with Sandy Hulshart

5:08 AM 3 Comments
 
Today we are thrilled to have Sandy Hulshart guest designing with us.  Let jump right in and see what she has come up with for us.
 
I started with this great stamp, Adirondack Chair, stamping it onto Cryogen Metallic card stock and coloring with my Copics.  I found a piece of denim that I use for patches so I trimmed it down and then machine sewed both it and my background paper to my card stock.  Now that wasn't so hard, lol!  I frayed the top and bottom edges of the denim just a bit.  Next I added a few Cheery Lynn Designs dies: Gauze Border, Fanciful Flourish and flowers created with Embellishments #3.  For the final touches, I air brushed some gems to match and then added Stickles to the centers of the flowers.  Finished size is 5 3/8" square.

Wednesday, August 28, 2013

Frosty Village

3:30 AM 7 Comments

Hi and Good Morning everyone, Alison here again today, sharing a Christmas card created using more of the gorgeous new release dies from Cheery Lynn Designs.

I used a 7 x 5 blank card base for this, and I cut a strip vertically from the front panel, so it shows the underneath of the card.  I used some of my favourite frosty printed card on the front and inside, and then attached the beautiful Tiffany Border for a lacey edge.

I coloured my image with PM's, and matted and layered onto Oval Stackers and Scalloped oval stackers and cut the Italian Flourish doily (which looks like a beautiful snowflake to me) in half to frame the oval with a delicate background. 

The bottom of the card is decorated with the stunning Winter Neighbourhood Border and the top of the card shows the fabulous Santa's Sleigh & Reindeer.  The white poinsetta flowers were inked delicately with blue and dipped into frosty glitter, and I added snow paste, glitter and pearls for a finishing touch.

All dies used on this card are:

B324 - Poinsetta Flower Strip
B137 - Tiffany Border
B326 - Santa's Sleigh and Reindeer
B323 Winter Neighbourhood Border
DL103 - Italian Flourish Doily
L-7 - Oval Stackers
XL - 8 - Oval Scalloped Stackers

Thanks so much for visiting our blog today, and I hope you find time to join us in our challenge where our theme is Frame It.

Have a smashing week!


Tuesday, August 27, 2013

Design Team Update

3:30 AM 3 Comments
Well, the design team call has officially come to a close - and we are so thrilled with all of the gorgeous entries that we received.  The Cheery Lynn Designs fan base sure does have some amazing talent.  We will be sorting through the entries and making some very hard choices! But thank you - to everyone who poured their hearts and souls into this audition.  You are all winners in our book!

We have another card from Jean to share with you today.  The simplicity of this card really shows off the frame and the flower.


Thanks for stopping by!

Monday, August 26, 2013

Beautiful Friend

3:30 AM 1 Comments


School officially starts back today - so I thought it was a great time to start sharing more fall-themed cards.  Just by adding some fall foliage to my flower cluster it really helped with the theme.  After I cut my flowers, I painted them with Viva Decor 3D Metallic Stamp Paint, and then shaped them.

Remember, tonight is the deadline for applying for the Cheery Lynn Designs DT.  If you have sent your application in, you should have gotten a confirmation email.  If you haven't then you need to resend.  Good luck to all of those applying!

The CLD Challenge this week is Frame It.  A winner will be chosen and will receive a  $20 store credit.

Cheery Lynn Designs Dies

Sunday, August 25, 2013

Cheery Lynn Designs Challenge #95 Frame It

3:30 AM 4 Comments
Welcome to the Sunday Cheery Lynn Designs Challenge - now here on our Inspriation Blog! We look forward to you joining us each week for a chance to win a $20 store credit.  To see last week's winner, click here.

What fantastic entries we had last week for our Doilies Challenge.  Thank you to all who entered. Every week the entire design team enjoys seeing your creations with our dies.  This week our challenge at Cheery Lynn Designs is

Frame It


 Here are the rules:
  • You MUST follow the theme and use at least one Cheery Lynn Designs die, of course, we would love to see more than one. 
  • You MUST add a link to your blog post in the InLinkz at the end of this post; no back posting, only new projects are allowed
  • You MUST link to this challenge in your blog post or on your gallery post
  • You may only enter the challenge ONCE per week.
The winner will be chosen based on merit by Cheery Lynn Designs. They will receive $20 towards shopping at the Cheery Lynn website. The challenge will end on Saturday night at 18:00 Eastern time.


And now to our inspiration for today......


is taking us ahead to Christmas with this pretty card.


Remember, you must use at least one Cheery Lynn Designs Die to enter this challenge.

Saturday, August 24, 2013

FRAME IT

3:30 AM 7 Comments
Hi and Good Morning everyone,

Itr's Judy here today sharing another card as Guest Designer for Cheery Lynn for the month of August.   

I decided to try and stretch my imagination with different ways to use the Cheery Lynn dies that I have.  I just love this frame and came up with this shaped card.  I have made one of these before but just used c6 plain rectangles.  I love the effect it has achieved using the frames and hope you do too.

The Magic Moonlight  image is centralised onto the Fiona's Magic Mirror Frame FRM140  The top inside edges are edged with the Anastasia Border B136  and I have added Frantage after first inking the frame and edges with Tim Holtz Distressing ink.

The two central inside panels have a pocket into which is placed  two Vintage Tags  These pockets are embellished with Ambergris Tiny Doilies DL245

And finally the flowers are made up using the  Chrysanthemum Strip B311  and  Build a Flower #1 B181 dies and these have been inked too.  I had such fun making this.


Cheery Lynn  dies used:  

Fiona's Magic Mirror Frame FRM140 
Anastasia Border B136   
Ambergris Tiny Doilies DL245
Chrysanthemum Strip B311
Build a Flower #1 B181 

Magic Moonlight image coloured  Items from stash

I do hope you find time to pop over to the Cheery Lynn Blog 
where there is lots of very talented inspiration to be had, plus a fabulous Challenge too.

Thank you for looking,

Judy x 

Friday, August 23, 2013

Ruffles and Roses

3:30 AM 4 Comments
Hi Cheery Lynn Fans.  This is the last weekend you have to get your Design Team entries in as the cut off date is Monday.  We've had some great entries but would love to have yours in you have entered yet.  Click here to see all the details about the design team entry process.  

Now onto today's project....  I tempted you a bit on Tuesday showing you the tutorial on how to create faux ruffles so today I've got the finish project
to share with you.  

I love how girly this looks with the ruffles, the color pink and of course the handmade roses.  


Here is a list of all the dies used and remember to check out the tutorial for the ruffles if you haven't already

See you next week, 

Hugs, Lori 

Thursday, August 22, 2013

Summer Bouquet

3:30 AM 2 Comments

Hi and Good Morning everyone, Alison here again today, showing more inspiration using some of the gorgeous new release Cheery Lynn Designs dies, as well as some of my favourite classic dies too! :)
 
I used a 6 x 6 blank card base, and layered K&Co papers onto white bazzill card.  I placed the gorgeous Dainty Dutch Deco Doily, on top of the base layer of paper and added die cut square and scalloped square mats. 
 
I made the border using the brilliant Alisons's Ribbons (these are so versatile!) and layered the Sophias Heart Border on top.  I coloured my image in PM's and matted it onto the oval scalloped and oval silver stackers, and the stunning new Horizon Oval Boutique Frames. 
 
The heart embellishment was created using 2 layers of the different sized Two of Hearts, and I cut a contrasting piece of paper for the centre heart too.  I added a super-cute bumble bee and also my signature butterfly (Oh.. I use this butterfly on everything!).
 
The pretty flowers were made from the quick and easy Sweet Williams Strip secured with a pearl brad, and I added some leaves, pearls and a pin for a finishing touch.

All dies used on this card are:

DL141 - Dainty Dutch Deco Doily
XL-2 - Scalloped Square Stackers
L-1 - Classic Square Silver Stackers
B335 - Alisons Ribbons
B333 - Sophias Heart Border
DL252 - Horizon Oval Boutique Stackers
L-7 - Oval Classic Stackers
XL-8 - Oval Scalloped Stackers
B241 - Rose Leaf Strip
B178 - Flourish Leaf Strip
B307 - Sweet Williams Strip
DL128 - Two of Hearts
B266 - Tiny Things with Wings
DL112 - Small Exotic Butterflies

Thanks so much for visiting our blog today, and I hope you find time to join in our challenge this week where our theme is 'Doilies'. 

Have a smashing week!


Wednesday, August 21, 2013

Envelope Punch Board Tutorial

3:30 AM 4 Comments
I'm so excited to share this simple tutorial with you for our latest product Cheery Lynn Designs is carrying..... Envelope Punch Board by We R Memory Keepers.  This tool will make your cards having matching envelopes in not time, and there are sooooo many different sizes to choose from.


Here are the pictures I promised you with more close ups of my fancy envelope. 


Here are all the Cheery Lynn Dies used on this envelope along with the Envelope Board


Tuesday, August 20, 2013

Faux Ruffles Tutorial

3:30 AM 3 Comments
Today I have a quick little tutorial to share with you for making faux fabric ruffles.  


Step One: Cut card stock with a border die of your choice.  I used the Anastasia Border B136


Step Two: Spritz water on the front and back of your paper and let it soak in for a minute.


Step Three: Pinch and gather your paper along the top, letting the bottom ruffle out.  You could use tweezers or a piercer, but I find it’s just as easy with my fingers. 


Step Four: Slightly pull out to the desired look and let the paper dry completely.  If you want to speed up the drying time you can use a heat gun.  


Here is an example of the ruffle applied to a project.  Check back Friday for the finished project and to see how I used the faux fabric ribbon.  


Hugs, Lori 

Monday, August 19, 2013

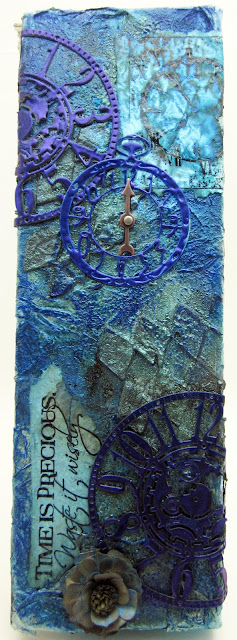
Time Is Precious

3:30 AM 4 Comments
I love trying new techniques and creating mixed media explorations.  A week or so ago, I had finished the base of this canvas –  it was covered with embossing powders, pastes and sprays, but had no final decorations added to it. I decided to add some of Cheery Lynn Design's new steampunk elements to finish it out. 


Cheery Lynn Designs


If you would like to see how this canvas came together, please be sure to check out my blog, for all of the mixed media details.

The new challenge at Cheery Lynn Designs is Doilies. Play along for your chance to win a $20 gift certificate to the store.  And don't forget....you have until August 26th, 11:59 pm EST to get your Design Team Applications in for the Cheery Lynn Design Team!

Sunday, August 18, 2013

Cheery Lynn Designs Challenge #94 Doilies

3:30 AM 1 Comments
Welcome to the Sunday Cheery Lynn Designs Challenge - now here on our Inspriation Blog! We look forward to you joining us each week for a chance to win a $20 store credit.  To see last week's winner, click here.

What fantastic entries we had last week for our Fun With Letters Challenge.  Thank you to all who entered. Every week the entire design team enjoys seeing your creations with our dies.  This week our challenge at Cheery Lynn Designs is

Doilies


 Here are the rules:
  • You MUST follow the theme and use at least one Cheery Lynn Designs die, of course, we would love to see more than one. 
  • You MUST add a link to your blog post in the InLinkz at the end of this post; no back posting, only new projects are allowed
  • You MUST link to this challenge in your blog post or on your gallery post
  • You may only enter the challenge ONCE per week.
The winner will be chosen based on merit by Cheery Lynn Designs. They will receive $20 towards shopping at the Cheery Lynn website. The challenge will end on Saturday night at 18:00 Eastern time.


Remember, you must use at least one Cheery Lynn Designs Die to enter this challenge.

Saturday, August 17, 2013

GATEFOLD EASEL CARD

3:30 AM 2 Comments
Hi and Good Morning everyone,

It's Judy here today sharing another card as Guest Designer for Cheery Lynn for the month of August.   

I opted to make my version of a Gatefold style Easel Card which enabled the card to stand more easily.

The LOTV image is centralised and framed on the inside using the Felicity Tiny Doily Die.  The card is edged with the fabulous Dancing Doiley Borders.  The side panels and base are made up using The English Tea party Doily die and the the Daisy Strip forms the flowers adding Tropical leaves. I loved making this!


Cheery Lynn  dies used:  

Felicity Tiny Doily - DL243
English Tea Party Doily - DL101
Dancing Doily Lace Border - DL134
Daisy Strip B259 
Tropical Leaves - B119 


LOTV  image coloured wityh Copics
Items from stash

I do hope you find time to pop over to the Cheery Lynn Blog 
where there is lots of very talented inspiration to be had, plus a fabulous Challenge too.

Thank you for looking,

Judy x 

Friday, August 16, 2013

Bold but Beautiful

3:30 AM 3 Comments

Good Morning, it's that time of the week that I get to share my latest Cheery Lynn Designs creation with you.  Today I have a bold card in color but it is still delicate with the flowers and the hummingbird.


For the backing on the lace hummingbird I just mounted the die on some black card stock and then cut out leaving a bit of an edge.  

Here is a complete list of the dies used in the project

See you next week 
Lori 


Thursday, August 15, 2013

Bumble Bee Card from Jean

3:30 AM 3 Comments

We have another lovely stitched card to share with you from Jean. Notice all the fine green stitching on the circles under the bee and also the tiny green cross stitches on the doily. The gold rim around the largest circle us made up with hundreds of tiny gold threads. This is a labor of love!

Cheery Lynn Designs Dies
Large Sunflower Doily DL181
Lace Corner Deco A B161
Tiny Things with Wings B266
Circle XM-4

Wednesday, August 14, 2013

Hello

3:30 AM 10 Comments

Hi and Good Morning everyone :)  Alison here today sharing a card I made using some of the gorgeous new release dies and my favourite 'Alison's Ribbons'! :)

I started off with a 6 x 6" blank card base and layered american crafts cardstock and K&Co papers.  I created the side panel by adding the oh so pretty Ankara Lace Border to each side, and then adding some gorgeous flourishes, butterflies and flowers.

I made the  ribbon border using scraps of left over card and paper and attached to the side.  I coloured my main image and matted and layered using circle stacker and scalloped dies, and then placed it on top of the stunning  Priscilla Doily.

For a finishing touch I added the Hello sentiment, and some grey blue pearls from stash.

All dies used on this card are:

B346 - Hello
B188 - Build a Flower Embellishment ~2
DL112 - Exotic Butterfly Small
B291 - Mini fanciful Flourish R
B117S - Mini Fanciful Flourish
DL260 - Priscilla Doily
L-4 - Silver Stacker Circles
XL-5 - Scalloped Circles
B335 - Alisons Ribbons
B332 - Ankara Lace Border

Thanks so much for visiting our blog today, and I hope you find time to join in our challenge where this week our theme is 'Fun with Letters'.

Have a smashing week,


Tuesday, August 13, 2013

There's a New Product in the House!

3:30 AM 3 Comments
I always have plenty of cards on hand for any occasion - but I end up running around the house, trying to find an envelope to go with it.  Well, if you are like me, then you are going to love the Envelope Punch Board.  This is the coolest tool ever! It a matter of a minute, you can make a custom envelope (In over 60 sizes!).  The tool scores and punches - and then you just add your adhesive.

Here's just a quick sampling:


You can make a tiny gift envelope up to a large 6 x 8.5" envelope - all from 12 x 12 cardstock.

And there is no need to keep the envelopes plain - you can decorate them to suit your tastes.

 We have these in stock now - (but they are very popular).  This will be one of those tools that you will think, how did I do without it?

Copyright Statement


All content, including designs, pictures and words are the exclusive property of the author of each blog post. Information shared here is for inspiration only and may not be copied for publication, competition or profit. Thank you for your cooperation.

SOCIAL MEDIA 2


Follow Us @jointhemakersmovement


All content, including designs, pictures and words are the exclusive property of the author of each blog post.
Information shared here is for inspiration only and may not be copied for publication, competition or profit. Thank you for your cooperation.