Friday, August 3, 2018

4:02 PM 0 Comments

How's this for Big News?! It's happening and we're so excited to share this with you! Cheery Lynn Designs is now Maker's Movement. With that said, you'll still be able to find your favorite Cheery Lynn Designs on Amazon, and a select number of them on our newest website.

Take a peek at our new release of products, including a variety of stamp and die sets that are just too darling to resist! Visit www.mymakersmovement.com to shop and dive into the start of your newest creative adventure. It doesn't end here! Be on the look out more information regarding new products and creative resources in the next weeks and months to come. 

Follow Us! Maker's Movement can be found on all of the social media channels, including makersmovementlove, where you can feast your eyes on the latest projects our makers have crafted up. You won't want to miss out on the big items headed your way! 

Join the Movement! Visit www.mymakersmovement.com for all the inspiration and creative goodies that will change your creative world. Our hopes are that you're just as excited as we are, and we're thrilled to be a part of your next creative endeavor. 

We are here to help you, if there's any questions don't hesitate to reach out. Drop us a line or give us a ring. We'd be delighted to hear from you, ENJOY! 

Tuesday, July 31, 2018

Whimsical Bee Card with Cheryl Walker

12:30 AM 1 Comments
 Hello everyone and Happy Tuesday to you all! Today I'm sharing a super sweet card I made using Cheery Lynn Designs darling dies. LOVE this super sweet Whimsical Bee die, and she works perfectly with the sweet Daisy strip die. I really enjoyed making this darling card. Of course I always seem to take forever choosing design papers.  I'm not sure why, maybe due to the fact that I own way too much of it.....LOL hehehhe that could be one reason, but I'm so funny about picking my design papers first, and doing all my layers, then cutting all my dies.

Anyway, I selected an OLD design paper I bought years back, and it's from All My Memories 2005.  I bought it in 2006 though, crazy right?  Well I bought a lot of it, as I really loved this collection, so I pulled it out and figured I would use the yellows and blacks in it, and leave out the reds and pinks. Next I had already picked out all the dies I wanted to use on my card. I love Cheery Lynn's flower strips, they are so easy to use, and make flower making super fast, so I made up the daisies.

Cheery Lynn Designs Dies used:
Whimsical Bee B800- Cut in black, and then added yellow card stock to the back , next I added some stickles to give some glitz to my sweet bee.
Flourish Frame B888- cut in white card stock, its behind the whimsical Bee
Daisy Strip B259- Cut in white, ran through machine just 1 time, and then dusted them in a yellow ink. I did use the hot glue gun to glue them together, and to add a white embellishment from Really Reasonable Ribbon to the center of each flower.
Flourish #3- was also cut in white and then dabbed with 2 different club scrap greens.
Page Tabs B567- was cut in the coordinating yellow card stock that was used to layer my card layers, then I stamped a sentiment from Lifes a Garden , Pink by design stamp set. I also added some black dots using a black pen.
Ribbons are from Really Reasonable Ribbon
 I really enjoyed spending some time crafting and making this card to share today. Hope you enjoyed my short post, and have a lovely week!
Hugs to all,
Cheryl

Friday, July 27, 2018

Merry Christmoose in July

1:00 AM 0 Comments

Hi everyone!

Laurie here from Stamping Up North. Today my card features Cheery Lynn's Merry Christmoose die. When I first got the die, I thought he was SO adorable that I cut out a ton of them and pieced them together. I only have a few left now, so it's time to get out the die and make some more!

I cut out a stitched rectangle with some fun patterned paper. Then I added Cheery Lynn's window and my cute moose. To make him more festive I added a bit of holly from the Christmas Wreath set. I added the sentiment, a snowflake and an enamel dot.

Here's a list of the dies I used:

Cheery Lynn stitched rectangle LSC-16
Cheery Lynn Chrsitmas Wreath B839
Shuttered Window Shaker K110
Merry Christmas with Tree B477


Merry Christmoose in July!

Thursday, July 26, 2018

Birthday Wishes by Jenny Alia

3:30 AM 0 Comments

Hi peeps, Jenny here today sharing a birthday card.  I like to have birthday cards handy but never seem to have enough.  I really like blue and green together as a color combination and I found a paper pack that had these colors so I cut stars, added rhinestones and voila, the card was finished.


The Birthday wishes die actually came within a circle but it was so simple to cut out and use by itself, a couple of cuts with my scissors and the die works in two ways.  I love adding versatility to my supplies.

Dies Used
Birthday Wishes Circle
Pierced Stars

Thanks for stopping by the blog today.  Keep an eye out for all the exciting new changes going on at Cheery Lynn and the new Makers Movement!

Wednesday, July 25, 2018

Happy Birthday by Julie Lavalette

3:30 AM 1 Comments

Hi everyone, it’s JULIE here today and I’m sharing some inspiration using one of our gorgeous Stacker Dies which I just adore. It’s such a beautiful design at the edges that gives any style of card an elegant touch.


I started by die cutting my Stacker Dies in white cardstock and tattered my patterned layers of papers at the edges. I layered onto my card with foam strips for extra dimension.


My flowers were shaped on my Embossing mat adding ink into the centres and a gem. I arranged on my card with some leaves.

Cheery Lynn Dies Used -
B181B Build a Flower#1 Petals/Leaves

Crafty Hugs
,Julie x

Monday, July 23, 2018

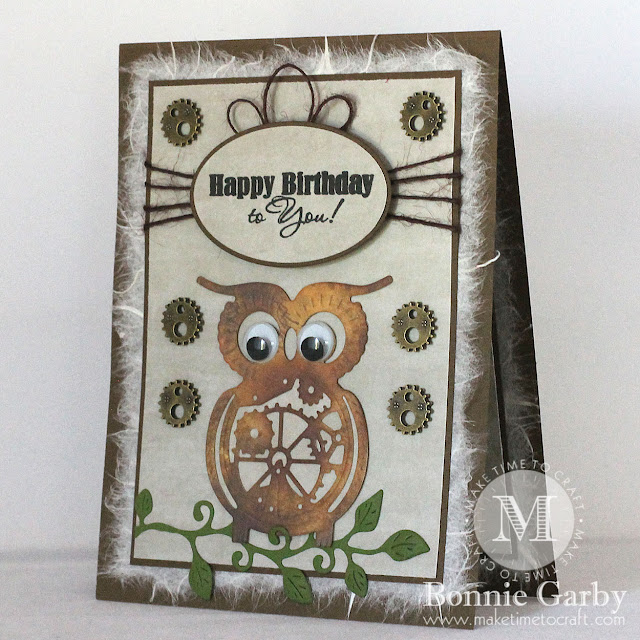
Birthday Steampunk Owl Wishes with Bonnie Garby

3:30 AM 0 Comments
Hey crafty friends.  Bonnie from Make Time to Craft here today and I'm sharing what is supposed to be a masculine card for a teenage boy.  I struggle so much with cards for guys and I'm not really all that psyched about this one, but it wasn't terrible, so I thought I'd share it anyway.  We are all our own worst critics, right?  Anyway, I used some really cool dies on this card from Cheery Lynn Designs.
I pulled out my stash of Distress Ink and Distress Oxide Ink papers to find a nice brown for the owl.  I backed the paper with Stick It adhesive and cut it out.  I also added some wiggle eyes for fun.  I also used part of the Ivy Corner Flourish as a place for my owl to sit.  

Cheery Lynn Dies used:

I stamped the birthday sentiment and then cut it out with the oval dies.  I wrapped some burlap string around the top of the card and mounted the sentiment over that.  I also added some burlap string loops to the top of the sentiment.  I wanted to continue the steampunk type theme so I also added some gear embellishments from Really Reasonable Ribbon to finish it off.
Thanks so much for stopping by today.  For more information on the other products used, please visit my Make Time to Craft Blog.


Friday, July 20, 2018

Snappy Birthday! with Lisa Blastick

3:30 AM 1 Comments

Hello! Welcome back to another fun card using lots of Cheery Lynn Designs die cuts! I felt like making a birthday card since today is my birthday. I also thought about making this card for a friend that I know that happens to have his birthday today too. Only problem is he is 20 years younger....


I used an oval for my water, cat tails, reeds, wood, and clouds. Plus the fabulous crocodiles with tiny pearls on their back, nose and eye. Little white dots were dabbed on the cat tail. There is a bit of gloss on the raindrops. I wasn't thinking sad birthday but I wanted to add some extra blue on the card. There is grass on the inside. 


The sentiment was printed on my computer. 


B389 Cat tails and Reeds

Thanks for stopping by today! Hope you have a great weekend!
Hugs Lisa 

Thursday, July 19, 2018

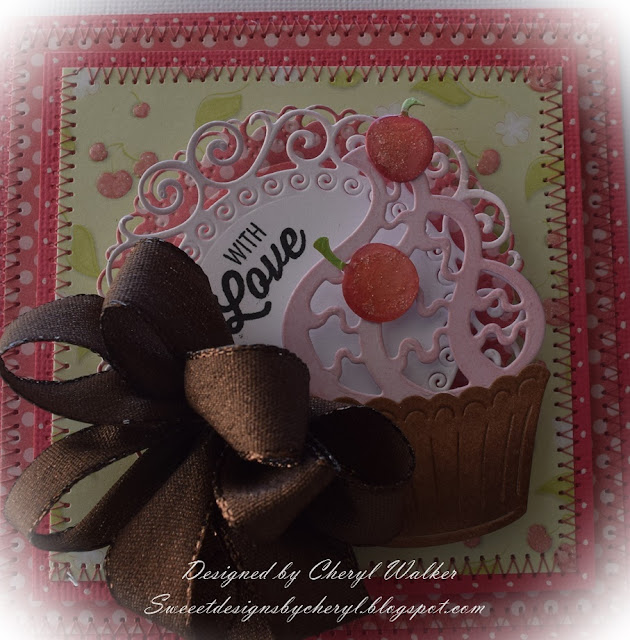
Sweet Cupcake Card with Cheryl Walker

1:00 AM 0 Comments
 Hello everyone and Happy Thursday to you all! Today I have a super SWEET Cheery Lynn cupcake card to share.  Yep, it's a sweet one...heeehehehe.  I love this little cupcake, it's absolutely too cute, and I really enjoyed coloring this one up. I used Copic markers on it, and I also used some Stickles and Glossy Accents on the cherries.  Yes I used both on them, super fun right??!!!

The card was layered using some old design papers I had come across in my stash when I was sorting through it a couple of months back, trying to clear out some things and make room for creating :) This darling cherry paper and polka dots was in some scraps I had on one of my shelves, so I pulled it out and set it aside to use, and thought how perfect it would be with this darling Cheery Lynn Cupcake die.

I layered the cupcake on 2 other Cheery Lynn dies and will list them below. This card was super fun and easy to make.

Cheery Lynn Designs:
Cupcake CABD42
Flourish Frame B888
DL272 Doily Dies
Big Sister die cutting machine
Best glue ever


Thank you so much for stopping by and have a lovely day!
Hugs to all,
Cheryl

Wednesday, July 18, 2018

Cheery Lynn Just Married

12:30 AM 0 Comments


Hi everyone! Laurie here from Stamping Up North. I don't know about you, but we sure have had lots of weddings to go to this summer. And I've been having fun making wedding cards with my Cheery Lynn dies!

For this card, I started out with some patterned paper. The cars on it reminded me of Cheery Lynn's Classic Car. I cut it out in white, pink and silver shimmer paper. I added some pearls  and stamped the sentiment on the licence plate.


B944 - Classic Car Die Set Colored Image
I cut out the bride and groom from the Wedding Vow die set and adhered them inside the car. 

Cheery Lynn Designs - Wedding Vows Die - FRM138

What a cute couple..lol!


I adhered the car onto a Heart to Heart Doily cut out in black and pink. I even used some of the tiny pink hearts that fell out of the doily to adhere on the card too!

Cheery Lynn Designs - Heart to Heart Doily 4 Piece Die Set - DL106


Here's a list of dies I used:


Tuesday, July 17, 2018

Spooky Scene by Jenny Alia

3:30 AM 0 Comments

Hi friends, I'm back today sharing a Halloween card.  Now that's it's gotten so hot here in NY I'm looking forward to autumn weather.  I love Halloween and I've started to see things popping up in online ads and I was inspired to pull out my Halloween dies. 


 Most of the work in this card went to creating the background by blending inks and then spritzing with water until the colors blended.  I also added a spritz of a white dimensional spray.  

To create the grass behind the fence I layered two different grass die cuts.  The fence did was much higher but I cut off the bottom.  It's a beautifully ornate die but I didn't want the fence to overshadow the tree.  The moon was cut out of a platinum colored glitter paper.  Last, I added the bats for spooky vibe.  


Cheery Lynn Dies

Thanks for stopping by the blog today!
Hugs, Jenny

Monday, July 16, 2018

New Baby by Julie Lavalette

3:30 AM 1 Comments

Hi everyone, it’s JULIE here today and I’m sharing a baby card using a couple of our Dies in the Whimsical range along with a selection of others.


You will notice I started tattering my layers of patterned paper adding onto my card with my Celtic Stacker die in-between. 


Next I added my pretty Doily layers and stamped sentiment. My Whimsical Giraffe I glued onto a pale green paper and fussy cut around.


My Whimsical Flower I cut out in pale green paper and layered my patterned flower on top twice which had been shaped on my Embossing mat to add dimension. Finishing with several gems on my card.

Cheery Lynn Dies Used -
XL21 Pierced Stacker #3

Thanks so much for stopping by today.

Crafty Hugs,
Julie x

Friday, July 13, 2018

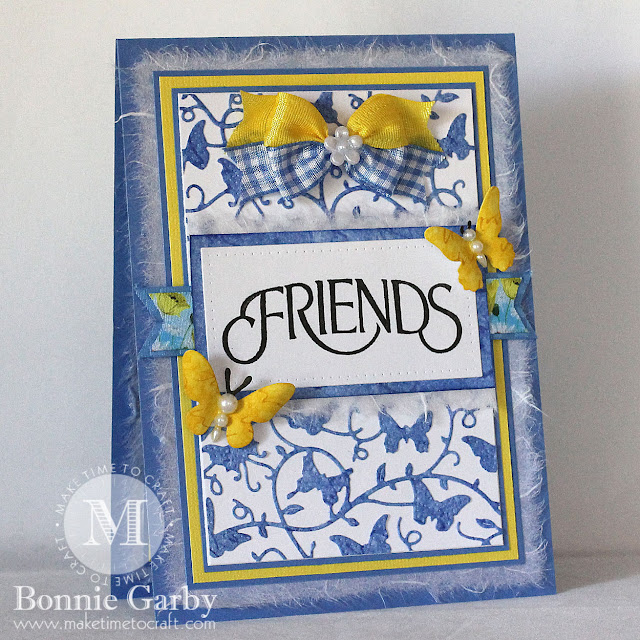
Friends Greeting Card with Bonnie Garby

3:30 AM 0 Comments
Hello die cut lovers!  Bonnie from Make Time to Craft here with you today sharing a pretty note card featuring some gorgeous dies from Cheery Lynn Designs.
My card today is my version of CAS.  Yes, I know there are lots of layers, but it's still a clean look.  This is as 'CAS' as it gets for me.  <smile>
I created the paper for the butterfly die cut with a couple shades of blue Distress Ink.  It gives it just a bit of added interest.  The background butterfly and vine die cut is actually a border die.  It's a long thin border and it worked perfectly for this card when I cut it in half and stacked it with the sentiment in the center.  It's always good when you can find an alternate use for a die.  It makes it worth twice as much!


My card was topped off with a pretty bi-color bow created on my Bow-it-All V3.0 Tool with ribbon from the July Ribbon Club Assortment from Really Reasonable Ribbon.  The center of the bow is adorned with a pretty flower shaped pearl embellishment.
Thanks so much for stopping by today.  For more information on the other products I used on my card, please visit my Make Time to Craft Blog.


Thursday, July 12, 2018

Furever Friends with Lisa Blastick

3:30 AM 0 Comments

Hello again!  Today I'm sharing a cat card that was inspired by vintage Old New York. I used lots of fun Cheery Lynn Designs die cuts, plus a few stamps that I fussy cut out. I have been wanting to use the "vintage books" for a while now. I thought the "Paris Sign" would be great for the sentiment as well. 


I used some Prima patterned paper and some cream and kraft cardstock. I then distressed the edges of the papers to give it an old worn out look. The "windows" were die cut out in black and then I placed cream paper behind them. The books were die cut in cream and then I distressed them with vintage ink. 


I kept the same colors for the mouse, yarn and fishbowl. The cats were die cut out twice and I just used part of the cats for the top window. 


Thanks for stopping but today! 
Have a great day! 
Hugs Lisa 

Wednesday, July 11, 2018

Beautiful Day Card with Cheryl Walker

5:00 AM 0 Comments


Hello crafty friends and Happy Wednesday to you all! Today I have a super fun and sweet card made using Cheery Lynn's sweet Whimsical Lion die along with a few others as well. Love how cute this little guy is.

For the lion, I cut him out twice in white card stock, and then dusted his body with ink and then colored his mane with Copic markers E55 & YR24. Next I added some pink colored pieces of card stock behind his ears.  The black for the eyes was colored with marker and then I added Viva Pearl pen in black to give a 3-D look for the eyes. The nose I colored a gray, and then glued to the back of the face like I did the eyes.

The sentiment was stamped in black using JustRite Papercrafts stamps and the Mini Misti stamping tool. Design papers - I'm not sure who they are by, as those are from my stash, and didn't have any name on them. Lately I've been pulling from OLD OLD papers and scraps, trying to use some different colors and such.

For the doily I used Cheery Lynn's French Pastry Doily die, along with the Horizon Circle die and then the Circle Cut and Pierce die, all layered up.

Corner dies were cut using a green card stock, and is from the BD-17 Corners die. Lastly I added a bow using ribbon from Really Reasonable Ribbon, and then some of their flower embellishments.

Cheery Lynn Designs Supplies:
LPC4 Circle Pierce and Cut tool-LG
DL102 French Pastry Doily Die
DL272 Horizon Circle Boutique Stacker frames
CABD-17 Corners
B792 Whimsical Lion die
Crafters Tools
Big sister die cutting machine


Hope you enjoyed my post for today, and thank you for stopping by.
Have a lovely day
Hugs to all,
Cheryl

Monday, July 9, 2018

Rock and Roll with Laurie Schmidt

12:30 AM 0 Comments

Hi everyone! 
Laurie here from Stamping Up North. Today's card features Cheery Lynn's Rock and Roll Jukebox die. 


Cheery Lynn Designs - Rock & Roll Jukebox Die Set - 10 Die Set - B947

I cut it out using glitter paper in lots of bright cheerful colors! 


Then I cut out a sign from the Retro Sign set and adhered the sentiment "Rock & Roll."

Cheery Lynn Designs - Retro Signs Die Set - 8 Die Set - B945
I added the music note,

Cheery Lynn Designs - Notes #1 Die - CABD3
and the tiny music notes from the Classic card die set. 
Cheery Lynn Designs - Classic Car Die Set - 13 Die Set - B944

I adhered it all onto a pierced circle.

Cheery Lynn Designs - Circle Pierce and Cut tool - LG Silver Pierce tool 6 Piece Die Set - LPC4


This was a fun and easy card to make! 


Here's a list of the dies I used:


Thanks for stopping by!

Laurie


Copyright Statement


All content, including designs, pictures and words are the exclusive property of the author of each blog post. Information shared here is for inspiration only and may not be copied for publication, competition or profit. Thank you for your cooperation.

SOCIAL MEDIA 2


Follow Us @jointhemakersmovement


All content, including designs, pictures and words are the exclusive property of the author of each blog post.
Information shared here is for inspiration only and may not be copied for publication, competition or profit. Thank you for your cooperation.