Showing posts with label Ivy Corner Flourish. Show all posts

Monday, July 23, 2018

Birthday Steampunk Owl Wishes with Bonnie Garby

3:30 AM 0 Comments
Hey crafty friends.  Bonnie from Make Time to Craft here today and I'm sharing what is supposed to be a masculine card for a teenage boy.  I struggle so much with cards for guys and I'm not really all that psyched about this one, but it wasn't terrible, so I thought I'd share it anyway.  We are all our own worst critics, right?  Anyway, I used some really cool dies on this card from Cheery Lynn Designs.
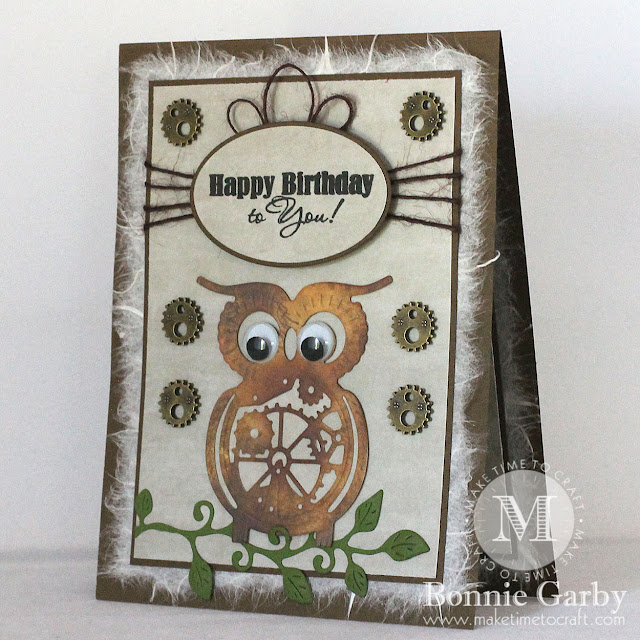
I pulled out my stash of Distress Ink and Distress Oxide Ink papers to find a nice brown for the owl.  I backed the paper with Stick It adhesive and cut it out.  I also added some wiggle eyes for fun.  I also used part of the Ivy Corner Flourish as a place for my owl to sit.  

Cheery Lynn Dies used:

I stamped the birthday sentiment and then cut it out with the oval dies.  I wrapped some burlap string around the top of the card and mounted the sentiment over that.  I also added some burlap string loops to the top of the sentiment.  I wanted to continue the steampunk type theme so I also added some gear embellishments from Really Reasonable Ribbon to finish it off.
Thanks so much for stopping by today.  For more information on the other products used, please visit my Make Time to Craft Blog.


Sunday, November 5, 2017

Floral Birthday Card with Bonnie Garby

3:30 AM 0 Comments
Hello Cheery Lynn die lovers!  Bonnie here today from Make Time to Craft to share a pretty birthday card that I created for my Mom featuring lots of beautiful dies from Cheery Lynn Designs.  
I find that birthday cards are the most needed cards and no matter how many I make, I always seem to be behind.  This Birthday Wishes Circle Sentiment is a great addition to your die collection and it can be used over and over in different settings without looking like you are always using the same die.

Cheery Lynn Dies used:
B783 Birthday Wishes Circle

I created my marbled background papers using Distress Inks and Distress Oxide Inks.  I just love creating my own background papers because they are always so beautiful.  I also used the Distress paper for the wording in the Birthday Wishes die.  I cut the die once in dark purple cardstock and again with the Distress Ink paper.  I then snipped out the words only and layered them on to the dark purple cut.  It also pops up the words just a little to make them stand out.

My Tea Roses were created by alternating layers of solid cardstock with Distress Ink paper.  I just love two tone roses.  I shaped the petals before layering them for a realistic rose look.
I topped my card off with a pretty bi-color bow created on my Bow-it-All V3.0 Tool using 5/8" Rose Bloom and Regal Purple Delicate Stitched Satin Ribbon from Really Reasonable Ribbon.  The bow was topped off with a pretty heart shaped pearl embellishment also from RRR.

I also ran a piece of Regal Purple Delicate Stitched Satin Ribbon topped with Tutti Frutti Chevron Stripe Grosgrain Ribbon across the center of the card under the sentiment.
Thanks so much for stopping by today.  What's your favorite die to use when making birthday cards?


Saturday, October 14, 2017

Hello Beautiful by Julie Lavalette

3:30 AM 0 Comments

Hi everyone, thanks for stopping by, it's JULIE here hosting the blog today.  


My card uses one of the many pretty background designed Dies. I started by cutting this out in pearlised cream cardstock and mounted onto the same card to form the base of my card. Cheery Lynn's word dies come in two different sizes which are great for layouts and cards. I decided to use the smaller Die on my word Hello and the larger Die on my word Beautiful.


My Daises were cut out in the same cream cardstock adding Distress Ink onto them and Prills into the centres. I mounted them onto my Ivy Corner Flourish which I also arranged a few extra leaves using my Ivy Strip Die and finished with some Butterflies.

Cheery Lynn Dies Used-

Crafty Hugs,

Julie x

Friday, July 21, 2017

Baby Card with Maggi

3:30 AM 1 Comments

Graphic 45's Precious Memories collection is so perfect for making baby cards along with Cheery Lynn's Baby Pram die.  Take a look at that sweet Baby Pram, isn't that just the most perfect die for a baby card?  It's part of the new vintage die release from Cheery Lynn Designs.   I've layered it over the Distressed Honeycomb die, which is also part of the vintage release.
This is a step card, here you can see how it stands on its own.  I made cherry blossoms to gussy up my card.  They are easy to make, just a couple layers and a pearl center.  Ink the edges and center to make the flowers more realistic.


I stamped a sentiment onto the Pierced Stacker .  I also used the Pierced Stacker  in a larger size behind the pram diecut.  

When I make step cards I always like to have my diecuts extending beyond the card's edge.  I used the Horizon Coved Rectangle Boutique Stackers to cut a large frame and layered that at the bottom allowing it to extend over the top of the card.


Cheery Lynn Designs Die Used:

Wednesday, April 19, 2017

New Window Shaker Card Kit!

3:30 AM 1 Comments
Cheery Lynn Designs has 2 new shaker card kits!  This window shaker that you see here (I think this is so fabulous) and a flower shaker that I'll share with you later on.  The shaker card kits come with 2 dies, foam, acetate and shaker pieces.  Everything you need except your design paper!
I do have a word of advice for you and that is to use a glue that is not so sticky and dries hard and quickly.  I used a sticky glue on this and some of my shakers stuck to the sides even though I allowed what I thought was an adequate drying time.

Underneath the window shaker I have layered Royal Scandinavian Boutique Stacker and 3 different sizes of the A2 Frames Rectangular Scalloped  frames.

The sentiment is stamped onto the small Pierced Stacker 3  frame.
The flowers are from the Floral Bouquet Kit 8 Piece Die Set and the leaves are Flourish Leaf Strip 5 Piece Die Set.  I also used the Ivy Corner Flourish Die under the flowers.


Cherry Lynn Designs Dies Used:

Thanks so much for stopping by!

Maggi Harding

Thursday, March 2, 2017

My Feathered Friend by Debbie Brownmiller

3:30 AM 1 Comments
A warm Hello to you . It's Debbie with you from Debbie's Time Out. Glad to see you visiting the blog. Well I don't know about you but I am ready for spring. So I choose to create a spring card.


I started out with a piece of pattern paper with butterflies along one side and matted it with black cardstock.


To the left side I have a little feathered friend sitting on the window sill among the leaves, flourishes and flowers.


For more details I layered the Shuttered Window with Flower Box  onto the base . I then added one of the little birds from the Feathered Friends   set. I added some of the  Ivy Corner Flourish , Add A Flourish  and Tiny Flower Kit  to add some greenery and flowers to make the little bird happy. Everything was inked up with distress inks. I hope I have inspired you to create some spring cards. Cheery Lynn Designs has a huge selection of flowers and greenery as well as several birds to make beautiful cards with.

Thank You so much for visiting the blog today and for the comments you leave. I always like to hear what you have to say. Have a crafty day my friends.

Dies Used
Shuttered Window with Flower Box FRM 151
Feathered Friends  B557
Ivy Corner Flourish B315
Add A Flourish B315
Tiny Flower Kit B376

Tuesday, January 31, 2017

Floral Notebook Cover for a 3-Ring Binder

3:30 AM 2 Comments
I made this to slip into the plastic sleeve of a small 3 ring binder.  I'm using the book in an assisted living facility so that visitors can make a note of their visits.


I created several layers to give this lots of visual appeal.  Starting at the back I used the largest die to from Coved Rectangle Stitch And Cut Tool - LG Silver Stitch Tool 6 Piece Die Set.

Next I layered in a cut-apart from the Graphic 45 Secret Garden collection.   The pretty flowers were  diecut with the Floral Bouquet Kit 8 Piece Die Set - B777.  I added leaves with  Flourish #7 Die - CAFLRS7.

On the bottom left corner I used Nesting Doll- Circles #1 3 Piece Die Set to diecut a circular doily to place behind my sentiment card.  I also used the Ivy Corner Flourish Die to accent the corner flowers.


Cheery Lynn Designs Dies Used:

Grapic 45 Secret Garden

Thanks for visiting today.


Monday, September 5, 2016

Birthday Wishes by Julie Lavalette

3:30 AM 2 Comments

Hi fellow crafters, it's JULIE hosting the blog and today I am using one of the fabulous Cardmaker dies for my card.


I started by matting and layering Craft Consortium's Wild Rose papers tattering them at the edges for a shabby feel. My Cardmaker layer I added foam dots behind to lift for extra dimension, I love the intricate design of the cardmaker overlay on my card.


Then onto my favourite part arranging my flowers which have been shaded with Distress inks and Flower Soft added to the centres. 
Finishing off with my butterfly, added bling and my drop shadowed sentiment.

Cheery Lynn Dies Used :

I hope you feel inspired to join in our Current Challenge with a chance of winning a $20 shopping spree.

 Crafty Hugs,
Julie x

Sunday, June 26, 2016

Lollipop Card Tutorial by Julie Lavalette

3:30 AM 5 Comments

Hi fellow crafters, it's JULIE here today. This week I am sharing a tutorial on my Lollipop card and I hope it inspires you to make one with all the gorgeous doily dies we have here at Cheery Lynn Designs.


I decided to make my Lollipop card a 3D design and concertina my doily, so I started by cutting out 5 doilies and shading with some ink at the edges. You will notice in the photo I cut half way into my doilies and scored down the sections to fold.


I then glued all my doilies together to form my rosette shape, gluing on to co-ordinating Angel Wing. The diameter of my rosette shape measures approx 5.5 inches and approx 3/4 inches in depth.  


Next I added several layers of foam tape to the centre so my topper would have stability when I glued in place.


My topper in place as seen here.


I cut out another Angel Wing Doily decorating it to complement the front and drop shadowed my Thank You sentiment to make it pop.


I held my straw in place on my decorated back panel with some extra strong tape.


I used a fast drying glue to adhere the front to the back, holding in place until it gripped.
My Flourish was embossed with a Shabby Pale Green shade. Adding on my flowers and leaves.


My paper tassels were made by recycling bead ends from an old necklace and using my Cutie Fringe die strip.


Finishing off with some small flowers and pearls.

Cheery Lynn Dies Used :


Good luck to everyone who is entering our current challenge Pretty in Purple.

Crafty Hugs,
Julie x


Wednesday, July 29, 2015

G'Day Love With Lisa Blastick

3:30 AM 1 Comments

G'Day Love! 
It's Lisa back this week with another New Release Diecut from Cheery Lynn Designs!
 It's Kaptain Kangaroo! 
The name of the diecut takes me back to my child time. I remember watching Captain Kangaroo on Saturday mornings. Such a great memory and blast from the past. When I was thinking about what I wanted to make with him, I thought about so many different backgrounds. Suddenly, I thought of one of my favorite movies from years ago, Crocodile Dundee and his love for his country. It then became about love and hearts. I used two of the smaller and one of the largest heart from Two of Hearts. I diecut it in red and Kraft paper and cut the inside of the red out and placed it on top of the Kraft paper. I stamped Love on the bottom corner heart and added little white dots on the edges. 


There are two Ivy Corner Flourishes in opposite corners and in the center behind the Kangaroo is a Priscilla Doily. Love it! Last but not least I added little flowers from Miniature Rose with little pearls in the centers. 


I cut the Kaptain Kangaroo out once in Kraft and one in red cardstock. I used the G'day for the inside and I used white cardstock for his ears and black cardsock for his eyes and colored his nose with a black copic. 

Cheery Lynn Diecuts Used:


Thanks for stopping by today and be sure to check out this week's challenge " anything goes" for a chance to win $20 at the Cheery Lynn Designs store! 
Hugs Lisa

Thursday, June 11, 2015

Enjoy with Jenny Alia

3:30 AM 1 Comments

Hi, Happy Thursday!  It's Jenny posting today.  I began this card by looking through my design papers.  I wanted a soft looking card but then added the blue accents because it seemed to need more contrast.

I started by layering the background onto a blue 5.5" card.  I cut the cream layer a little smaller and glued the green design paper layer on top which was cut with the largest French Flair Stacker.  I then layered cream paper cut with the Royal Scandinavian Doily, blue paper cut with a smaller French Flair Stacker and then topped them with the Royal Scandinavian Tag #1 and the word Enjoy.  All three of the top layers were adhered using foam adhesive.


The Ivy Corner Flourish was cut out of blue paper.   The flowers were created by cutting the Sweet Williams die out of a shimmery cream card stock. The edges were inked with broken china distress ink and they were crumpled and stacked.  The flower centers and little flowers on the ivy are from the Embellishment #2 die and then pearls were added.

Cheery Lynn Dies

Thanks for visiting and make sure to check out the Creative Corners challenge for a chance to win a $20 voucher to the Cheery Lynn shop.  

Hugs, Jenny

Thursday, April 23, 2015

Mother's Day Card with Jenny Alia

3:30 AM 2 Comments

Hi, it's Jenny posting today with a Mother's Day card.  After seeing the beautiful flowers Julie made with the Black Eyed Susan Strip die I couldn't wait to play with this die.  The leaves are all from the Ivy Corner Flourish cut with the same background paper.  I also tucked in some Dandelions.


I cut the Concentric Circles Mesh Border out of the background card stock, layered patterned paper behind the negative space and then glued another concentric circles border in blue on top.  I kept some of the white negative cut outs and glued them back into the center of the border in a pattern.


Stickles were added to the edges of the Black Eyed Susans and I used a little gold paint on the edges of the dandelions.

Cheery Lynn Designs Dies

Thanks for visiting and be sure to check out this week's Mother's Day Challenge for a chance to win $20 towards shopping  at Cheery Lynn Designs!

Hugs, Jenny

Friday, March 27, 2015

Happy Birthday Butterfly Card with Corina Finley

3:30 AM 4 Comments

Hello!

Welcome back to another Friday with me, Corina, here on the Cheery Lynn Designs Blog. This weeks card has a light colour palette, with a layered design. 

For the base I used Kraft cardstock and matted a piece of pattern paper which is cut 1/4" smaller. I tore the right hand side and placed a white Lilith Doily Edger die cut underneath so the scallop shape is seen.

I created my Doily layered center using the Horizon Circle Boutique Stacker Frames in the medium and large, the Lilith Doily and a circle die from the Classic LG Stackers Nesting Dies.


I placed the largest Horizon Circle die cut down on my card base and then layered the Lilith Doily directly on top.


As you can see in the photo above, I die cut a circle out from the center of the medium Horizon Circle and pop-dotted it to the layers. I die cut my embossed butterfly image with the same circle stacker die and inset the image to the center.


For my focal flower, I used the Chrysanthemum Strip and an altered petal from the Sweet Christine die in the center. I accented using the Baby's Breath Flower set, Tiny Flower set and the Ivy Corner Flourish for foliage.

I added the Happy and Birthday sentiments to my card and add Rhinestones for a touch of bling!

Dies Used:

Lilith Doily w/ Angel Wing - DL263


I hope you will play along in our weekly Cheery Lynn Designs Challenge 177 - Anything Goes. You could win a $20 shopping spree at the online Cheery Lynn Design Store.

Thanks for joining me today!

Take care,

Live, Laugh & Create

Copyright Statement


All content, including designs, pictures and words are the exclusive property of the author of each blog post. Information shared here is for inspiration only and may not be copied for publication, competition or profit. Thank you for your cooperation.

SOCIAL MEDIA 2


Follow Us @jointhemakersmovement


All content, including designs, pictures and words are the exclusive property of the author of each blog post.
Information shared here is for inspiration only and may not be copied for publication, competition or profit. Thank you for your cooperation.