Showing posts with label Circle Classic. Show all posts

Saturday, November 4, 2017

Let it Snow by Julie Lavalette

3:30 AM 0 Comments

Hi Cheery Lynn fans, its JULIE here today. The clocks changed last weekend in Scotland and there is definitely a wintry feel in the air now which inspired me to make my winter scene using the pretty Maja Design papers and some of our vast range of amazing Festive and Winter dies.


I started my card by tattering at the edges two layers of paper and adding a scattering of Frantage for a snowy effect. My rosette styled Snowflower was cut out in glitter card adding Holly, Pine Branches and layering on my cute snowman.


My Let It Snow was drop shadowed and layered onto my Stackers with a little cheesecloth and Frantage for extra detail. I mounted my Dancing Snow Flurries Border around my sign using sections of this Die to form the oval shape.

Thanks so much for stopping by today and I hope you have a lovely weekend.

Crafty Hugs, 
Julie x   
Cheery Lynn Dies Used :

Monday, March 13, 2017

Happy Mothers Day by Julie Lavalette

3:30 AM 6 Comments

Hello everyone, it's JULIE here today and here in the UK we celebrate Mother's Day this month so I thought it would be nice to share some inspiration that could easily be adapted into many other occasions by changing the centre sentiment.


Using Craft Consortium's paper pad "Wild Rose" for my card I cut out my Heart Stacker Die and layered on my Stitched Squares which I distressed at the edges to give a material patchwork effect. 


Next I layered my Doily onto the centre.


My flowers were cut in White Cardstock and shaded with Distress Inks adding Flower Soft into the centres of one of my favourite smaller flower Dies - Sweet Christine and my Chrysanthemums I added gems to their centres.


My heart I backed onto White Cardstock and kept all the negative cut hearts adding onto my card for extra detail.

Thanks for stopping by and I do hope you have a lovely week with some time to create.

Happy Crafting, 

Julie x   

Tuesday, February 21, 2017

Dream Forever by Julie Lavalette

3:30 AM 2 Comments


Hello Cheery Lynn Fans, it's JULIE here today hosting the blog and I am delighted to be sharing some more inspiration from our new Bohemian Collection on my Dream Forever card.


Have you noticed on Cheery Lynn's Stacker Dies you can get Stitched and Pierced details at the edges of these Dies or just left plain. I love all these extra touches of detail and when I looked at the details on my Mandala Doily, Cowboy Boots and Dreamweaver Dies I noticed all the Pierced details so I knew I wanted to use one of the sets of Pierced Stackers. I chose the Coved Rectangles and added an accent from the outer edge of my Mandala Doily at the edges.


My Cowboy Boots were cut out of Kraft Cardstock highlighting all the embossed detail with a Fineliner Pen and a little ink to age them. I layered the swirls and buckles on twice and added a brad onto the boot. Aren't they so cool !


I cut my Mandala Doily out of Kraft Cardstock and paper from Maja Design, layering it on top for contrast. Next I cut out the centre and added my Dreamweaver Die which had also been layered twice. I extended the tassels on my Dreamweaver and hid the joins with my pretty flowers.


I offset the feathers to look as if they are blowing in the wind and added some small feathers that I pulled out of a feather pillow for added texture.

I finished with lots of pearls and a sentiment.

Thanks so much for stopping by today and I hope you manage to get some creative time  this week.


Crafty Hugs,
Julie x

Cheery Lynn Dies Used:
B872 Dreamweaver
B245 Dream Big
B517 Arizona Cowboy
B387 Tiny Fanciful Flourish Left & Right
B352 Forever
B586 Step Card Bundle Set 3
M4 Circle Classic
LPC-10 Coved Rectangle Pierce and Cut Tool

Monday, October 10, 2016

Halloween Trick or Treat Fun by Julie Lavalette

3:30 AM 2 Comments

Hi everyone it's JULIE here today, I hope you had a lovely weekend and managed some creative time. Today I am sharing some more Halloween inspiration using many of the amazing Halloween dies Cheery Lynn have.


My Witches Cauldron was cut out in black cardstock adding some Vintage photo Distress powder at the edges to give a rust effect. My flames and logs were cut out in White cardstock and coloured with Copic pens adding some Glossy Accents onto the flames.


My cute little Witch was cut from the Trick or Treat Border layering her with a foam pad.


My hills were die cut from my Stitched stacker die, I then fussy cut the shape of hills and highlighted the stitching effect with a black pen, distressing the edges and adding some black soot Distress ink.


My house I layered Orange cardstock behind to give a warm glow, layering on with foam pads and a spooky ghost behind. My stormy sky was created with inks and a cloud stencil.

Thanks so much for stopping by today and I hope I have inspired you to create a Halloween scene on a card or Scrapbooking page.

Good luck to everyone entering our Bi-Weekly Challenge for a chance to win a $20 spending spree.

Crafty Hugs, 
Julie x 

Cheery Lynn Dies Used-
B594 Jack O Lanterns
B595 Home Sweet Home
B852 Halloween Ghost
B847 Witches Brew
B779 Camping Set
B469 Happy Halloween Twiggy Wreath
B191 Spooky Tree
B470 Trick or Treat Border
XL15 Rectangle Scalloped LG Purple Stackers
LSC-16 Rectangle Stitch and Cut Tool
M4 Circle Classic
B596 Bat Family 

Monday, September 5, 2016

Birthday Wishes by Julie Lavalette

3:30 AM 2 Comments

Hi fellow crafters, it's JULIE hosting the blog and today I am using one of the fabulous Cardmaker dies for my card.


I started by matting and layering Craft Consortium's Wild Rose papers tattering them at the edges for a shabby feel. My Cardmaker layer I added foam dots behind to lift for extra dimension, I love the intricate design of the cardmaker overlay on my card.


Then onto my favourite part arranging my flowers which have been shaded with Distress inks and Flower Soft added to the centres. 
Finishing off with my butterfly, added bling and my drop shadowed sentiment.

Cheery Lynn Dies Used :

I hope you feel inspired to join in our Current Challenge with a chance of winning a $20 shopping spree.

 Crafty Hugs,
Julie x

Saturday, March 12, 2016

Easter Cupcake Baskets by Julie Lavalette

3:30 AM 3 Comments

Hi Everyone, it's JULIE here today and I am sharing with you some Easter Inspiration using our fab new Cupcake die.


These cute little baskets which measure approx 3" diameter by 4" height are easy to make and once I worked out all the measurements it didn't take long to make the second one. So let me show you how to make them.


I started by cutting my Cupcake Wrapper from cardstock and added a double layer of grass to the base. To get the grass strip to curve around your cupcake die, layer on sections measuring about 2 inches in length, offsetting the grass on each layer.


For my base I used the 2 largest dies in the Circle Classic set. You will see in this photo I cut my die out and then drew around the outer part of my smaller die and fussy cut out some notches.


My Cupcake Wrapper I added a little bit of glue to the die cut join for added strength for the weight of my chocolate eggs and formed the shape of my cupcake. I then bent all my notches up on my circle and added a little glue to each one, pushing my circle down into my cupcake to form the base of my basket, pressing all the notches onto my cupcake wrapper.


This makes it all lovely and neat and the grass disguises the notches on the inside.


Next I added on my handle with some brads, you will notice I have the pretty side of my Brad to the inside of my basket as I hid the closure with a flower on the outside.


Now the fun bit of adding all my Easter Chicks, sweet Bunny and flowers.


I disguised my join on the cupcake wrapper be carefully placing a Chick or Bunny over the join.


I finished off my baskets with a pretty bow and some Chocolate Mini Eggs which had been gathered inside a Cello bag that we normally place our cards into. I tied with some Easter ribbon and a die cut Sweetheart Candy.


Cheery Lynn Dies Used:


Thanks so much for stopping by today and you still have plenty of time to join in our Current Challenge which is Doilies.

Crafty Hugs, 
Julie x 

Saturday, November 14, 2015

Love You by Julie Lavalette

3:30 AM 2 Comments

Hi there Cheery Lynn friends, it's JULIE here today and I'm sharing with you a card using our fabulous new word die - Love You. I gave my card a Masculine touch, hopefully to inspire you, as I know we all struggle when it comes to thinking what design to make for a male, but changing the colours and adding a flower would equally give this design a feminine look.


I used several of my Stacker dies to build my layers and with it coming close to the Festive season I just had to add some Platinum Stickles for an accent of bling. 


My Ink bottle was coloured with a Copic Pen and I wrote the work Ink on it. My Feather I inked the edges and ruffled the sides for a realistic look.


I fussy cut a heart shape to place behind my heart doily and gave my word - Hugs a shadow effect.

Cheery Lynn Dies Used :

Thanks for stopping by today and good luck to everyone entering our Weekly Challenge.


Julie x

Saturday, September 19, 2015

Who Ate The Spider ! by Julie Lavalette

3:30 AM 6 Comments

Hi Everyone, It's JULIE here today. I am having so much fun with the Halloween Dies creating little scenes on my cards that I just had to share another one with you.


My background was created with Hickory Smoke and Stormy Sky and a Spiders Web Stencil. 


My  Washing Line and Moon were cut out in White Cardstock and coloured with Copics adding a little bling on to the Witches shoes.


My Tombstone was also cut out in White Cardstock and shaded with Distress inks. My Barbed Wire was heat embossed with Silver Embossing Powder and a little Rust Coloured Stazon ink added to it.


As you can see my very naughty Horrible Cat ate the Spider off the web ! I cut my cat out in Black Cardstock and trimmed his head and front legs off. I then glued the body part in to a sitting position and placed a little Silicone Glue on to the back of his head and re positioned it for added dimension. My Spider I trimmed his legs down a little bit in an uneven way so they had a chewed look to them.

Cheery Lynn Dies used : 

Thanks for stopping by today and good luck to everyone entering our Weekly Challenge with a chance of winning a $20 spending spree.

Julie x

Saturday, September 12, 2015

Merry Christmas my Reindeer by Julie Lavalette

3:30 AM 1 Comments

Hi Everyone, It's JULIE here today sharing a Festive card with some of our New Release dies.


My large Snowflake die was cut out in White Cardstock. I sprayed with glue and added some extra fine glitter on it. You will also notice that on my Pierced Stacker die cut the little pierced holes act as a super guide line for adding Stickles evenly - Unfortunately the camera hasn't picked up the sparkle too well. 


My cute Reindeer was cut out in Kraft Cardstock adding a layer of White Cardstock to the back I shaded the areas with Red and Gold pens, adding a little ribbon to the neck and Stickles to the nose.


My Poinsettias were cut out in Patterned Cardstock, distressing lightly with ink and adding a few stamens.

Cheery Lynn Dies Used:


Thanks for stopping by today to see my post and good luck to everyone entering our weekly challenge.


Julie x

Saturday, August 8, 2015

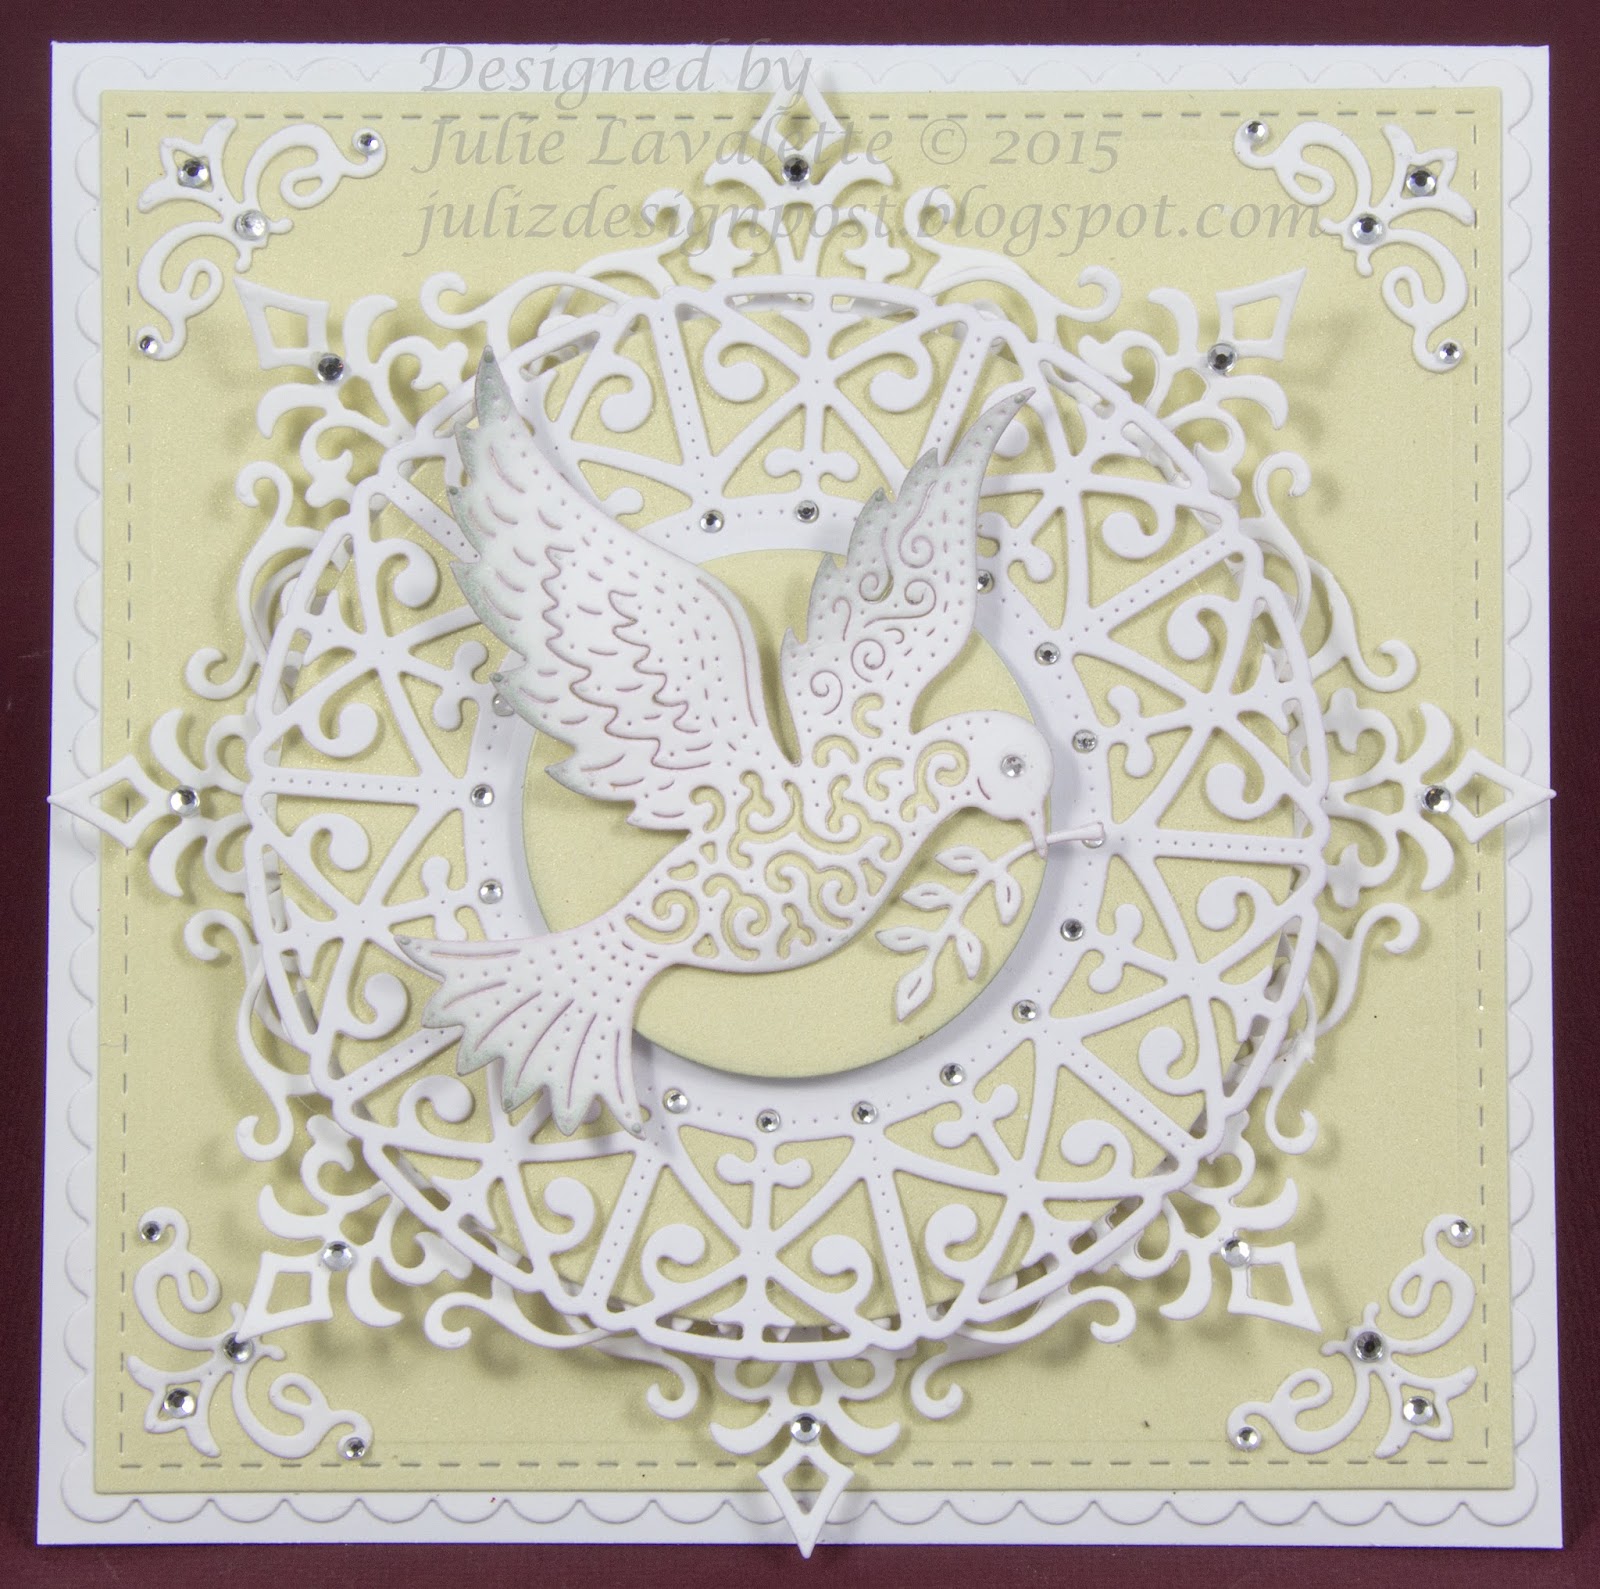
Dove Card by Julie Lavalette

3:30 AM 2 Comments

Hi Everyone, it's JULIE here today hosting the blog and today I am showcasing the Peace Dove, a very elegant bird die with the most beautiful detail.


My layers are cut out in white and a pearlised lemon shade. This photo shows my first set of layers. I love the added detail the stitching stackers give to the edge of a card. I used my corners from the Royal Scandinavain Tag Set and added some gems on to my card.


My next layers I also added some gems and layered with Silicone Glue for height and dimension.


My Dove I added some Distress Ink to the edges curling the wings slightly and adding a little lemon card behind to highlight the Dove's detail and a little gem on to its eye.


Finally adding all my layers together to finish.


Cheery Lynn New Release Dies Used:
Other Cheery Lynn Dies Used:

Good luck to everyone entering our Weekly Challenge and thanks for stopping by today.


Julie x

Copyright Statement


All content, including designs, pictures and words are the exclusive property of the author of each blog post. Information shared here is for inspiration only and may not be copied for publication, competition or profit. Thank you for your cooperation.

SOCIAL MEDIA 2


Follow Us @jointhemakersmovement


All content, including designs, pictures and words are the exclusive property of the author of each blog post.
Information shared here is for inspiration only and may not be copied for publication, competition or profit. Thank you for your cooperation.