Sunday, April 30, 2017

A Pretty Basket for Mom - Maggi Harding

3:00 AM 0 Comments
Well this should have been an Easter basket but I'm a day late and a dollar short as they say, so I turned it into a Mother's Day basket filled with my Mom's favorite chocolates!  She'll love it!

To start my design, I used Coved Rectangle Stitch Nesting Set - SM Silver Stitch Nesting Set 6 Piece Die Set - MS10 to cut panels for the front and back of the basket.  I just cut rectangles for the side panels and used a corner chomper to mimic the coved corner on the front panels.  Then I added Border #7 Die - CABRD7  in the center.  I cut a little tag with the smallest of the Horizon Fishtail Banners 3 Piece Die Set - DL278 and stamped a simple greeting.

I used several different flower dies (listed below) to make the flowers that embellish the front and back panels.  I always like to tuck in a few leaves to my floral clusters and one of my favorite dies for making leaves is Flourish Leaf Strip 5 Piece Die Set - B178.

The handle is "gussied up" with more flowers, a seam binding ribbon and  beautiful flourishes cut with  Flourish #1 Die - CAFLRS1.

On this side view you can really see how pretty that leafy flourish looks cascading down the side.  The papers I used are from Graphic 45's DCE Once Upon a Springtime.  The pinks and greens are perfect for this springy Mom's Day project don't you think?


Other
Graphic 45 Once Upon a  Springtime DCE
Really Reasonable Ribbon seam binding


That's it for me today! Thanks for joining me.


Saturday, April 29, 2017

Beautiful Gardenias with Cheryl Walker

12:30 AM 1 Comments
Hello everyone, Cheryl here with a card I created using Cheery Lynn's Beautiful Dies. I had so much fun creating this beauty, and LOVE working with Cheery Lynn Dies, as they make is super easy and fun to create.

On my card for today I chose to use 5 different dies, and I will list them below for you :) I LOVE LOVE LOVE this Gardenia Strip die, and I really enjoyed creating my flowers. The Rose Leaf strip was fun as well. I ended up distressing the leaves, and because of the way Cheery Lynn created these beautiful leaves, it made distressing them easy and I think they turned out BEAUTIFUL!
I love to layer, so I chose to use Cheery Lynn's Large Oval Stitch and Cut Tool to begin the layering on my sentiment layer. Next I used the Polynesian Sails Oval Doily, and then I used the Oval Classic.

I made 2 bows using Really Reasonable Ribbon satin ribbon, and then glued them under my sentiment layer. My card came together super fast, as super easy! LOVE that!

Cheery Lynn Dies Used:
B339 Gardenia Strip
B241 Rose Leaf Strip
DL153 Polynesian Sails Oval Doily
LSC-7Oval Stitch and cut tool
M-7 Oval Classic

The stamp set is the Project Bin's 'fun is good set', and design paper is Club Scraps 'Cherry Blossom'.
Pearls are from my stash, and sewing was done on the machine with pink thread. 


I hope you enjoyed my post for today, and thank you for stopping by!

hugs to all,
Cheryl

Friday, April 28, 2017

Dream with Your Eyes Wide Open

3:30 AM 4 Comments
Hi Cheery Lynn fans.  Bonnie here today from Make Time to Craft with a pretty all-occasion card featuring one of my favorite floral die sets from Cheery Lynn Designs.
I started with an A2 card base (4-1/4" x 5-1/2").  I cut my Quatrefoil A2 Frame 1 die in navy blue and then adhered it to a piece of Distress Ink paper I created.  I then trimmed that down to 3-3/8" x 4-5/8".  Then I layered that panel on both a navy and brown layer leaving a small border on each.  I then added a piece of turftan brown delicate stitched satin ribbon across the middle of the card securing at the back.  Finally there is a layer of natural mulberry paper on the bottom.  This panel was then adhered to the navy card base.

My stamp from Quietfire Design was stamped on cream cardstock and cut with an oval die.  I then layered that on navy and brown cardstock ending with a natural mulberry paper layer.  Then I attached this sentiment panel to the upper center of the card over the ribbon.
The Floral Bouquet Kit is such a versatile die set with a couple of flower sizes and a wide variety of foliage dies.  

I cut out a variety of sizes of the flower using a Distress Paper I made along with kraft and navy cardstock.  I stamped on the layers with an old script stamp and spritzed with water to soften the look.  I then shaped the flower petals and assembled the flowers.  The foliage was cut from a green Distress Ink paper I made and shaped a bit and then adhered to the card.  The flowers were adhered on top of the foliage.  The centers of the flowers are metal gear embellishments from Really Reasonable Ribbon.

Cheery Lynn dies used:

My card was finished off with a pretty bi-color double-loop bow created on my Bow-it-All V3.0 using turftan brown and capri blue Delicate Stitched Satin ribbon from Really Reasonable Ribbon.
Thanks so much for stopping by today.  I hope I've inspired you to grab your favorite flower dies and create a pretty floral card or project today.

~ Bonnie ~

Thursday, April 27, 2017

Cheery Lynn Camping Set with Laurie Schmidt

12:30 AM 1 Comments


Hi everyone!

 It's Laurie here from Stamping up North, with my turn to host at the Cheery Lynn blog today.  I decided to create a scene that is a familiar one with so many people up north....campfires! Nothing tastes better then hot dogs and marshmallows cooked over the fire with friends and family. It's always a good time sitting around the fire, relaxing and talking. 

Cheery Lynn has such a great camping set for creating fun scenes. I used the tree and camp fire, and added the Whimsical Sun and Clouds
Here's a close up of the cute, happy face on the sun:


I also added a lawn chair and some grass, and framed it all with the A2 rectangular scalloped frames.


Here's a list of the dies I used:


Grass die  CAFLRS15

Beach set B785


Making this card has me anxious for our first campfire this season, I can't wait!

Thanks for stopping by!

Wednesday, April 26, 2017

Whimsical Ladybug Tag

4:30 AM 1 Comments
Hello again!  Cherry here with you today with a cute little tag for you featuring some lovely dies from Cheery Lynn Designs.
 I used the cute Whimsical Ladybug die.  
I cut it out twice to give it a shadow effect and layered it on the  Pierced Stacker 3 dies.
 I added some buttons and the Olive Branch 2 piece die set.
From here I just added some ribbons and added Tags for some interest at the bottom. I think this would look cute added to a flower for Mother's Day to carry on the garden theme.  Ladybugs are good for the garden!  Thanks for visiting, Cherry

-Cheery Lynn Dies-

Tuesday, April 25, 2017

Thank You by Jenny Alia

3:30 AM 1 Comments

Hi, it's Jenny here on the blog today.  I decided to challenge myself by creating a card using mostly scraps.  I found the pink and gray papers in my scrap bin along with these flowers and once my colors were set, the card came together.


I trimmed the pink papers and backed them with a black mat before adhering it to a 5.5" card.  The gray circle was a scrap from a Halloween card I made and was already cut using a Cheery Lynn Classic Circle die.  I popped it up with double sided foam tape.  The pin flowers were created using probably my favorite flower dies, the small and large Gardenia's.  The larger one has a fine shimmer from a glitter spray.  The edge of the yellow Tea Rose was dipped in a dark pink ink pad.  
  
To complete and complement the flowers I added white branches and black flourishes. 

Cheery Lynn Dies

Thanks for stopping by the blog today!
Hugs, Jenny

Monday, April 24, 2017

You Make the World a Better Place

3:30 AM 4 Comments
Hi there everyone.  Bonnie from Make Time to Craft here with you today sharing a pretty all-occasion card made with lots of my favorite dies from Cheery Lynn Designs.
I created an open card front using the Quatrefoil A2 Frame.  I used the A2 Retangle Classic die to cut the large opening on the card front and also created a bit of a frame of the same size for the back.  I sandwiched the Quatrefoil cut in white in between the card front and the frame backing to hold it in place.

I created a rectangle for the sentiment panel using some Distress Ink paper I made measuring 2-3/4" x 4 which covers enough of the front to allow you to put a message on the inside of the card without it showing though.  The sentiment was added to that with a ribbon banner in between.

I lined the inside of the card with the same Distress Ink paper for uniformity when the card is closed.
My tea roses were made with a mix of the Distress Ink Paper and solid dark purple cardstock for some interest.  The layers were cut and the petals were shaped with a foam pad and stylus before assembling.  They were attached to the card below the sentiment.

Cheery Lynn dies used:

My card was topped off with a pretty bi-color double-loop bow created on my Bow-it-All V3.0 using Regal Purple and Rose Bloom Delicate Stitched Satin Ribbon from Really Reasonable Ribbon.
Thanks so much for stopping by today.  I hope I've inspired you to pull out your frame stamps and make an open front card.

~ Bonnie ~

Sunday, April 23, 2017

Be Happy by Julie Lavalette

3:30 AM 2 Comments

Hi everyone, it's JULIE here and today I am sharing a card using the beautiful flower die called Black Eyed Susan. I love the dimension you can get with these flowers and they always look so pretty on a card.

My card has been made using Craft Consortium's paper pad called Wild Rose and measures approx 7.5 inches by 5 inches. 


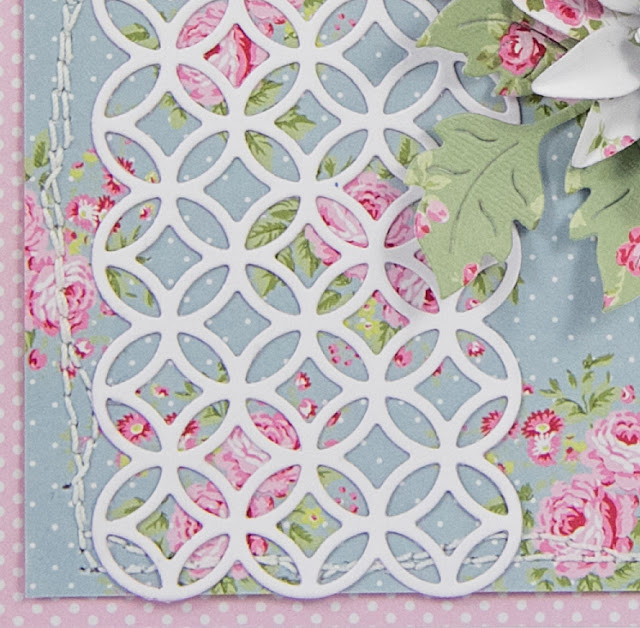
I starting by cutting my layers and adding some stitching for a shabby feel and an extra touch of detail, mounting on my Concentric Circles Mesh.


My Stackers have both been placed on with foam strips adding them both on at different angles adding on my Be Happy sentiment.


My flowers I used a quilling tool to wind the centres and shaped them on my Embossing mat.


Cheery Lynn Dies Used :

Thanks so much for stopping by today and thank you for all the lovely comments you leave.

Happy Crafting,
Julie x

Saturday, April 22, 2017

Smile Card by Amy Voorthuis

3:00 AM 2 Comments
Hello lovely Cheery Lynn Fans.
Flowers, flowers, flowers, who doesn't love flowers? Well I am a huge sucker for flowers especially when they are made with Cheery Lynn dies. I so enjoy making them myself. For today's card I used two different collections by Maja Design and two amazing dies to make the flowers on my card.  
The color palette is like my latest layout I made for Maja Design that was posted on my blog yesterday if you click here => Amy's Pretty Papers <= you can see more of my work. 

Smile: 
The color palette I used is black and white plus one, but for this card I added two colors orange and green for the leaves because in my opinion leaves are supposed to be green. I cut my B312 - Burlap Border in uneven strips to make the card more shabby chic and placed them behind my flower like I did with the leaf dies. At the end I added a pretty dot stamp and some cute feathers. 

Cheery Lynn Design dies used:

Thank you so much for visiting the blog today!
I hope you enjoyed my post and I have inspired you to use your Cheery Lynn Designs dies.
Have a wonderful weekend.

Friday, April 21, 2017

Just For You by Debbie Brownmiller

3:30 AM 3 Comments
Hi, it's Debbie from Debbie's Time Out. Glad to see you here. Today I am sharing a card with flowers. To me flowers always make for a beautiful card to give to that someone special.
I started the base of this card by embossing it with the Hearts and Rose Leaves Embossing Plate .
It is always nice to have that extra texture on the base of your cards.
I then layered the Royal Scandinavian Oval Doily  to one side of the card and the Southern Charm Valance Die  at the top and bottom of the card.
The Mini Flourish One  was used as a background for the flowers and leaves.  The flowers are the Chrysanthemum Strip inked up with distress inks for color. The leaves were cut from the Build a Flower #2  and tucked in behind the flowers. A pearl was placed in the center of each flower to finish them off .
I cut the sentiment "Just For You" from the Just For You Oval Die  . I then traced the outer edge of the die onto the purple paper and fussy cut it out to place behind the sentiment. The XOXOXO were placed along the bottom of the sentiment.

I would like to thank you for visiting the blog today and for the comments you leave. I hope I have inspired you to play with some of Cheery Lynn Designs flowers. They have a huge variety of flower dies to choose from.

Dies Used
Hearts and Rose Leaves Embossing Plate - E134
Royal Scandinavian Oval Doily 2 Piece Die Set - DL307
Southern Charm Valance Die - B454
XOXOXO 2 Piece Die Set - B375
Just For You Oval Die - B784
Mini Flourish One Die - B170
Chrysanthemum Strip 6 Piece Die Set - B311
Build a Flower #2 27 Piece Die Set - B187

Thursday, April 20, 2017

Birthday Cupcake With Lisa Blastick

3:30 AM 2 Comments

Hi everyone! Ready for a new quick, clean and simple card? It is easy to do with Cheery Lynn Designs die cuts. Here is an A2 size card using only 2 die cuts and an embossing folder. 
Plus I lost a bit of my Mojo? Anyone seen it? 


I die cut out the cupcake out twice. Once in brown and once in the pink. There are 3 scalloped frames and along the edges of the pink I added liquid pearls. The 2 cherries have some diamond glaze and I placed pop dos behind the cherries and cupcake wrapper. 


On the inside scalloped white paper I embossed it with old parchment. 
Just to give it a little extra something... 


Thanks for stopping by....Hope you enjoyed.
Have a great day! 
Hugs Lisa 

Wednesday, April 19, 2017

New Window Shaker Card Kit!

3:30 AM 1 Comments
Cheery Lynn Designs has 2 new shaker card kits!  This window shaker that you see here (I think this is so fabulous) and a flower shaker that I'll share with you later on.  The shaker card kits come with 2 dies, foam, acetate and shaker pieces.  Everything you need except your design paper!
I do have a word of advice for you and that is to use a glue that is not so sticky and dries hard and quickly.  I used a sticky glue on this and some of my shakers stuck to the sides even though I allowed what I thought was an adequate drying time.

Underneath the window shaker I have layered Royal Scandinavian Boutique Stacker and 3 different sizes of the A2 Frames Rectangular Scalloped  frames.

The sentiment is stamped onto the small Pierced Stacker 3  frame.
The flowers are from the Floral Bouquet Kit 8 Piece Die Set and the leaves are Flourish Leaf Strip 5 Piece Die Set.  I also used the Ivy Corner Flourish Die under the flowers.


Cherry Lynn Designs Dies Used:

Thanks so much for stopping by!

Maggi Harding

Tuesday, April 18, 2017

Wedding Shaker Card with Cheryl Walker

12:30 AM 2 Comments
Hello everyone, and Happy Tuesday to all!

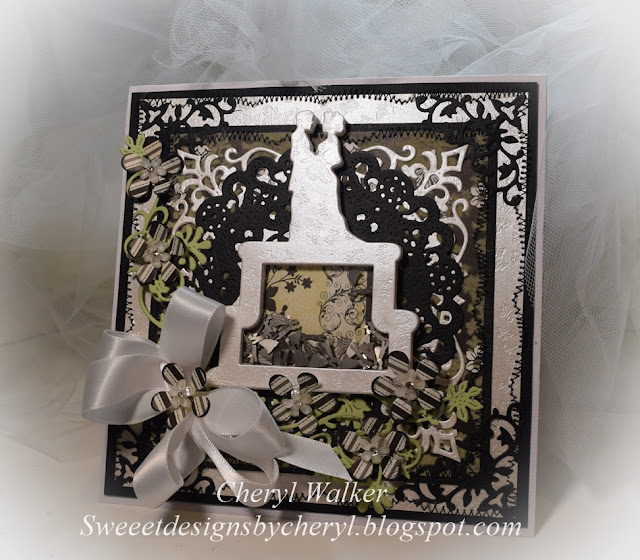
Today's card features the beautiful Wedding Cake Shaker Kit and several other beautiful dies from Cheery Lynn Design! I LOVE using the shaker kits from Cheery Lynn as they have everything you need to create a shaker for your card, and they are super easy to make!

So for my card I chose to use some beautiful shimmer butterfly design paper for my wedding cake. I LOVE the way it looks paired with the DCWV design paper. I did cut a different print for the backing on the wedding cake. I added tons of the little bride and groom metal pieces to the shaker part of this card :)

I then cut out a Priscilla Doily in black card stock, so the shaker would show up well, and behind it I used the beautiful Royal Scandinavian Doily die, cut in the same shimmer design paper.

The flowers are cut using Cheery Lynn's Medium Rose die, cut in coordinating card stock. I then distressed the edges of the petals using black ink. For the Greenery I used Cheery Lynn Step Card Bundle for the greenery pieces in it. I chose the 2 smaller greenery.

For the corners of my card I used the  BD-17 Corners set. and cut the one corner out in black four times.

Lastly I added some sewing in black, and white satin ribbon for my bow.


I hope you enjoyed my post for today!
Thank you for stopping by, and have a lovely day!

hugs to all,
Cheryl

Monday, April 17, 2017

Seahorse Card Set with Laurie Schmidt

12:30 AM 1 Comments

Hi everyone!
Laurie here today sharing a card I made with some fun Cheery Lynn ocean dies.
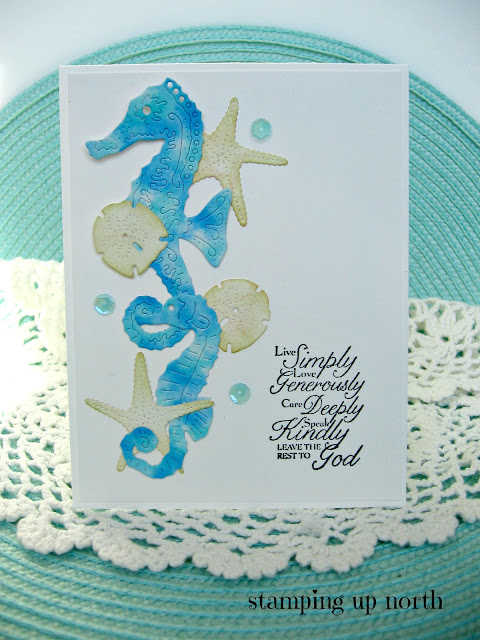
I love the cute seahorse family...for this set of cards I used 2 of them.

 I cut them out of some alcohol ink background papers I made some time ago. It's a fun technique, you can find the link on how to do it here

You can see the awesome detail on the seahorse and starfish...I did distress the edges of the starfish and shell a bit. I also added a few sequins for a bit of bling.
For the top card I backed it all on some scallop rectangles, and the bottom I kept very clean and simple:
\
Here's a list of the Cheery Lynn dies used:

Thanks for stopping by!

Copyright Statement


All content, including designs, pictures and words are the exclusive property of the author of each blog post. Information shared here is for inspiration only and may not be copied for publication, competition or profit. Thank you for your cooperation.

SOCIAL MEDIA 2


Follow Us @jointhemakersmovement


All content, including designs, pictures and words are the exclusive property of the author of each blog post.
Information shared here is for inspiration only and may not be copied for publication, competition or profit. Thank you for your cooperation.