Saturday, March 31, 2012

Lacy Elegance

3:30 AM 8 Comments
Hello! Jodi here today with a card inspired by this weeks challenge,
 Things with Wings.


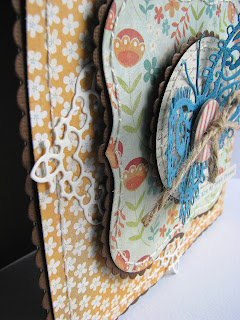
The base card was created by layering the largest Scalloped Square Nesting Die and Classic Square Silver Stacker. The second set of layers being the the third size from the Scalloped French Flair Nesting Die and the Classic French Flair Silver Stacker. Have you seen all the new corner dies? They have endless possibilities! I added a corner behind the center of each peak on the French Flair to add a bit of lacy elegance to the card, Lace Corner Deco C. The third layer was cut from the second smallest dies from Scalloped Circle Stackers Nesting Die and Classic Circle Silver Stacker dies.


I adhered each set of layers with foam adhesive giving the card dimension, and emphasizing the butterfly.


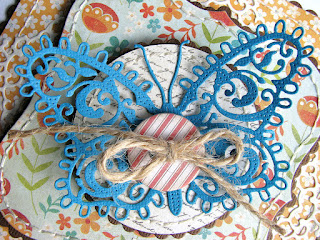
Here is a close up of the Small Lace Butterfly. Isn’t she just gorgeous! She has so many amazing details! I was going to add some flowers and foliage by I really wanted her to stand out alone, showing off her beauty!
There is still time to enter this week challenge for your chance at the $20 shopping spree! Details here

Friday, March 30, 2012

Springtime Card

3:25 AM 7 Comments
I had a ton of fun making this sweet card.


As usual, I have used a ton of dies and Authenticate Paper's Delightful Collection.


I started by using the largest egg in the NESTING EGGS and decorated it with the following dies:


I then used the Spring Basket 1 and Darling Daisies to create the focal point of the card.


I had found the phrase I wanted to use first, so that is how I decided what to put IN the basket.


The bunny is the perfect touch for this Springtime card.


I love the colors and the dies were such fun to work with on this project.
I hope you have enjoyed my post.  Have a great weekend, this has been Jeannie with The Polka Cabana with today's post.

Thursday, March 29, 2012

Vintage Easter card - Kianel

3:00 AM 14 Comments
Hello dear cheery lynn designs lovers,
So happy to be here with you today presenting a card i have made in a vintage style, using several reflection dies to work in layers.
To make the base of the card i used the reflection dies "mini pearl square mega doily" (size 7). I then used a second layer made with the "lace square heart mega doily" (size 5) and the XL square stacker. I made a 3rd layer with the "nautical wheeler" die. Fourth layer is made using the "mini pearl rectangle mega doily" and shortening it to become a long rectangle (size 6). And last layer with the main image has been made with the "horizon coved rectangle mega doily" (size 1). Each layer has cardstock and patterned paper so it really gives dimension to the card.
 To decorate my 4th layer, i added the "Tiffany border" together with old lace and added some parts of the "tropical leaves".

 To decorate the upper part of my card i decided to use only handmade flowers and leaves.
 The biggest flower is made using the "lace corner deco D" which i colored with distress inks to match my patterned paper.
 I built 2 small roses using the "miniature rose" die. To finish the clustering, i used the "olive branches", the "fanciful flourish" and parts of the "tropical leaves" dies.


Two "small exotic butterflies" finish the card.

The dies are all from Cheery Lynn designs. The stamp is a Magnolia. The colouring is made using distress inks. The papers are from Bazzill and Pion design.

I wish you a wonderful week and also want to remind you of our weekly challenge each monday with a chance to win a 20$ shopping spree.
love from France, Kianel.

Wednesday, March 28, 2012

Best Wishes

3:30 AM 8 Comments
Hello and welcome back!

This week I wanted to share with you an easel card that I have made.  


I started off making a regular easel card out of card stock.  I then used the French Flair - Scalloped XL-13 die with the French Flair - Classic L-12 die on top in the blue and lastly the French Flair - Classic - XL-12.  I hope thats not too confusing!


Next I used the Spring Basket 1 and added the Darling Daisies.  I thought the Darling Daisies were cute for this card as they reminded me of spring and the flowers weren't too big and they sat perfectly in the basket.  I used one of the Exotic Butterflies small and finished off with a ribbon at the top of the basket.  On the bottom of the card the rabbit from the Nesting Eggs was used as it was a wee bit smaller.  I also used Cuties 2 as a border this time for the edge of the card.


Dies used:
If you haven't already entered the challenge for this week, jump on over to the Cheery Lynn Designs blog to get all the info!

Thanks for stopping by

Tuesday, March 27, 2012

Frills and Flower Ornament & Goodbye

3:30 AM 14 Comments

My blog post today is my last one for Cheery Lynn Designs.  I will miss creating for such a lovely company, though will enjoy my visits back to the blog. Cheery Lynn Designs is a fantastic company to design for, and for me personally, it has been a wonderful learning experience, and one I will always be truly grateful for. I want to thank Mike and Bj Dwyan (owners of Cheery Lynn Designs) for their hospitality in having me as part of their 2011/2012 design team!!

...and a BIG thank you to Sandy, our DT coordinator who has been an amazing source of information, inspiration and help to the whole team...You really do an amazing job, and I am
going to miss you!

To the other design members, it has been so much fun working with you, and I am really looking forwards to what the new Design Team members will bring to the team from April onwards - welcome aboard!

Cheery Lynn Designs has some exciting news coming up soon, so please stay tuned on the Cheery Lynn Designs blog for further information, which will be posted around the 1st of April!
It is 'must not miss' news!


Anyhow......today, for Cheery Lynn Designs I have created something a little different - two lace and rose ornaments.  I placed ribbon on the back of mine, but these could also be used to decorate tags or layouts.  


To create the base of the ornament, I used the Frills and Hearts Border for the first ornament, and the Anastasia Border for the second.  The photo below shows how I constructed the base. I used the Eazi Score board by Diamond Card Craft, scoring evenly along the length of the die cut, and then fan folded each border.  You can find the Eazi-Score Board/s "HERE". 

Thank you to Phillis Gullick, who provided the score board, embossing tool and book to all the design team members.  I am enjoying my creating with your products! 

I cut several Scalloped Window Stacker circles (smallest, and next size up).  The larger circle out of the two was used to adhere the borders upon.  The smallest circle was used on top of the lace base, to adhere the flower upon so I had an even surface to work upon.


The photograph below is a close up of the Frills and Heart Border ornament.  The flower was created using the Cuties 2.  For this flower I curled each of the petal tips outwards using a quilling tool, and lightly inked the edges with Aged Mahogany distress ink. 

The foliage consists of Olive Branches, and the Cuties 4.  The Cuties 4 makes the perfect sized leaves for this sized flower.  All you do is remove the petals from the die cut!

Both projects were constructed using strong adhesive glue dots. Larger glue dots were used to adhere flower, and the Scalloped Window Stacker circles.  Tiny glue dots were used for the foliage. 


The rose in the below photograph was created using the Miniature Rose and Medium Rose. As I was constructing the rose (especially the outer layers) I used a quilling tool to curl the petals under or upwards 'slightly' to give the petals a more realistic appearance.

The leaves (above photograph) I used the Small Dimensional Leaves 2. Again, I rolled the edges of the leaves upwards and outwards, to create realism.

Dies Used:


This week on the Cheery Lynn Designs blog, the challenge theme is 'Things with Wings' - please come and join in the fun of the challenge, you can create anything at all - layout, card, off the page project, etc. as long as there is at least one Cheery Lynn Designs die used in your creation (of course, more is better).  You have the chance of winning a $20 voucher to spend in store with Cheery Lynn Designs.

Wishing everyone, happiness always..
Sandie
xx

Monday, March 26, 2012

Cheery Lynn Designs Challenge 21 - Things with Wings

10:41 PM 1 Comments
This week our challenge at Cheery Lynn Designs is

Things with Wings

Here are the rules:
  • You MUST follow the theme and use at least one Cheery Lynn Designs die, of course, we would love to see more than one. 
  • You MUST add a link to your blog post in the InLinkz at the end of this post; no back posting, only new projects are allowed
  • You MUST link to our blog in your post
The winner will be chosen based on merit by Cheery Lynn Designs. They will receive a $20 coupon for shopping at the Cheery Lynn website. The challenge will end on Sunday night at 22:00 Eastern time.


Remember, you MUST use a Cheery Lynn Designs die to enter this challenge.

Cheery Lynn Designs Challenge 21 - Things with Wings

3:30 AM 6 Comments
This week our challenge at Cheery Lynn Designs is

Things with Wings

Here are the rules:
  • You MUST follow the theme and use at least one Cheery Lynn Designs die, of course, we would love to see more than one. 
  • You MUST add a link to your blog post in the InLinkz at the end of this post; no back posting, only new projects are allowed
  • You MUST link to our blog in your post
The winner will be chosen based on merit by Cheery Lynn Designs. They will receive a $20 coupon for shopping at the Cheery Lynn website. The challenge will end on Sunday night at 22:00 Eastern time.


Remember, you MUST use a Cheery Lynn Designs die to enter this challenge.

Sunday, March 25, 2012

Cheery Lynn Designs Challenge 20 - Easter

5:58 PM 0 Comments
This week our challenge at Cheery Lynn Designs is  

Easter

Here are the rules:
  • You MUST follow the theme and use at least one Cheery Lynn Designs die, of course, we would love to see more than one. 
  • You MUST add a link to your blog post in the InLinkz at the end of this post; no back posting, only new projects are allowed
  • You MUST link to our blog in your post
The winner will be chosen based on merit by Cheery Lynn Designs. They will receive a $20 coupon for shopping at the Cheery Lynn website. The challenge will end on Sunday night at 22:00 Eastern time.


Remember, you MUST use a Cheery Lynn Designs die to enter this challenge.

The Card That Grew and Grew

3:30 AM 6 Comments
Good Morning Everyone, Donna here with another card for Cheery Lynn Designs, what started out as a card, suddenly became a 4 Drawer Box Card, which suddenly changed to a 4 Drawer Easel Box Card......phew, that was a mouthful.


For the front of the card I used an Easter image from Krista Smith, colored with Copics and Tria Markers, papers from Bearly Mine Designs, ribbon from my stash, the oval behind the image is a XL Oval Classic Stackers Nesting Die and behind that is the Swedish Spring Oval Frame, I've also used the Francesca border cut out in pink and white along the bottom. The Easter Eggs are from the smallest of the nesting egg die, which I cut out of shrink plastic, colored with tria markers, then shrunk down, I've added glossy accents and then glamour dust to them to give them the shine, and I've also cut out another of the nesting eggs out of clear shrink plastic and punched a hole through the top, and added glossy accents and glamour dust to them as well. The letters were cut using the Italian Romance alpha Font set. The tiny bunny was cut using the bunny that comes with the nesting eggs, on shrink plastic, and a hole cut through it so it would hang as a nice charm. The flowers are a mixture of mini roses and cuties 2, which has olive branches and something else behind that. The edging under the card for the box part is the cuties 3 die, see you can use these dies as a border as well as making flowers with them.


The inside of the card I cut out one of the French Flair Classic LG nesting dies, and then the  French Flair Doily Stack die in white, letters are from the Italian Romance Font set, eggs are the nesting eggs.


Also on the inside is one of the gorgeous corner dies from Deco Lace Corner Set F, which I put glossy accents on and glamour dust to give it some sparkle.


A closeup of the flower arrangement, with the addition of head pins and some dots using liquid pearls.


A closeup of the Easter Eggs Banner,connected together with twine. I love the shine on these eggs.


Finally on the drawers I have attached papers from Bearly Mine Designs and used a pearl brad so you have something to open the drawers with.........and finally look what's in the drawers


Mmmmmmmmmmmm.....Chocolates.

Thanks for stopping by today and I hope you enjoyed the pictures of my project that grew and grew into something bigger. You'll have to excuse the blurriness in some of the photo's as  my hands shake a lot with my medical condition when taking pictures.

Don't forget the challenge with the theme of Easter ends tonight.

Saturday, March 24, 2012

Easter Garden

3:30 AM 14 Comments
Hello everyone! Jodi here today. We’ve had a streak of record breaking temps with beautiful sunshine which has given me a bad case of spring fever. Since it is way to early to start digging in the garden, I thought I would create one for you using my dies!

A strip of patter paper layered atop the new Bunny and Chick border was place down the center. I cut two diecuts from the Mega Tea Party Doily. Using only about 2/3 of each die, I placed one on each side of my center strip. The English Tea Party Doily is layered in the center of the Mega Doily…a little extra lace and frilliness for her first Easter!

Of course we need to have a Picket Fence around the garden! I lightly inked some of the edges of the fence posts with Ranger Distress ink Pumice Stone and then applied a generous coat of Ranger Rock Candy distress paint in areas to give the fence an aged look.


I “hid” a few eggs and a bunny that were created using the new Nesting Eggs, one egg being decorated with Lace Egg Four. The larger white flower was created using four layers of the Sweet Williams die, two layers each size. The center being the Darling Daisies. A pink Medium Rose is to the left and Frangipani to the right, again using the Darling Daisies as the flower center. A yellow Miniature Rose is nestled in among the eggs, while a Mini Butterfly rests gently amidst the branches of the Fanciful Flourish.


The larger yellow flower was created using three layers of the Stacker Flower #3 die, with the Darling Daisies cut in yellow as the flower center. The flowers around consist of white and pink Large Roses, a white Medium Rose, and Darling Daisies two of which were created with two layers of each size to create a fuller flower. A pink Miniature Rose rests near the top of the photos while a Small #2 Butterfly flutters gently above the garden.
Can you believe about half of the leaves and the flourishes were cut from white cardstock and colored with a combination of Ranger Distress inks? The inks really bring out the detail of the dimensional dies! The foliage for the garden consists of Fanciful Flourish, Stacker Flower #1 Leaf, Olive Branches, Small Leaves #2.
I hope you enjoyed our stroll through the garden and are ready to test your green thumb!
Have you entered this weeks challenge for your chance to win the $20 gift certificate?
There is still time! Details Here

Friday, March 23, 2012

Getting Ready for Easter

4:51 AM 10 Comments
It is amazing to think it is almost Easter time.
We are in our Spring season and nothing is more fun than making Easter/Spring decorations.
Today I am showing you a very easy idea I cam up with based on this cute sticker I found online.


This is a sticker meant for a scrapbook page, I just thought it was adorable.  I thought it would also make a very cute decoration, but this is a sticker, soo..this is what I came up with.


I used the largest egg in the Nesting Eggs set to cut out the egg base. The bunny in the basket are the Spring Basket 1.


After cutting the large eggs I embossed them with the Black Eyes Susans embossing plate and then sanded the paper to reveal the gorgeous design.


To make my eggs and chicks, I used a combination of Little Stacker Ovals and the Nesting Eggs. The wings for the chick are petals from the Frangipani die.


To cut the eggs and leave the shell looking like they do, I used the Zig Zag Ric Rac border.


I adhered these to some rectangle blocks of wood, so they are nice and sturdy and will stand up just fine on a counter or mantel.


Sometimes ideas for things can be found in unusual places. 
Looking at my project, it is hard to believe it is based on a sticker I saw..right??


This also reminds me to tell you about our current challenge.  
The theme is EASTER.
Be sure and check out all the details for the challenge HERE.
Thanks for stopping by, this has been Jeannie with The Polka Cabana with today's post.

Copyright Statement


All content, including designs, pictures and words are the exclusive property of the author of each blog post. Information shared here is for inspiration only and may not be copied for publication, competition or profit. Thank you for your cooperation.

SOCIAL MEDIA 2


Follow Us @jointhemakersmovement


All content, including designs, pictures and words are the exclusive property of the author of each blog post.
Information shared here is for inspiration only and may not be copied for publication, competition or profit. Thank you for your cooperation.