Wednesday, August 31, 2011

Design Team Call

5:31 PM 29 Comments
Due to the overwhelming response to our design team call, we are still going through all the fabulous applicants.  We had hoped to have the names of our newest members picked by tonight but we are going to need a few more days.  So we will be sending out DT invitations on Saturday Sept 3rd.  Thank you so much for your interest in our team and for your patience.

Floral Wreath

3:30 AM 18 Comments

I was inspired by a wreath done by KittieKraft to try and make my own using Cheery Lynn Designs dies.  So I die cut a bunch of Fanciful Flourish and Pair of Ferns and Cherry Blossoms.  I created the base for my wreath using 2 XL Circle Stackers Nesting dies, that I layered on top of each other before running them through my Vagabond.  It created a perfect ring base.  I also cut a bunch of dimensional leaves but decided not to use them. 

To create the wreath, I glued the ferns all the way around the wreath.  Next came the Cherry Blossoms, then I cut up the Fanciful Flourish and added pieces here and there.  I added a bow that I colored with my Copic marker to match and some Viva Decor Pearl pen accents.  The DP I used on the background and the flowers is from the SEI Corinne 6x6 paper pad.  Finished size is 6" square.

Tuesday, August 30, 2011

Pink card - Kianel

3:00 AM 12 Comments
Hello dear Cheery Lynn Designs lovers!
Kianel here with you today. aren't those dies just amazing and magic? Today i am showing you a card i made using them as my base and for all my decorations so here it is:
 I made the base of my card using XL scalloped oval stackers and XL oval stackers. I used the Kiwi oval frame to put in the center of my card layering it with a piece of stamped paper and don't forget to use the great Cuttlehug to make it easier to cut all the small details of the frame. To make my left clustering, i used the tropical flourish and the Judy's blooms. For the right clustering  i used what was left from the tropical flourish. I then added 2 discontinued Cheery Lynn Designs dies the luggage tag (that you can still find at only $2.00 but hurry because it's only untill tomorrow!) and the key which has been covered with white crackle paint. I then added a butterfly.

To make this butterfly pop up, i first used the small angel wings die that i inked. I then put a small exotic butterfly gluing it only in the middle. I added some pearls and voilà.
I hope that you will enjoy your week and don't forget to pop by everyday on this blog to see the marvellous creations of my DT mates.
Love from France, Kianel.

Monday, August 29, 2011

Another Monday Post

3:30 AM 7 Comments
Good day Cheery Lynn Designs blog readers! It's Tanisha here with another Monday post.

Every once in a while, I come across a photo that really speaks to me and I just HAVE to scrap it. In this case, the photo belongs to my friend Dolores. The picture is of her and her 3 daughters and she uses it as her facebook profile photo. I fell in love with it as soon as I saw it!

I pulled out some very "girl friendly" dies and new Authentique papers and went to work creating a layout that was as pretty as those 4 smiling faces!!


I started by creating a few pleated flowers to draw attention to the photo. This one was created using the Frills and Hearts border. If you haven't checked out the store in a while, you should. This die (and many others) are now available at a deeply discounted price in the clearance section!!

I also die cut a few Darling Daisies, Exotic Butterflies and Fanciful Flourish from cardstock and added them throughout the layout.


School Days Font finishes off the title to complete the layout.


Thanks for stopping by today!!

Tanisha

Sunday, August 28, 2011

And I love you so.. And I love Cheery Lynn Designs dies so much too!

3:15 AM 8 Comments
My new page for my most adorable grandson- and with my most adorable Cheery Lynn Designs  dies..
I used this old song for my title, actually I don't remember it at lot, but the very first line, and it was perfect for this page.

I am in this " white space" mood lately on my pages, and this page was one of those " keep a lot of white for a change" one.
So lots of Cheery Lynn Designs dies were used here  and still lot of white on the page- what can be better?
I used 2 Doilies here, but  made 3 cuts:   2 were made with Italian Flourish Doily and one with Canadian Kaleidoscope Doily
Then this fantastic  Border Carnivale - 2 cuts again
The Ribbon Eyelet Border was added with a real ribbon and a tie and for my journaling I used those fantastic Index Cards on the top.
Then 2 sizes of  Small Scalloped Coved Rectangles were added over and under the photo- and the page was just perfect for me!
Want to try this kind of pages? All you need are some Cheery Lynn Designs  great dies from the shop!

Saturday, August 27, 2011

Guest Designer - Karen Wallace

3:30 AM 6 Comments
Today we have a guest designer, Karen Wallace from Karen's Kreations.....

I’m so honored to be the guest designer for Cheery Lynn this week.  I absolutely love these dies!!  I’m retired and have been stamping about 12 years and love anything vintage and elegant and anything using die cuts.   I hope you enjoy this creation and will try the Cheery Lynn dies, they are made in the USA and the quality is fabulous!!

Let's see what Karen has for us today......


Karen has made a wonderful Halloween stair step card using Cheery Lynn Designs Victorian Picket Fence, Lace Lights Decoration Border, Grass Border and Colonial Lamp Post The stamps for the background are a brand new set from Stamp A Mania, debuting today. What a fun card and a true Halloween delight.  Thank you so much, Karen for sharing with us today. 

Friday, August 26, 2011

Fall Leaves

3:30 AM 13 Comments
Jeannie had a family engagement so I am filling in for her today.  The weather in Michigan is starting to get cool at night and I noticed leaves are changing colors.  So I decided to play with my Dimensional Leaves die sets.


I die cut a variety of leaves using shades of orange and gold cardstock, then added additional color with a stipple brush and dye inks.  This is a lot of fun and messy, lol.


For the card base, I used my Scalloped French Flair XL Stackers Nesting dies, adding a background DP die cut with the coordinating French Flair Silver Stacker.  Before mounting the DP I added some texture with my Dotted Swiss XL Embossing plate.  Next I added an English Tea Party Doily, mounting a Sunflower with dimensional foam in the center.    Then it was just a matter of adding the leaves, bending and layering them around the sunflower.  Finished size is 5 5/8 inches. 

Thursday, August 25, 2011

Cool In The Pool

1:30 AM 10 Comments
Happy Thursday!!
I have another layout to share with you featuring fabulous Cheery Lynn Designs dies.


To make this layout I did a little bit of layering and then I embellished away with a great border die like the Embossed Scalloped Hearts border. And if you know me at all, you know I HAVE to include lots of flowers. My dies of choice this time are the Judy's Blooms, Tropical Flower and the Darling Daisies.


Other dies used:
Never Ending Love Hearts
Buttons3
License Plate
Tropical Flourish
Pennant Die
French Flair Nesting Die
Mini Font alphas

Wednesday, August 24, 2011

Cheery Lynn Designs and Edwin Fishing

3:30 AM 12 Comments
For my Cheery Lynn Designs project today, I thought I would see what I could do with Magnolia's Edwin Fishing. 


I started with the outer frame from the Emperor's Swan die.  I hand cut a piece of glossy card stock to fit behind the frame; then using a stipple brush and dye inks, I created the clouds in the sky and the water.  I added a piece of wood textured paper for Edwin to sit on, colored him with Copic markers and then cut him out.  I added pieces from the Tropical Flourish die to the bottom of the frame.  The sentiment is from Sweet Stamps, I used my Oval Little Stackers dies to cut the panels.  Cute huh?  The background paper is from Magnolia stamps.  Finished size is 5 x 7 inches.

Tuesday, August 23, 2011

Box - Kianel

3:29 AM 13 Comments
Hello Cheery Lynn Designs lovers!
Kianel here with you today to share a box i made lately for my niece's birthday. The last tomic challenge is about recycling so i used a cereal box to cut all my dies. I am also showing you another use of your XL scalloped oval stackers building a simple arch  (i already showed you a big complete birdcage, several layers on a card and a little half bird cage with base). Here is the finished box:


And i have made a tutorial to show you how to build a bush with Cheery Lynn Designs dies.

STEP 1
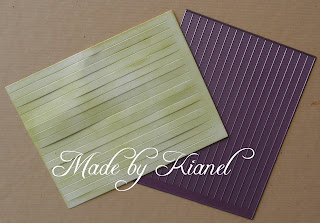
Cut out 2 pieces with the "wittle wicker" die in a thick paper. I used white Canson paper 224gr that i covered with distress ink and Creative Inspirations paints for the shimmery look.

STEP 2
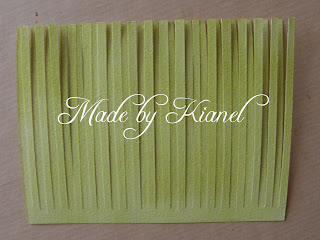
Cut each piece in half and keep the ones with the 0,5cm plain border. Cut in 2 each little fringe and here is what you get.

STEP 3
Glue the plain 0,5cm part for each piece and roll it around a pencil. Let it dry with the help of a clothespin to keep it tight.

STEP 4
Here is what you get when it is dry. Add a piece of double sided tape at the bottom. This will help maintain your first rolled fringes at the base.

STEP 5
With the help of a pencil, roll every fringe at different heights as the picture shows.

STEP 6
Here's what you get when finished: a nice little bush!

STEP 7
To complete your small bushes, just add some flowers in it and place on any creation you want. Of course using different lengths of fringe, you can make bigger or smaller bushes.


 Here are the dies i used on this box (click to go directly to the shop):
XL scalloped oval stackers, XL oval stackers, XL scalloped square stackers, XL square stackers, pierce rectangle plate, wittle wicker plate, English tea party doily, Little circle stackers, Little scalloped circle stackers, slightly script 5/8" font and don't forget to use the cuttlehug to get a beautiful cut!

Oval - Scalloped LG Stackers Nesting Dies   Oval - Classic - LG Stackers Nesting Dies   Square - Scalloped LG Stackers Nesting Dies


 Square - Classic LG Stackers Nesting Dies   Pierce Plate Large Parallel Rectangle   Wittle Wicker 1/4" Strips

English Tea Party Doily    Scalloped Circle       Circle
 

Slightly Script  5/8" Tall Upper/Lower Case 

Well, I hope that you liked that box as much as my niece did. I just became the world's best auntie! yeah!
Don't forget to pop by everyday to see the marvelous projects my DT mates make. If you have any question about the tutorial, feel free to ask and I'll do my best to answer.
Love from France, Kianel. 

Monday, August 22, 2011

Repetition

3:30 AM 9 Comments
Happy Monday Cheery Lynn Designs blog readers!! It's Tanisha here with a quick post to show you how to use repetition to make some of the smaller dies that Cheery Lynn Designs offers really stand out on your projects.

I used 3 die cut apples to create this A+ Teacher card. Of course the apples could be swapped out using any number of our dies...like the Clover for a good luck card or the Jack-O-Lantern to create a Halloween card, for instance.

I created texture on the front panel of this card by embossing it with the Burlap plate and embossing pad and then finished off the title using the School Days font.


Here's a close-up of the dimension created by adding pop dot to my elements. I also added more texture by stitching the Coved Rectangle stacker before adhering it to the card.


Here's another example of using repetition to increase the impact of smaller dies.

I used Little Stackers Scalloped Circle Nesting Dies to highlight 4 stamped pumpkin faces on this Halloween card. Again, any of the smaller dies in our Little Stackers Dies sets could be used in the same fashion!

Other Cheery Lynn Designs dies used:
Coved Rectangle Stackers
Border Carnivale
French Flair Stackers

I hope this post has inspired you to pull out your smaller dies and put them to work on your projects!

Until next post...happy scrapping!!

Tanisha

Saturday, August 20, 2011

Live- Laugh- Love with Cheery Lynn Designs and Core'dinations cardstock

3:30 AM 16 Comments

/

The great swap week with Core'dinations is almost over and I am a last one to show you  all  great things you can craft  combining our precious Cheery Lynn Designs dies and the  great Core'dinations cardstock.
I need to say that we got this cardstock about 2 month ago and it was very generous  of Core people, so I used some of it here and there and even won Core'dinations July contest Sketch lo challenge  and got a huge new pack of MME  very new embossed cardstock to play with together with  3 Sand It tools..
 So here we go this time:
Altered shadow box in a fall and a bit  of vintage style, using some of my home " findings" such as a small  wood bird house and a small handmade hat, but then- all other thing here are hand made just with 2 companies: Cheery Lynn Designs  fantastic dies and Core'dinations fantastic cardstock.
I made the inside with Large Scalloped  Coved Rectangle Nested dies, embossing the inner one with Daisy Garden XL  Embossing plate.
Then the Victorian Picket Fence was die cut and distressed with this great sanding tool- now I have 4 of them, one from the swap and 3 more from my win- LOL..
A pair of Tropical Flourishes  were added  under the fence and 2 Exotic Small Butterflies  #2 over it.
Now it was a time for the frame and I first made 3 strips with Ribbon Eyelet Border and added some ribbon inside and then finished the frame using 2 layers of Border Carnivale- all sanded again.
The right lower corner was a bit empty, so  a Pair of Ferns were die cut and glued over it, with Judi's Blooms  combined with some Darling Daisies and some  smallest Tropical leaves  and I just had to add one more Exotic Butterfly here..
Almost everything was sanded with Sand It Gadget- as I have 4!! of them- LOL.
Did I finish? No, I didn't. The bird house needs a bird, so Bird on a Branch was  die cut and added and now my piece was done (also I added some Petaloo small flowers here and there, some buttons and a metal sign.)
 Here are close ups of this project:


I hope you like my shadow box ..
And now please visit the Core'dinations blog too.. Their DT girls are playing with our  Cheery Lynn Designs dies and do a great work.  And then go straight to Cheery Lynn Designs shop- you need those dies!! Yes, you do!  You are also invited to Core'dinations blog to visit them and to see their DT girls palying with Cheery Lynn Designs  dies.

Friday, August 19, 2011

Cheery Lynn Designs & Core'dinations go Native!

3:34 AM 20 Comments
Today I am paying tribute to my heritage. I am Native American and part of the Navajo tribe.
I was inspired to focus on some Navajo designs for today's post.
Here are 2 of my favorite images I found that my cards today are based off of.


Where do I begin to tell you what Core'dinations paper and Cheery Lynn Designs dies I used?


For my paper I used paper from the Core'dinations Whitewash and Vintage Collections.


As for dies, I used the Fanciful Flourish as a mask for the card base and sprayed some Turquoise Tattered Angels Glimmer Mist to create that beautiful background. I then took as assortment of dies and cut and or embossed all the detail for my "pottery" vase. The pottery base was embossed with the Burble/Cheesecloth Embossing Plate. I used the following dies, listed in order from the bottom of the vase and working my way up. Japanese Lace, Wittle Wicker, Border Carnivale, Ribbon Eyelet w/Piercing, Pennant, Japanese Lace, Border Carnivale, Daisy Chain and Heart Chain.


For my lettering, I used the Optimistic 1/2" dies. Ya'at'eeh means HELLO in Navajo.


I did a lot of sanding on these cards, I mean a lot. Core'dinations has a wonderful tool called the Sand It Gadget which makes sanding pretty painless. I do want to pass a top secret Polka tip onto you however. If you have narrow pieces or small pieces like I do in today's cards, lie the Core'dinations paper "sanding needed" side facing up on a piece of fine sandpaper. You can see in my photo below I have all my pieces on the sandpaper, the Sand It block is pictured towards the back. By placing your pieces on top of sandpaper and then using the Sand It Gadget, your pieces will stay put! The sandpaper underneath works like velcro not allowing the paper to move while you sand. You still want to hold the pieces in place while sanding, but trust me this works like magic!


For this card I mostly used paper from the Core'dinations Black Magic Collection.


I cut paper in 4 different colors with the Dottie's Ric-Rac die. I cut pieces from both sides of the paper and then intertwined them together.


The yellow frame is the Japanese Frame. I also used the Stitcher plate on the black background to give it texture.


I used tons of extras on this to make it special. I used twine, hot fix silver studs, jewelry findings, glass beads, silver charms ribbon and silver string.


What do you think? So colorful, don't you agree?


I hope you enjoyed seeing my cards today!


I might have to mail these to my Grandma...look at her, isn't she adorable?

Now be sure to hop on over to the Core'dinations blog and see what their DT has made with the Cheery Lynn Designs dies....
Have a Fabulous Friday and a great weekend.

Copyright Statement


All content, including designs, pictures and words are the exclusive property of the author of each blog post. Information shared here is for inspiration only and may not be copied for publication, competition or profit. Thank you for your cooperation.

SOCIAL MEDIA 2


Follow Us @jointhemakersmovement


All content, including designs, pictures and words are the exclusive property of the author of each blog post.
Information shared here is for inspiration only and may not be copied for publication, competition or profit. Thank you for your cooperation.