Friday, July 31, 2015

Best Wishes Dove Card With Corina Finley

3:30 AM 2 Comments

Hello and Happy Friday!

Today I wanted to share my Anniversary card that I created using the new Peace Dove die from the Cheery Lynn Designs July 15th release!

I started with a layered base from pattern paper and cardstock. I added stitching along the edges of the layers with white thread. Next, I die cut the Royal Scandinavian Doily from black Damask pattern paper.


The Peace Dove was cut from Music note pattern paper. There is so much detail in this Dove, from the feathers on the wings to the delicate detail on the Doves body. So Elegant! I also added two gold circles for rings.


My black embossed sentiment was stamped on to the Royal Scandinavian Tag die cut from white pattern paper.

The Cherry Blossom flower was cut from white pattern paper. I die cut the smallest layer twice and layered them on top of each other. I added a center in gold cardstock from the Embellishment #2 and added a rhinestone to the center. I used the leaf from the Rose and Leaves set and pieces from a Fanciful Flourish tucked into the sides.

Dies used:

Royal Scandinavian Doily (Set of 2)


I hope you will play along in our weekly Cheery Lynn Designs Challenge 195 - Anything Goes. You could win a $20 shopping spree at the online Cheery Lynn Designs store

Thanks for joining me today!

Take care,
Corina Finley

Live, Laugh & Create!

Thursday, July 30, 2015

Gingerbread Christmas with Jenny Alia

3:30 AM 0 Comments

Hi, Jenny here today with a Christmas card in July.  It's 90 degrees in NY today but I wanted to play with this adorable Gingerbread Family  die!


The card base is a green A2 card.  I cut a piece of patterned card stock slightly smaller to layer on top. Then I cut three gingerbread people out of a creamy gray paper. I glued white card stock to the backs so the eyes and buttons would look like they were made with white icing.  A little distress ink was sponged around the edges and I added red pearls for buttons and the center of the bow.


The circle was cut with the new Circle Stitch & Cut Tool.  Merry Christmas is a Crafty Ann die, I just love this vintage font!  Cheery Lynn is now carrying all the Crafty Ann dies.  You can see them all HERE.  Last I added the snowflake from the Snowflake Set 2 and glued a sparkly silver embellishment to the center.

Cheery Lynn Designs Dies


Thanks for visting and make sure you link up a card to join in this week's Anything Goes challenge! 


Hugs, Jenny

Wednesday, July 29, 2015

G'Day Love With Lisa Blastick

3:30 AM 1 Comments

G'Day Love! 
It's Lisa back this week with another New Release Diecut from Cheery Lynn Designs!
 It's Kaptain Kangaroo! 
The name of the diecut takes me back to my child time. I remember watching Captain Kangaroo on Saturday mornings. Such a great memory and blast from the past. When I was thinking about what I wanted to make with him, I thought about so many different backgrounds. Suddenly, I thought of one of my favorite movies from years ago, Crocodile Dundee and his love for his country. It then became about love and hearts. I used two of the smaller and one of the largest heart from Two of Hearts. I diecut it in red and Kraft paper and cut the inside of the red out and placed it on top of the Kraft paper. I stamped Love on the bottom corner heart and added little white dots on the edges. 


There are two Ivy Corner Flourishes in opposite corners and in the center behind the Kangaroo is a Priscilla Doily. Love it! Last but not least I added little flowers from Miniature Rose with little pearls in the centers. 


I cut the Kaptain Kangaroo out once in Kraft and one in red cardstock. I used the G'day for the inside and I used white cardstock for his ears and black cardsock for his eyes and colored his nose with a black copic. 

Cheery Lynn Diecuts Used:


Thanks for stopping by today and be sure to check out this week's challenge " anything goes" for a chance to win $20 at the Cheery Lynn Designs store! 
Hugs Lisa

Tuesday, July 28, 2015

For You by Karen Maldonado

3:30 AM 3 Comments


Hi there Cheery Lynn friends!  Karen here today sharing
this fun 3-D Poinsetta card!

I started by using the pink snowflake designer paper and
die cut it using the French Flair Classic Silver Stacker set for the card base.

Then, I created a 3-layered piece to put on the base of the card
using these dies in this order:  Square Scalloped LG Square Stackers,


Then, I die cut the 3-D Poinsetta twice, distressed inked both pieces,
and layered, and added some pearls to the center of the flower.

Finally, I die cut the smallest Pierced Banner die and stamped the sentiment.
I added a few pearl and rhinestone swirls to give a little elegant flair!

List of the dies used: 


It's "Anything Goes" for this week's challenge!  Hope 
you come and play along using all of your favorite Cheery Lynn dies
for a chance at winning a $20 shopping spree to the 
Cheery Lynn Designs on-line store!!

Have a beautiful day!

Hugs, 
Karen

Monday, July 27, 2015

Savor the Season by Eva Dobilas

3:30 AM 2 Comments

Hi there, this is Eva.  This week our challenge is Anything Goes, so I thought I would show case one of our newest dies called the Thankful Harvest.

I started my card die cutting two Horizon Rectangle Boutique Stacker Frames out of Pumpkin color card stock.  I cut a smaller piece of white water color card stock and embossed it using Leaves Textures and using watercolors I created my background and backed it up with black.  Than I die cut a Royal Scandinavian Oval Doily out of black card stock.

I die cut one Thankful Harvest using water color paper and painted it in partially and also cut smaller pieced of colored card stock to fill in some of the areas to build my cornucopia scene and added it on top of the black doily.  Finally I die cut a Pierced Banners and stamped my sentiment on it and tucked it under my cornucopia.


And here are the items I created this card with:


Thanks for stopping by and good luck to everyone for entering our Weekly Challenge with a chance of winning a $20 spending spree here at Cherry Lynn Designs.

Hugs,
Eva

Sunday, July 26, 2015

Cheery Lynn Designs Challenge 195 - Anything Goes

3:30 AM 2 Comments
As always, the entries we had last week for our Silver and/or Gold challenge were fabulous.  Thank you to all who entered, we enjoy seeing your creations with our dies.  This week our challenge at Cheery Lynn Designs is

Anything Goes

Here are the rules:
  • You MUST follow the theme and use at least one Cheery Lynn Designs die, of course, we would love to see more than one. 
  • You MUST add a link to your blog post in the InLinkz at the end of this post; no back posting, only new projects are allowed
  • You MUST link to this challenge in your blog post or on your gallery post
  • You may only enter the challenge ONCE per week.
The winner will be chosen randomly. They will receive $20 towards shopping at the Cheery Lynn website. The challenge will end on Saturday night at 18:00 Eastern time.  And now to our inspiration for today (for details on each project, click on the designer's name and it will take you to their blog)

Debbie Brownmiller
Dies used:
7.5 x 8.5 inches album cover

Dies used:
Remember, you MUST use a Cheery Lynn Designs die to enter this challenge.

Silver and/or Gold Challenge Winner

3:25 AM 1 Comments
What beautiful entries we had last week. Using Random.org, the winner of our Silver and/or Gold challenge is

Random Integer Generator

Here are your random numbers:
16
Timestamp: 2015-07-26 02:02:50 UTC
#16 Kathy Krug 


Congratulations, Kathy. Please contact me for your $20 shopping spree to Cheery Lynn Designs.  Be sure to grab the winner's badge from the right sidebar for display on your blog.  And thank you to everyone who joined in on the challenge.  We hope to see you again in this week's Anything Goes challenge.

Saturday, July 25, 2015

Gingerbread Tree by Julie Lavalette

3:30 AM 2 Comments


Hi Everyone, it's JULIE here today showcasing this adorable Gingerbread Family. I love how you can dress them up, aren't they so cute !


I started off by cutting out 2 Scalloped Squares in red cardstock trimming a strip off them both to form the length of rectangle required for my 8 x 6 card. My next layer I used my die cut edge strip, gluing the layers together and adding Stickles into all the small holes. I then sprinkled a little Red Tinsel Embossing Powder over my paper and heat set for a little more sparkle.


My pot for my Tree was made using a section from my die cut Sentiment Tag. I heat embossed Red Tinsel Embossing Powder on it and my word Believe.


I started layering sections of my Build a Christmas Tree onto my card to form a large tree and added Santas Sleigh.


My Gingerbread Family were coloured with Copics and Glitter Pens, highlighting the embossed details with a white pen. The girl's bows and dresses were layered twice.


The boy's hats I used Snowtec on them adding extra fine glitter whilst still wet and a few gems for buttons.

Cheery Lynn New Release Dies Used:


Other Cheery Lynn Dies Used:


Good luck to everyone entering our Weekly Challenge with a chance to win a $20 spending spree at Cheery Lynn Designs and thanks for stopping by today.


Julie x

Friday, July 24, 2015

Abundant Blessings Card with Corina Finley

3:30 AM 0 Comments


Hello, welcome back to the Cheery Lynn Blog! Corina here with you today. I have a rich, earthy, layered card to share. I hope you like it!

So lets jump right into the step I used to create this card. 

I first cut three layers of cardstock, one at 4 1/2 inches x 5 3/4 inches one 4 1/4 inches x 5 1/2 inches, and one at 4 1/8 inches x 5 3/8 inches. I distressed and inked the edges of the largest, embossed both of the other two with the Wood Grain/Leaves embossing texture plate using the leaves side. I inked them both with brown ink (one a darker shade). I then used two dies from the Pierced Stacker #4 and cut the smaller one out from the lighter brown Leaf embossed cardstock. Placing the die in the center so I could still use the outside (discarded/negative) as a card matte. I repeated with the larger Pierced Stacker #4 die and the darker brown carstock.

I glues all three mattes together. Then cut the Fall Leaf Doily out twice. I inked with a blend of green shades and placed one Fall Leaf Doily down on my card front and fussy cut the leaves out of the second and placed them aside.


I cut the Thankful Harvest Cornucopia out twice also. One I inked with a bronze brown and the other I inked each piece with different colours according to the type of vegetable/fruit. Cut out & pasted the vegetable/fruit to the bronze brown die cut and used glossy accents to enhance the detailed cuts outs.

I placed the finished Thankful Harvest Cornucopia, my Pierced Banner sentiment and the cut leaves to my card front.

In the picture below, you are able to see the multiple layers that the card has. These layers create a rich and dimensional card without it being too heavy.


Dies used:

Thankful Harvest - B600

Wood Grain/Leaves - E104


I hope you will play along in our weekly Cheery Lynn Designs Challenge 194 - Silver and/or Gold. You could win a $20 shopping spree at the online Cheery Lynn Design Store.


Thanks for joining me today!

Take care,
Live, Laugh & Create

Thursday, July 23, 2015

Turkey Time with Jenny Alia

3:30 AM 0 Comments

Hello!  It's Jenny posting today with a card using Tom The Turkey.  This die is so incredibly detailed, it's amazing.  I didn't end up using a lot of embellishments because Tom didn't need it.  He can stand on his own.  I colored him with distress ink, fluffed out his tail feathers and popped him up with foam adhesive.  


He's standing on four layers of card stock that I cut using the Pierced Stacker #3 die.  The top layer was cut with the die and then I hand cut the pierced edge off so it would be slightly smaller than the orange layer.  The largest white layer of Pierced Stacker #3 was made by tracing the outside of the die and then hand cutting the edge with a scissor.  


The stitched detail on the 5.5" base layer was cut using the Square Stitch Nesting  die.  This die doesn't cut the squares but it does add these stitches in a variety of sizes.  It's perfect for adding a little extra detail.  Last I cut flourishes from the Leafy Flourish die, added a little distress ink to the edges and tucked the die cuts around the Turkey.

Cheery Lynn Dies

Thanks for visiting and don't forget to check out this week's Silver and/or Gold Challenge for a chance to win $20 towards shopping at Cheery Lynn Designs.  

Wednesday, July 22, 2015

Thankful For You With Lisa Blastick

3:30 AM 1 Comments

Hi, Its Lisa back again sharing more of the New Release by Cheery Lynn Designs
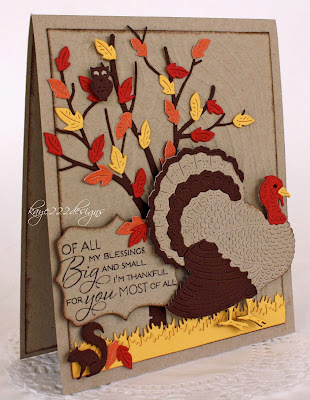
Today, I'm sharing Tom the Turkey! It truly is a beautiful diecut with amazing details. So originally, I colored the turkey with copic markers and well since I'm not a great at coloring it was a disaster! So THANKFULLY (pun intended LOL) you can be like me and still get a fantastic looking turkey! 

I diecut the turkey once in Kraft cardstock and once in brown cardstock. I fussy cut out the brown pieces that I wanted to highlight and glued them to the top of the Kraft. I then diecut just a piece of red and yellow for the feet and beak then layered them on top. Easy and pretty fast! I chalked the edges of the Kraft and Tom is ready to go! 


The base of the Kraft card is 5 x6 and I cut, chalked and then embossed another piece of Kraft 4.5 x 5.5 in the background. For the Birch tree with Cute Critters, I used the same brown cardstock as Tom the Turkey. I diecut 3 different color strips, red, orange, and yellow of Flourish Leaf Set. I then cut the leaves off and placed throughout the tree. You will have leftovers but you can always save them for another autumn card. :) The New Grass Border 2 was cut twice in yellow and placed on the bottom. I stamped my sentiment and diecut it out with Pierced Stacker #4 with chalking on the edges. I used the little owl and the squirrel to finish this Thankful Card to a friend or loved one! 


A few pop dots underneath, but ready to mailed in a regular envelope...

Cheery Lynn Diecuts Used:


Thanks or stopping by today and be sure to check out more inspiration and New Release diecuts from our fabulous DT at Cheery Lynn Designs Blog. While your visiting, be sure to join our challenge this week "silver and/or gold" for a chance to win $20 dollars at the Cheery Lynn Designs store
Hugs Lisa 

Tuesday, July 21, 2015

Trick or Treat by Karen Maldonado

3:30 AM 2 Comments

Hi there Cheery Lynn friends! It's Karen sharing another
new release card with you today!

I first started by creating my card base in orange designer paper.
Then, layered a black and white designer paper to that top.
I added these layers and tucked them under the main 
small diamond designer paper!

Next, I die cut the Trick or Treat die, and distress inked the 
sentiment in several colors.  I poured some distressed crackle, and once dried,
 I distressed inked in some walnut stain distress, so that cracks 
would really stand out!

Then, I cut out the Rose Leaf Strip
Build a Flower #1 (for center of flower), and the Daisy Strip!  Each piece 
was distress inked and I also added some distress glitter to the flower center!!


Finally, I die cut the Horrible Cat and  two of the Jack-O'-Lanterns!
Then, poured some distressed glitters to the top of each of these dies.
I just love the sparkly and amazing texture this adds to the dies!

I also added a few Ivy Strip die cuts to the top of the smaller pumpkin and 
also to the top of the medium size pumpkin.  
I added some Glossy Accents to each of the ivy leaves for some added shine! 


You would be amazed at the sparkly, shiny and crackly texture on this card!

Here's the full list of dies used:


Still time to join this week's challenge for a 
chance at a $20 shopping spree to the Cheery Lynn on-line store!

Have a great day!
Hugs,
Karen

Monday, July 20, 2015

Gold card by Eva Dobilas

3:30 AM 0 Comments

Hello there, this is Eva here today and I have a pretty glitzy card to share with you today using this week's challenge as inspiration!  I quite like the way it turned out.

To start my card I cut an A2 size card based out of white card stock.  I die cut a Cathedral Lace Frame using a glittery gold card stock and layered it on my card front.  I wanted to create a floral focal piece and I die cut two Gardenia Strips to create my flowers.  I added some ink to them to create the look I wanted.  I also die cut two leaves using the Judy's Blooms die and painted them with water colors.  I die cut a Rose Leaf Strip out of white card stock and kept it white to add contrast.  I die cut a Chrysanthemum Strip and created a closed flower and added it to my cluster.

Finally I die cut a Thank you #2 using black card stock and added it to my card to complete it.


Here are the dies I used to create this card:


Thanks for stopping by and good luck to everyone for entering our Weekly Challenge with a chance of winning a $20 spending spree here at Cherry Lynn Designs.

Hugs,
Eva

Sunday, July 19, 2015

Cheery Lynn Designs Challenge 194 - Silver and/or Gold

3:30 AM 0 Comments
As always, the entries we had last week for our White on White challenge were fabulous.  Thank you to all who entered, we enjoy seeing your creations with our dies.  This week our challenge at Cheery Lynn Designs is

Silver and/or Gold

Here are the rules:
  • You MUST follow the theme and use at least one Cheery Lynn Designs die, of course, we would love to see more than one. 
  • You MUST add a link to your blog post in the InLinkz at the end of this post; no back posting, only new projects are allowed
  • You MUST link to this challenge in your blog post or on your gallery post
  • You may only enter the challenge ONCE per week.
The winner will be chosen randomly. They will receive $20 towards shopping at the Cheery Lynn website. The challenge will end on Saturday night at 18:00 Eastern time.  And now to our inspiration for today (for details on each project, click on the designer's name and it will take you to their blog)

Debbie Brownmiller
Dies used:
8.8 x 8.5 inches

Dies used:
Remember, you MUST use a Cheery Lynn Designs die to enter this challenge.

White on White Challenge Winner

3:25 AM 3 Comments
What stunning entries we had last week. Using Random.org, the winner of our White on White challenge is

Random Integer Generator

Here are your random numbers:
8
Timestamp: 2015-07-18 23:06:32 UTC
#8 Diane H
 
Congratulations, Diane.  Please contact me for your $20 shopping spree to Cheery Lynn Designs.  Be sure to grab the winner's badge from the right sidebar for display on your blog.  And thank you to everyone who joined in on the challenge.  We hope to see you again in this week's Silver and/or Gold challenge.

Saturday, July 18, 2015

Haunted House by Julie Lavalette

3:30 AM 3 Comments

Hi Cheery Lynn friends, it's JULIE here today and I am sharing with you another card using some Halloween dies from the Latest Release.


I started off by making my own background paper with stamps and inks, matting and layering on to my stacker dies. Next I cut out my Spiders Web in purple card stock then placed them on to the corners and added purple Stickles around the edges.

My orange mat I added a little Distress ink and went around the pierced holes with a white pen, layering on to my card with a little Silicone Glue.


My Home Sweet Home die I layered up twice and added some yellow card stock behind the windows to make them pop and I pulled the windows to an ajar position.


With layering my house twice it gave my tree some extra added dimension and popped the house forward on my card rather than lying flush to the card stock.


My Bat was cut in black cardstock and offset with some white. I stamped my sentiment in clear Embossing ink and embossed with extra fine white Embossing Powder.


My cute figures were trimmed out of the Trick or Treat Border and offset with yellow card again to make them pop on my card.

Cheery Lynn New Release Dies Used:

 Other Cheery Lynn Dies Used:


Thanks for stopping by today and HERE is the link to see all the New Release dies if you have still to check them out.

Good luck to everyone entering our Weekly Challenge and I'll see you all next Saturday.


Julie xx

Copyright Statement


All content, including designs, pictures and words are the exclusive property of the author of each blog post. Information shared here is for inspiration only and may not be copied for publication, competition or profit. Thank you for your cooperation.

SOCIAL MEDIA 2


Follow Us @jointhemakersmovement


All content, including designs, pictures and words are the exclusive property of the author of each blog post.
Information shared here is for inspiration only and may not be copied for publication, competition or profit. Thank you for your cooperation.