Showing posts with label Scalloped Square Stackers. Show all posts

Wednesday, July 6, 2016

Thinking of You by Jenny Alia

3:30 AM 1 Comments

Hello crafty friends, it's Jenny here today.  Lately I've been making tons of flowers using different Cheery Lynn dies.  They are easy to create and I love how they come to life once assembled.  For this card, I matched flowers to the striped Bo Bunny card stock and then developed the card. The card is a 5.5" square with the Scalloped LG Stacking Square as the base.  I layered a piece of white card stock on top, then the patterned paper, then the doily and then the sentiment.


I chose the Quadrafoil Square Doily as the central point of the design.  Both the Shasta Daisy and the Black Eyed Susan were colored with distress ink and the center of the Black Eyed Susan was rolled with a quilling tool.  I added a little distress ink to the edges of the blue petals as well as the edges of the Thinking of You Sentiment Square


Cheery Lynn Dies

Thanks for stopping by today and make sure to join in the current Pretty in Purple Challenge for a chance to win a $20 gift certificate to Cheery Lynn Designs!
Hugs,
Jenny 

Saturday, August 8, 2015

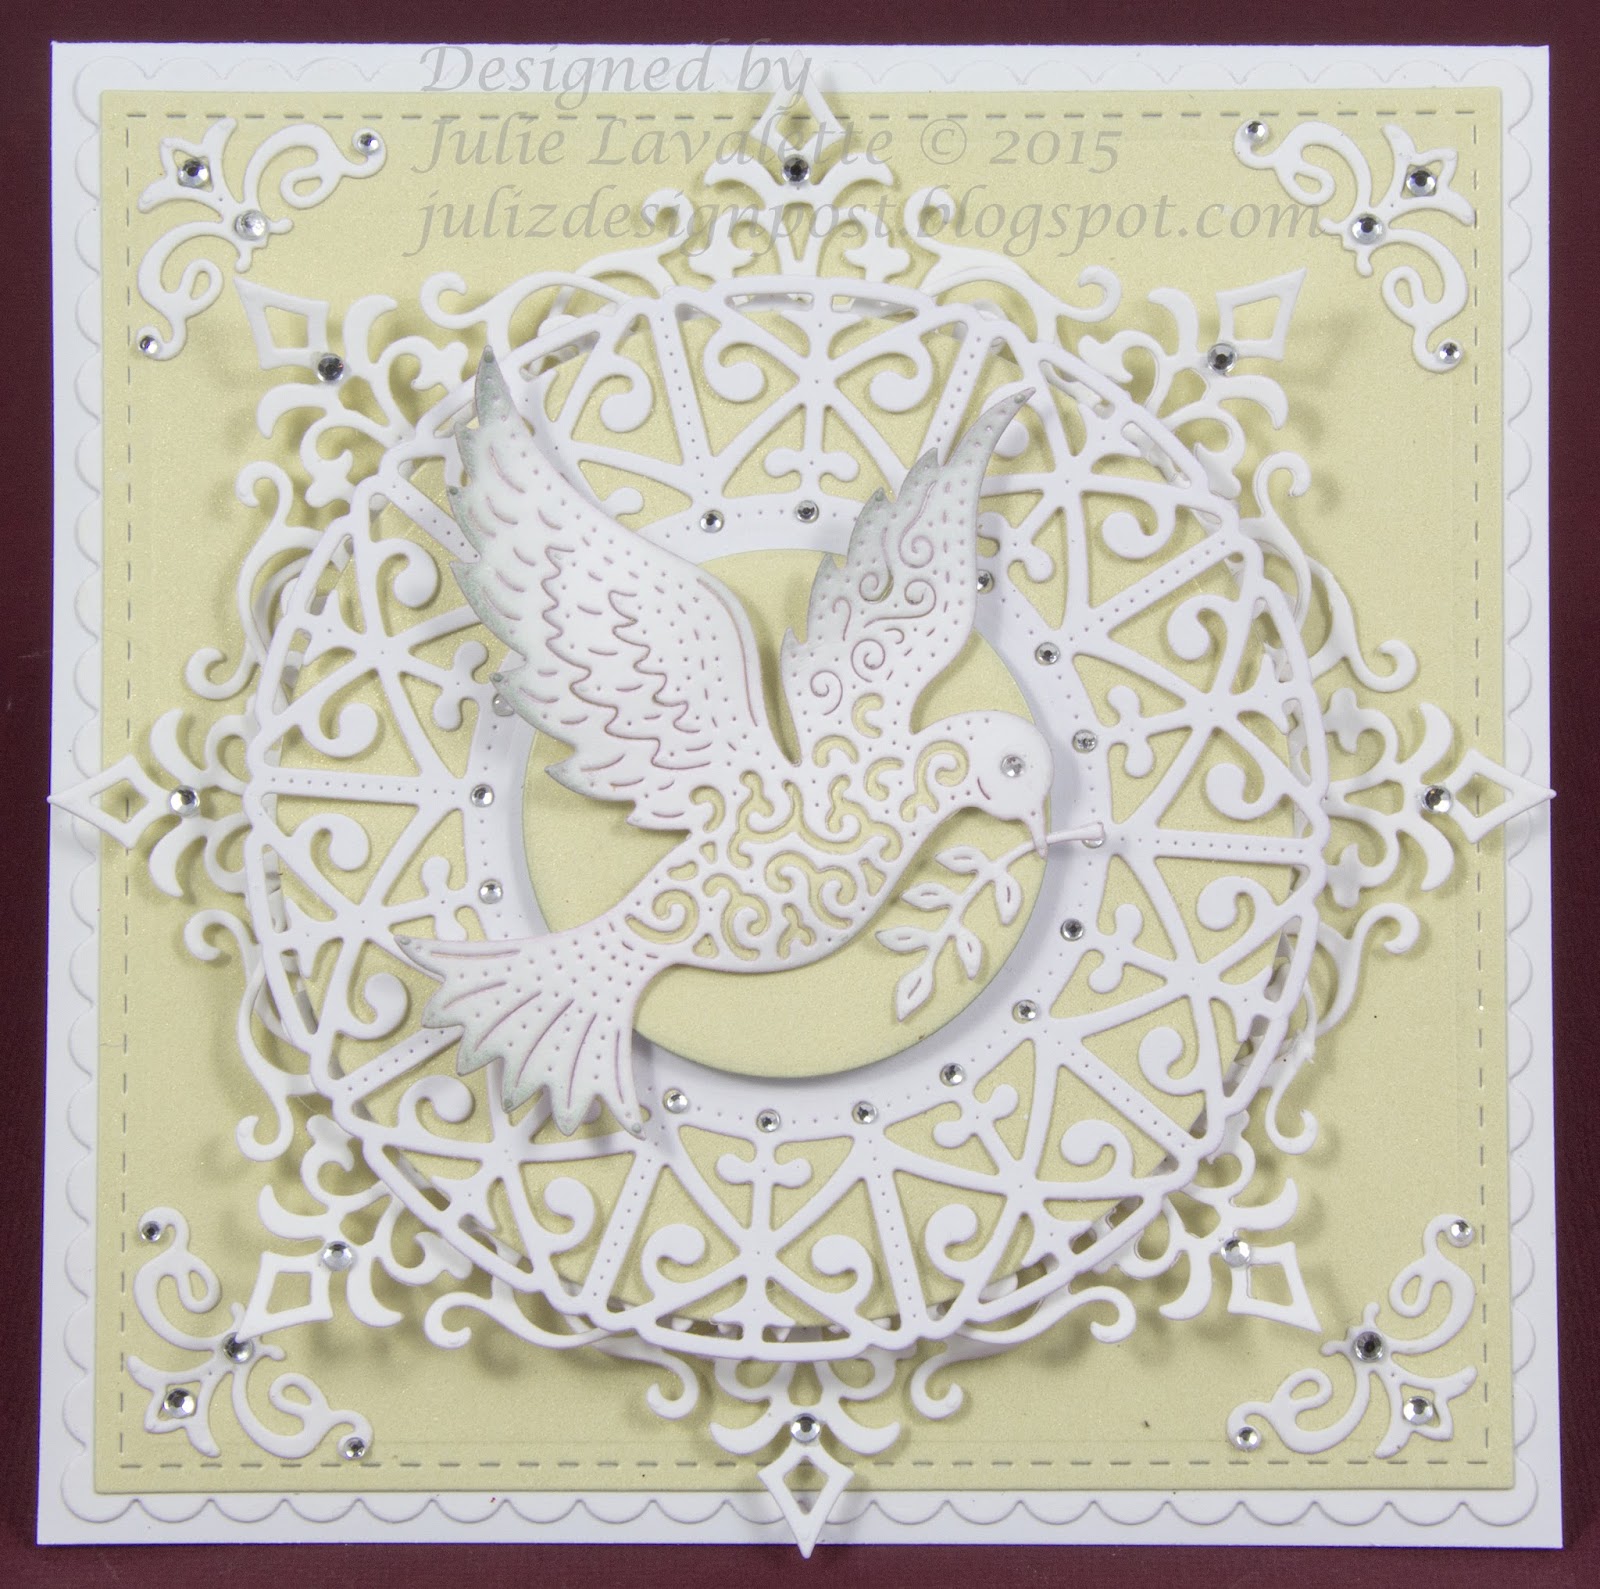
Dove Card by Julie Lavalette

3:30 AM 2 Comments

Hi Everyone, it's JULIE here today hosting the blog and today I am showcasing the Peace Dove, a very elegant bird die with the most beautiful detail.


My layers are cut out in white and a pearlised lemon shade. This photo shows my first set of layers. I love the added detail the stitching stackers give to the edge of a card. I used my corners from the Royal Scandinavain Tag Set and added some gems on to my card.


My next layers I also added some gems and layered with Silicone Glue for height and dimension.


My Dove I added some Distress Ink to the edges curling the wings slightly and adding a little lemon card behind to highlight the Dove's detail and a little gem on to its eye.


Finally adding all my layers together to finish.


Cheery Lynn New Release Dies Used:
Other Cheery Lynn Dies Used:

Good luck to everyone entering our Weekly Challenge and thanks for stopping by today.


Julie x

Saturday, July 18, 2015

Haunted House by Julie Lavalette

3:30 AM 3 Comments

Hi Cheery Lynn friends, it's JULIE here today and I am sharing with you another card using some Halloween dies from the Latest Release.


I started off by making my own background paper with stamps and inks, matting and layering on to my stacker dies. Next I cut out my Spiders Web in purple card stock then placed them on to the corners and added purple Stickles around the edges.

My orange mat I added a little Distress ink and went around the pierced holes with a white pen, layering on to my card with a little Silicone Glue.


My Home Sweet Home die I layered up twice and added some yellow card stock behind the windows to make them pop and I pulled the windows to an ajar position.


With layering my house twice it gave my tree some extra added dimension and popped the house forward on my card rather than lying flush to the card stock.


My Bat was cut in black cardstock and offset with some white. I stamped my sentiment in clear Embossing ink and embossed with extra fine white Embossing Powder.


My cute figures were trimmed out of the Trick or Treat Border and offset with yellow card again to make them pop on my card.

Cheery Lynn New Release Dies Used:

 Other Cheery Lynn Dies Used:


Thanks for stopping by today and HERE is the link to see all the New Release dies if you have still to check them out.

Good luck to everyone entering our Weekly Challenge and I'll see you all next Saturday.


Julie xx

Saturday, July 4, 2015

Someone Special at Christmas by Julie Lavalette

3:30 AM 4 Comments

Hi Everyone, It's Julie here today hosting the blog. This week our challenge is Christmas and I couldn't resist playing along, as I love making Festive cards and getting the Glitter out.


I started by cutting out my paper with the image of Santa on it, mounting onto green card and I then dropped a little Stickles into the centre of all the tiny holes around the frame of my Horizon Stacker die.


My sentiment was stamped adding some Stickles and Distress ink for a Vintage look, layering onto my die cuts with a little Silicone Glue.


My foliage was cut and curled slightly with my embossing tool and mat. I then added some red gems to look like berries for added detail.


My Poinsettias were made be shading white card stock with Distress Stains and a gold Mica spray. Once the card stock was dry I die-cut out my flowers, shaped on my embossing mat and added some glittered stamens to the centre.

Cheery Lynn Dies Used:


Thanks for stopping by today and good luck to everyone entering our Weekly Challenge.


Julie x

Thursday, February 26, 2015

Layered Doily Dies with Rhonda

3:30 AM 1 Comments
Happy Thursday crafty friends!  It's Rhonda here today to host the blog for you. My project today is a square card.

"Hello" (5x5 card)

I love the pretty layers of our doily dies and how they add such a delicate touch to your project. Here I'm showcasing a few of our newer dies, the Royal Scandinavian Doily and the Florence Filigree Doily. The steps that I used to create this card are:
  • To start I used a 5x5 card base in white card stock. 
  • Next I added the square scalloped layer.
  • This was followed by the Royal Scandinavian Doily in light pink card stock. 
  • Then I added the Florence Filigree Doily with foam adhesive for dimension. 
  • I cut a layer using the Horizon Circle Boutique Stacker medium die.
  • The Bird Cage was added on top.


  • Cut the Daisy Strip, misted lightly with water, shaped and formed the layers and adhered.
  • Add the Princess Tree and arrange under the Daisy.
  • Hummingbird was cut next, then cut the wing a second time and attach to behind the bird. Ink edges and attach with foam adhesive for dimension.
  • Final step is to cut the smallest Horizon Fishtail Banner and trim to fit. Add sentiment by stamping or using a rub-on. Shape and attach by tucking under the Daisy.
  • Finishing touches were to add a pearl for an eye on the Hummingbird and gems in the corners of the Royal Scandinavian Doily.

Cheery Lynn Designs Dies Used:

Please be sure to join us this week for our challenge, the theme is "Anything Goes".  You can find all of the details right here.

Thanks so much for stopping on over to the blog today!

Thursday, February 12, 2015

Clean and Simple Valentine with Rhonda

3:30 AM 1 Comments
Greetings and welcome, it's Rhonda here today to host the blog for you.

I have card to share that is more clean and simple today.  I wanted to play along with our all new challenge "Tickled Pink", so I paired my pink sweetheart frame with a black square cardstock base.


I added a square scalloped LG stacker to the back of the card to frame it. The center square to back my sweetheart frame was cut from my square classic LG stackers. I shaped the Heart and Arrow and adhered with foam dimensionals for interest.

Cheery Lynn Designs Dies Used:
Heart and Arrow - B530
Sweetheart Frame - FRM127
Square Scalloped LG Stackers - XL2
Square Classic LG Stackers - XL1
XOXOXO - B375

Thanks so much for stopping on over today, be sure to play along with our Tickled Pink challenge this week if you have some time. You can win a $20 gift certificate just for playing along!

Have a wonderful week!
~ Rhonda

Tuesday, February 3, 2015

Layered Love Valentine

3:30 AM 1 Comments


Happy Tuesday everyone! leslierahye here sharing a  layered Valentine Card for you! I love the visual texture of the printed flowers against the solid colors of red, pink and black. To create this card I layered a heart assemblage and sculpted flowers on a base of the Royal Scandinavian Doily and a scalloped square. The heart assemblage consists of  the larger of the Two of Hearts doilies, the steampunk wings and the small steampunk heart. The flowers are layered with Tiny Flower centers. 

  Cheery Lynn Dies used
*****
Remember there is still time to join the new challenge!!! Challenge 170 is Add a Flourish There is a chance to win a $20 shopping spree at Cheery Lynn Designs. Thank you for stopping by today!

Tuesday, December 16, 2014

Shaking Up some Cheer!

3:30 AM 0 Comments

Happy Tuesday everyone! leslierahye here playing along with this weeks challenge Sparkle and Shine. I have created a shaker card with the circle stackers and Horizon Circle set! 

I love how easy it is to cut a frame for your shaker I simply lined up a smaller circle inside my Horizon die, secured them with some washi tape, and cut them together in my machine.
I cut all of my snowflake pieces in white which was a little stark compared to the rest of my paper. I used pearl mists to add gold and pearl shimmer to my snowflakes and dull the stark white card stock.

For the shaker I cut a circle for the background and a circle out of clear acetate. I adhered the acetate to the frame with a clear lacquer.

I then added foam tape to the back of the frame to give my sequins and sparkles a space in which to move. If you desire chunkier shakings use another layer or two of foam tape. Make sure you have all of your pieces touching so there are no holes for shakings to escape!

I stack my shakings in the middle before adhering the frame. Here I used sequins, snowflake glitter and some crystals.

When you adhere the frame, make sure all sides are secure and then give it a shake to make sure it works! 

I added my shimmer snowflakes to the frame and then used a clear gem as a spacer for a smaller snowflake to be placed on top. It added just the right height and was clear so could not interfere with the top layer of snowflake

As a final touch I added crystals here and there to centers and along the flurry strip!


  Cheery Lynn Dies used
*****
Remember there is still time to join the new challenge!!! Challenge #163 is Sparkle and Shine There is a chance to win a $20 shopping spree at Cheery Lynn Designs. Thank you for stopping by today!

Saturday, October 18, 2014

Wish You Were Here by Julie Lavalette

3:30 AM 4 Comments

Hi Everyone, Julie here hosting the blog today. 

Can you believe it's the weekend once again and only another week until the clocks change here in the UK and the dark winter nights are upon us.

I hope you are all loving the new release dies as much as I am. This card shows you what I have done with another couple of them. I stamped my postcard stamp, shaded it with Distress added some crackles and mounted onto the Alpine Flourish Doily die. I totally love all the detail on this die and shaded it also with distress. It gives a stunning Vintage look. The clever thing with this die is you have the option of having a solid centre to stamp on, add a sentiment to or place your centre coordinating die piece into it for a lace look.


My binoculars I die cut out in Grey and Black cardstock slightly off setting for a shadow effect. I then put some Glossy Accents onto the lens area and rubbed a little distress over to highlight.


A pretty Vintage style flower and some black gems were added to finish my Parisian themed card.

Cheery Lynn New Release Dies Used:

Other Cheery Lynn Dies used:

If you haven't checked out the new release yet please click here. Good Luck to everyone entering our Weekly Challenge and I will see you all next Saturday.


Julie x

Tuesday, October 14, 2014

Mad About You!

3:30 AM 3 Comments

 Happy Tuesday everyone! leslierahye here with another fun Halloween card today playing along with the black and orange challenge. I've cut a number of square mats in orange and black to mount the focal image of the mad scientist. I cut out large circles from the Lattice Circle Background and smaller circles from the Tiny Bubbles Borders in orange and black to create bubbles for the scientist's experiments.


*****
Remember there is still time to join the new challenge!!! Challenge #154 is Black and Orange There is a chance to win a $20 shopping spree at Cheery Lynn Designs. Thank you for stopping by today!


Saturday, October 4, 2014

Nice Little Things by Julie Lavalette

3:30 AM 3 Comments

Click to Enlarge

Hi Everyone, It's Julie here hosting the blog today. With winter now just around the corner here in Scotland, I have started to feed our Garden Birds once again. This card is inspired by them and the Summer flowers that are now all disappearing.

Let me show you previous layers again on this card to make it easier to understand how I made it.


You will see I layered my French Flair Doily stackers rotating the following layer to a diamond shape and I paper pieced in my Snowflake Doily at the back.


I shaded my leaves,birds and birdbath with distress inks and my flowers were coloured with Copics.


I stamped my verse, added a little distress and accent stamping to soften the sharpness of the white card.

Good Luck to everyone entering our weekly challenge and I'll see you all next Saturday.

Cheery Lynn dies used:

Happy Crafting,


Julie x

Saturday, September 13, 2014

Brr It's Cold Outside by Julie Lavalette

3:30 AM 4 Comments

Hi everyone, it's Julie here hosting the blog today. The challenge this week is - All About Texture so I decided to join in using my Cheery Lynn Texture Plate.

I used the brick plate and ran some co-ordinations paper through my die cutting machine and then sanded it back to reveal the coloured core. Next I die cut this piece of paper and sprayed some glue onto it and added extra fine glitter for a frosty feel.


My tree I layered up and sprayed with some gold mica spray and dried with my heat gun. This helps to curl the paper and gives it a firmer feel. I added Flower-soft snow, glitter, red stickles, my little birds and snowflakes all to give a winter feel. The Tree comes with some wonderful decorations dies also and you can see it decorated here on one of my previous cards.


My window I wanted a frosty feel to, so I added some icicles....I adore this die. They we're die cut in white card with a little distress added to the points of them, I then sprayed glue and added glitter too them and placed onto my window frame with a little snow. I also made some curtains for behind my window using my Cuties strip die.

My wording I layered up twice for a shadow effect. I wish you could see all the sparkle on this card but the camera has unfortunately only picked up a bit of it.

Cheery Lynn New Release dies used:


Texture Plate used:


Other dies used:


Thanks for stopping by today and I'd love it if you had time to leave me a comment. Good luck to everyone entering our Challenge this week.

Julie x


Tuesday, August 26, 2014

Back To School Greetings

3:30 AM 3 Comments

 Happy Tuesday everyone! leslierahye here with a back to school card! I love this time of year and creating a simple layered card like this with the scalloped square stackers and the Horizon Square die are so much fun! Using coordinating papers and precolored digital images make this type of card making super fast and easy! A few simple embellishments [paper flower and black on black flowers] add just the right touch!

*****
Remember there is still time to join the new challenge!!! Challenge #148 is Frame It! There is a chance to win a $20 shopping spree at Cheery Lynn Designs. Thank you for stopping by today!


Copyright Statement


All content, including designs, pictures and words are the exclusive property of the author of each blog post. Information shared here is for inspiration only and may not be copied for publication, competition or profit. Thank you for your cooperation.

SOCIAL MEDIA 2


Follow Us @jointhemakersmovement


All content, including designs, pictures and words are the exclusive property of the author of each blog post.
Information shared here is for inspiration only and may not be copied for publication, competition or profit. Thank you for your cooperation.