Monday, October 31, 2011

Easel Card with Lots of Dies

3:30 AM 12 Comments
Good Morning Everyone, Donna here to show you an Easel card I made using some of the fabulous dies from Cheery Lynn Designs
For the top of the card I've used the Victorian Romance Flourish die and to create the oval, I've used the Inverted Scalloped Oval Dies, then one of the large oval dies, and a smaller Inverted Scalloped Oval die, and then the Kiwi oval Frame on top of that and I cut out the image using one of the smaller oval dies.

I've added snowflakes from the fabulous snowflake die set, as well as flowers from the Stacker 5 and also the Cherry Blossom. Beneath the flower I've used the pine branches and the lace rose & flourish

For the inside of the Easel card I've used the Border Carnivale, and the sentiment has been cut out using the oval stackers, and oval scalloped stackers.

A closeup of the Victorian Romance Flourish with a tiny gem in the centre
Closeup of the Flower Stacker 5, with the Cherry Blossom on top, the pine branches and the lovely Lace Rose and Flourish

Closeup of all the lovely little snowflakes that come as part of the Snowflake die

Here's a complete list of the dies used


Sunday, October 30, 2011

Tilda with Bear

3:30 AM 8 Comments


Hello!

Its my turn to show you a project and today I made a card! The card base is made with the French Flair Scalloped Large Stackers in combination with the Silver Stacker Layers.
The image is a Magnolia stamp colored with the copic markers. Design papers from Graphic 45. The image is sitting on the French Pastry Doily. I have cut out a circle to place it behind the doily to make the details really pop!
Around the image I have used the beautiful flowers Cherry Blossom in combination with Judy's Blooms. The leaves are made with the Pair Of Ferns.
In the middle of the card I have used the Border Carnivale die and cut it out 2 times and glued it together. In the middle I have put a ribbon.
And like I said before.. I just loveee the Exotic Butterflies Small so they are there too!

Hope you like my card.
Hugs,
Marley

Saturday, October 29, 2011

Shaped Card

3:30 AM 6 Comments
Jodi back again today! I’ve taken my dies into the masculine world again! How about a shaped masculine card?!
By first folding my cardstock and letting my die hang slightly over the folded edge, I cut the base (red cardstock) of my card using the Inverted Scallop Circle. I cut the next layer (plaid) using the Circle Stacker Nesting Dies. I can’t tell you how much I love the Nesting Dies and Stackers! They are designed to fit inside each other taking all the guess work out!!


I cut a Coved Rectangle to layer my chipboard sticker and sentiment on. I adhered the coved rectangle and chipboard with dimensional foam to add life to the card.


Thanks for stopping in today and have a super Saturday!!

Friday, October 28, 2011

Home Decor with Cheery Lynn Designs

3:38 AM 11 Comments
Have you ever had an idea of what you wanted to do and the final product turns into something entirely different?


This is so far from what I had planned to make.


But, I really like what I ended up with.


I had gotten my flowers all done to adhere to my white lights and then...


I opened up my package of lights and realized I bought the lights with a green wire and I just about started to cry.  I meant to get the white wired lights.


In the end, I think it all came together and now I really like the way the green looks.


I used the die called JUDY'S BLOOM for each light base.


I'm not even going to pretend getting the flowers on the lights was easy, it was a struggle, but worth the struggle, I think! 


The frames are an added bonus.  I have had them forever with the grocery store picture inserts in them.


I decided to use some of my favorite papers and things and make this nice little trio of frames with the matching lights.

For the frames I made flowers with an older Cheery Lynn Designs die and made my rolled flowers from the smallest circle die of the Scalloped Circle Little Stackers.

I would love to know what you think of my project, so let me know.
Thanks for stopping by, this has been Jeannie DeGruccio from The Polka Cabana with today's post.
Products used:

Thursday, October 27, 2011

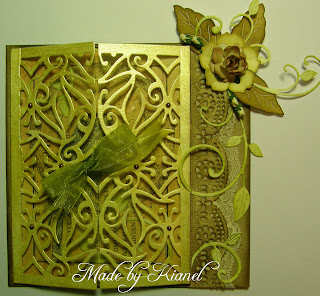
Window card - Kianel

3:30 AM 6 Comments
Hello dear Cheery Lynn Designs lovers!
Kianel here with you and i hope you all had a great week! Today i am showing you a card i call "window card" as i made a window out of the mediterranean lace rectangle frame


I first cut my card base using XL square stackers. I made my own background paper and stamped a stamp from La Blanche which i like very much. I then cut out the mediterranean lace rectangle frame that i painted with Creative Inspirations paint. I glued it on a piece of transparent paper and added some 3D pads on the back. I cut it in two parts and placed it over my stamped background. I also made 2 little holes to fix my ribbon and added some pearls to decorate. On the stamped image, you can see pieces of the fanciful flourish that i inked.

I then fixed the whole window on my card base and added some lace and the carnivale border that i also inked.
To decorate the card, i decided to use a cherry blossom together with the leaves of the Judy's blooms. And then added small parts of the  fanciful flourish.

I hope you will like it and don't forget to come here everyday to see the beautiful creations of my talented dt mates. Have a good week, love from France, Kianel.

Wednesday, October 26, 2011

Tri-Shutter Holiday Card

3:30 AM 5 Comments

For my Cheery Lynn Designs project today, I created a tri-shutter card.  It folds up to 4.25 x 5.5 inches.  All of the DP is from the Bo Bunny Blitzen 6x6 paper pack.  On the front I started with an Elegant Evergreen die, dressed up with some gold and red Viva Decor Pearl pen accents.  I added pieces of the new Holly Flourish in the corners (notice the little red berries I added with my pearl pen) 


For the center panel, I added more Holly Flourish and berries; then hung an ornament made with Decoration 1, backing it with the center portion of Geometric Snowflake.   I added Snowflake 7 on the bottom panel, trimming the edges. 


I added Zig-Zag Ric-Rac to the small panels, it mimics part of the pattern in the paper.   The final step was to add a sentiment to a Scalloped Coved Rectangle Little Stackers panel, adding some gold pearl pen accents.

Tuesday, October 25, 2011

"Special" Card

3:30 AM 5 Comments

This week I have been busy making a variety of cards.  Card making is a creative venture all on its own, with so many wonderful tutorials out there in the ‘cyber world’.  The template I used, I discovered on Splitcoast Stampers and just had to try it out. 

The new release “Flower Stackers” are amazing, with so many uses and ways to create with them.

The flower I created for this particular card is from using a selection of different dies.  Firstly, I used the Stacker Flower #6, lightly turning under the petals using a drinking straw.  The second layer is formed using the Stacker Flower #5, rolling the petals inwards using a skewer.  The third layer is the Sweet Williams die, using the smaller of the two flowers in the set – again, rolling the petals inwards slightly.  The leaves are from the Frangipani with Leaves set, they are actually upside down, but they are soooo real in shape, I could not resist in using them for this flower.  I just adore the Exotic Butterfly Mini and placed one on the card, they are so perfect for so many projects, and are available in a larger size too – the larger butterflies can be found “here”.

Also, to complete the card, I used the beautiful Anastasia Border which looks just like real lace. 

Do not forget to watch the video on the Stacker Flowers, which can be found “Here”.

Till next week
Dies Used:

Monday, October 24, 2011

Dies Galore on a Three Panel Card

3:30 AM 9 Comments
Good Morning Everyone......I hope you all enjoyed the post showing off all the new dies that came out this month......I know we all enjoyed playing with them.
I'm back again to show you a three panel card which I created.

On the front of the card, I've used the Anastasia Border cut out of white textured card, then sponged with Vintage Photo distress ink, the Polynesian Sails Oval, Oval Stackers nesting dies, and three butterflies, two from the Exotic Butterflies Small, the larger one from the Butterfly bundle. I've added some roses and then card candy in metallic for the corners.

The other sentiment panel I've used the Kiwi oval frame, the oval Stackers nesting dies, and the Anastasia border.

For the left hand panel, I've used one of the Kenny K Steampunk images on top of the English Tea Party Doily which was embossed using the Old Parchment embossing plate, and you can see the Fanciful Flourish that I've put on two panels by cutting it in half.

For the middle panel I've used the Kiwi Oval Frame with gold mirri card behind it using the Oval Stackers Nesting Dies, and behind all that is the Lattice 2 Frame, cut out of blue and gold card and laid overtop of each other just slightly off to give a shadow effect. I've also cut out one of the small hearts from the Heartland America LG doily, but put clear tape behind it to keep all the pieces in, then stamped a greeting from a stamp set I designed. Another one of the KK Steampunk Burlesque images.

On the right hand panel, another of the Steampunk Burlesque girls is in front of the English Tea Party Doily, again embossed with the Old Parchment embossing plate and you can see the other part of the Fanciful Flourish die

Here's a full shot of the inside of the card

Here's the full shot of the outside panels of the card

Here's a complete list of the dies used to create my 3 panel card

Thank you for stopping by and leaving a comment
~hugs~
Donna

Sunday, October 23, 2011

Flower Girl

3:30 AM 6 Comments

Hello!

Hope you all had a lovely weekend.. its my turn to show you a project today and I have made this card.
The image is a Wee Stamp and is colored with the copic markers.
Design papers are from Echo Park.
Behind the image I have used the beautiful English Tea Party Doily.
Around the image I have used flowers.. aren't they beautiful? its the Cherry Blossom die.. I also used the Tropical Flourish die and I've manipulate it a little, cut it in half and replaced some leaves..
In the middle I have used a ribbon through the Ribbon Eyelet Border
Hope you like my card!
Hugs,
Marley


Here you can see the beautiful Cherry Blossom and the Tropical Flourish.. notice the beautiful little cuts?

Saturday, October 22, 2011

Tutorial

3:30 AM 5 Comments
Jodi here again today!  Did you enjoy the projects the ladies created with the newly released dies?!  They did such a lovely job, didn't they?!  AND, the dies are sooo pretty!!

I am going to start with a tutorial for the glass etching I did using the Fall Harvest 2 die. 

I cut the die from a piece of scrap vinyl…which I must say it cut beautifully!! I applied the cut vinyl to transfer tape, then very carefully removed the backing….you have to go slow with all the flourishes!

I centered my diecut on the glass and used a flat tool to make sure I got the vinyl down tight with no air bubbles. You don’t want the etching cream to leak under any areas.

Remove the transfer tape and apply the etching cream (I used Armour Etch). Read the instructions and wait the allotted time letting the etching cream work. Rinse off the cream. Remove the vinyl diecut. Admire your handy work!!

I dressed up my frame by forming a cluster of leaves cut from the Small Dimensional Leaves.

Next I want to share a card. The background was cut using the Dutch Scallop Square Frame, just the perfect size for a card!  The lacy blue trim is two pieces of Carnivale Border over lapped slightly and wound with ribbon.  I added Stacker Flower Leaf #1 and a Mini Exotic Butterfly to dress it up.

Thanks for stopping in today!

Friday, October 21, 2011

Fall colors with Cinderella's Pumpkin

3:30 AM 6 Comments
 The temperatures are coming down and it's time to start making fall type cards and things, hooray!


I used the Cinderella's Pumpkin die and the Thanksgiving Embossing Plate for this card.


 I also used the Lace Light Deco Border for the opening edge of the card.


I took some ecru colored lace and stitched onto the base of the card before assembling the card.


I think the lace adds to the vintage feel I was creating with this.


In the back of the colored pumpkins is an embossed image of the pumpkins.  I just love how this all turned out.
Have you seen all the new FABULOUS new dies?
Be sure to go HERE to check them all out.
You will love the new line-up, I know I do.
Thanks for stopping by, this has been Jeannie with The Polka Cabana with today's post.

Dies used today:


Thursday, October 20, 2011

little basket - Kianel

3:30 AM 10 Comments
Hello Cheery Lynn Designs friends!
Kianel here with you today to show you another project i made using the fantastic dies that were released on the 15th. Okay so on the common post, i showed you that you could create a cake with the new Doily Stacker circles  and today, i'm going to show you a basket i designed with those same dies. How versatile is that? I looooove the stackers and those are absolutely fantastic to play with!!!!
Go take a cup of coffee because there is many pictures to show you all the details of it...
I used the largest  Doily Stacker circle to make the top of my basket (i placed inside a smaller version of the XL circle stackers to take the center away), then i used the middle one to make the bottom and finally the smallest one is decorating the inside bottom of the basket. To get a cleaner cut to those intricate dies, i used the Cuttlehug metal adaptator.
The structure of the basket is made from "wittle wicker" die that i assembled together with the doily circle stackers. I then glued the whole structure on a XL scalloped circle stacker that i decorated with lace and pearls.

Then i made a band of paper that i inked and decorated with "daisy lace bracelet" inside and outside and pearls to make a handle.
I also added a small exotic butterfly die that i covered with Creative Inspirations paints. I have fixed it with 2 rhinestones brads.
To hide the glued parts around the basket, i used the "Anastasia border" inside and outside the basket that i inked with Distress Victorian velvet and decorated with pearls.
Another small exotic butterfly is placed on the basket's structure together with the matching angel wing. To use both of them together allows you to make it pop up.
To decorate each side of the handle, i wanted something that was flowding down to the bottom. I looked through my dies and there was the perfect die for me to use: the "lace rose and flourishes". This one is sooo exquisite and delicate. I first worked it with embossing powder "frosted crystal" and inked it with distress Walnut stain.
Then i took away the lace rose but glued one part of the flourish to each side of the basket on the doily stacker. Then i bent it and glued the other end on the basket structure. I just added some paerls to enhance it.
I made small buckets on each side of the handle and added the "pair of ferns" die that i covered with some distress ink and also Creative Inspirations shimmer paint.
On the left side i used the flower stacker "leaf".
On the right side i added 2 "snowflake 5" that i painted with shimmer paint and embossed with "frosted crystal" embossing powder.


To finish my basket i added a sitting Magnolia stamp that is sitting on the top of the basket. In her hands i put a wooden stick that i painted and decorated with a "snowflake 6" die. For this one, i used Creative Inspirations paint and "frosted crystal" embossing powder. And to make it look more "winter", i added some "puffy velvet" white pen.
 
Well, i hope that you will like this basket. I had sooo much fun creating it!!! I wish you all a wonderful week and encourage you to come and admire the fabulous creations of my dt mates here on the blog each day.
Take care, love from France, Kianel.


Copyright Statement


All content, including designs, pictures and words are the exclusive property of the author of each blog post. Information shared here is for inspiration only and may not be copied for publication, competition or profit. Thank you for your cooperation.

SOCIAL MEDIA 2


Follow Us @jointhemakersmovement


All content, including designs, pictures and words are the exclusive property of the author of each blog post.
Information shared here is for inspiration only and may not be copied for publication, competition or profit. Thank you for your cooperation.