Showing posts with label Angel wings. Show all posts

Tuesday, February 11, 2014

Love is Like a Box of Chocolate

3:30 AM 2 Comments
Happy Tuesday everyone! leslierahye here! This week is Valentine's week and that means our house is really busy getting Valentines ready for the kids' classmates and teachers as well as for special people in their lives. My Fancy Pants wanted to give boxes of chocolate to all of her teachers and rather than buying them I though a Cheery Lynn crafted heart box would be even more fun! I hope you enjoy this tutorial!
Begin by die cutting the elements that you will need for the construction of your box. You will need 2 pieces of 1" cardboard 8" long, 2 pieces of Kraft card stock 1½" by 8" long, 2 cardboard Heartland America Large Angel Wing, 2 each red card stock and kraft card stock Heartland America Large Angel Wing, Heartland America Doily in Kraft card stock, Allison's ribbons in coordinating colors. For the embellishments I also cut some fringe,cuties, a flourish and the 2 of hearts dies in coordinating colors.

I glued the red angel wing to the top of the to card board and the bottom of the bottom card board. I then glued the kraft card stock to the insides to the card boards. This forms the top and bottom of my box.
Next I drew a pencil line to indicate where I would glue my card board strip. I prepared the card board strip by curling it slightly. I prepared the card stock strips by scoring them along the 1" line, folding and trimming to the fold to allow the strip to be contoured to the box bottom.

With a strong white glue I adhered one side of the card board along the line. I repeated with the second side adding glue where the seams would meet.

For the top, I measured the strips around the dried card board. I folded the strip to contour around the base card board heart. I glued the strips together so that they would close. I added a ½" wide strip of glue to the top of the heart box and holding the bottom strip into place around the top of the heart, I glued the lid into place. 

I held the box together for a brief moment to ensure the glue held on the lid. I cut a small heart to give a finished look to the inside top of the lid--covering up the fringed strip.

I finished off the box with Allison's ribbons around the edge of the box, the Heartland Doily, 2 Heart doilies and flowers on top. I hope you enjoyed my project! Happy Valentines!

Cheery Lynn Dies used

 Thank you for stopping by!!

*****
Remember there is still time to join the new challenge!!! Challenge #119 is Frame It!. There is a chance to win a $20 shopping spree at Cheery Lynn Designs. Thank you for stopping by today!


Tuesday, January 14, 2014

Fancy Flap card with Angel Wings

3:30 AM 2 Comments
 Happy Tuesday everyone! leslierahye here today with simple technique to create a Fancy Flap on your card. The original intent of the Angel Wings that come with Cheery Lynn Dies was to create a neutral background upon which to adhere the intricate doilies to help them stand out! The fact that they are HALF the size of the doily make them perfect for this technique to achieve the fancy flap look!

Cheery Lynn Dies used


To create the base of the card cut an 8½×5½" piece of card stock. Fold in half and crease. The gently fold again the front and lightly crease to just mark a crease on the edges. Line up the angel wing die on the light crease. Run through your die cut machine. fold cut back to main fold of card...you can either glue down or leave loose. I then stamped the background with a script stamp for this card.

I then glued in my doily, lining it up with the angle cut. I then grouped the new Bow Die with leaves and flowers to create a focal cluster. I added the music in the background to contrast with the stamped script. I hope you enjoy creating fancy flap cards using the angel wings that come with your doilies! 
 Thank you for stopping by!!

*****
Remember there is still time to join the new challenge!!! Challenge #115 is Snowflakes. There is a chance to win a $20 shopping spree at Cheery Lynn Designs. Thank you for stopping by today!
Fancy


Wednesday, November 6, 2013

Butterflies and blues by Susan Longman

3:30 AM 1 Comments
Susan Longman here and it’s Wednesday, which means I get to share with you all again. This week I have used a “stack” of the gorgeous butterflies from Cheery Lynn for this fresh birthday card.
Susan Longman39_1
To create the card I have used a white card base and a chicken wire mask … sprayed it in a coordinating blue mist (I used Tattered Angels Sapphire). I have then cut out the angel wing from the Lilith Doily w/ Angel Wing - DL263 in white cardstock and inked the edges and topped it with the Lilith Doily cut in blue. I have stacked the Exotic Butterfly X-tra Large – DL119, Exotic Butterfly Medium #2 – DL115 and the Small Exotic Butterflies #1 w/Angel Wings – DL112AB with some of the other stackers in between. Finished the card with a couple of the Mini Fanciful Flourish – B117S and some ribbon and stamped pick pins.
Susan Longman39_2
Cheery Lynn Dies Used:
Lilith Doily w/ Angel Wing – DL263
Exotic Butterfly X-tra Large – DL119
Exotic Butterfly Medium #2 – DL115
Small Exotic Butterflies #1 w/Angel Wings – DL112AB
Mini Fanciful Flourish – B117S
Horizon Oval Boutique Stacker Frames – DL252
Heart Circle Boutique Stacker Frames – DL267
Remember there is still time to enter our Cheery Lynn Designs Challenge 105 - Give Thanks…

Wednesday, October 30, 2013

Layered Oval Card by Susan Longman

3:30 AM 3 Comments
Hi, Susan Longman here again today. I have a pretty little birthday card to share with you using different oval shapes and some of the gorgeous roses.
Susan Longman38_1
On the base of a plain white card I have used a few random numbers from a chipboard pack and spritzed it with some glimmermist. Then for this card I have layered the ovals horizontal and vertical to create some interest. I have used a combination of the Horizon Oval Boutique Stacker Frames – DL252 and the Oval - XM-7 to do this. I have topped the Ovals with some of the Medium Rose – B154 and Large Rose – B155 on a base of the Rose Leaf Strip – B241 and added some Small Exotic Butterflies #1 w/Angel Wings - DL112AB . All die-cuts have had a light inking with a pink ink.
Susan Longman38_2
Cheery Lynn Dies Used:
Rose Leaf Strip – B241
Medium Rose – B154
Large Rose – B155
Horizon Oval Boutique Stacker Frames – DL252
Oval - XM-7
Small Exotic Butterflies #1 w/Angel Wings - DL112AB
Don’t forget the Cheery Lynn Designs Challenge 104 - Borders and Edgers this week… still plenty of time to enter.

Have fun creating Susan…

Wednesday, August 21, 2013

Envelope Punch Board Tutorial

3:30 AM 4 Comments
I'm so excited to share this simple tutorial with you for our latest product Cheery Lynn Designs is carrying..... Envelope Punch Board by We R Memory Keepers.  This tool will make your cards having matching envelopes in not time, and there are sooooo many different sizes to choose from.


Here are the pictures I promised you with more close ups of my fancy envelope. 


Here are all the Cheery Lynn Dies used on this envelope along with the Envelope Board


Sunday, June 9, 2013

Awesome tip with Guest Designer Holly

3:30 AM 8 Comments


Hello again!  It's Holly Brown back for another guest designer post today.  I've done something a little different with this card.  It looks clean and simple, right?  Take another look at the red doily underneath the butterfly.  Do you see what I did?  :-)

The Cheery Lynn Designs dies that I've used on this card are:

French Pastry Doily
Small Exotic Butterflies #2 with Angel Wings

I used the whole French Pastry Doily even thought it looks like I only have half of it on here.  I made one cut from the outside edge to the center of the doily.  Then I put my doily on my trusty little Scor-Buddy and scored from the scallops in towards the center.  The doily was then accordian-folded into this little half-rosette that you see here.

This was my first time trying this idea with a doily, and I was thrilled to see that it worked.  Now if I want a full sized rosette, I can do this with two of the doily die cuts and glue them together.  Wouldn't that be fun??  I hope you enjoyed this card today.  I've got some more to show you, so come on back next week.

Friday, April 5, 2013

Buddleia Flower w/mini-tutorial

3:30 AM 10 Comments

Hi Everyone,

Today, I have a little something different to share and would like to show you how to make a "Buddleia" flower : ) The "Buddleia" is more commonly known as the Butterfly Bush.

The color of these flowers are so vibrant and I think they just scream Summer!


Here is a closer look at the flowers


So now for the fun ........

Oh, before we begin, here is a photo of what the flower looks like in real life:


 First, using the dies shown from B188 - Embellishment #2 you will need to cut quite a few of each since these flowers are small and depending how long you want each flower will dictate how many you will need. I used on average about 20-22 for each stem. I decided to do a Purple outside with a Yellow center. A pipe cleaner is what I used as the base for the flower.


After you have all pieces cut you can start to assemble by cupping each of the pieces and I used my Glossy Accents as a glue to attach the 2 pieces together.


Starting at the top of the pipe cleaner attach the flowers 1 by 1 making sure that you have them close together. Good glue is very important and since these are small the Crafters Tools that Cheery Lynn Designs sells are perfect. 


To finish the flowers off I used the B119 - Tropical Leaves. I cut and separated the leaves so they were mostly individual and glued them as desired to the pipe cleaner.

As a final step in finishing the flower off, wrap the bottom of the pipe cleaner in Floral Tape to cover the pipe cleaner to make it look more realistic.


I hope you enjoyed this little tutorial. Stay tuned for more : )

Here's a list of the dies used for this project:

B119 - Tropical Leaves
B160 - Queen Anne's Lace Border
B188 - Embellishment #2
B266 - Tiny Things with Wings
D138 - Mini Dimensional Butterflies w Angel Wings
DL112A - Small Angel Wing
XL-10 - Coved Rectangle-Classic LG Stackers Nesting Dies

I hope you can find some time to visit the challenge this week and put in your entry where the theme is Back to Nature (add a butterfly, dragonfly, hummingbird, etc)! With your entry you will have a chance to win a $20.00 shopping spree at Cheery Lynn Designs!

Have a Cheery Day!

Wednesday, March 13, 2013

Easter Chic

3:30 AM 5 Comments

 
Good Morning fellow crafters and bloggers, Alison here today sharing a card made for this weeks challenge theme of 'Easter'.  :)  As always the lucky winner will receive $20 to spend on the Cheery Lynn Website, so well worth joining in!
 
Now, I have been wanting to use my Lace Egg die for ages, so really enjoyed making this sweet card in layers of chocolate and cream cardstock.  I stitched MME papers onto rich brown bazzil card and sanded and distressed around the edges.  I used the gorgeous Polynesian Sails die to mat and frame my image, and cut 3 easter eggs from contrasting card and paper and decorated with pearls.  I added 2 delicate butterflies from the Tiny Things with Wings set, and finished off with 'Happy Easter' from the brilliant mix and match range of sentiment dies.
 
All dies used on this card are:
 
 
I hope you find time to play along with our challenge this week, the DT love popping along to your blogs to see all the creative ways you can use Cheery Lynn Dies, and there is always daily inspiration over on our Cheery Lynn Inspiration Blog too.
 
Have a smashing week, and thanks so much for visiting today.


Monday, February 25, 2013

Half Window Card Tutorial

3:30 AM 6 Comments
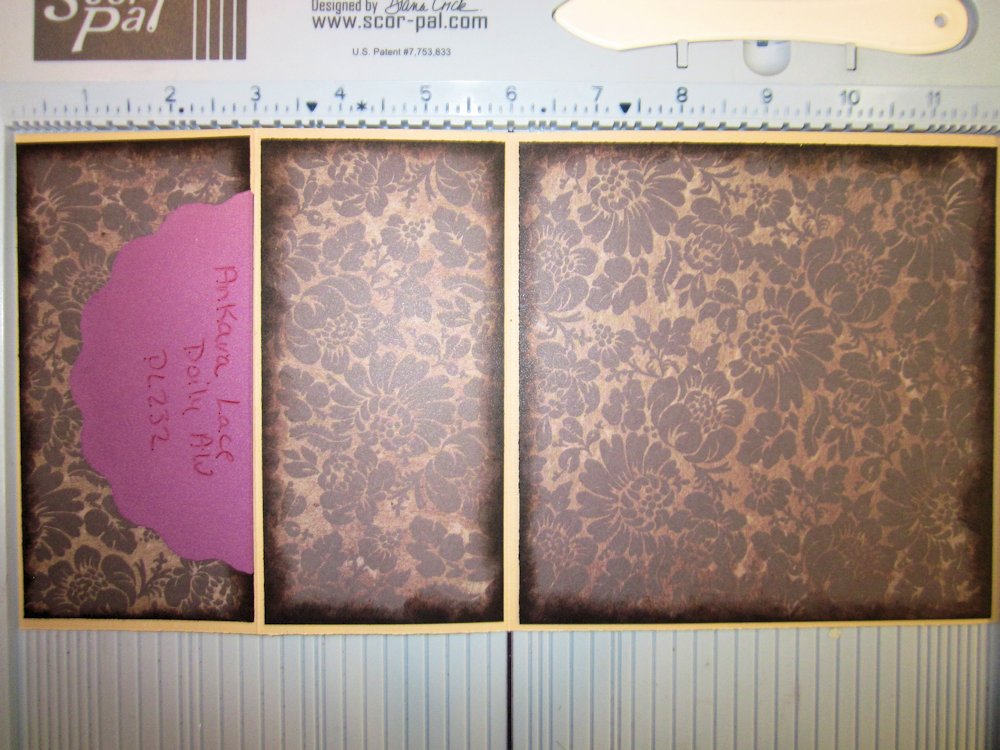
Today, I've got a tutorial to share with on on how to make a beautiful Half Window Card using a technique with your Angel Wings.


Supplies:

Cheery Lynn Designs Dies: 
Scor-Pal
Scor-Tape
Fancy Pants - Home for Christmas collection
Core'Dinations - Signature Series Graphic 45
 Clearsnap Ink


Cut a piece of cardstock 6" x 12". Score at 3" and 6".  Fold as shown.


Cut patterned paper to add to the card base.
 (2)  2 7/8" x 5 3/4"
(2) 5 3/4" x 5 3/4" : Set one of these to the side. 
Ink the edges of the paper. Use Scor-tape to adhere the panels to the base, but on the first panel, do not put the tape along the edge that will have the cut.


 Take the angel wing die (this is an outline die, that matches a fancy doily die, but has one edge that is not a cutting edge).  Tape the angel wing along the scored/folded line. **If I want to hold something temporarily in place with tape, onto pretty patterned paper, I stick the tape to my skin a couple of times, before adhering to the paper, to make it less sticky and to decrease the chance of messing up my patterned paper.

This is what your card will look like after you run it through your die cutting machine.


When I added my doily on top of this, I wanted to have a consistent cream background underneath, so I cut a full circle with the angel wing (make the first cut, line the up so that it completes the circle, tape in place and cut).  Then I matched this up with the half circle, glued in place, then added the doily on top. This will be the inside portion of the card.


Take the second piece of designer paper  5 3/4" x 5 3/4" and lay it on top of the front, to see where the doily fits.  Tape your angel wing to the patterned paper, and using the two step method, cut a full circle from this piece of paper.  Then line it up on the front and attach.


Add your second doily to the front. Embellish as you please.


I love how this card looks like it's flipping around when you open it and hope that you will give it a try.  

Monday, February 11, 2013

Valentine's Tag

3:30 AM 5 Comments
You just have a couple more days to pull together your Valentine's goodies, and what ever you choose, it always makes things extra special to add some homemade love.  I created a tag to decorate a bottle of champagne for the special occasion, but you could just as easily add this to a box of chocolates (or even better - both!)

 
 I love making tags with a little shape to them, and created this one by using the Angel Wing that came with the Chasing Rainbows Doily die.  It's such a beautiful shape, and I just lined it up on the rectangular piece of paper, and taped it in place, so it wouldn't shift when I ran it through the machine.

 I added the sentiment over the printed vintage picture (Pion Papers) - and cut away the original "S), so that it would just read Valentine. 

 The flowers were nestled around the smallest die from Two of Hearts, which is just a perfect size for such arrangements.

Frame It - is the new Cheery Lynn Designs Challenge for the week.  We would love to visit your blog, and see what you create.  One participant will be chosen to win a $20 gift certificate each week. 

Cheery Lynn Designs Dies
Pion Patterned Papers
May Arts Ribbon: Pink Crinkle EA17; Eyelet 447-58-01
Viva Glitter Liner
Xyron Mega Runner

Wednesday, November 28, 2012

Sparkly Pink Christmas

3:30 AM 8 Comments


Hi and Good Morning everyone, Alison here today, sharing a card inspired by this weeks challenge theme of 'Non Traditional Christmas Colours'.  As always there is a fab prize on offer and you still have plenty of time to enter HERE:

Now I love to see light and fresh looking christmas cards, they can really stand out amongst the darker, more traditional colours and its quite nice to have a break from all the reds and greens too.

I started off with a 6 x 6 scalloped card base and layered K&Co papers from my scraps box onto American Crafts white textured cardstock.

This stunning Lace Christmas Tree die cuts beautifully and is so ornate and swirly it has a real wow factor!  I layered it on top of the matching Angel Wing for dimension and then added lots of sparkle and bling.  The gorgeous snowflakes were layered snowflowers from set 1 and 2 held together with moonstone brads, and the smaller snowflakes were made using embellishments from the BAF embellishment sets.

The beautiful border is the Anastasia die with 2 staggered layers and topped off with pink dotty satin and organza ribbon.  This was a pretty quick card to make, and would work well with any colour combo and scraps of papers :)

All dies used on this card are:

Lace Christmas Tree + A/W
Anastasia Border
Snowflowers #1
Snowflowers #2
Snowflakes plate (the 3 mini snowflakes, top left)
BAF - Embellishment set  #1
BAF - Embellishment set #2
Square Classic Silver Stackers
Scalloped Square Stackers

I cant wait to see how you interpret this  weeks challenge and dont forget this is always fresh and inspirational projects uploaded daily by the rest of our talented DT over on the Cheery Lynn Designs Inspiration blog.

Have a smashing week and thanks so much for visiting today.

Saturday, November 24, 2012

Fun with Angel Wings

3:30 AM 6 Comments

Hello! Today I have a fun Thanksgiving card for you!
I created the fun scallop edge of my card using the English Tea Party Doily Angel Wing!
I cut the strip for my card base, then taped the angel wing to the end of the strip so that it wouldn’t move as I cut it.
Whaaala!! A fun decorative edge on your card!
The frame was cut using the middle size Classic Coved Rectangle Silver Stacker. I then cut out a portion of the coved rectangle block using Classic Square Silver Stacker making a fun frame for my sentiment! I finished off the frame with Lace Corner Deco B. I cut two layers of Fall Pumpkins, trimming off the outer edge of one layer and adhered it to the center of the pumpkin with foam adhesive for dimension to my pumpkin. I layered the pumpkins atop the larger of Two of Hearts tucking in leaves and foliage from Mini Fanciful Flourish, Wreath Strip, Small Leaves #2.
There is still time to enter this weeks challenge for your chance to win the $20 gift certificate! Details Here
Thanks for stopping by!

Copyright Statement


All content, including designs, pictures and words are the exclusive property of the author of each blog post. Information shared here is for inspiration only and may not be copied for publication, competition or profit. Thank you for your cooperation.

SOCIAL MEDIA 2


Follow Us @jointhemakersmovement


All content, including designs, pictures and words are the exclusive property of the author of each blog post.
Information shared here is for inspiration only and may not be copied for publication, competition or profit. Thank you for your cooperation.