Wednesday, February 29, 2012

Little Girl Banner

3:49 AM 10 Comments
Hello and welcome back.

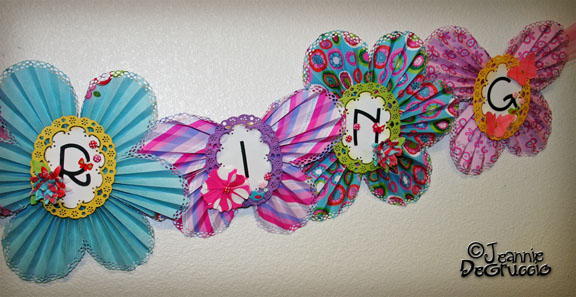
This Wednesday I am showing you my banner.  It was completed just before the weekend.  I was very excited to be doing a banner, as I thought no one else had made one.  Then  to my surprise, Jeannie's creation came up.  All I can say is,  "Jeannie, great minds think alike" and I hope you like mine just as much as all the fantastic comments you gave Jeannie.
So here goes!


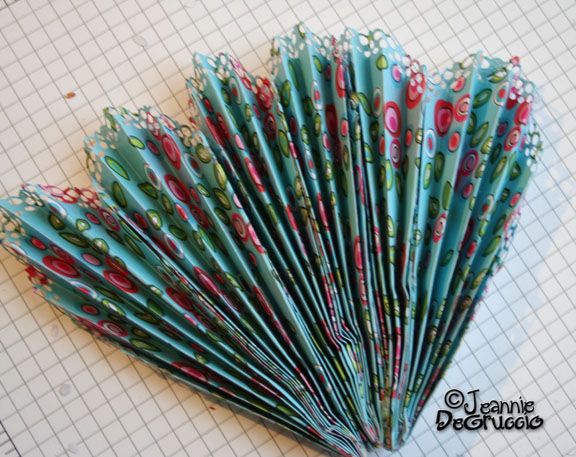
I started off with wooden off the page flowers from Kaiser and went about covering them with Sweet Nothings 6 1/2 paper pad also by Kaiser.  Starting with the Dainty Dutch Deco Frame, I cut the middle out and used that for the middle of each flower.  On top of the flower are bling alphabets with small wings just underneath.  The edges of the flowers are covered in pearls.  The flowers are made up of the Miniature Rose, the Cuties 2, the Darling Daisies and the Stacker Flower #1 Leaf.  Finishing off with ribbon and binding them all together used pink links.


Dies used:


Thanks for stoping by and if you would like to join in the fun at Cheery Lynn Designs, click here to find the latest challenge.

Happy Scrapping Celeste.

Tuesday, February 28, 2012

Decorative Purse Container

3:30 AM 10 Comments
Hi Everyone,  this weeks Cheery Lynn Designs project is a creation I can use on my work desk for all my pens, rulers, and odds and ends.  The purse is a wood kit  made by Kaisercraft, and stands at 6 inches tall.  I adhered gorgeous My Minds Eye papers to the inside and outside.   As this project is going to be used I did not decorate any of the sides or back - just highlighted the front.   

I have many favourite Cheery Lynn Design dies.... but the Lace Rose and Flourish has the most adorable swirls, leaves and curls.  This die can be cut into smaller pieces to decorate, or used in one long flourish.  As you can see with my project I cut my pieces to 'fit' my project.

The flowers were created from tissue paper, and the Scalloped Window Stackers. You can create a variety of flower sizes using the Scalloped Window Stacker dies and various paper mediums.  All I did to create the two on my project was cut multiple layers of tissue paper, from the varying sizes of each die.  Each layer was crunched up in my hands to 'crinkle' and a brad put through the middle to hold each layer together.  I separated some of the layers to give a little more dimension.  On the smaller flower, I wet a few petal edges with water lightly and curled the edges in slightly.

The leaves I used for this project are the Judy's Blooms die set, which comes with the flower and leaves. Also, Pine Branches were added to give a little more character to the flower.  AND, I just had to place a Small Exotic Butterfly onto the project .... I so love them!

To complete the project, a small amount of stickles was applied to highlight the die cuts.

Dies Used:

This weeks challenge at the Cheery Lynn Designs Blog is "Lots of Layers" - call on over to see what Bonnie and Sandy have created as examples for the challenge, they are both cute!  You can find all the challenge information "HERE".

Till next week

Monday, February 27, 2012

Cheery Lynn Designs Challenge 17 - Lots of Layers

3:30 AM 11 Comments
This week our challenge at Cheery Lynn Designs is  

Lots of Layers

Here are the rules:
  • You MUST follow the theme and use at least one Cheery Lynn Designs die, of course, we would love to see more than one. 
  • You MUST add a link to your blog post in the InLinkz at the end of this post; no back posting, only new projects are allowed
  • You MUST link to our blog in your post
The winner will be chosen based on merit by Cheery Lynn Designs.  They will receive a $20 coupon for shopping at the Cheery Lynn website.  The challenge will end on Sunday night at 22:00 Eastern time.

Remember we are doing a DT call, you can read all the details here.  If you interested in trying out for our team, just add DT after your name in the InLinkz box.

Bonnie Brown

Sandy Hulsart

Remember, you MUST use a Cheery Lynn Designs die to enter this challenge.

Cheery Lynn Designs Challenge 17 - Lots of Layers

3:30 AM 12 Comments
This week our challenge at Cheery Lynn Designs is  

Lots of Layers

Here are the rules:
  • You MUST follow the theme and use at least one Cheery Lynn Designs die, of course, we would love to see more than one. 
  • You MUST add a link to your blog post in the InLinkz at the end of this post; no back posting, only new projects are allowed
  • You MUST link to our blog in your post
The winner will be chosen based on merit by Cheery Lynn Designs.  They will receive a $20 coupon for shopping at the Cheery Lynn website.  The challenge will end on Sunday night at 22:00 Eastern time.

Remember we are doing a DT call, you can read all the details here.  If you interested in trying out for our team, just add DT after your name in the InLinkz box.

Bonnie Brown

Sandy Hulsart

Remember, you MUST use a Cheery Lynn Designs die to enter this challenge.

Sunday, February 26, 2012

Guest Designer - Karen Wallace

3:30 AM 13 Comments
Today we have a repeat guest designer, Karen Wallace from Karen's Kreations.....


I’m so honored to be the guest designer for Cheery Lynn this week.  I absolutely love these dies!!  I’m retired and have been stamping about 12 years and love anything vintage and elegant and anything using die cuts.   I hope you enjoy this creation and will try the Cheery Lynn dies, they are made in the USA and the quality is fabulous!!


Following our challenge theme of Frame It, Karen has made this wonderful card for us today......
  Dies used:
 Fanciful Flourish , flourish from the Celtic Oval Frame

Thank you Karen for filling in for us.  Today is the last day to enter the Frame It challenge for a chance at a $20 shopping spree at Cheery Lynn Designs.

Saturday, February 25, 2012

Winter Sunshine

3:30 AM 12 Comments
Hello! Jodi here today! How’s the weather in your area? Being from Minnesota, I can say we have had an exceptionally warm, snow-free winter! However, the days have been a bit cloudy and dreary lately so I thought I would bring you some Winter Sunshine!


The base of the card was created by layering the largest Stacker Nesting Die-Square Scallop and Silver Stacker Square Classic. Next, the Dutch Scallop Square Frame cut from a sunshiney yellow!


The details on this lacy frame are just pronominal! Again, layers from the Stacker Nesting Die- Square Scallop and Silver Stacker Square Classic using a middle size die are stacked atop. Don’t you just love the dainty doily in the center? It is the center cut of the Dutch Scallop Square Frame….two gorgeous doily cuts in one die! Framing my sentiment is the smallest die from each set of Stacker Nesting Die Circle Scallop and Silver Stacker Circle classic.


Dressing up the corner of the frame is a flower created from the new Cuties 1 with foliage from Stacker Flower #1 and Pine Branches.

There is still time to enter this weeks challenge for your chance to win a $20 gift card to the Cheery Lynn Designs Store! Details Here

Friday, February 24, 2012

Unique Springtime Banner

3:30 AM 14 Comments
Today I am using the LACE OVAL REFLECTIONS die to make a unique banner.
To start out I cut a lot of ovals from the largest die in the LACE OVAL set.
I use the Sizzix Big Shot and I can still use the largest die, by folding my paper in half and cutting the shape.  I will have a fold line down the center, but for this project, that doesn't matter.
Here you can my folded ovals, cut, still in half, and then I scored the ovals at 1/2" increments.


Here are the same papers, opened up at their full size.
Can you believe how big those are and that I cut something that big from a Big Shot?


Once again, here the oval has just been cut, the paper in folded down the middle...


...voilà, here the same paper from above has been opened to it's full size, it's like magic!!


I am making 2 different shapes for my banner.  To make the flower shaped base, I need 3 of the largest ovals.
Here they are cut, and scored at 1/2" increments.


Here the same ovals are, folded accordion style on the scored lines.


Fold the accordion folded ovals in half.


Hot glue the centers of each oval.


Then hot glue the 3 ovals together, they will look something like this.


Fan the outer edges open to meet each other on the other side and hot glue the remaining edges to form the flower shape.


The other banner shape I created is a butterfly shape.  For the butterfly you will need 2 ovals, folded, scored and glued in the same manner as the flower shapes.


Because we I only have 2 ovals, when I flair the ovals around to glue, the ovals create this butterfly shape instead of the flower shape.


To string all the shapes, I cut a paper towel tube up and glued them to the back of each shape.
After embellishing the fronts, I strung 2 layers of tulle through all the shapes to create the SPRING banner.


To embellish the fronts, I used the SWEDISH SPRING OVAL in the centers of each shape.


I had some large letters that I used to spell the word SPRING and then added lots of Cheery Lynn Designs flowers from The Floral Shop.


All the bright and Cheery paper is from Momenta.


Here you can see the letters more close up.


I just love all the colors and patterns!


Here is one last look!


I hope you have enjoyed this post today.
Hopefully you can see just how versatile the REFLECTIONS dies are.
You can just do anything with these dies, at least it seems like that to me!
Have you checked out or current challenge?
The theme is FRAME IT.
You can read all about it HERE.
This has been Jeannie from The Polka Cabana with today's post.

Thursday, February 23, 2012

Booklet card - Kianel

3:30 AM 14 Comments
Hello dear Cheery Lynn designs lovers,
Kianel here with you today to show a booklet card i made using Cheery Lynn designs dies. I also used the Diamond Card Craft scoreboard to create the structure.

The base of the card is square but i used the french flair stackers to make a cool opening. The french flair doily stacker adds an amazing elegant touch to it and then the printed paper is cut using the large silver french flair stacker.

 I used a tag that i embossed with the dotted swiss embossing plate. I then cut out the two of hearts die and used the large one that i slightly inked. I then decorated with a pearl bucket and an exotic small butterfly die.

 I used the Heart key die that i inked, stamped with a text and finally embossed in clear and tied up together with the ribbon.

And the card when it's opened:
 On the inside, i also used the french flair doily stacker and then the large silver french flair stacker to coordinate the paper.
 
  The little heart is coming from the two of hearts die and used together with an embossed exotic butterfly small. Under it, i added a tropical flourish die.

 I used the Judy's blooms die that i colored with ink and shimmery paints. In the center of the bloom i tied up a button die from the Buttons 3 dimensionnal dies set.
  
There you can see the details of the Circle lace Mega doily die from the Reflections Boutique. See that i sewed the details of the die, pretty cool isn't it?

The papers are from TOGA, the shimmer paints and embossing powders are from Creative Inspirations paints, the dies are from Cheery Lynn designs, the stamp is a Whimsy Stamps. 

Well, i hope you'll like it. Don't forget our weekly challenge and the DT call we are having.
See you next week, love from France, Kianel.

Wednesday, February 22, 2012

Number One Fan!

3:30 AM 12 Comments
Hello and welcome back.  Celeste here with you for another Wednesday.

Today I want to show you a card I made using the Eazi-Score, that Phyllis from Diamond Card Craft sent to the Design Team members a little while back.
I used the score board and instruction booklet to make this Bouncy Card.


I started off using purple card stock to make the card.  Next I used some patterned paper to put on the bottom of the card and in the square.  I cut out the Folding Fan from the same card stock as the main card and then used a shimmering purple to go over the fan itself.  One flower using the Large Rose and Cuties 2 dies was used at the bottom.  Lace Corner Deco A were used for the corners on the square of the card, while two of the other Lace Corner Deco A were used for the stand of the card.


To add some "greenery", the Olive Branches were popped in behind the flower.  On the stand of the card I used the Small Dragonfly with Angel Wing in one corner and the Darling Daisies in the other.  


Don't forget the challenge this week.  Head on over to the Cheery Lynn Designs blog for all the information and good luck!

Dies used:

Thanks for stopping by Celeste


Tuesday, February 21, 2012

All Grown Up

3:30 AM 14 Comments

Hi Everyone,  this week for Cheery Lynn Designs I have created a mini canvas (6" X 6").  The photograph is a recent photograph of my two grown up daughters, Amanda and Tayla at Aldinga Beach, in South Australia.


The base of the canvas is corrugated cardboard, which I gessoed, and distress inked (Black Soot) to achieve a corrugated iron appearance.  Maybe I should have added some silver, but I'm happy with the results.  The photograph base was cut from the French Flair Classic Stacker Series. Beneath the photograph is the Spiderweb which I brushed lightly with stickles to give a shimmery appearance. 

The flower and flower buds were created using the Judy's Blooms die.  I cut two die-cuts of each die, misted lightly the petals with water, and curled the leaves using a kitchen skewer.  After assembling the flower, the curled edges were inked using Victorian Velvet distress ink, and a pearl added to the centre.  The flower buds were created using single cut petals from the Judy's Blooms larger flower die cut - the green bud casing was created using the leaves from the Pair of Ferns.  The foliage consists of the Fanciful Flourish, and Olive Branches.


Several brass charms were used from my stash.  I adore the detail in the bee and spider!  Stickles was applied to the outer edges of the flower petals, buds, and butterfly - just enough to highlight the applied distress ink.  Stickles tends to really draw out the colour of distress inks.

..and one of my very favourite dies - it is one that introduced me into Cheery Lynn Designs, the Exotic Butterfly Small.

 Before I sign out, this weeks challenge theme on the Cheery Lynn Designs blog is 'Frame It' - all the details can be found "HERE". You have a chance of winning a $20 shopping voucher to spend in-store.

Have a wonderful week...
Sandie

Dies Used:


Copyright Statement


All content, including designs, pictures and words are the exclusive property of the author of each blog post. Information shared here is for inspiration only and may not be copied for publication, competition or profit. Thank you for your cooperation.

SOCIAL MEDIA 2


Follow Us @jointhemakersmovement


All content, including designs, pictures and words are the exclusive property of the author of each blog post.
Information shared here is for inspiration only and may not be copied for publication, competition or profit. Thank you for your cooperation.