Thursday, March 31, 2016

Cheery Lynn Designs Challenge #226 - Back to Nature Theme

3:31 AM 1 Comments
As always, the entries we had for our Anything Goes challenge were fabulous.  Thank you to all who entered, we enjoy seeing your creations with our dies.  

Our new bi-weekly challenge theme is
Back to Nature
Add a butterfly, dragonfly, hummingbird or something from nature

Here are the rules:
  • You MUST follow the theme and use at least one Cheery Lynn Designs die, of course, we would love to see more than one. 
  • You MUST add a link to your blog post in the InLinkz at the end of this post; no back posting, only new projects are allowed
  • You MUST link to this challenge in your blog post or on your gallery post
  • You may only enter the challenge ONCE per week for a total of 2 entries per bi-weekly challenge.
  • Be sure to let us know which Cheery Lynn Die or Dies you used on your project.
The winner will be chosen randomly. They will receive $20 towards shopping at the Cheery Lynn website. The challenge will end on Wednesday afternoon April 13th at 15:00 Eastern time.  We will also showcase the Top 3 picks from our Design Team.

And now to our inspiration for today (for details on each project, click on the designer's name and it will take you to their blog).
Cheery Lynn Designs Dies used:

Bonnie Garby
Cheery Lynn Designs Dies used:

Remember, you MUST use at least one Cheery Lynn Designs die to enter this challenge.

Cheery Lynn Designs Anything Goes Themed Challenge Winner and Top 3 Picks

3:30 AM 4 Comments
What wonderful entries we had last week for our Anything Goes themed challenge.

 Our randomly selected winner is:
Random Integer Generator
Here is your random number:
32

Crafts and Beyond
Congratulations Crafts and Beyond. Please contact Judy by clicking here for your $20 shopping spree to Cheery Lynn Designs.  Be sure to grab the winner's badge from the right sidebar for display on your blog.  

Our Top 3 Picks for Challenge #225 in no particular order are:

Kathy Krug

Laura C

HydeParkHill.com Eileen
Great job!  Be sure to grab our Top 3 badge from the right sidebar for display on your blog.

Thank you to everyone who joined in on the challenge.  We hope to see you again in this week's Back to Nature challenge.

Wednesday, March 30, 2016

Dream with Lisa Blastick

3:30 AM 2 Comments
Hi everyone! I hope you all had a wonderful weekend! Today, I wanted to make a beach card for Cheery Lynn Designs. I recently was in Mexico on the beach and I truly love the sound of the waves. So, I'm dreaming that I want be back on the beach today. I used "wave edger", "sand dollar and starfish", and "seahorse" with some "clouds" dies. I stamped some seagulls to give a more beach feeling with the sentiment Dream. It is my serenity.
The beautiful "alpine flourish doily" is so whimsical. It seemed perfect for my Dream! 
There are pop dots under several dies to finished this 4 x 5 inch card. 

Cheery Lynn Dies Used:

Be sure to check out this week's challenge and your chance to win $20 at the Cheery Lynn Designs store. Have a great day!
Hugs Lisa

Tuesday, March 29, 2016

Cheery Lynn Designs March Blog Hop Winner!

10:00 AM 3 Comments
This is the second post of the day. Be sure to scroll down to see the beautiful project that Bonnie has shared with us today.

Thank you so much for hopping along with us this month on the Cheery Lynn Designs Blog Hop. We had so much fun and we hope you did too!! We'll be hopping on the 15th of each month, so be sure to mark your calendars and join us again next month.

Don't you just LOVE the new Frame It Embossing Folder and  Oval IOE Plate Set??!!


I hope you loved all the samples the design team shared.  Thanks so much for the wonderful feedback for future product. I encourage you to hurry over to Cheery Lynn Designs NOW and order your own set so you can get creating!

Now, on to our winner who will receive a $20 gift certificate to Cheery Lynn Designs.

 Our randomly selected winner is:
Random Integer Generator
Here is your random number:
43
Diane17Lynne

Congratulations Diane17Lynne. Please contact Judy by clicking here for your $20 shopping spree to Cheery Lynn Designs.  

Now if you didn't win, don't worry!! We will be 'hopping' each month so you'll have another chance to win soon! We hope you stop by and visit our blog often.

Follow Your Dreams with Bonnie Garby

3:30 AM 1 Comments
Hi there friends.  It's Bonnie here today from Make Time to Craft filling in for Amy.
I was really in a Spring mood when I was working on Saturday, even though the temperature didn't really support that.  I went with a lavender, pink and white color combination.  Beautiful roses and butterflies are a great addition to any card and I just love this new Dutch Daisy Oval Doily die for Spring themed projects.  

I stamped my beautiful sentiment from Quietfire Design on white card stock and cut that out with one of the XM7 Oval dies.  I wanted to mat that with a purple layer just a little larger and I didn't have a die for that, so I used my Magic Matter tool from Puzzle Mates and traced around it with the 1/8" wheel and fussy cut it out.  Where there's a will, there's a way!
Then I added some Stick It adhesive to the back of a white piece of card stock and cut my Dutch Daisy Oval Doily.  I adhered that to a lavender oval cut with the Oval Classic Stacker and then I added a layer of white mulberry paper.  I wet the edges of the mulberry paper to tear it and leave the fuzzy, feathery edge.  Then I added that to another purple oval.

The dots on the white background were created with the Large Parallel Rectangle Pierce Plate and I just love the texture it gives.  I used one of the pieces from the Dutch Daisy Accents set to fill in some of the white space in the corners of the card.

My roses were made using the Medium Tea Rose die.  I cut the layers, inked them and shaped them with a stylus and then adhered them to create the pretty roses.  
The final touches were the pretty sparkly butterflies and the gorgeous bi-color double loop bow made on my Bow-it-All Tool using Grape and Sherbet Delicate Stitched Satin from Really Reasonable Ribbon.
Cheery Lynn Dies used:

Thanks so much for stopping by today.  Don't forget, there is still time to enter our current 'Anything Goes' themed challenge for a chance to win a $20 gift certificate to Cheery Lynn Designs.

Monday, March 28, 2016

Cherish Card by Eva Dobilas

3:30 AM 2 Comments

Hi there, this is Eva. Hope you had a beautiful Easter celebration.  Today I have a spring card to share with you with a pretty butterfly.

To start out this card I cut an A2 size card base out of white card stock.  Next I die cut the front of it using Card Cover Maker #1 and colored it in with green/blue/brown inks.  I added a yellow piece of card stock underneath to show the design of the die cut.  Next I die cut an Ankara Lace Doily with Angel Wing out of light blue card stock and added some green and brown ink.  I also die cut the wing that comes with the same die out of cream card stock and glued it to the lace die and using pop dots I adhered it to the card front.

Next I die cut the angel wing from the Whimsical Butterfly with Angel Wing die set and sprayed it with shimmer ink and then die cut the actual butterfly from the same set and glued it together and adhered it to the doily.  Finally I die cut the sentiment Cherish out of pink card stock and added it below my butterfly.


Hope you like this card and here is the list of the Cheery Lynn Designs dies I use on this card:


Thanks for stopping by and hope to see your creations in our newest challenge.
Hugs,
Eva

Sunday, March 27, 2016

Easter Basket by Jenny Alia

3:30 AM 2 Comments
For our March Blog Hop featuring IOE Plates and Embossing Folders please click HERE.


Hi Cheery Lynn fans, it's Jenny here today wishing you a Happy Easter!  This card was centered around this fun Easter Basket.  I cut out the Easter Basket twice and colored the first one.  Using as scissor I cut the eggs and bow off the second basket, colored them individually using distress ink and the glued them on top of the first basket.  To further embellish the eggs I added glitter glue.  The basket is popped up with foam adhesive.  I like how the glitter glue made some of the ink run and the eggs look as though they'd really been colored with dye.


This is a step card using the Step Card Bundle Set #3.  You can see a video HERE explaining how the step card die works. I glued rectangular strips of green card stock to each of the steps before adhering grass to each.  The shorter Grass Border 2 was glued to the first two "steps" and the Grass Border on the two background steps.


I cut a top fold A2 size card with the step die and then used the main die in the Step Card set to cut a piece of dotted patterned paper.  It was easy to then fold the paper and cut away the bottom portion of the dotted paper with an Exacto knife.  The background panel was made with a piece of patterned card stock with a Lattice #2 overlay.

Cheery Lynn Dies

Thanks for visiting the blog today.  There's still time to enter the current Anything Goes challenge, join in for a chance to win a $20 gift card to Cheery Lynn Designs!

Saturday, March 26, 2016

Happy Easter by Julie Lavalette

3:30 AM 4 Comments
For our March Blog Hop Featuring IOE Plates and FRAME-IT Embossing Folders, please click HERE.  


Happy Easter Weekend to all our lovely followers. It's JULIE here today hosting the blog. Thanks so much to everyone for stopping by my own Blog for our current Blog Hop, I was overwhelmed with all your lovely comments. This week I have made a Spring card filled with Easter inspiration.


I started by layering 2 layers of paper onto my base card adding Stickles at the edge for a touch of sparkle. I layered on part of my doily as an accent, this helped my Basket pop from the design against the busy floral paper.


My Happy Easter was layered twice for a shadow effect, adding my branches and flowers which had been shaded with Copics.


My sweet Easter Chicks were shaded with Distress Inks. I coloured their feet and beaks with Copics and finished them by adding a little black liquid pearls onto their eye. Mounting them onto the Grass Border Strip.


My Basket I die cut in purple cardstock and then used our Special Effects technique demonstrated HERE to get the background. Layering in my Eggs with a touch of Silicone Glue and adding a little Satin Bow.

Thanks for stopping by today and good luck to everyone entering our Current Challenge - Anything Goes and please check out our current Blog Hop HERE.

Crafty Hugs, 
Julie x

Cheery Lynn Dies Used:

Friday, March 25, 2016

Miss Easter Bunny and her Chicks

3:30 AM 3 Comments
For our March Blog Hop Featuring IOE Plates and FRAME-IT Embossing Folders, please click HERE.  

A warm hello to you. It's Debbie here from Debbie's Time Out wishing you a Happy Easter. It is cool and rainy here today but at least we have no snow left in our yard so it should be a good weekend for an Easter egg hunt. With Easter weekend here I wanted to share a cute Easter card with you.
 My base is black cardstock, Rectangle Scalloped LG Silver Stackers pierced using the Pierce Plate Large Parallel Rectangle and then the  Dutch Daisy Boutique Stacker A2 Frame .
I offset the Happy Easter sentiment after cutting it in two different colors to give a shadow effect and added some stitching to it with a black marker. I thought the cute bunny would look good standing on the letters and holding a bouquet of tulips created from the negatives of the Dutch Daisy Boutique Stacker A2 Frame . Two of the cute chicks from the Chicks (set of 3) stayed in the grass cut from the Grass Border while the other chick hopped up on the letters with the bunny. These chicks really are priceless.
Here I have used the Mini Fanciful Flourish Right and added some flowers to it from the Tiny Flower Kit . On this close up, you can really see what a nice textured background the Pierce Plate Large Parallel Rectangle makes.

I want to thank you for visiting the blog today and for the comments you leave. I enjoy reading them and hearing from you.

I invite you to come join our bi-weekly challenge @ http://cheerylynndesigns.blogspot.ca/search/label/challenge for your chance to win a $20.00 store certificate. I would love to see your creations.

Have a crafty week and a great Easter weekend with your family and friends.
                                                                                               Debbie

Dies Used

Thursday, March 24, 2016

Cheery Lynn March Blog Hop Featuring the New IOE Plates and FRAME-IT Embossing Folder

3:30 AM 54 Comments

Hello everyone and welcome to our March Blog Hop at Cheery Lynn Designs!


Today you will see some great projects featuring the NEW IOE (Inside Out Embossing) folders and plates now available at Cheery Lynn Designs. There is currently one Frame It Embossing Folder and one Oval Embossing Plate Set available, but more will be added soon.  Our fabulous design team created some wonderful projects to show you what can be done with this great new product.  They always come up with such great ideas and we wanted to share them with you today.

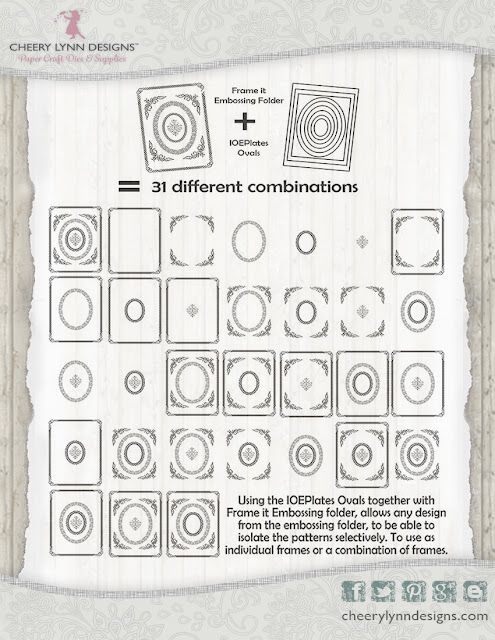
The Frame IT Embossing Folder has several design elements on it that can all be used at once, or specific design elements can be isolated so that those are the only ones that would emboss. This is accomplished by using the appropriate size oval plate or plates when running it through with the paper on your die cut and emboss machines.


The embossing plates can also be used with any embossing folder to isolate and emboss certain areas as you will see on the video below.

IOE (Inside Out Embossing) Plate and Embossing Folders with Tasha Armour

To view this video on YouTube, please click HERE.


Now let's get hopping and see what our fabulous design team has created for us!

Here is our blog hop list.  If you get lost along the way, hop on back here and we'll get you back on track.

Cheery Lynn Designs Blog

Be sure to leave some love on all the stops along the way.  
Your comments are most appreciated!


Post Your Comments for a Chance to Win!

When you arrive back here at the end of the hop, please be sure to answer our questions below in a comment on this POST FOR A CHANCE TO WIN a $20 GIFT CERTIFICATE to Cheery Lynn Designs.

Questions


1. What other types of embossing plates and folders would you like to see? The current plate set offered is an oval set which we featured today.

2. Would you like to see circles, squares, diamonds. something else?

3. What size cards do you typically create?

Our winner will be selected on Tuesday, 3/29.  Be sure to stop back on Tuesday evening to see if you are our lucky winner.

Thanks so much for Hopping with us today.  Now head on over to Cheery Lynn Designs and start your shopping!!  Enjoy!

Wednesday, March 23, 2016

Shabby Chic Easter with Lisa Blastick

3:30 AM 3 Comments

Hello everyone! Can you believe it is almost Easter? Time is flying by this year.... Today, I wanted to make an Easter card for Cheery Lynn Designs. It is a shabby chic card and I added some ribbons and lace to it. The fun part of this card was making these hugs eggs by using 2 dies. I used the "deutschland doily in the center and layered the " Oval stitch " on the top and cut. Behind the doily I added blue cardstock. 


The little eggs are a stamp and I used the largest egg from "bird nest" to cut them out, then I distressed the edges. The sentiment was stamped in matching ink and I fussy cut the flag. Easy, fun card to make for the holiday.


Cheery Lynn Designs Dies Used:


Thanks for stopping by today have a Happy Easter! 
Be sure to check out this week's challenge for your chance to win $20 from the 
Hugs Lisa 

Tuesday, March 22, 2016

Happy Anniversary by Jenny Alia

3:30 AM 7 Comments

Hi, it's Jenny posting today with a card inspired by the embossed leaf paper from Trim Craft's New Leaf paper pad.  It's a simple card that could easily be made into a shaker.  I cut a green piece of paper to a 5.25" square and glued it to a 5.5" square card.  I then cut the leaf paper to 5", cut a hole in the center with a circle from the Classic Circle Silver Stackers set and adhered it with foam adhesive to the green paper.


I used the birch tree from the Birch Tree with Cute Critters die and tucked the base of the tree into the bottom of the circle.  The rest of the tree I glued down.  I was going to leave the tree completely in the circle but I liked seeing more of the branches.


I cut two little owls from the Birch Tree with Cute Critters die then colored them with distress ink, added googlie eyes, and adhered them with foam tape.  The On Your and Anniversary sentiments were cut and colored with distress ink and then covered in glitter glue.

Cheery Lynn Dies

Thanks for stopping by the blog today and make sure to check out the current Anything Goes challenge for a chance to win a $20 gift certificate to Cheery Lynn Designs.  

Monday, March 21, 2016

Spring Hello from Eva Dobilas

3:30 AM 3 Comments

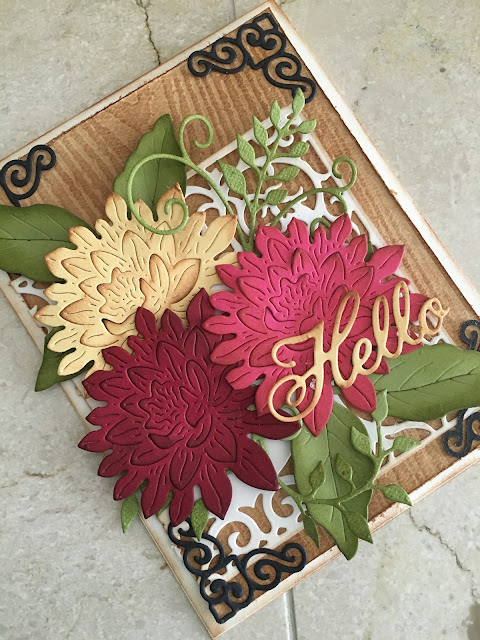
Hi there, this is Eva here with a floral card just in time for Spring.  I love the pretty Lotus Flower and I thought I would use them again.

To create this card I started by creating an A2 size card out of cream card stock.  Then I cut a piece of   light brown card stock and embossed it using Wood Grain/Leaves embossing plate and distressed it with brown ink to show the design even more.

Next I die cut a Card Cover Maker #1 out of cream card stock and cut it off partially to fit my card front.  Next I die cut 3 different color Lotus Flowers out of three different color card stock and layered them on the card.  Then I die cut two leaves using the Judy's Blooms and Flourish#3 using green card stock and tucked them under the flowers.  Finally I die cut 4 corners using Lords and Commons Accents and black card stock and placed them in the corners.  I cut Hello out of yellow card stock and placed it on the flower.


Hope you like this springy card and here are the Cheery Lynn Designs dies I used to create this card:


Thanks for visiting and hope to see your cards in our newest challenge.

Hugs,
Eva

Sunday, March 20, 2016

True Love Never Grows Old 8x8 Layout by Amy Voorthuis

12:30 AM 3 Comments
Good morning lovelies.
Oh boy I am back on the roll making 8x8 layouts again...it's not that hard if you are fortunate enough to work with the prettiest dies, papers and embellishments there are in this market. For this layout I used the pretty "Enchanted Forest"collection by Graphic 45. 
It has such beautiful colors and prints on it that you are totally swooned with it the moment you get them in you hands. I really went overboard using so many dies lol, but it was worth it.  At least that's what I think. 

True Love Never Grows Old
For this layout I used a lot of layers and I have to say I almost used half of my 8x8 paper pad! I just couldn't stop adding more and more {well I know that's a habit of mine}. The background paper is called brilliant gem and that is my favorite sheet for sure....I sprayed some white spray on it and then added paste using my favorite stencil. Let's have a closer look: 

 If you know me a little you must know I love metal pieces on my work especially on my layouts...so here I used a bunch of them like the buckle which is amazing to use.  It adds so much to you work. 
I distressed all my edges of the paper and moistened & wrinkled my flowers like on my last layout. 

 Cheery Lynn Designs dies used: 

This is one of the layouts I will use to enter the Graphic 45 Design Team Call this year,
wish me luck!
Thank you so much for visiting the blog today and for the lovely comments you always leave on every design team member posts - we really appreciate them. 
If you love the Cheery Lynn Designs dies I used, you could always enter our bi-weekly challenge to win a $20 shopping spree.
This time it's challenge #225 "Anything Goes Theme"- I can't wait to see your work, there are some amazing entries already enjoy creating!

Saturday, March 19, 2016

Wedding Memories by Julie Lavalette

3:30 AM 3 Comments

Hello fellow bloggers, I hope you are having a lovely weekend creating. It's JULIE here today and I am sharing my Wedding Memory card that would look equally as good in a Scrapbook layout using the larger die in this Film Set collection.


I started off using my Stacker dies for my layered background. Next my heart was heat embossed with an Aged Bronze and I cut it in half to layer on and extend its size so it fitted perfectly as a background accent.


My black paper accents were made using a section from Sophia's Heart Border. On top of this I added 2 torn layers of paper which I heat embossed with Aged Bronze at the edges to compliment my heart.


My Film Set die I placed over my images and die cut to obtain the perfect size to reinsert into my frames. I heat embossed my images with Clear powder to look like a glossy photo.
Thanks so much for stopping by today and I do hope you get a chance to join in our new challenge which is Anything Goes
Julie x

Friday, March 18, 2016

Live Inspired by Debbie Brownmiller

3:30 AM 5 Comments
Hi. It's Debbie from Debbie's Time Out with you today. I hope you are having a wonderful day. I have a card to share with you today using the beautiful CLD flower dies.

I always keep my scraps of paper as they can make the most beautiful card bases. I matted this beautiful designer paper with black cardstock for my base. I then layered the intricate Japanese Garden Lace Oval doily. All it needed now was flowers. 
 
I stamped a sentiment on the inside opening of  the doily.
Here I have used the Judy's Blooms , Black Eyed Susan Strip , Sweet Williams Strip , and the Shasta Daisy to make the assortment of flowers. The Embellishment #2 was used for some of the centers for the flowers.
I used the Fern Leaf  for filler behind the flowers and added one of the butterflies from the Mini Butterflies w Angel Wings .

I invite you now to come join our bi-weekly challenge @ http://cheerylynndesigns.blogspot.ca/search/label/challenge . The theme is "Anything Goes".

Thank You for stopping by today and for all the comments that get left. I enjoy reading them. Have a crafty week my friends.

Dies Used
Japanese Garden Lace Oval with Angel Wing - DL136AB
Judy's Blooms - C184
Black Eyed Susan Strip - B338
Sweet Williams Strip - B307
Shasta Daisy - B310
Embellishment #2 - B188
Fern Leaf - B666
Mini Butterflies w Angel Wings - D138

Copyright Statement


All content, including designs, pictures and words are the exclusive property of the author of each blog post. Information shared here is for inspiration only and may not be copied for publication, competition or profit. Thank you for your cooperation.

SOCIAL MEDIA 2


Follow Us @jointhemakersmovement


All content, including designs, pictures and words are the exclusive property of the author of each blog post.
Information shared here is for inspiration only and may not be copied for publication, competition or profit. Thank you for your cooperation.