Showing posts with label Snowflowers. Show all posts

Sunday, December 24, 2017

Merry Christmas by Julie Lavalette

3:30 AM 0 Comments

Hi everyone, it's JULIE here and Happy Christmas to all our Cheery Lynn fans. Today I'm sharing some last minute Christmas inspiration for a fairly quick card to make should you have forgotten someone last minute or are in need of a Gift Card.


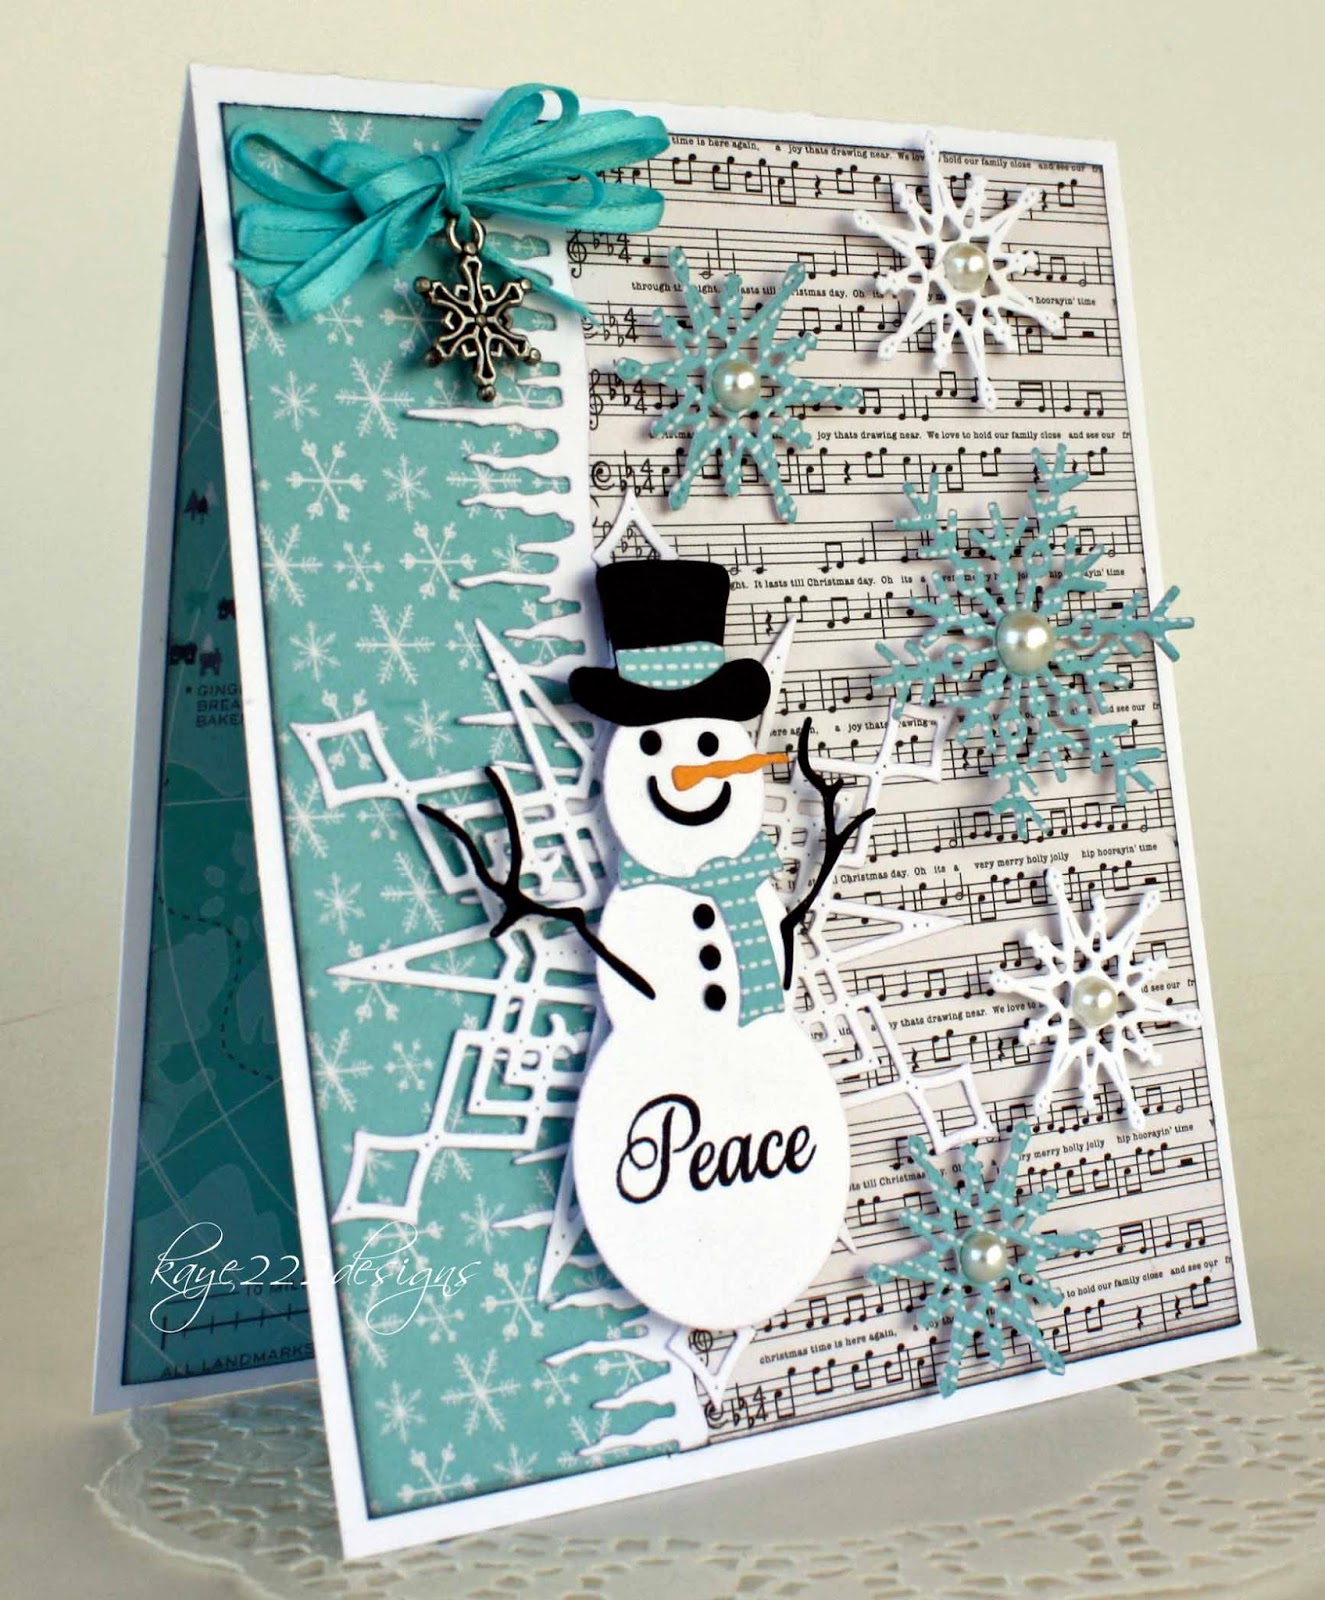
My card has all been cut out in glitter card for lots of sparkle. My Icicles have been drop shadowed with silver glitter card under the white glitter card to make them 'pop' from the white background. I also drop shadowed my sentiment.


My whimsical car I cut out in white card and then cut out my elements in glitter card trimmed the sections I wanted and glued on top of the white card, adding a couple of gems onto the wheels.

Cheery Lynn Dies Used -
LSC1 Silver Stitch Stackers

Wishing you a wonderful festive season with precious memories.

Crafty Hugs, 
Julie x

Monday, September 11, 2017

Tree Rex With Lisa Blastick

3:30 AM 2 Comments

Hi! Introducing "Tree Rex" with Cheery Lynn Designs! He is just an adorable dinosaur part of the New Fall and Winter release this month. I also used the amazing "Aspen Forest". It is a for sure MUST for your die cut collection. I love it!! 


I fussy cut out the hill of snow and I used the beautiful "Classic Christmas Tree" in the background. I thought I needed some more snowflakes so the "Snowflowers" are the perfect size to offset the colors. 


Thanks for stopping by today! 
Have a great day...
Hugs Lisa 

Sunday, October 16, 2016

Carolers Christmas Greeting Card by Ginny Nemchak

3:00 AM 0 Comments
Hey there Paper Peeps! Happy Sunday to you. It's my day to share some Christmas inspiration and I've created a sweet little greeting card with carolers, snowflakes and blingy embellishments. I've started with an A2 sized card base and layered on patterned papers.  The Oval Stitched die cut makes the perfect frame for the vintage image.
I've got several dies cut in crisp white for a wintry scene. The Neighborhood Border  creates a base with the Icicles nestled underneath.  To complete the arrangement there's Snowflowers topped off with blingy accents and glitter for a frosty finish.
The Southern Charm Valance had a fabulous edge border that was easy to fussy cut and helps to balance the arrangement on the bottom.  A simple bow with pearly center is a nice finishing touch and hides where the die cut was joined in the center.
~Cheery Lynn Designs Dies~
Ribbon trims and embellishments from Really Reasonable Ribbon.
Okay that's all for me. Wishing all  of you a happy and productive day. : ) G

Friday, October 7, 2016

Peace Be With You Christmas Greeting Card

3:00 AM 0 Comments

Hey there Peeps! Ginny here to share that I'm working away on my Christmas and holiday cards. Seems like you always need a few more than you make and have to actually ( gasp) buy one or two.  Having these fabby dies will make it easy to create lots of cards and be ready to spread the holiday cheer. This card has a crisp white base A2 size with festive patterned paper layered on top with a solid red border.  Next I cut sweet little Snowflowers from white and layered a few under the stocking.

The tiny but sweet sentiment is stamped to match the red and white color scheme. I've also included a tiny red clip and a blingy jewel. After cutting the  Jingle Bell Stocking from red cardstock I pounced a bit of embossing gel and added sparkly red then heat embossed it to make it extra fun. There is also spacers between the layers of a bit of added depth.

~Cheery Lynn Designs Dies~

Wishing all of you a happy and productive day : ) G

Wednesday, January 13, 2016

Peace with Lisa Blastick

3:30 AM 2 Comments

Hi everyone! Its Lisa back again this week sharing with you a new card for Cheery Lynn Designs! It was inspired by this week's challenge "snowflakes" and from Pinterest.  I just love the "frosty the snowman".  He is super cute and you can match up his hat and scarf to any papers. The "icicles" border is much longer than on my card 5x 6, so it is a beautiful die to use for scrapbooking too. 


I made a triple layered bow for the top with a little snowflake charm. The big "snowflake delight" I placed behind the "frosty" and then I used 2 different sets of "snowflowers and snowflakes" on the side with pop dots and pearls in the centers.  Lastly, I stamped Peace on the bottom snowball of "frosty".


DL226 Snowflowers Set 2

Thanks for stopping by today and be sure to check out this week's challenge "snowflakes" PLUS the new release coming up this Friday, Jan 15th!
Have a great day! 
Hugs Lisa

Wednesday, December 2, 2015

Joy with Lisa Blastick

3:30 AM 3 Comments

Hi everyone, It's Lisa back this week with a new card for Cheery Lynn Designs! This week I was inspired by the challenge "non traditional Christmas colors" I would never use black on a Christmas card but I'm quite happy on how it turned out. It looks vintage with the creams and black
 "Lace Christmas Tree". 


I changed between white and black reindeer with the "Santa's Sleigh and Reindeer" Of course I added white "Snowflowers Set 2" with pearls and pop dots. The "Curved Border Set" I used to represent hills of snow and on the bottom I added the "Siena Double Edge Border"


A closer view of the pop off the card look. 

Cheery Lynn Designs Dies Used: 

Thanks for stopping by today! 
Be sure to check out this week's challenge "non traditional Christmas colors"for your chance to win $20 at the Cheery Lynn Designs store.
Hugs, Lisa 

Wednesday, November 18, 2015

Christmas Tags with Lisa Blastick

3:30 AM 1 Comments
Hi everyone! It's Lisa sharing some Christmas Tags I made for Cheery Lynn Designs. I was inspired by this week's challenge "Tag Your It".  Since it is already the second part of November, I figured for sure it is time to make some cute tags for your Christmas packages. These tags are really easy to make too. For the base of the three tags, I used "Pierced Stacker #2".  I layered it twice using the second and the third largest dies. Then I just played with other dies to embellish. 
Here I used "Snowflowers Set 2" and some stamped doves. I stamped the sentiment on the second smallest "Pierced Stacker #2"
Next, I used a "Gingerbread Man" from the "Gingerbread Family", I added some wiggly eyes and placed red cardstock in the back for the buttons. For the patterned paper I used "Horizon Fishtail Banner" and stamped on another "Pierced Stacker #2" for the sentiment. I also stamped and fussy cut out the bells.
Last, but not least, I stamped the sentiment on "Horizon Fishtail Banners" Die, cut out two candy canes from "Gingerbread House" and die cut out "Christmas Lights Swag".  I stamped and fussy cut out a two layered poinsettia.

Cheery Lynn Designs Dies Used:

Thanks for stopping by today! Be sure to check out this week's challenge "Tag Your It" for your chance to win $20 at the Cheery Lynn Designs Store. 
Have a great day! 
Hugs Lisa

Friday, January 2, 2015

Winter Wonderland Card by Corina Finley

3:30 AM 5 Comments

Happy New Years! Wow it is 2015!

Corina here, hosting the blog today! As I sit here and look outside, winter is absolutely here, the snow is gently falling. So to share a part of my beautiful surroundings, I created this Winter Wonderland Card.


I created this card using three snowflake die sets. My favourite multi purpose snowflake die that I think everyone absolutely needs to be in their collection is Snowflakes - C146

Image 1

As you can see, this die comes with various shapes and sizes of snowflakes so you always have the right style for your project. Love it!


The Snowflake Doily is a beautiful larger detailed snowflake die, measuring 3 1/4 in diameter. It always captures your attention with its elegance. I added foam adhesive to create depth, added one Snowflake from the Snowflower Set #1 and a rhinestone to the center.
 
Dies used:
 
I hope you will play along in our weekly Cheery Lynn Designs Challenge 165 - Thank You. You could win a $20 shopping spree at the online Cheery Lynn Design Store

Thanks for joining me today!

Take care,

Corina Finley
Live, Laugh & Create!

Tuesday, December 16, 2014

Shaking Up some Cheer!

3:30 AM 0 Comments

Happy Tuesday everyone! leslierahye here playing along with this weeks challenge Sparkle and Shine. I have created a shaker card with the circle stackers and Horizon Circle set! 

I love how easy it is to cut a frame for your shaker I simply lined up a smaller circle inside my Horizon die, secured them with some washi tape, and cut them together in my machine.
I cut all of my snowflake pieces in white which was a little stark compared to the rest of my paper. I used pearl mists to add gold and pearl shimmer to my snowflakes and dull the stark white card stock.

For the shaker I cut a circle for the background and a circle out of clear acetate. I adhered the acetate to the frame with a clear lacquer.

I then added foam tape to the back of the frame to give my sequins and sparkles a space in which to move. If you desire chunkier shakings use another layer or two of foam tape. Make sure you have all of your pieces touching so there are no holes for shakings to escape!

I stack my shakings in the middle before adhering the frame. Here I used sequins, snowflake glitter and some crystals.

When you adhere the frame, make sure all sides are secure and then give it a shake to make sure it works! 

I added my shimmer snowflakes to the frame and then used a clear gem as a spacer for a smaller snowflake to be placed on top. It added just the right height and was clear so could not interfere with the top layer of snowflake

As a final touch I added crystals here and there to centers and along the flurry strip!


  Cheery Lynn Dies used
*****
Remember there is still time to join the new challenge!!! Challenge #163 is Sparkle and Shine There is a chance to win a $20 shopping spree at Cheery Lynn Designs. Thank you for stopping by today!

Friday, December 12, 2014

Seasons Greeting Card by Corina Finley

3:30 AM 1 Comments

Hello, Corina here with you today!

As promised, my card was inspired by the stencil from last weeks card post. As you can see from the top of the picture below.


I thought the stencil with the leftover texture paste on it was too interesting to throw away. The affect looked 'Frosty' and got my creativity rolling!


Here is an up close look at the stencil. Adorned with a few clear rhinestones to highlight each snowflake.

I also used the Snowflake Doily with angel wing. I love layering the Snowflake Doily with one of the Snowflowers as a center. It think it gives the card depth and interest. 


To finish my card, I added the Horizon banners die, Add a Flourish die and my embossed sentiment.

Dies used:

Snowflake Doily w/Angel Wing - DL279


Snowflowers Set One - DL225


hope you will play along in our weekly Challenge 162 - Red and Green over on the Cheery Lynn Design blog. You could win a $20 shopping spree at the online Cheery Lynn Design Store

Thanks for joining me today!

Take care,
Live, Laugh & Create!

Friday, December 5, 2014

Winter is Better Card with Corina Finley!

5:00 AM 4 Comments

 Hello Everyone!

Corina here with you today to share a Winter themed card. I will show you how I added texture/pattern to my card, with the snowflake border die to create a stencil and texture paste.

First I die cut the Snowflake Mesh Border out of thick/heavy card stock.
 

Then apply 2 Way Glue (this glue will dry tacky) which will allow the border to be removable.


Then place your stencil on to your card stock and apply the texture paste.


Lift up the stencil and place it down on the other side of card stock to use it again.


I love how it turned out! Cheery Lynn dies work so well for this technique because they are so detailed.

Also the Stencil that is left looks interesting with the texture paste on it - frosty! I will have to create a card using it for next week!


Here is a close up of the texture card stock after I layered a few snowflake dies and my sentiment. I tied a piece of white seam binding across the center to hide the gap in the middle. I used the

Dancing Snow Flurries snowflake, one snowflake from set #1 & #2 of Snowflowers, and a few of the small snowflake to create my blizzard! I finished my card off by adding a little Bling to the snowflakes!


Die used:

Dancing Snow Flurries - B486


I hope you will play along in our weekly Cheery Lynn Designs Challenge 161 - 'Tis the Season. You could win a $20 shopping spree at the online Cheery Lynn Design Store

Thanks for joining me today!

Take care,
Corina Finley
Live, Laugh & Create!

Copyright Statement


All content, including designs, pictures and words are the exclusive property of the author of each blog post. Information shared here is for inspiration only and may not be copied for publication, competition or profit. Thank you for your cooperation.

SOCIAL MEDIA 2


Follow Us @jointhemakersmovement


All content, including designs, pictures and words are the exclusive property of the author of each blog post.
Information shared here is for inspiration only and may not be copied for publication, competition or profit. Thank you for your cooperation.