Showing posts with label Bird Bath. Show all posts

Tuesday, August 1, 2017

Bird Cage Tea Light With Lisa Blastick

3:30 AM 0 Comments

Hi! Welcome back with a new project using Cheery Lynn Designs. I wanted to make a 3D Bird Cage Tea Light using the new "decorative bird cage"  It is really very beautiful with amazing details. I die cut out the bird cage 4 times and glued it together. The little door opens up too.


I used "miniature roses" and one of my favorite "flourish #13" on the sides and on top. 


I added one bird from "bird bath" but you could add as many as you like. The tea light fits perfectly in the center. Great for wedding, baby shower or any special occasion.  


Two more roses on top...I tied the tops together with pink ribbon. 


Thanks for stopping by today!
Hope you enjoyed!
Hugs Lisa 

Wednesday, February 24, 2016

Thinking of You with Lisa Blastick

3:30 AM 2 Comments

Hi everyone, Lisa here today sharing with you another spring card made for Cheery Lynn Designs. The "fern" is a new die that I thought went so well with the papers that I chose today. I added the "bird bath" and the "garden bench" to go with the theme I was trying to make. Which it happened to be about a beautiful spring day and walking through a lush park.


I added some pop dots behind the "garden bench" and the "bird bath".  The sentiment was stamped on cardstock and fussy cut out. Behind the bench is an "ornamental fence" it has such beautiful details. Actually, all the dies are so very detailed. I fussy cut out some of the flowers from the patterned paper to blend in the background a bit more. Lastly, I added some birds from "bird bath". 


Cheery Lynn Designs Dies Used:


Thanks for stopping by today and be sure to check out this week's challenge "add a flourish" for your chance to win $20 from the Cheery Lynn Designs store. 
Hugs Lisa

Saturday, June 13, 2015

Fathers Day card by Julie Lavalette

3:30 AM 2 Comments

Hi Everyone, It's Julie here today. A week on Sunday marks the Celebration of Fathers Day in both the UK and USA, so I thought it would be nice to share my inspiration for this special day. My Dad loves being out in his garden and his cat is not usually far away from him, so I decided to create this little scene on my card.


I started off by using the Brick Embossing Plate and some Beige card stock. Once embossed I dry brushed Gesso onto my bricks to highlight them. Next mounting onto Green Cardstock and stitching around the edges for detail. My garden fence was shaded with a little Distress ink to shabby it up and a couple of layers of grass added.


My watering can I added a little gilding wax to highlight it. My flowers,leaves and dragonfly were shaded with Copics.


My sunflower was shaded also with Copics and I made the word Dad from my words Day/And as I have still to get the Cheery Lynn die saying Dad.


Cheery Lynn Dies Used:


Thanks for stopping by today and for the lovely comments you leave. I love to read them. Good luck to everyone entering our Weekly Challenge this week.

Julie x


Wednesday, May 27, 2015

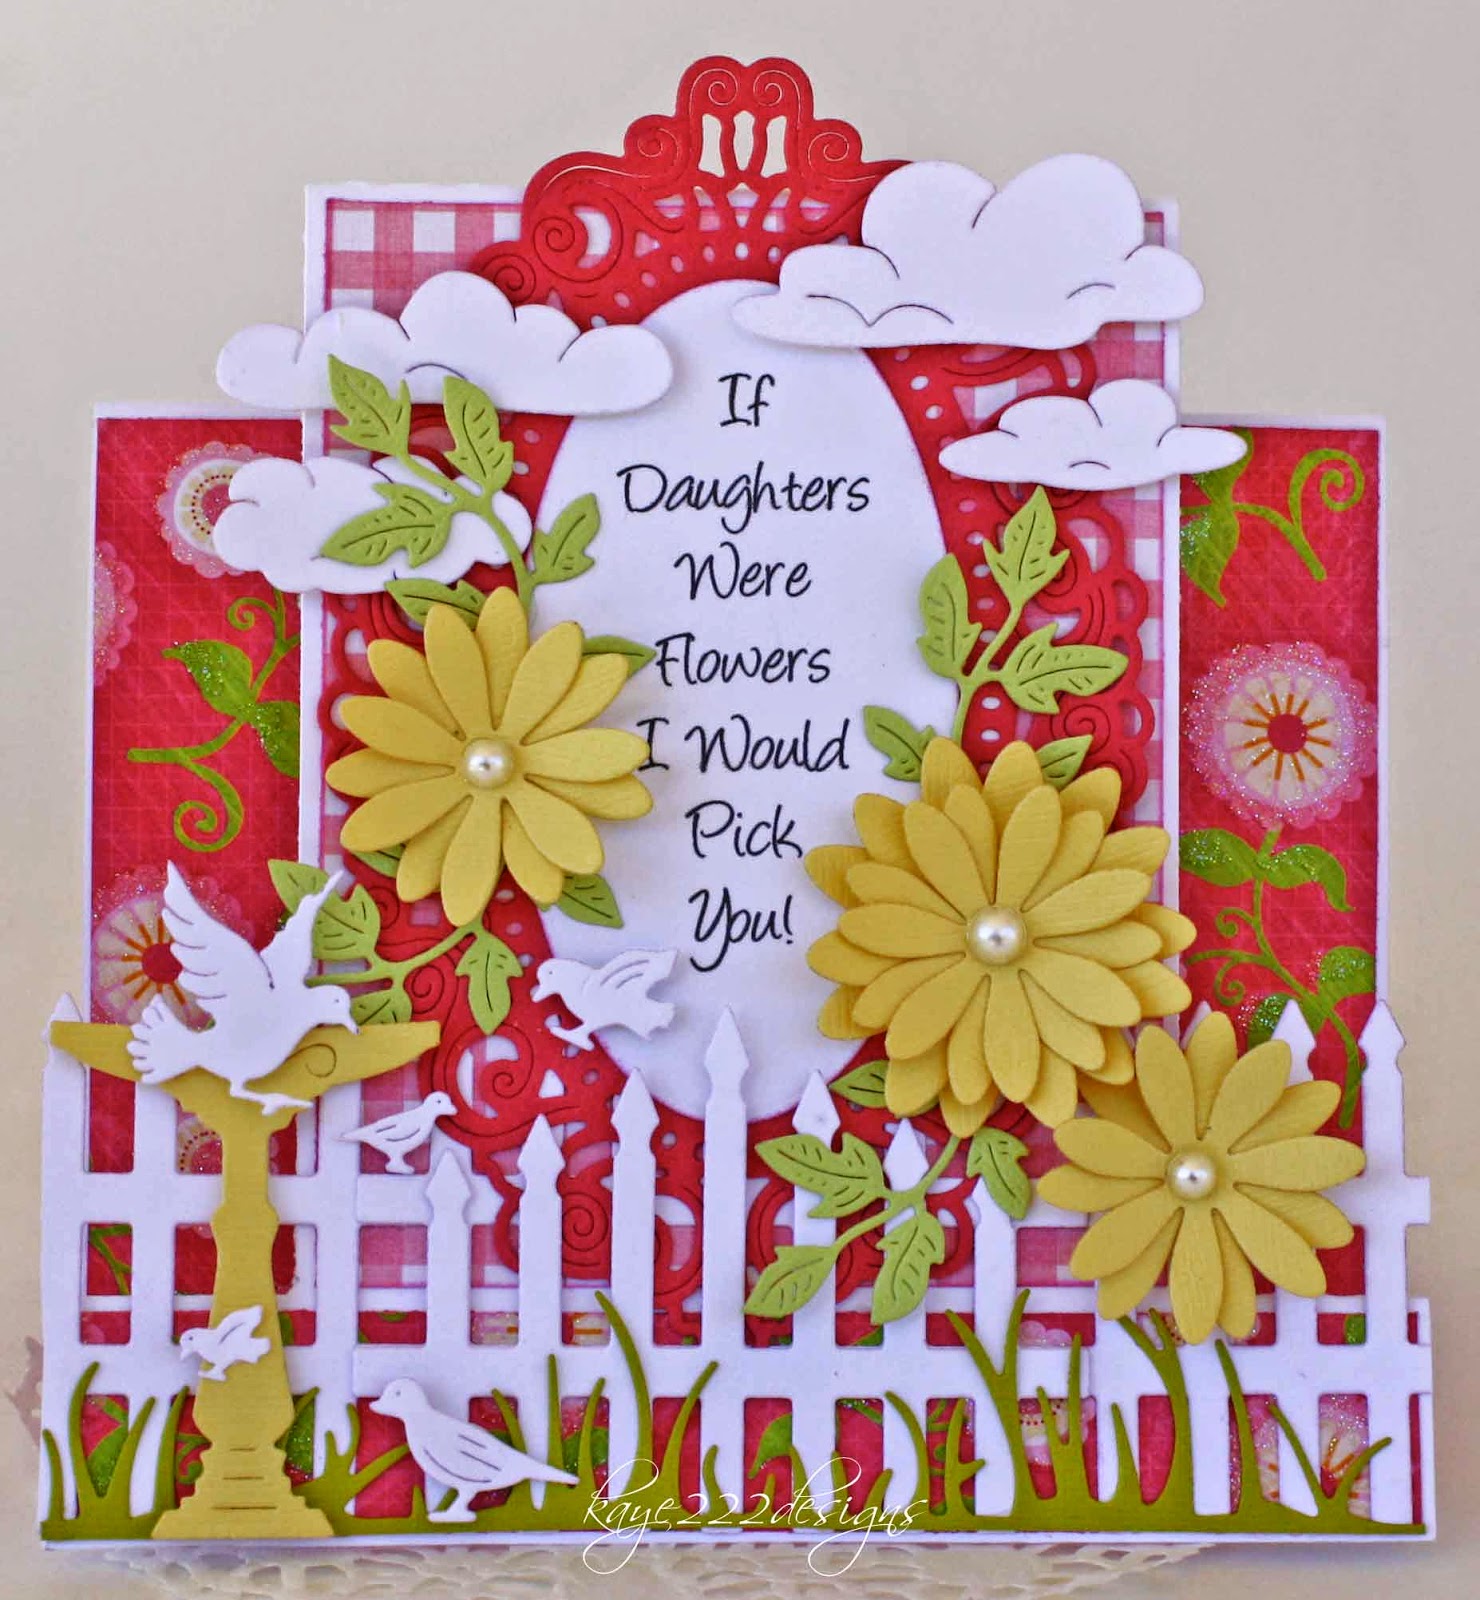
If Daughters Were Flowers With Lisa Blastick

3:30 AM 3 Comments

Hi everyone! 
It's Lisa back this Wednesday sharing a step card made for Cheery Lynn Designs. 
I was thinking about the challenge this week "anything goes" and I all of the sudden became overwhelmed with so many ideas! Finally, I thought about the Victorian Picket Fence and Garden Gate. I could see it on the front of a step card, but what colors? I was digging and found this fun bright pink papers and it really worked for the look I was hoping to achieve. As I was finishing the card,  I wanted to offset the yellow flowers on the other side, so I used Bird Bath and all the tiny birds to go with it. Love the tiny birds. On the bottom, I used the Grass Border in lime green. 


The Mirror Mirror Doily Frame has been on my wish list for a long time. I was so excited to bring it out for this fun spring/summer card. The Clouds and Rain are one of those diecuts that is a must have in your stash...Ive been using it quite a bit. :) The Daisy Flowers and Flourish Leaves were easy to put together and you will find it easy too.  I added little white pearls in the centers of the flowers for a finished flower. PS...I'm addicted to pearls too... :)


The sentiment was printed out on my computer and I used the inside diecut of the Mirror Mirror Doily Frame and inked the edges in pink. Here you can see the really amazing details of all the beautiful diecuts. Gosh, I always remind myself on how lucky I am to be part of this amazing team!

Cheery Lynn Diecuts Used:


Thanks for stopping by today! 
Be sure to enter this week's challenge "anything goes" 
for a chance to win $20 at the Cheery Lynn Designs store.
Hugs, Lisa

Saturday, May 2, 2015

Birdhouse Card by Julie Lavalette

3:30 AM 4 Comments

Hi Everyone, It's Julie here today. I immediately fell in love with the new Fancy Birdhouse die as soon as I saw it and gathered inspiration for my 7 x 7 card from feeding all the birds that visit my garden.


My background was made with shading Distress inks over cardstock, stamping on feathers to give a cloud effect and spritzing with water. I tattered the edges with a Distress Tool.


I layered my grass in two shades of green and shaded a little Distress Ink onto my fence to shabby it up a bit.


My Birdbath was layered twice with a little Silicone Glue added into the bath part to give some extra dimension and Distress ink added to it and my birds for shading.


My sign was cut out in white and the pole area coloured with a Black Copic Pen. I layered the oval area twice with Silicone Glue and stamped on my sentiment and added a little bird.


My branches and leaves were all shaded with Copic Pens and my Blossom had a little Distress Ink added into the centre with a little yellow Stickles.


My sun is made using the Sunflower die, colouring also with Copics and adding a little orange Stickles. My Birdhouse was cut out 3 times and shaded with Distress ink. I paper pieced the fence area twice and my roof three times to give the effect of being 3D.

Well I do hope you like my card which was a lot of fun to make. I have another few plans for the Fancy Birdhouse die which I will share with you over the coming months.

Cheery Lynn New Release Dies Used:


Other Cheery Lynn Dies Used:


Thanks for stopping by today and good luck to everyone entering our weekly challenge.


Julie x

Saturday, October 4, 2014

Nice Little Things by Julie Lavalette

3:30 AM 3 Comments

Click to Enlarge

Hi Everyone, It's Julie here hosting the blog today. With winter now just around the corner here in Scotland, I have started to feed our Garden Birds once again. This card is inspired by them and the Summer flowers that are now all disappearing.

Let me show you previous layers again on this card to make it easier to understand how I made it.


You will see I layered my French Flair Doily stackers rotating the following layer to a diamond shape and I paper pieced in my Snowflake Doily at the back.


I shaded my leaves,birds and birdbath with distress inks and my flowers were coloured with Copics.


I stamped my verse, added a little distress and accent stamping to soften the sharpness of the white card.

Good Luck to everyone entering our weekly challenge and I'll see you all next Saturday.

Cheery Lynn dies used:

Happy Crafting,


Julie x

Saturday, September 13, 2014

Brr It's Cold Outside by Julie Lavalette

3:30 AM 4 Comments

Hi everyone, it's Julie here hosting the blog today. The challenge this week is - All About Texture so I decided to join in using my Cheery Lynn Texture Plate.

I used the brick plate and ran some co-ordinations paper through my die cutting machine and then sanded it back to reveal the coloured core. Next I die cut this piece of paper and sprayed some glue onto it and added extra fine glitter for a frosty feel.


My tree I layered up and sprayed with some gold mica spray and dried with my heat gun. This helps to curl the paper and gives it a firmer feel. I added Flower-soft snow, glitter, red stickles, my little birds and snowflakes all to give a winter feel. The Tree comes with some wonderful decorations dies also and you can see it decorated here on one of my previous cards.


My window I wanted a frosty feel to, so I added some icicles....I adore this die. They we're die cut in white card with a little distress added to the points of them, I then sprayed glue and added glitter too them and placed onto my window frame with a little snow. I also made some curtains for behind my window using my Cuties strip die.

My wording I layered up twice for a shadow effect. I wish you could see all the sparkle on this card but the camera has unfortunately only picked up a bit of it.

Cheery Lynn New Release dies used:


Texture Plate used:


Other dies used:


Thanks for stopping by today and I'd love it if you had time to leave me a comment. Good luck to everyone entering our Challenge this week.

Julie x


Saturday, August 23, 2014

A Little Birdie Told Me by Julie Lavalette

3:30 AM 4 Comments

Hi everyone, it's Julie here today hosting the blog.
I hope you are managing to get some creative time to yourself. Today I have made a little Mediterranean inspired card. My husband and I love to go to the island of Majorca where you see many white washed houses with shuttered windows.


My window was cut out of a cereal packet which I then painted to give a shabby feel. I mounted the window onto a little grey card, placing a little spider ribbon behind to give the illusion of a net curtain. I then added my Anastasia border behind to look like curtains. Don't you just want to peek in the window ! I love having the little window box as it is a lovely finish touch to add the Wow factor.


My Penny Farthing (bicycle wheel) I cut out twice in black and once in silver card stock, paper piecing it back together over the first complete die cut. My little birds were highlighted with some distress inks.


My brick wall was made using Cheery Lynn's embossing plates, please check them out here on the shop blog. I rubbed some distress ink over the embossing plate, placed a white piece of paper onto it and ran through my die cutting machine using the rubber embossing mats. So easy to do with fabulous results.

Cheery Lynn products used:

Hope you have enjoyed looking at my card today and I have managed to inspire you. Good luck to everyone entering our weekly challenge and I'll see you all next Saturday.


Julie x

Saturday, June 7, 2014

Gone Fishin by Julie Lavalette

3:30 AM 4 Comments


Hello there Blogging friends its Julie here today.Thanks so much to all of you who have taken the time to leave me a comment or a ‘like’ on Facebook last week for my card and previous weeks, I appreciate it so much. Also a warm welcome to our new followers. This week I combined our challenge of red, white and blue into my card.


I matted and layered my seaside themed papers using the stacker dies, to make them look like a picture frame with a little scene inside. I used the new Old Barn Board die which comes with the words, log and fishing line. The log was cut out in Kraft paper and I distressed the edges, I placed a few foam pads in the middle and glue at the edges this added more dimension to my card. My stamped image had a fishing line on it, which I cut off. You will see the extended bit on my fishing line is now made using my die, don’t you just love the little hook on the end of this. I pressed the hook into my embossing ink and double embossed using silver embossing powder and threaded a few beads through it to give a 3D look of a float on the line.
 My birds are from the birdbath set and my little Starfish was made using the leaves from the miniature rose die.
Good Luck to everyone entering our Weekly Challenge.

Thanks for popping by, enjoy your weekend and I’ll see you all next Saturday.


Julie x

Cheery Lynn dies used –

Friday, May 2, 2014

Life Moments Card

3:30 AM 3 Comments

Happy May Everyone!

It's Corina here with you today to share my Life Moments Card. For this weeks card, I used the NEW Bird Bath die, along with a few Doily dies and my favourite NEW die set the Horizon Fishtail Banners (3 Dies but on this card I used the smallest). Absolutely perfect for sentiments!
 
 
I love layering with Cheery Lynn Dies. They work so well together. As you can see from the pictures above and below that I have 7+ layers! Even with so many layers, this card can easily fit into a regular card envelope for mailing.
 
 
Thank you for joining me today. I hope you have a wonderful weekend - with some time to create with your favourite Cheery Lynn Dies!
 
Dies used:
 
Take care,

Corina
Live, Laugh & Create

Copyright Statement


All content, including designs, pictures and words are the exclusive property of the author of each blog post. Information shared here is for inspiration only and may not be copied for publication, competition or profit. Thank you for your cooperation.

SOCIAL MEDIA 2


Follow Us @jointhemakersmovement


All content, including designs, pictures and words are the exclusive property of the author of each blog post.
Information shared here is for inspiration only and may not be copied for publication, competition or profit. Thank you for your cooperation.