Showing posts with label Garden Gate. Show all posts

Thursday, March 22, 2018

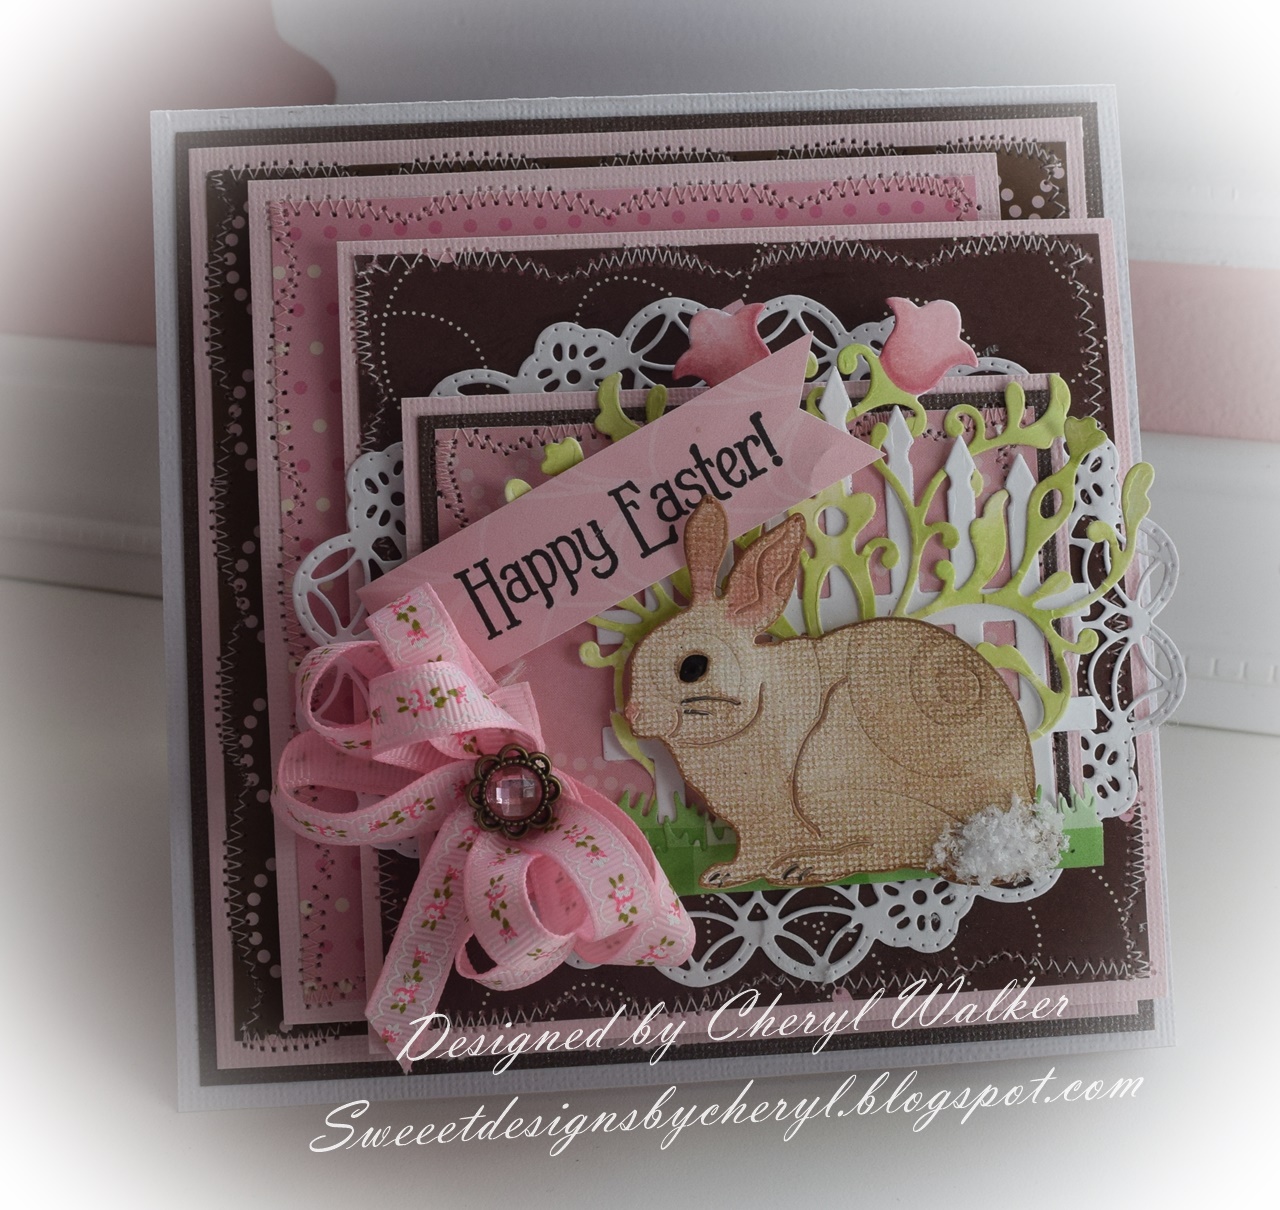
Happy Easter with Cheryl Walker

1:30 AM 0 Comments

Hello everyone and Happy Thursday to you all! Today I have a sweet Easter card made with Cheery Lynn's Beautiful Dies.  I love the bunny dies, they are super cute and fun to work with as well.

On this card I chose the Bunnies for Easter, they are a perfect! I used just the one, and he was cut using a white card stock that came embossed with swirls.  I think its Bazzill, I just came across a stack of this card stock and thought it would look cute. I also wanted to use the beautiful Ornament #7 die, and I colored it with Copic markers, as it was cut out in a white card stock. I'm in love with the ornament dies Cheery Lynn has and need to add a few to my Wish List! The Garden Gate Die was a perfect match for this sweet bunny...heheheehe.  I also used the grass border cut out once and then cut it apart to layer for behind the bunny.  For my sentiment I cut a pink coordinating design paper. I also used the Polynesian Sails Oval for behind all the top layers.  It was cut in white card stock.

I love making the cutesy Easter cards, they are so much fun  to design :) I do hope you enjoyed my post for today :)

Cheery Lynn Supplies Used:
Ornament #7 CAS07 there are also others to choose from

Thank you so much for stopping by and have a lovely day!
Hugs to all,
Cheryl

Tuesday, May 2, 2017

You Make Me Smile With Lisa Blastick

1:30 AM 3 Comments

Hi everyone! Welcome back to a fun new card for Cheery Lynn Designs
I have been busy with life and family lately so I believe I had lost my Mojo for a bit....But today I think it came back...at least for a little while! 
I wanted to make a straight Z Fold Card for some time now...who would have known it would be super fast and easy.... this is a 4.5 inch x 11 inches. You just fold it in half and then half again. 
The bottom is the 2 inches x 11 inches, fold it the same and you place it the opposite way to create the little box. I added a little center for extra flowers...


I used 5 different die cuts..."victorian fence" "whimsical tree of life" "whimsical sun and cloud" "garden gate" and "floral bouquet kit" The colors were scream "springtime" to me! 


I cut out 2 trees, one sun, one each of the clouds and one extra cloud, 2 sets of the small and larger flowers in pink, purple and yellow, 5 sets of small and large leaves, one garden gate and one big strip of the victorian fence with a little bit extra to finish to the end. 


Here you can see it is flat for easy mailing...the sentiment I stamped over the top of the cloud and tree. In the centers are silver gala glitz and the sun eyes are silver brads to match the gala glitz. 


Thanks for stopping by today!
Have a wonderful week!
Hugs Lisa 

Sunday, October 23, 2016

Fall Leaves, Garden Gate and Chrysanthemums Card: Guest Designer, Kathy Clement

3:30 AM 0 Comments
Hello, Friends!

Kathy Clement here with another guest designer project for Cheery Lynn. I am having so much fun playing with my Cheery Lynn dies!  Today I have another colorful fall card to share with you featuring Fall Leaves, the Garden Gate and Chrysanthemum Strip Die.


I had some fun experimenting with the dies this time around.  The Fall Leaves were die cut from corrugate, then sprayed with various mica sprays.  I love the texture this added, and I was thrilled so see how well the dies cut through the corrugate material.  The flourishes on either side of the sentiment panel are from the Pumpkin Patch die set. 


The Chrysanthemum Strip die is a joy to work with!  I love how quick and easy it is to die cut loads of pretty flower layers.  I die cut these from Carta Bella's Fall Blessing paper collection, then shaped and layered them, adding a gem to the center of each blossom.

The garden fence was die cut from Tim Holtz woodgrain watercolor paper.  I love the wonderful texture this added to the die cut.  To give the fence an aged appearance, I blended a little Pumice Stone and Vintage Photo Distress Ink randomly onto the surface, then spritzed with water.


I hope you found some inspiration in this project.  It's wonderful to work with dies that cut so easily and make such pretty embellishments!

Thanks for joining me!
Cheerio,
kathy

Product Links:


Monday, March 17, 2014

Enjoy Spring with Rhonda

3:30 AM 3 Comments
Happy Monday and St. Patrick's Day crafty friends! Rhonda here today to host the blog for you.

Yesterday we introduced our brand new challenge for this week "Think Spring".  My project for today is inspired by and follows the theme as I am definitely thinking Spring the last 3 weeks.


In the background you'll see a Horizon Oval Boutique Stacker frame underneath the Lattice. On top of the Lattice I've used the XM Scalloped Circle and Horizon Circle Boutique Stacker Frame. A few Rose Leaves peek out from the bottom right.


The Garden Gate is layered next and I've cut the Ivy Corner Flourish and woven it through the gate in a few areas. Darling Daisies were a sweet little floral accent to mix in with the Sweet Williams Strip flower as well.  The Tags 2 that I've used is tied around my blue flower with simple white string.

Cheery Lynn Designs dies used:

Please join us this week for our new challenge "Think Spring"!  You could win a $20 gift certificate to the Cheery Lynn Designs online store just for playing along!!! Check out all of the details here.

We always love to see your beautiful creations! Have a fabulous week.

Friday, March 14, 2014

Garden Gate Card

3:30 AM 13 Comments

Hello Everyone!

Corina here again for my second Friday post as March Guest Designer.

I wanted to share a Spring themed card that I made last week. I enjoy the snow here in Canada but now I am longing for Spring to come.

I pieced together two Cheery Lynn dies - the Garden Gate and the Victorian Picket Fence to create the front flaps that interlock. They worked so well together!

Once again, all my flower were cut out from white cardstock and then inked and sprayed with homemade shimmer spray. I added the trellis, greenery, hummingbirds, which also were all cut from white cardstock and a few pearls.

I would like to thank you for the positive comments last week on my first post. Please keep the comments coming!!

I used:
Garden Gate - B124
Victorian Picket Fence - B123
Trellis - B298
Tiny Things with Wings - B266
Horizon French Flair Boutique Stacker Frames - DL271
Tiny Flower Kit (Set of 3) - B376
Shasta Daisy - B310
Cuties 3 - B151
Cuties 1 - B149
Grass Border - B126
Ivy Corner Flourish - B315
Ivy Strip - B304
Olive Branches - B147
Sentiment Frame #1 - B189

Take care,
Corina Finley

Remember to Live, Laugh & Create!

Wednesday, January 22, 2014

Saying Thanks in a Whimsical Way

7:30 AM 12 Comments
 
Hi everyone! It's me Gabrielle here with you today to share a couple more projects with you as January's guest designer for Cheery Lynn!  I don't know about you but I find I am always in need of thank-you cards, I like to take the time to send a card to show my appreciation to someone.
 
 
I wanted to get some extra use out of that cute lattice piece I got in my last CL order so I thought I'd use it like a window design on a whimsical style card featuring fairies and flowers.
 
 
For my flowers I just layered a couple of the Sweet Williams floral dies, inked the edges with a little chalk ink and glued some flower stamens to the centers.  I wanted to continue the light filligree look so I used the leaves from the Flourish Leaf strip in white and the Lace Corner Deco in white.  I used papers from Graphic 45, Prima and Bo Bunny.  I gave the whole thing a more tattered look by tucking in bits of muslin (cheese-cloth) here and there.
 
Cheery Lynn Products used for this project:
 
 
The funny thing is, once I get started playing with my pretty Cheery Lynn dies, I more often than not find that I can't just stop at one card!  I get a few ideas going at once and therefore ended up with an extra card this week! :)
 
 
For this card I wanted to play up the delicate gate die!  I just love the super fine design on the Ornamental gate and I thought it again played well with the Graphic 45 window design in their patterned paper. 
 
 
I used adhesive foam dots to create pocket design behing the gate, I find the shadow this creates gives a nice 3D look to the card.  I also used another one of the Lace Corner designs I used in the top card for this one.
 
 
I used one of my all time favorite CL dies, the Fanciful Flourish as a 'stem' for my floral arrangement and again used the Sweet Williams Strip for my handmade flowers but in this case I curled the petals to create more of a rose look tothe blooms.
 
Cheery Lynn products used for this project:
 
I hope you enjoyed my projects today and hope that I've inspired you to get out your Cheery Lynn dies to play today!  I look forward to sharing another project with you all next week! xo

Saturday, December 21, 2013

A little boy 8x8 layout with Amy

3:30 AM 4 Comments
Hello everybody  it's Amy here with you today!
Holy moly!!  I'm so super glad I already took pictures of my layout pfff.....I had a disaster going on in my scrap room oh my...
I spilled a whole glass of sticky orange juice on part of my layout :-( but it's ok now I used quit a lot of towels to save my layout.
 
This time it's a boy's layout, I stole a picture of my uncle Evert's Facebook page, one of when he was about two years old.
I so love old pictures it makes me go back in time.....the good golden day's
 
When I was just a little Boy:
I so much like the gate die it is such a fun one to play with. This is the first time I used the oval frame and wow what a great die!
Now for some close-ups:

 
It's the lower right corner with the gears that got messed up with orange juice! So one tip for you all use a bottle when drinking in your scrap room. :-)))
 
Cheery Lynn Designs dies used:
B340 - Gears (set of 9)
D136 - Large Leaves #2

I want to wish you all a great and wonderful Christmas with your loved ones!
Enjoy

I hope you still find the time to join in on our weekly challenge 111 called
Sparkle and Shine you could win a $20 shopping spree at the Cheery Lynn Designs store awesome right?
See you next week.
 
 
Lots of love


Saturday, September 21, 2013

My box of little secrets { small CLD dies }

3:30 AM 7 Comments
Happy Saturday everybody, it's Amy here to share my Cheery Lynn Designs die box.
I bought a really ugly box for just one euro and thought I will fix it up and put my small dies in in there.
I think it turned out great.

Cheery Lynn Designs dies used:
  
Side of the box

Front of the box

Top of the box
I really enjoyed using the gorgeous Gardenia Strip it makes such great flowers. You only have to distress them and use any centre you want.
For Miniature Rose I made them look like a daisy. Oe la la  I had so much fun playing.
I hope I got you inspired to make something amazing.

Oh and don't forget you still have time to join our challenge.
Challenge #98
There is a chance to win a $20 shopping spree at the Cheery Lynn Designs store.

Have a great crafty weekend,

Love

Saturday, December 8, 2012

Collaborating with Hampton Art

3:30 AM 16 Comments
Hello! I want to give a huge thank you to Hampton Art for sending us such a wonderful package of goodies to play…um, I mean work with! I really enjoyed using their products!!
This week, the designers from Hampton Art and Cheery Lynn Designs have teamed up to share with you some beautiful Christmas projects to help you get into the holiday spirit!
The blogs will be sharing new projects throughout the week - plus each company is giving away a fantastic prize to one lucky commenter.
From Hampton Art one lucky winner will recieve this fun bundle of goodies
and from Cheery Lynn Designs one lucky commentor will recieve a

$25 Gift Certificate

I created a holiday card with the stamps and inks I received.
I started by stamping the The Snow Cardnial with Prussian Blue on white cardstock. I cut the my card 3.5 inches x 6 inches and extended to 4x7 inches on the bottom to make my folds. I stamped the background paper with the Musical Border using Warm Red ink. The card base and matte were cut using the Mini Pearl Rectangle Reflections Mega Dies. To the right of the image, I added a portion of the O Tannenbaum X-mas Tree, adding color and filling in the scene. On the first fold, I added the Garden Gate (distressed with Chestnut Roan), adorned with the Christmas Light Swag. Pine Branches in the top corner add more color and texture. Snowflakes flutter about.
Snow flowers #1 dress up the sentiment stamp (Love & Cheer), stamped in Dark Moss.
Supplies From Hampton Art:
I hope you have enjoyed our venture with Hampton Art this week! Be sure to browse back and see the gorgeous inspiration my teammates my created for you this week.
Also, head over to Hampton Art and elxpore the fabulous ways they have used our dies!
There is still time to enter this weeks challenge for your chance to win the $20 gift certificate!
Thanks for stopping by!!


Friday, July 27, 2012

Celebrate....NATURE

3:30 AM 9 Comments
Today I have a cute little canvas to share with you.


Since our theme on the Challenge Blog is CELEBRATION, I decided that something involving appreciating my surroundings was what I wanted to focus on.
I've mentioned before how I love to save my Mary Engelbriet desk calendars for focal points on crafts and cards.  This was the perfect focal point for my canvas.


I then used lots of dies and just embellished the theme around the picture.


The rainbow is made from the OVAL dies, the sunshine from the Sunflower and the frame in black around the Mary Engelbreit picture is from CUTIES 3.  


What do you think?  I just love this!  It is small and just draws you is because it has so much to look at.
There there is the message!  Such a big message on such a small canvas!
I hope you have enjoyed my post today.  This has been Jeannie with The Polka Cabana with this mini canvas, have a great weekend!


Friday, September 9, 2011

Halloween Fun Stuff

3:13 AM 4 Comments
I do so want fall to get here!
The warm weather is getting old and I am in the mood for cooler temps, changing colors and making costumes!
So, I have decided to help things along the way by thinking forward.
Here is my project for today. It is called a shelf card.

Now, I am not going to lie to you, maybe the theory of making this card is easy, but...


...if I had someone to call and cry to about this card, I would have!

I borrowed the name BOO CREW from Authentique Paper. I as using paper from their GLOWING line and on one of the HEADLINES for GLOWING , you will see this cute little phrase.

Once again, I used a lot of dies on this project. To start, on each level I used a SCALLOPED OVAL as my decorating base.
For my spiders on the first level, I worked my magic on some DARLING DAISIES turning the daisies into this likable spiders.

Also on the first level of the card I made flowers out of the smallest SCALLOPED OVAL.
The oval made this funky sort of shaped flower, perfect for this card.
The leaves underneath are from the set called JUDY'S BLOOMS.


On the 3rd and top layer I used a cute little stamp I had to represent the BOO CREW.

Here is a side view of this intricate card.

Another side view.

You can see how each layer is staggered.

Believe it or not, it DOES fold flat!

Have I made you long for some fall time activities or card making? I hope so.
I had fun making this, even though it was very trying!
I adore the way it turned out and it was huge therapy for me to make my own spiders...
...NO ONE is more scared of those things than me!
Like I always say, Paper-crafting is THERAPY!!
This has been Jeannie from The Polka Cabana with today's post.

Copyright Statement


All content, including designs, pictures and words are the exclusive property of the author of each blog post. Information shared here is for inspiration only and may not be copied for publication, competition or profit. Thank you for your cooperation.

SOCIAL MEDIA 2


Follow Us @jointhemakersmovement


All content, including designs, pictures and words are the exclusive property of the author of each blog post.
Information shared here is for inspiration only and may not be copied for publication, competition or profit. Thank you for your cooperation.