Showing posts with label Cheryl Walker. Show all posts

Tuesday, July 31, 2018

Whimsical Bee Card with Cheryl Walker

12:30 AM 1 Comments
 Hello everyone and Happy Tuesday to you all! Today I'm sharing a super sweet card I made using Cheery Lynn Designs darling dies. LOVE this super sweet Whimsical Bee die, and she works perfectly with the sweet Daisy strip die. I really enjoyed making this darling card. Of course I always seem to take forever choosing design papers.  I'm not sure why, maybe due to the fact that I own way too much of it.....LOL hehehhe that could be one reason, but I'm so funny about picking my design papers first, and doing all my layers, then cutting all my dies.

Anyway, I selected an OLD design paper I bought years back, and it's from All My Memories 2005.  I bought it in 2006 though, crazy right?  Well I bought a lot of it, as I really loved this collection, so I pulled it out and figured I would use the yellows and blacks in it, and leave out the reds and pinks. Next I had already picked out all the dies I wanted to use on my card. I love Cheery Lynn's flower strips, they are so easy to use, and make flower making super fast, so I made up the daisies.

Cheery Lynn Designs Dies used:
Whimsical Bee B800- Cut in black, and then added yellow card stock to the back , next I added some stickles to give some glitz to my sweet bee.
Flourish Frame B888- cut in white card stock, its behind the whimsical Bee
Daisy Strip B259- Cut in white, ran through machine just 1 time, and then dusted them in a yellow ink. I did use the hot glue gun to glue them together, and to add a white embellishment from Really Reasonable Ribbon to the center of each flower.
Flourish #3- was also cut in white and then dabbed with 2 different club scrap greens.
Page Tabs B567- was cut in the coordinating yellow card stock that was used to layer my card layers, then I stamped a sentiment from Lifes a Garden , Pink by design stamp set. I also added some black dots using a black pen.
Ribbons are from Really Reasonable Ribbon
 I really enjoyed spending some time crafting and making this card to share today. Hope you enjoyed my short post, and have a lovely week!
Hugs to all,
Cheryl

Thursday, July 19, 2018

Sweet Cupcake Card with Cheryl Walker

1:00 AM 0 Comments
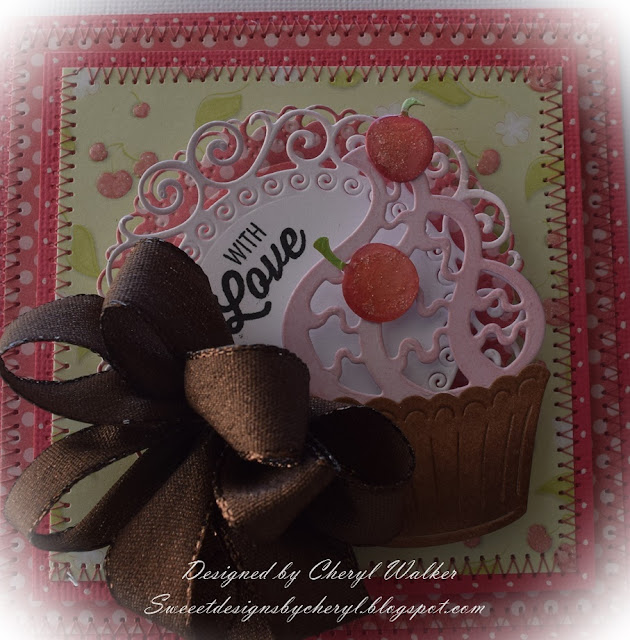
 Hello everyone and Happy Thursday to you all! Today I have a super SWEET Cheery Lynn cupcake card to share.  Yep, it's a sweet one...heeehehehe.  I love this little cupcake, it's absolutely too cute, and I really enjoyed coloring this one up. I used Copic markers on it, and I also used some Stickles and Glossy Accents on the cherries.  Yes I used both on them, super fun right??!!!

The card was layered using some old design papers I had come across in my stash when I was sorting through it a couple of months back, trying to clear out some things and make room for creating :) This darling cherry paper and polka dots was in some scraps I had on one of my shelves, so I pulled it out and set it aside to use, and thought how perfect it would be with this darling Cheery Lynn Cupcake die.

I layered the cupcake on 2 other Cheery Lynn dies and will list them below. This card was super fun and easy to make.

Cheery Lynn Designs:
Cupcake CABD42
Flourish Frame B888
DL272 Doily Dies
Big Sister die cutting machine
Best glue ever


Thank you so much for stopping by and have a lovely day!
Hugs to all,
Cheryl

Wednesday, July 11, 2018

Beautiful Day Card with Cheryl Walker

5:00 AM 0 Comments


Hello crafty friends and Happy Wednesday to you all! Today I have a super fun and sweet card made using Cheery Lynn's sweet Whimsical Lion die along with a few others as well. Love how cute this little guy is.

For the lion, I cut him out twice in white card stock, and then dusted his body with ink and then colored his mane with Copic markers E55 & YR24. Next I added some pink colored pieces of card stock behind his ears.  The black for the eyes was colored with marker and then I added Viva Pearl pen in black to give a 3-D look for the eyes. The nose I colored a gray, and then glued to the back of the face like I did the eyes.

The sentiment was stamped in black using JustRite Papercrafts stamps and the Mini Misti stamping tool. Design papers - I'm not sure who they are by, as those are from my stash, and didn't have any name on them. Lately I've been pulling from OLD OLD papers and scraps, trying to use some different colors and such.

For the doily I used Cheery Lynn's French Pastry Doily die, along with the Horizon Circle die and then the Circle Cut and Pierce die, all layered up.

Corner dies were cut using a green card stock, and is from the BD-17 Corners die. Lastly I added a bow using ribbon from Really Reasonable Ribbon, and then some of their flower embellishments.

Cheery Lynn Designs Supplies:
LPC4 Circle Pierce and Cut tool-LG
DL102 French Pastry Doily Die
DL272 Horizon Circle Boutique Stacker frames
CABD-17 Corners
B792 Whimsical Lion die
Crafters Tools
Big sister die cutting machine


Hope you enjoyed my post for today, and thank you for stopping by.
Have a lovely day
Hugs to all,
Cheryl

Friday, June 29, 2018

Sweet Baby Boy Card with Cheryl Walker

1:30 AM 0 Comments
 Hello crafty friends and Happy Friday to you all! Cheryl here today sharing this sweet little Rocking Horse card I designed using Cheery Lynn's darling dies. I love making baby cards as they are always so much fun to create, and I LOVE this darling horse, so cute!

On my card I used the C108 Rocking Horse cut out in coordinating design paper and white card stock. I did add some glitz using stickles in blue.  The doily he is on is the Priscilla Doily, one of my many favorite Cheery Lynn Doily dies. It was cut using the same white card stock. I did also cut the corners in white using BD-17 Corners die.

All the card layers were done using Pebbles design paper and american crafts card stock. I did add sewing in blue. The eye on the horse was done using the Viva Pearl pen in black, love using this for eyes. For the ribbon I chose to use Really Reasonable Ribbon's Taffeta ribbon.

Super fun and simple card to make, hope you enjoyed my post, and Have a wonderful weekend!

Cheery lynn dies used:
Corners BD-17
Priscilla Doily DL260
Rocking Horse C108
Best Glue Ever
Big sister die cutting machine
Crafters tools
Thank you for looking and have a lovely day
Hugs to all,
Cheryl

Tuesday, June 19, 2018

Retro Rocket Card with Cheryl Walker

1:30 AM 0 Comments

Hello Crafty Friends and Happy Tuesday to you all! Today's card features the Retro Rocket die from Cheery Lynn Designs, and a few other fun dies as well.  I thought it would be cute cut out in some of the coordinating design papers I used on my card layers.

To start with, I used a 5 1/2 x 5 1/2" white card base. Next I took some blue scrap card stock pieces and used them for my layering with the design paper pieces. The design paper pieces are also scraps, and I believe they are from the Pebbles Americana Stack.  I layered the Cheery Lynn Pierced Banners using red card stock and the same design paper, and then did the Nesting Doll circle in blue, with a white circle die. I did distress the white circle using red ink and a dabber. The Rocket was cut in another design paper from the stack, and then I colored the pieces that went on it with Copic markers. The rocket was also distressed using red and blue inks on the edges. I did add some Stickles as well. Now the moon is done with a GLOW in the DARK glitter, fun huh!?

Lastly I added a double bow using the Really Reasonable Ribbon May Ribbon Club assortment, and one of their sweet embellishments.

All layers were popped using RRR foam squares. Also I added sewing in red thread.

Cheery Lynn Designs Supplies Used:
Retro Rocket
Pierced Banners
Circle Die
Nesting Doll Circles #2
Best Glue Ever
Big Sister Die cutting machine

Other Supplies:
Really Reasonable Ribbons and embellishment
Glow in the dark glitter
Stickles
Pebbles paper stack
Sewing
Copic markers
Club Scrap ink
Tim Holtz ink


Hope you enjoyed todays card, and thank you so much for stopping by!
Hugs to all,
Cheryl

Monday, June 11, 2018

Sakura Flower Card with Cheryl Walker

1:30 AM 0 Comments
Hello Crafty friends and Happy Monday to you all! Cheryl here today with a super fun & easy mini card designed for Cheery Lynn Designs! Love making these for those last minute cards that you may need. This card took me very little time to make, as I just added my design paper, lace, Sophia's Mini Doily, Flourish frame and then the colored Sakura flower.

The Sakura Flower was cut out in white card stock, then colored with 3 copic pink markers, and one green. I did cut off all the other flowers on this one cut, and layered them in the center for a 3-D look. Love how easy it was to do.

Next I cut both the doily and frame in white, and then stamped my sentiment on the Flourish frame. I also distressed the frame with a pink ink.

Cheery Lynn Designs Supplies Used:
Sophia's Mini Doily
Flourish Frame B888
Sakura Flower B776
Best Glue Ever
Big Sister Die cut and emboss machine

I hope you enjoyed my post for today, as I enjoyed creating my card to share with you all! Thank you again!
Hugs to all,
Cheryl

Thursday, May 31, 2018

For You Card with Cheryl Walker

1:30 AM 0 Comments
Hello crafty friends and Happy Thursday to you all! Cheryl here with a sweet card created for Cheery Lynn Designs using the darling Cats.  I LOVE their tails and how they make a heart shape around the sentiment. Also used several other Cheery Lynn dies, and I will list them below for you.

On my card I started by cutting out both the cats in 2 different design papers, then used perfect pearls over them both to give some glitz to both kitties.  Next I added a sweet little flower to the left one, and it's from the Tiny Flower Kit die. I also made up the flowers from the same die using pink paper, used perfect pearls to them, and added a viva pearl dot to the center of each. The greenery was distressed with green ink and then colored with perfect pearls green.  Then I added the branches using the wreath strip.

The brown frame is from the Mirror Mirror Doily Frame, and then the white was also cut using the same die set. I distressed the white one with pink ink.

Cheery Lynn Supplies:
Cat CABD-45
B376 Tiny Flower Kit die
BD-17 corners
DL286 Mirror Mirror Doily frame
Flourish #1
Flourish #3
B21 wreath strip


Thank you for stopping by and have a lovely day!
Hugs to all,
Cheryl

Monday, May 21, 2018

Love Pumpkin Carriage Card with Cheryl

1:30 AM 2 Comments

Hello crafty friends, Cheryl here from SweeetDesignsbyCheryl with a sweet card I designed for Cheery Lynn Designs using their darling dies. My inspiration for this card came from this super sweet design paper I found in my stash.  It was another scrap piece and it inspired me to use this darling pumpkin and carriage die, and several other Cheery Lynn dies as well.

To start, I cut and layered all my pieces and added my sewing to each. Then I cut out the pumpkin carriage die using a pink design paper and colored in the areas that are darker, like the wheels, stem, and all the greenery. Next I added some flower embellishments to the centers of the wheels.  These are from Really Reasonable Ribbon, and I love how cute they look here. I did add some Stickles to the greenery and the stem.

Next I cut out my circle, nesting doll circle, and corners so I could do all my layering. I did add some glitter over the corners after my card was put together. The mice were colored with a grey Copic marker, and the little love tag I added another mouse to it, and stamped love with an SU! stamp. Lastly I made a double bow using ribbon and lace from Really Reasonable Ribbon.

Cheery Lynn Designs Dies Used
LPC4 circle pierce and cut tool
CAS019 Nesting Doll Circles #2 
B471 Pumpkin Carriage with Mice 
BD-17 Corners 
Cara-27 Love tags
Thank you so much for stopping by and hope you have a lovely day!
Hugs to all,
Cheryl

Thursday, May 10, 2018

Happy Camper Card with Cheryl Walker

1:30 AM 0 Comments


Hello crafty friends and Happy Thursday to all! Today's card was designed using the darling new camper die set from Cheery Lynn Designs. Love these sweet Retro dies, as they are so fun to work with and create different types of cards. My card is kinda shabby chic camping...hehehehe.  Just had to make it PINK.

I used the super darling camper die set from Cheery Lynn called "Happy Camper", along with the trees that come in the Camping Set!   Next I used the circle dies, and  the nesting doll circle #2 for the layer behind the trees. For the beautiful fancy frame I used the Alpine Flourish doily and it's cut in white. I used some Crafty Secrets design papers, they are old, I just pulled these out of a cabinet :) The Happy Camper sentiment is distressed with pink ink, and then added some Stickles. The blue for the windows is the clear acetate that comes in the shaker card kits. I just left the blue protective stuff on :)


Cheery Lynn Designs Supplies Used:
Happy Camper die set 
Camping Set 5 piece (tree's only )
LPC Circle cut and pierce tool
Alpine Flourish Doily 
Nesting Doll Circles #2 CAS019
Big Sister Die Cutting Machine 
Best Glue Ever

Thank you for stopping by and have a lovely day!
Hugs to all,
Cheryl

Monday, April 30, 2018

Picture Perfect LOVED card with Cheryl Walker

1:30 AM 1 Comments
Hello crafty friends and Happy Monday to you all! Feels good to be back in my craft room crafting.  I have been trying to get everything organized, and that seems to take awhile. Anyway, I created this sweet card for today using one of the New Release Dies from Cheery Lynn Designs. I LOVE this darling camera, it's called Picture Perfect, and thought it would be super cute with a sentiment on the bottom part of where the photo normally is.

For the card base I chose white card stock, and it measures 5 1/2" x 5 1/2".  Next I found this sweet deign paper in one of the paper stacks I have, and did 3 layers of it. I did add some sewing as well. The camera was cut using another design paper from this same paper stack, and love how it turned out. I added some bling to the camera, as I thought it would be cute. The photo part was also cut using three design papers, and then white. I think it turned out sweet.

I did add the darling Cheery Lynn Designs Sophia's Heart Mini Doily behind the camera . Lastly I added some more bling to my card and a big bow.

Its nice to be back in a clean almost fully organized craft room. I still have some more organizing to do, as Ive been doing a little each day :) 


Cheery Lynn Designs Supplies Used:
Picture Perfect Die Kit
Sophia's Heart Mini Doily
Best Glue Ever
Crafters Tools
Big Sister Die cutting machine
Metal Snippers
tweezers


Thank you for stopping by and hope you have a wonderful week!
Hugs to all,
Cheryl

Thursday, April 19, 2018

Classic Car Card with Cheryl Walker

1:30 AM 0 Comments


Hello Crafty Friends and happy Thursday to you all! Today's super sweet card was designed for Cheery Lynn Designs using their new release called " Let's Go RETRO".  LOVE this release, it's absolutely darling!  For my card today I chose to use the Classic Car die, and I love how it turned out, as it's so cute! All the dies in this release are so cute, if you haven't seen the dies in the release you will want to go check them out!

Classic Car die- was cut using a shimmery white card stock, and then dusted with a pink distress ink. Next I colored in the grey with a Copic marker, and then the darker pink for the lights. The steering wheel and mirror were colored with a black Copic marker and so were the tires.

Flourish & Tiny flower kit- I had a white flourish already cut and ready for me to color.  Then I cut out the pink flowers in the same white shimmer card stock and dusted them to match. For the centers I used the Viva Pearl pen.

Paris Sign- Cut in a grey card stock.  The Cool Cat was cut in white and dusted lightly in pink.

The design paper came from the paper stack called Forever & Always stack. I used it to create my 3 layers and the grey card stock in Bazzill shimmer card stock, it's absolutely beautiful in person, photos don't show it as well. Each layer has sewing in pink. I should have added some gems to the headlights but forgot, and had my photos all ready to go. Next time I will have to add some :)

Cheery Lynn Designs Supplies Used:
B376 Tiny Flower Kit
CAFLRS-8 Flourish #8
B549 paris Signs 3
B944 Classic Car die Set
B946 Retro Rhetoric Die set
Best Glue Ever
Metal Snippers 
Big sister die cutting machine
Crafters Tools
Thank you for looking and have a lovely day!
Hugs
Cheryl

Tuesday, April 10, 2018

Feline Good Card with Cheryl Walker

1:30 AM 0 Comments
 Hello Crafty Friends and Happy Tuesday to you all! Today I have this super darling card made with Cheery Lynn's DARLING dies, I just LOVE this Small Cat die, and the Mirror Mirror Doily frame I used for my sentiment. Well I love it all....hehehee.  I always love using fancy frames, and this Cheery Lynn die is perfect!


To start with I cut my Small Cat out using the coordinating Graphic45 design paper, how perfect this kitty is, she goes perfectly with the design paper. I did add some distressing, Viva Pearl pen for an eye, nose, and on the ears and tail. Next I distressed her using red ink.

Flowers on cat- I used the Tiny Flower Kit Die, and cut out some flowers to go along with my kitty. The greenery is the Flourish #8 Die, and I just cut a piece of it, and colored it green. All pieces were glued using the Best Glue Ever found at Cheery Lynn Designs, LOVE this glue, it's honestly a must have to any crafters collection!

Frame- I have to say this is one of my NEW favorites, not that its newly released, but new to my collection...hehehe.  It's perfect for layering, I will get a lot of use out of this one for sure. I used it to cut out a brown doily frame, it's dark brown.  Then I used the other 2 dies to cut coordinating design paper for my sentiment frame. All 3 pieces come in this die set, love that too! Stamp is from The Project Bin.

Heart-Sweetheart candy die was used for this. Cut in coordinating design paper. This die is perfect to use all year round.

Butterfly In- used for the corner, it's so pretty and comes out of the die so smoothly. Love that about Cheery Lynn's dies, they come out so easy, no poking and trying to get the delicate pieces out.

I did add some sewing in a coordinating color to each layer. and lastly I added a bow was made with Really Reasonable Ribbon Satin, for my embellishing on my card :)

Cheery Lynn Supplies Used:
B205 Butterfly In
B675 Sweetheart Candy
DL286 Mirror Mirror Doily Frame
OR01 Small Cat
Flourish #8
B376 Tiny Flower Kit
Best Glue Ever
Big sister Die cutting machine
Mini platform
Crafters Tools
Thank you so much for stopping by and have a lovely day!
Hug to all,
Cheryl

Saturday, March 31, 2018

Celebrate Easter with Cheryl Walker

1:00 AM 1 Comments
Hello Crafty Friends, Cheryl here with a sweet Pop Up Easter Card designed for Cheery Lynn Designs using some super darling dies they carry. LOVE the sweet bunny and chicks together, aren't they just darling???!!!! I think I used 9 Cheery Lynn Dies on this one...hehehe I really had a lot of fun designing this card to share with you all!

On my card I started with cutting the sweet bunny out using design papers for her. Next I did distress her and her dress.  She is so cute, love her! I will use her on other cards, not just for Easter. She does have one of the Tiny Flowers made from the tiny flower die. The chicks were cut using white card stock and then colored in with 2 yellow Copic markers. I can totally see them cut in a yellow batik or some kinda 2 tone yellow print card stock, and then distressed, that would be so cute. I did add eyes using the Viva Pearl Pen in black. Also another flower on one of the chicks.

Greenery was cut using the Olive branches and Flourish #3 dies, and cut with a olive tone card stock. I added little flowers made using the Tiny Flower kit to the greenery. I also used a LOVE Heart from the Sweetheart Candy die.

The frame was cut using 2 different dies for my scenery and sentiment. I chose to use the beautiful Mirror Mirror Doily Frame die, and the Scandinavian Oval Doily. Sentiment is from ODBD.

Cheery Lynn Designs Supplies Used:
C182 Easter Parade (girl bunny)
B528 Chicks (2 used)
DL307 Scandinavian Oval Doily cut in white
DL286 Mirror Mirror Doily Frame(used only the 2 small dies for the sentiment)
B147 Olive Branches
CAFLRS-3 Flourish #3
B675 Sweetheart Candies
B376 Tiny Flower kit
B934 Pop Up Celebrate
Cheery lynn Big Sister Die cutting machine
Best Glue Ever
Mini Platform S192 
Full Size cutting platform set S180 

Other supplies Used:
Design Paper Heidi swapp paper pad
Ribbons and foam squares, Scotch Tape are all from Really Reasonable Ribbon
Viva Pearl pens,
Copic Markers
Sewing machine
AC yellow card stock
I want to wish you all a Blessed Easter and thank you so much for stopping by and taking a peek at my card for today!
Hugs to all,
Cheryl

Thursday, March 22, 2018

Happy Easter with Cheryl Walker

1:30 AM 0 Comments

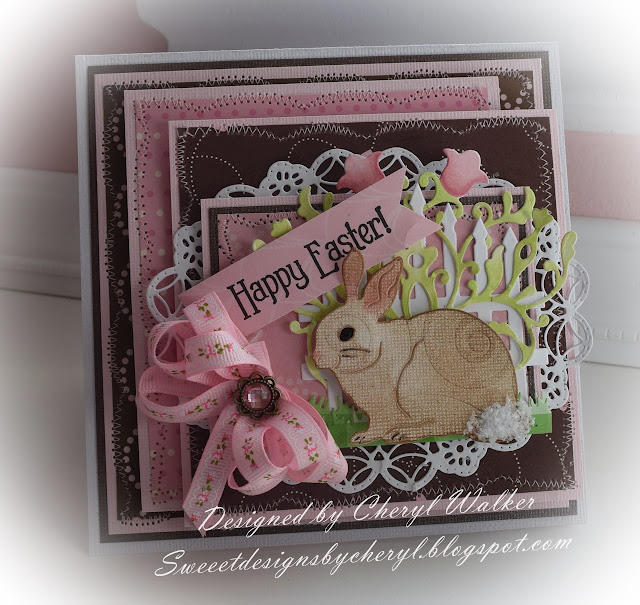
Hello everyone and Happy Thursday to you all! Today I have a sweet Easter card made with Cheery Lynn's Beautiful Dies.  I love the bunny dies, they are super cute and fun to work with as well.

On this card I chose the Bunnies for Easter, they are a perfect! I used just the one, and he was cut using a white card stock that came embossed with swirls.  I think its Bazzill, I just came across a stack of this card stock and thought it would look cute. I also wanted to use the beautiful Ornament #7 die, and I colored it with Copic markers, as it was cut out in a white card stock. I'm in love with the ornament dies Cheery Lynn has and need to add a few to my Wish List! The Garden Gate Die was a perfect match for this sweet bunny...heheheehe.  I also used the grass border cut out once and then cut it apart to layer for behind the bunny.  For my sentiment I cut a pink coordinating design paper. I also used the Polynesian Sails Oval for behind all the top layers.  It was cut in white card stock.

I love making the cutesy Easter cards, they are so much fun  to design :) I do hope you enjoyed my post for today :)

Cheery Lynn Supplies Used:
Ornament #7 CAS07 there are also others to choose from

Thank you so much for stopping by and have a lovely day!
Hugs to all,
Cheryl

Saturday, March 10, 2018

Birthday Pop Up Card with Cheryl Walker

1:30 AM 0 Comments

Hello crafty friends and Happy Saturday to you all! Today's Cheery Lynn Pop Up 3-D card is done on the outside and the inside, as I've used 2 of the NEW 3-D pop up dies for this. I also combined some of Cheery Lynn's other dies for my card. I am LOVING these 3-D Pop up Dies that Cheery Lynn Designs came out with, they are super fun to use!

To start with I used the Party! Pop up as the outside of the card. It can be used both on the inside and outside. I then added some of the sweet Pebbles design paper to the PARTY! to coordinate with the card layers. Next I cut out the dress form, oval, and frame all using the coordinating design paper in this line. Each front layer is sewn to give a bit of embellishing. I lastly added a Taffeta Bow to the front.

Cheery Lynn Supplies Used:
Pop Up Party B932
Pop Up Birthday B938
Antique Dress forms B882
Pierced Stacker #2 XL-20
M-7 Oval Classic-sm silver stacker layers 8
Best Glue Ever
Big Sister Die and Emboss machine
Crafters Tools S122
 For the inside I used the Happy Birthday Pop Up and just colored it with coordinating colors.  Super easy and fun! I should have added sewing to the inside but forgot.

Thank you for stopping by, and please let me know what you thought of my card for today :)
Hugs to all,
Cheryl

Wednesday, February 28, 2018

Thanks 3-D Pop Up Card with Cheryl Walker

1:30 AM 0 Comments
 Hello Crafty Friends and Happy Wednesday to you all! I can't tell you how much I am LOVING the new Cheery Lynn 3-D Pop Up Dies, they are so much fun to work with. This one is the Thanks Pop Up that works for the inside of the card, and can also work for the outside of your card as well. I wanted to use it for the outside of this Thank you Card!

To start with I used white card base and cut the Thanks, then ended up taking scissors and cutting the top part off the thanks so it's all in the back. Super easy to do. Next I cut the pink in thanks and cut them out and glued to the Thanks. That is why they are pink now and the card base is white :)

All layers were done using the same pink and then some Crate Paper from the Random 6 x 6 paper stack. I used two doily dies on this and then the Beautiful Decorative Gift Envelope Die.  It's a 12 piece set and comes with all of the flowers, butterflies, birds and a leaf. I added a circle tag and stamped the sentiment on it. All the flowers have little pink pearls in the centers and the butterflies have a cream color pearl on them. Super fun card to make.  I had so much fun designing this one!

Cheery Lynn Designs Supplies Used:
Pop Up 3-D Thanks
B860 Decorative Window Gift Envelope
Olive BranchesB147
DL314 Quadrafoil Square Doily
DL280 Royal Scandinavian Doily
Best Glue Ever S165
Big Sister Die cutting machine
 Close up of the window and flowers with butterflies. I love the little flowers, they are so sweet. I did layer the bigger flower two times to give them a 3-D look. I also added a flower to the T and the bottom of the S in the photo below you can see.
Thank you for looking and have a lovely day!
Hugs to all,
Cheryl

Tuesday, February 20, 2018

Wedding 3-D Pop Up/Shaker Card with Cheryl Walker

1:30 AM 0 Comments
 Hello crafty friends and Happy Tuesday to you all! Today I have a super special wedding card to share using the NEWLY released Cheery Lynn 3-D Pop Up Dies and some past dies as well. Love how this wedding card turned out for today. I also did the inside as well :) I truly LOVE all these new Pop Up dies, and can't wait to share them all with you!

On the front of my card I chose to use the Celebrate Pop Up die, and cut it in white. Next I layered using some wedding design paper and black card stock. Each layer has sewing on it. I also used the quadrafoil-square-doily-die-set-DL314 cut in white, then layered with another layer.  On top of that I used the Vintage Tile die cut in black two times and layered. On top of that is the Wedding Cake Shaker piece, love it! I did layering on it as well using the Olive Branches, and the Tiny Flowers kit.

For the inside I cut some of the matching design paper and then used the Best Wishes Pop Up on that, then layered it on some grey card stock and placed inside my card.

Cheery Lynn Supplies Used:
NEW Pop Up Celebrate B934
NEW Pop Up Best Wishes B935
DL314 Quadrafoil Square Doily
Vintage Tile B886
B147 Olive Branches
B376 Tiny Flower Kit
K109K Wedding Cake Shaker Card Kit
Best Glue Ever
Big Sister Die cut and embossing Machine
Crafters Tool S122


 Here is the inside of my card. I like when the insides are done, as it helps to save time when going to give them, besides that they look complete :) LOVE these new pop up dies!!!
 It had been a while since I've used the Shaker dies and thought this card was perfect for the Wedding cake. The Shaker dies are so easy to use and love how everything you need comes in the kit!
Thank you for stopping by and have a lovely day! Please let me know what you think of my card today, as I always love reading your comments!

Hugs to all,
Cheryl

Copyright Statement


All content, including designs, pictures and words are the exclusive property of the author of each blog post. Information shared here is for inspiration only and may not be copied for publication, competition or profit. Thank you for your cooperation.

SOCIAL MEDIA 2


Follow Us @jointhemakersmovement


All content, including designs, pictures and words are the exclusive property of the author of each blog post.
Information shared here is for inspiration only and may not be copied for publication, competition or profit. Thank you for your cooperation.