Showing posts with label Olive Branch. Show all posts

Wednesday, April 26, 2017

Whimsical Ladybug Tag

4:30 AM 1 Comments
Hello again!  Cherry here with you today with a cute little tag for you featuring some lovely dies from Cheery Lynn Designs.
 I used the cute Whimsical Ladybug die.  
I cut it out twice to give it a shadow effect and layered it on the  Pierced Stacker 3 dies.
 I added some buttons and the Olive Branch 2 piece die set.
From here I just added some ribbons and added Tags for some interest at the bottom. I think this would look cute added to a flower for Mother's Day to carry on the garden theme.  Ladybugs are good for the garden!  Thanks for visiting, Cherry

-Cheery Lynn Dies-

Saturday, March 4, 2017

Timeless Photograph 8x8 Layout by Amy Voorthuis

3:30 AM 1 Comments
Good morning lovelies.
Today it's my turn again to show you how I used my precious "Cheery Lynn Designs"dies. 
This time I made a 8x8 layout again {it's been ages since I did one} using a old picture of my mother in law, she is in her seventies now and on the picture she was just four years old, such a cutie pie...
I ordered some foam from England last week because I saw some lovely flowers made out of them on YouTube...and I have to say I LOVE that stuff.  I am hooked now lol.

Timeless Photograph:   
I cut out the flower dies times four then I used my heat gun to curl my flowers. This layout came out so easily. For the flower centers I used some stamen and a diamond gem on top of that. These papers I used are from such a thick quality that it's really easy to distress it. 


In some of the dies I left the cut out bits and pieces because I really think shabby chic is all about that.  The word stickers are inked with white ink and I added a treat underneath the picture. In my flower clusters I added some cheesecloth.


  I really adore how much depth the flowers have with the foam & dies I used wow. I am totally going to make more flowers with my Cheery Lynn Designs flower dies on my next projects so keep a close eye on this amazing blog.


Cheery Lynn Design dies used: 

Other products used: 49 and Market papers & stamps, Paste, Dusty Attic stencil, foam to make the flowers, Lindy's Stamp Gang sprays, word stickers, cheesecloth, treat, steamen, prills, diamond gems, gesso and ink.

Thank you so much for visiting the blog today!
I hope you enjoyed my post and I have inspired you to use your Cheery Lynn Designs dies.
Have a lovely weekend.

Thursday, January 5, 2017

Love You Card with Bonnie Garby

3:30 AM 1 Comments
Hi everyone.  Bonnie here today from Make Time to Craft.  Today I am sharing a love inspired card using several dies that I happen to 'love' from Cheery Lynn Designs.
I started with a 4-1/4" x 5-1/2" brown card base.  I backed a piece of pink cardstock with Stick It Adhesive and cut using the Quatrefoil A2 Frame 2.  I adhered the die cut to a piece of cream cardstock.  I then trimmed that to 3-1/2" x 4-3/4".  I layered that on to pink cardstock and then brown cardstock leaving a small border on each.  Then I added some natural mulberry paper and wet the edges to tear leaving a feathery edge.
I created my Love You Sentiment in the same fashion.  Apply Stick It Adhesive to the back of pink cardstock, cut with the Love You die and then adhere to cream cardstock.  I then cut a brown base using the Square Pierce & Cut die.  This was then backed with natural mulberry paper.  I ran a piece of 5/8" Turftan Brown Delicate Stitched Satin topped with 3/8" Sherbet double-faced satin ribbon from Really Reasonable Ribbon across the top of the main panel dove-tailing the sherbet ribbon.  Then the sentiment panel was attached on top of that.

Cheery Lynn Dies used:

The beautiful roses were created with the small and medium tea rose dies.  I used both cream and pink cardstock to build the layers.  I inked the cream using wadded wax paper and also inked the edges of both colors for definition.  Then the leaves were shaped and the flowers were assemble.  The flowers and foliage were added to the card below the sentiment.

The card was finished off with a pretty bi-color double-loop bow using Sherbet and Turftan Brown Delicate Stitched Satin from Really Reasonable Ribbon.
Thanks so much for stopping by today.  I hope I've inspired you to pull out your flower dies and create some pretty flowers for your next project.  Happy crafting!

Wednesday, May 11, 2016

Tropical Birthday with Lisa Blastick

3:30 AM 2 Comments

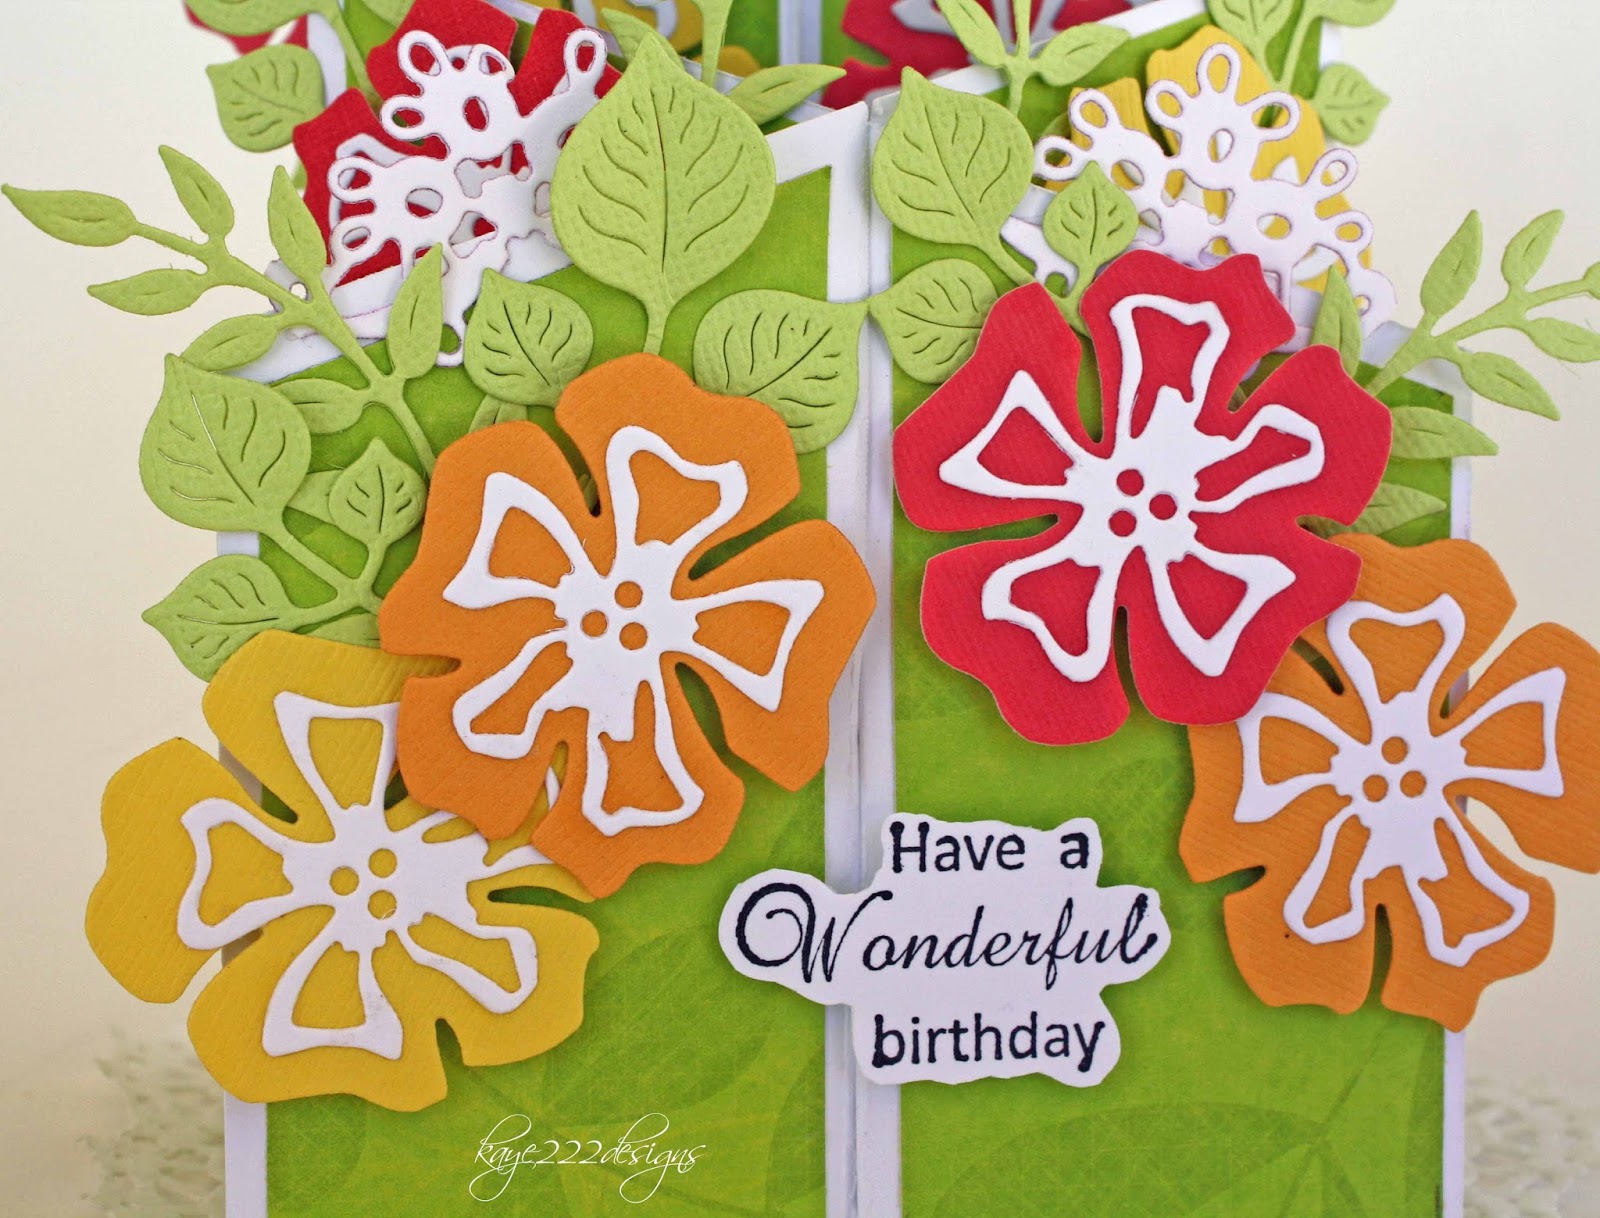
Hello everyone! I'm here today to share with you my first cascading card made for Cheery Lynn Designs. I have been making some different shaped cards lately. So I wanted to make this cascading card using lots of tropical flowers. It was inspired from patterned paper by K & Company. You will see the patterned paper below. 


Lots of "tropical flowers" in hot pink, orange, and yellow. The "olive branches" and "flourishes" were my fillers. The "olive branches" even match the green patterned paper too!  I placed small pop dots behind the flowers for a bit more 3D look.  


On the top edge I die cut "dancing doily" in white and fussy cut out 6 pieces. 


I layered the "dancing doily" on the edge first. Next I placed leaves and flourishes and then placed the flowers on top. The "tropical flower" has 2 pieces, I die cut one in the color and then in white on top. 


The sentiment was stamped in black and fussy cut out too. 
Here you can see how it is flat for mailing. 


Last, but not least...my patterned paper that was my inspiration!


Thanks for stopping by today! 

Cheery Lynn Designs Dies Used:


Be sure to check out this week's challenge for your chance to sin $20 at the Cheery Lynn Designs store! Have a great week! 
Hugs, Lisa

Thursday, January 14, 2016

Happy Birthday with Jenny Alia

3:30 AM 1 Comments

Hi, it's Jenny here today.  I'm so excited to share the new release dies with you tomorrow.  Make sure to check back here to see all the new January dies as well as some wonderful inspiration from the team! Today I'm sharing a birthday card featuring this pretty dragonfly.  He's large and would be perfect for scrapbook pages too.  He was cut twice and the one underneath was colored purple.  I glued the two bodies together but left the wings separate so the second pair of wings would show.  He is covered in glitter glue.  


The lattice is half of the Lattice #3 left over from another project.  I used it instead of one the doilies I  usually use to back my florals.  The flowers were made with the Tea Rose Medium die.  I colored them with yellow distress inks, shaped them with a molding tool and added rhinestone centers.  I used the leaves that are included in the rose die and added a few Olive Branches.  The tiny white flowers on the Olive Branches are from the baby breath kit in the Embellishment #2 set.  It's my first time playing with them but I love the detail they add to the floral cluster.  Last, I cut Happy and Birthday with the same purple paper used for the background layer. 


Cheery Lynn Dies

Thanks for visiting today and make sure to join in this week's Snowflakes challenge for your chance to win $20 towards shopping at Cheery Lynn Designs.  Check back tomorrow to see the new release, you are not going to want to miss the gorgeous new dies!

Thursday, October 1, 2015

Big Day with Jenny Alia

3:30 AM 2 Comments

Hi, it's Jenny posting today with a new card I made using a few dies that are new to me.  I love how delicate and intricate this Dutch Daisy Doily Square die is and couldn't wait to play with it.


I first cut the Dutch Daisy Doily Square out of a blue-green paper.  I then cut three layers using the French Flair Classic Stackers.  I used the largest to cut the kraft card base and then a smaller one to back the phrase created by the On YourDream Big and Day words that were cut with the same blue paper used for the Dutch Daisy Doily.  

The Sweet Williams Strip flowers were cut out of a cream patterned paper.  The edges were colored with blue distress ink and then they were molded using a stylus and molding mat.  I stacked and glued them together and then used double sided tape to adhere them to the card front.  Last, I tucked in some Olive Branches and my go-to foliage, Flourish Leaf Strip die cuts and glued pearl centers on the flowers.

Cheery Lynn Designs Dies 

Thanks for visiting today and make sure to join in this week's Anything Goes challenge for a chance to win a $20 gift certificate towards shopping at Cheery Lynn Designs!

Friday, September 11, 2015

Heartfelt Wishes Card by Corina Finley

3:30 AM 0 Comments

Hello Fellow Crafters!

Corina here, I have a Heartfelt Wishes Card to share with you this week.

First, I created the flowers inspired by the pattern paper, then designed the card. I used pewter embossing powder on the flower centers, Tropical Flourish and the sentiment. I embossed the leaves from the Rose Leaf Strip and the Miniature Rose (center of large flower) with holographic embossing powder.


Above is a view of the depth and dimension that creating with the variety of Cheery Lynn Flower dies allow you to achieve. Love it!


This card came together with ease - I have not had such a good, ideas working out, time flies by, relaxing creative night in along time! 

The base was created by layering two pattern papers on to a white card base. I covered the seam with a die cut from the Deutschland Border SetI cut out the Coved Rectangle Classic Stackers in pattern paper and white cardstock. I embossed the white cardstock with my Heartfelt Wishes sentiment. I matted each on a Scalloped Coved Rectangle. I used the Ankara Lace Border on the left hand side of the card and layered my flowers, leaves and flourishes on top.


Dies Used:

Deutschland Border Set (set of 3) - B523


I hope you will play along in our weekly Cheery Lynn Designs Challenge 201 - All about Texture. You could win a $20 shopping spree at the online Cheery Lynn Designs store.

Thanks for joining me today!

Take care,
Corina Finley

Live, Laugh & Create!

Thursday, May 14, 2015

Roses of Friendship Card with Jenny Alia

3:30 AM 1 Comments

Hello friends, it's Jenny here today with a card inspired by this week's Roses challenge.  I cut and and assembled the Medium Tea Roses and then actually created everything else from there.  I love the ombre cards I've seen and decided to incorporate some of that into my card using the Ankara Lace Border die and stacking each different yellow layer.


I cut the blue background layer once with the Curved Border die and then cut the patterned paper three times to get the fancy edge and the dot pattern.  The stack of Ankara Lace Borders was glued to the card and then I cut the edge off the Ankara Doily and tucked it under the edge of the stacked borders.  The sentiment layer was cut using the new Pierced Stacker #4 and adhered with foam tape.


I colored the the roses to match the other colors in the card using distress ink and a foam dauber.  I added some white Olive Branches and blue Add a Flourish flourishes to the floral spray and finished by adding the two butterflies from the Small Exotic Butterflies die.

Cheery Lynn Designs Dies

Thanks for visiting and be sure to check out this week's Roses challenge for a chance to win $20 towards shopping  at Cheery Lynn Designs!

Friday, April 10, 2015

In One Yesterday Card with Corina Finley

3:30 AM 5 Comments
 
Hello, Corina here with you today to host the blog!
 
For todays card, I decided to play with my new Mirror Mirror Doily Frame die and the Stacker Flower 5 die. - I used a turquoise pattern paper, white cardstock, a little turquoise ink and of course my Cheery Lynn Dies to create this card.


I layered the background using a die from the A2 Frames Rectangular Classic to die cut a turquoise pattern paper panel and white cardstock panel. I distressed the edges and adhered them on to my white cardstock base. The Mirror Mirror Doily Frame went on next.
 
I stamped my sentiment with black ink on to the Sentiment Tag 2 (Set of 3) and layered it upon a turquoise die cut from the same set - one size larger. Then pop-dotted to the center of the Mirror Mirror Doily Frame.
 
To form my floral arrangement, I used the two layers of the Stacker Flower 5 and then the Shasta Daisy on top. Tucked in a mix of foliage die cuts with some flourishes from the center of the Celtic Oval Frame die.
 
 
Added Rhinestones to finish it off!
 
Dies Used:
 
I hope you will play along in our weekly Cheery Lynn Designs Challenge 179 - Flowers.  You could win a $20 shopping spree at the online Cheery Lynn Design Store.
Thanks for joining me today!

Take care,
 
Live, Laugh & Create

Friday, March 6, 2015

Spring Birthday Card with Corina Finley

3:30 AM 5 Comments

Hello Fellow Crafters!

Corina here with you all, to host the blog and share this weeks card creation. As you may notice, my card is all about Spring! Flowers, twigs and foliage!

I used a piece of thin Cork and die cut it with the French Flair Classic Stackers and the Adaptor Plate. The Cork cut out very easily - one run thru my die cut machine!  I then cut my pattern paper with a smaller French Flair Classic Stacker from the same set.

I layered these on a piece of pattern paper, which I rounded both top and bottom right side corners.


I used the Old Barn Board as a base for my Sentiment. I added the foliage before I adhered my Sentiment to give depth by layering. I also added three pink rhinestones to draw your eye to the sentiment.

The small dragonfly from the Tiny Things with Wings set was inked with blue and only glued in the middle (body) so I could lift the wings up for dimension.


I created three large flowers, four small flowers, and two rose buds. I chose pink and blue hues to compliment the background pattern paper.

I also used the Dandelions, twigs and various foliage to fill in my floral arrangement. Rhinestones were added to the center of each flower.

Dies Used:

Birthday (Set of 2) - B231


I hope you will play along in our weekly Cheery Lynn Designs Challenge 174 - DoiliesYou could win a $20 shopping spree at the online Cheery Lynn Design Store.

Thanks for joining me today!

Take care,

Corina Finley
Live, Laugh & Create

Friday, February 20, 2015

Friends Card with Corina Finley

3:30 AM 3 Comments

Hello!

Corina here, to host the blog today and to share my card. 

This weeks card highlights the A2 Frames Rectangular Classic set and the Deutschland Boutique Stacker A2 Frames.

I used a medium grey cardstock to cut the Deutschland Boutique layers and black cardstock for the A2 Frames Rectangular Classic set.


The Exotic Butterfly Medium #3 is cut out of light cardstock and clear acetate. The butterfly is layered, first layer is acetate, the top layer is cardstock and glued only in the middle.

The floral arrangement was created using the Cherry Blossom, Ivy Corner, and Olive Branches. I used a glitter pen on the black cardstock and added clear rhinestones.


Dies Used:

Cherry Blossom - B129

A2 Frames Rectangular Classic (Set of 7) - CM5


I hope you will play along in our weekly Cheery Lynn Designs Challenge - Shaped Card anything but Square. You could win a $20 shopping spree at the online Cheery Lynn Design Store.

Thanks for joining me today!

Take care,

Corina Finley
Live, Laugh & Create

Friday, November 7, 2014

Get Well Soon Card with Corina Finley

3:30 AM 1 Comments

Hello Hello!!

It is November!! Wow, how time has flown by!

Corina here and here in British Columbia, Canada, we have a lot of rain during Fall. Then the rain turns into snow - I will be starting to create my Christmas Card next week!

My card palette was inspired by the weather. With a little 'bling' shine for the few rays of sun that peek through now and again!


I used the Florence Filigree Doily from the Octobers release to draw your eye into the center. The New Release Doily dies are really versatile and once you try them - you will be hooked! 


Dies Used:

Tags 4 - B263


I hope you will play along in our weekly Cheery Lynn Designs Challenge 157 - Give Thanks
You could win a $20 shopping spree at the online Cheery Lynn Designs store

Thanks for joining me today!

Take care,

Live, Laugh & Create!

Friday, July 4, 2014

Enjoy the Ride Card with Corina Finley!

3:30 AM 4 Comments

Hello Everyone!

Corina here with you today! With July already upon us, I thought I would mention to you that on July 15th Cheery Lynn Designs is having their July 2014 New Release! The DT are all working hard on our samples. Let me tell you - there are some must haves!! Whom I kidding, I want them all!


Now back to my card for this week. I wanted to use some dies that I have not used before and also added some of my favourites! A little ink, spray, glue and stitching and the card came together!


I really like to layer my die cuts to give my card depth and detail. Cheery Lynn dies allow you to layer so easily - to give your card the  "Wow" factor!

Dies used:
Rose Leaf Strip - B241
Olive Branches - B147
Shasta Daisy - B310
Cuties 4 - B156
Hinges (Set of 8) - B399
Add a Flourish (Set of 2) - B456
Horizon Square Boutique Stacker Frames - DL253
Infinity Doily w/Angel Wing - DL261
Little Pink Bicycle - A195
Tiny Fanciful Flourish Right & Left (Set of 2) - B387

I hope you will play along in our weekly Challenge 139 - Christmas in July. You could win a $20 shopping spree at the online Cheery Lynn Designs store!
Thanks for joining me today!
 
Take care,
 
Live, Laugh & Create!

Copyright Statement


All content, including designs, pictures and words are the exclusive property of the author of each blog post. Information shared here is for inspiration only and may not be copied for publication, competition or profit. Thank you for your cooperation.

SOCIAL MEDIA 2


Follow Us @jointhemakersmovement


All content, including designs, pictures and words are the exclusive property of the author of each blog post.
Information shared here is for inspiration only and may not be copied for publication, competition or profit. Thank you for your cooperation.