Showing posts with label A2 Frames Rectangular Classic. Show all posts

Tuesday, July 11, 2017

Happy Birthday! with Lisa Blastick

3:30 AM 0 Comments
Hello again! Today, I'm sharing a new tropical card for Cheery Lynn Designs
I made a cascading card using similar flowers and papers in the past. So, I wanted to use the amazing tropical leaves too! 
I was thinking of Hawaii.
The ocean sounds great...guess the lake will have to do...
The stamped sentiment is from Verve and all the die cuts are from Cheery Lynn Designs. 
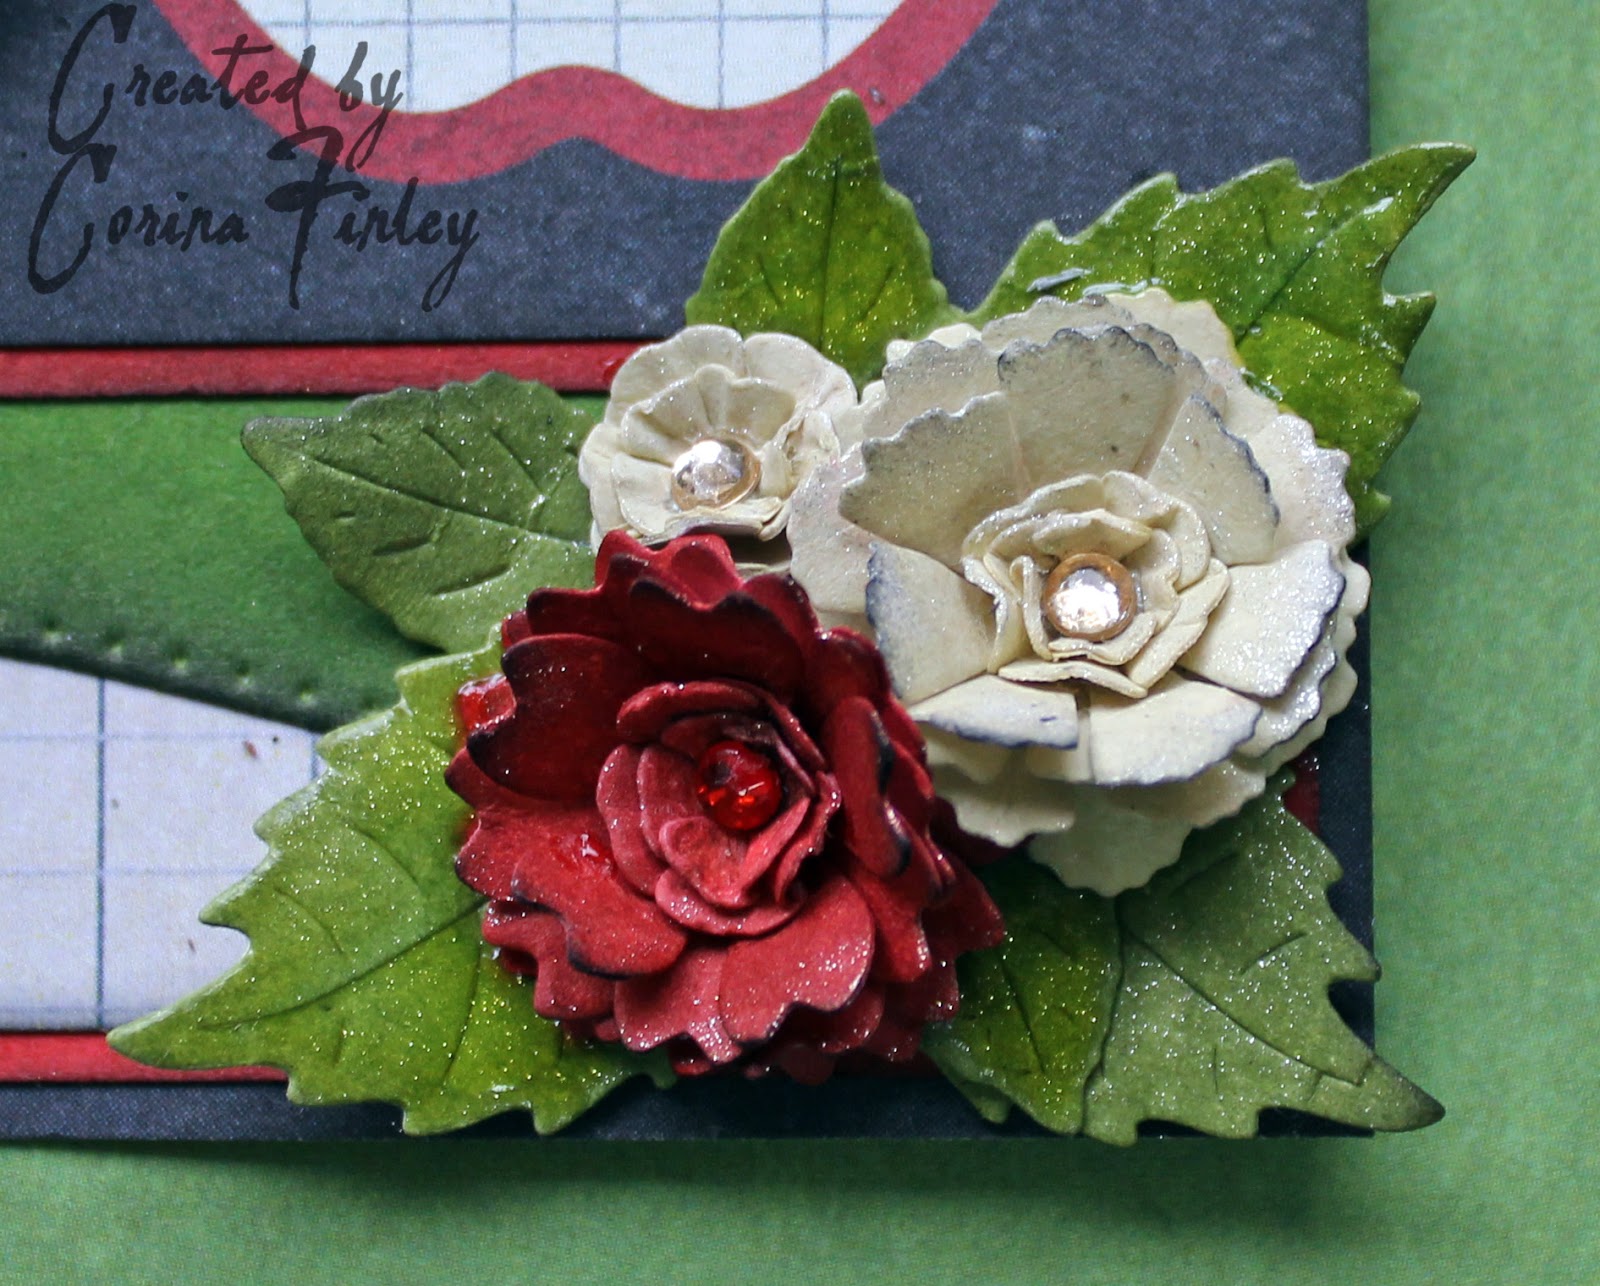
Closer view....I misted the flowers and leaves so they would stay scrunched up.

CM5 A2 Frames Rectangle  Classic
B119 Tropical Leaves
B127 Tropical Flourish 
A160 Tropical Flower

Thanks for stopping by today!
Hope this tropical card brightens your day! 
Hugs Lisa 

Wednesday, September 21, 2016

Spooky Dresser With Lisa Blastick

3:30 AM 0 Comments

BOO!
Today, Im sharing with you a super fast card for this Halloween season! 
I have seen some similar card on line and this card was made using all Cheery Lynn Designs 
 die cuts. 

I first card the base of the card which is 5 x 6 inches. Then I diet the 4th smallest "rectangle" twice and cut them in half. You should have 4 pieces, I used 3 of them. Next chalk the edges in white. Add a white dot or button for the drawer handles.


The "ghosts" are part of the "ultimate Halloween' die cut set. Lots of goodies in that pack! I diet the ghosts 3 times and place a piece of black cardstock behind the eyes with a pop dot. The "boo" sentiment was die cut in paper wand then I die cut it again in foam to pop it up with some red tickles for the blood drippings....EW! 


Cheery Lynn Designs Dies Used:


Thanks for stopping by today and be sure to check out this week's challenge for your chance to win some $ at the Cheery Lynn Designs store!
Hugs Lisa 

Friday, June 24, 2016

Happy Thoughts...with Corina Finley

3:30 AM 3 Comments
Hello!

I just want to start off by letting you all know that I will be taking a leave of absense. I need to focus on my family and my family's health.

With that said, let's get to today's card! 

I die-cut the Whimsical Tree of Life (I am in love with the new Whimsical Tree of Life from the June Release! It will be great for all season themed cards!) from cardstock and heat embossed with Vintage Copper Frantage embossing powder.
I cut the A2 Frames Rectangular for the base from light weight chipboard and heat embossed the edges with Copper Vintage Frantage embossing powder. I matted the Lined pattern paper to the chipboard and used the A2 Frames Rectangular in one size smaller to cut it.

From Kraft cardstock, I cut the Pierced Stacker #3 and Scalloped Oval. I inked the edges with Vintage Photo Distress Ink. I then cut my green pattern paper with a smaller die from each of the two sets and matted them to the larger Kraft die-cuts.

I stamped my Happy Thoughts sentiment onto the Paris Signs 4, heat embossed with Copper embossing powder and trimmed the die-cut. Inked the edges with Vintage Photo Distress Ink. To accent, I added the green rhinestones to the sentiment and corners.

Whimsical Tree of Life Die - B798


I hope you will play along in our Cheery Lynn Designs ChallengeYou could win a $20 shopping spree at the online Cheery Lynn Designs store.

Remember that I am sending you 'Happy Thoughts 'til next time!

Thank you for joining me today!
Take care,
Live, Laugh & Create

Monday, June 13, 2016

A Little Something for You by Corina Finley

3:30 AM 4 Comments
Hello!

Thanks for joining me today, Corina, here on the Cheery Lynn Blog.

For my card this week, I stamped, watercoloured, embossed and inked the background with Distress Inks on watercolour paper. I then die cut the stamped image out using the Pierced Stacker #4 set. I placed a larger black cardstock die cut (from the same set) to cover the die cut hole. 

I then layered the stamped image on top. I inked a variety of foliage die cuts with Distress Inks and placed in the bottom left and top right corners. I used the Build a Flower #2 to create my large flower and the Embellishment #2 for the small buds.


My Sentiment Frame was also cut from watercolour paper and inked to match the background. I stamped and embossed my sentiment in black. Added a few rhinestones to the center of the flowers and stamping.

Dies Used:

A2 Frames Rectangular Classic (Set of 7) - CM-5


I hope you will play along in our Cheery Lynn Designs ChallengeYou could win a $20 shopping spree at the online Cheery Lynn Designs store.

Thank you for joining me today!
Take care,
Live, Laugh & Create

Friday, June 3, 2016

Friends Card with Corina Finley

3:30 AM 2 Comments

Hello!

Corina here with you today to host the Cheery Lynn Blog and share my card that I have created using the 3D Peacock die for inspiration. The Peacock die is from May's New Release and has so much beautiful detail. 
I cut most of the layers for my card from a large piece of watercolour paper that I inked and sprayed with Distress Stain and Glimmer Mist. I cut a circle and card base from black cardstock. For the 3D effect on the Peacock, I bent up along the detailed cuts and embossed areas. I also added Stickles and a Turquoise glaze to the body for shine.

Dies Used:

A2 Frames Rectangular Classic (Set of 7) - CM-5


I hope you will play along in our Cheery Lynn Designs ChallengeYou could win a $20 shopping spree at the online Cheery Lynn Designs store.

Thank you for joining me today!
Take care,
Live, Laugh & Create

Thursday, May 5, 2016

Live, Dream, Love Card with Corina Finley

3:30 AM 2 Comments
Hello!

Thank you for joining me today, Corina, for today's post on the Cheery Lynn Blog. I have created a simple vintage card that could be used for a variety of occasions.

I used the A2 Frames Rectangular for the base and top layer. I cut two rectangles from Kraft cardstock. The third layer edge is paper distressed and the second layer was embossed using the Burlap Embossing Plate.


I layered two of the Coved Rectangle die cuts. I cut the largest out of black patterned paper and added detail using the Coved Rectangle Stitch die. I stamped my sentiment on the Coved Rectangle cut one size smaller and heat embossed in black.

For my border along the top, I cut strips of pattern paper, layered them and added the Anastasia Border to the top and bottom. Wrapped twine around it and tied in a bow.


Dies used:
I hope you will play along in our Cheery Lynn Designs ChallengeYou could win a $20 shopping spree at the online Cheery Lynn Designs store.

Thank you for joining me today!
Take care,
Live, Laugh & Create

Thursday, April 21, 2016

"Misfit' Butterfly Card with Corina Finley

3:30 AM 2 Comments
Hello!

Thank you for joining me, Corina, here on the Cheery Lynn Designs Blog.

For this weeks card post, I decided to create a card using my 'Misfit' cuts. These are the die cuts I have previously cut for another creation and cast aside!! I store these die cuts all together in a container and they always come in handy. As I cut 75% of my die cuts from white cardstock, it is easy to ink to any colour palette.


Here I have layered the one of the Small Exotic Butterflies #2 die. The layer underneath is vellum and gives the butterfly more depth. I inked the top layer with purple Distress Ink, added Clear Wink of Stella and purple rhinestones for a touch of glitter.


Dies used:

Royal Scandinavian Boutique Stacker A2 Frame - DL313


I hope you will play along in our Cheery Lynn Designs ChallengeYou could win a $20 shopping spree at the online Cheery Lynn Designs store.

Thank you for joining me today!
Take care,
Live, Laugh & Create

Sunday, February 28, 2016

Rainbows and Stars by Jenny Alia

3:30 AM 2 Comments

Hi, it's Jenny today with a card a bit different than my usual style.  I was inspired by Bonnie's card HERE and I thought a rainbow of colors would work well with my new stamp.  I took an assortment of plain colored card stock and cut each with a die from the Curved Border Set.  Then I stacked and glued the colors together, cut the edges and mounted it to a piece of black card stock that was then glued to a white A2 card base.


I cut the stamped sentiment with one of the smaller dies from the A2 Frames Rectangle Classic set and popped the rectangle up with foam adhesive.  Last I thought the card looked a little too plain so I added a couple of clear rhinestones for stars and then added real stars cut using the Pierced Stars die set.  I used the two smallest stars in the set and put them on a magnetic platform so they wouldn't move much when I cut one inside the other to cut the center out of the larger star.

Cheery Lynn Dies

I hope you enjoyed seeing my card and make sure to join in the Add a Flourish Challenge for a chance to win a $20 gift card to Cheery Lynn Designs.   

Thursday, February 11, 2016

Cupid Card with Corina Finley

3:30 AM 0 Comments

Hello!

Thank you for joining me today, Corina, here on the Cheery Lynn Blog. I will be hosting the blog every second Thursday, by sharing a card that I have created with Cheery Lynn Dies. On opposite Thursdays, I will be sharing an inspiration card for the challenge here and on my blog.

With Valentines is only a few days away, I wanted to use the Cupid die from January's release. I decided to paper-piece him by cutting 2 from white cardstock. I placed one aside as the base. On the other, I used a gold felt pen and coloured is the areas I wanted to cut out and glue to the base. I like the crisp defined look when it is paper-pieced.

I created the background using distress ink, a stencil and water. I saturated the background with distress ink, placed a stencil on top and sprayed with water. Used my heat gun to speed up the drying time. Where the water sprayed on to the distress inked background it lightened and revealed the stencil pattern. Love doing this!

I used one die from the Square Classic set to cut from the center of my inked background (this will get covered up!). I adhered the square to the center of the pattern paper Quadrafoil Square Doily

As you know, I love layering my cards. This gives so much depth and dimension to my cards. Using these dies makes the work so easy. On top of the background, I placed the Fleur De Lis Square Doily and then the Quadrafoil Square Doily.

I used the gold felt pen on the Polynesian Sails Mini Doily and cut it into two. I tucked the largest piece in the top and the other underneath. Added Cupid and a few gold glittered die cut hearts that comes with the Cupid die.


Cheery Lynn Designs Dies Used:


I hope you will play along in the Cheery Lynn Designs ChallengeYou could win a $20 shopping spree at the online Cheery Lynn Designs store.

Thanks for joining me today!

Take care,


Live, Laugh & Create!

Saturday, October 17, 2015

Je t'aime Paris by Julie Lavalette

3:30 AM 5 Comments
Hi Everyone, it's JULIE here today. Have you seen our New Release of dies ? Today I am sharing with you my vintage styled Parisian card.


As you can see on my rectangle layers I tattered and inked the edges, nesting the new Royal Scandinavian Doily in between my mats with Silicone Glue.

My Heart was cut out in cream cardstock and inked at the edges. I layered on to pink cardstock and fussy cut around it and glued in place with Silicone Glue then added my Paris word.

My Eiffel Tower was cut out in 2 shades for a shadow effect.


My Vintage Car was cut out in Cream cardstock twice, I then coloured small elements with a Gold pen and glued in place, finishing off with a little ink on the edges.

Cheery Lynn New Release Dies Used:

B657 Paris Eiffel Tower Set (set of 2)
DL313 Royal Scandinavian Boutique Stacker A2 Frame

Other Cheery Lynn Dies Used:

CABD-33 Old Car
CASO-3 Ornament#3
CM5 A2 Frames Rectangle Classic (set of 7)

Thanks for stopping by today and good luck to everyone entering our Weekly Challenge.

Julie x

Friday, October 16, 2015

Best Teacher Ever with Corina Finley

4:13 AM 1 Comments

Hello Crafters!

I hope every one checked out the New Release over on the Cheery Lynn Designs Website! There is an assortment of great new dies for you to create with.

My card for today's post features a New Release die set called the Best Teacher Ever. It comes as a set of 2 - the apple which has the Best Teacher Ever cut from it and the little cute Worm!


Here is a close up of the Apple. I cut it from white cardstock and inked with Distress Ink. I layered it on top of black cardstock and used clear embellish liquid over the words to give a glossy look. I also added a touch of glitter. For the leaf & stem, I used Distress Inks also and added Glossy Accents.


While I was colouring (inking) the worm, my son was calling him Fred! So for Fred the Worm, I cut him from white cardstock, inked with Distress inks and used a glitter pen over. I added a small piece of white cardstock behind his eyes and used a black glaze pen for his eyes. 


My flowers are created from the Sweet Christine, and the Sweet Williams Strip. I added the leaves from the Tea Rose Medium die and three from the Rose Leaf Strip.

Die used:

Best Teacher Ever (Set of 2) - B652


I hope you will play along in our weekly Cheery Lynn Designs ChallengeYou could win a $20 shopping spree at the online Cheery Lynn Designs store.

Thanks for joining me today!

Take care,
Corina Finley

Live, Laugh & Create!

Friday, August 28, 2015

Jingle Bell Stocking Card with Corina Finley

3:30 AM 0 Comments

Hello! 

Thank you for joining me! Last week my card was Halloween themed, this week Christmas! A beautiful Holiday Die with glitter and Rhinestones!

My Card started with the awesome A2 Frame dies. I first used the A2 Frames Rectangular Classic dies and then layered the A2 Frames Rectangular Scalloped die. On top of the Rectangular Scalloped, I layered the Alpine Flourish Doily, another A2 Frames Rectangular Classic die and centered the Pierced Stacker #4. I matted the Pierced Banner on top of the Horizon Fishtail Banner and center on my card.


To create the Jingle Bell Stocking, I applied Be Creative Tape (double sided tape with a backing) to one side of cardstock, placed the die cut face down on top and put thru my die cut machine. I then pulled off the backing, sprinkled glitter and burnished with my finger. I backed with two different pattern papers, added burgundy rhinestones and centered on my card.


Dies Used:

Jingle Bell Stocking - B633


I hope you will play along in our weekly Cheery Lynn Designs Challenge. You could win a $20 shopping spree at the online Cheery Lynn Designs store.

Thanks for joining me today!

Take care,
Corina Finley

Live, Laugh & Create!

Friday, August 7, 2015

Land among the Stars Card with Corina Finley

3:30 AM 3 Comments

Hello Crafty Friends!

Corina here, for today's blog post! I wanted to share my card that I created with some products that I would normally use when I play in my Art Journal or when creating Mixed Media style artwork. 

You probably have seen online or in Magazines that Mixed Media is very popular and 'IN' right now. I wanted to show you how I made my card using a few products and my trusty Cheery Lynn Dies to create a Mixed Media inspired design.


Above are the products that I started off with. The Pierced Stars comes in a set of 6, that have just been released last month.

I applied Gesso onto a piece of 8 1/2 x 11 white cardstock with a paint brush. I then randomly added Gelatos and blended with my finger.


With a few stencils and a baby wipe, I removed some colour. I also added a few stamps with Navy ink to my background.

I placed my Cheery Lynn Dies on top of my background and die cut using the Ebosser.


I cut my sentiment from White cardstock and a matte from Navy Cardstock using the using Pierced Stacker #2 die. I sewn the base and a little here and there with my sewing machine. I outlined and created faux stitches around a few of my Pierced Stars and Pierced Stacker #2  with my Black and White pens to draw focus.

I hope that today's post shows you another reason that Cheery Lynn's Dies are a versatile must have. With so many dies, the possibilities are endless!


Dies Used:

I hope you will play along in our weekly Cheery Lynn Designs 196 - Summer Fun. You could win a $20 shopping spree at the online Cheery Lynn Designs store.

Thanks for joining me today!

Take care,
Corina Finley

Live, Laugh & Create!

Friday, July 3, 2015

Believe Card with Corina Finley

3:30 AM 0 Comments

Hello!

Corina here with you today! This weeks card inspiration came from my stamped sentiment. I sometimes need a little reminder once in a while!


As you might have noticed on my previous cards, I love Cheery Lynns banners. I saw the Tags 4 in my Cheery Lynn Die book and thought I would give them a try instead, to create a flag look. I am happy with the results!

I have also used one die from the Royal Scandinavian Border Set to cut into the burgundy paper strip border. I layered the border on top of black cardstock to add depth.

On top of my stamped embossed sentiment, I have added a Page Tab. I love this set for card making, mini albums, journals, and page layouts.


My flower was created using Judy's BloomsDandelions, and the Leafy Flourish die. Inked and finished off with a black rhinestone for the center.

Dies Used:

Judy's Blooms - C184


Thanks for joining me today!

Take care,
Live, Laugh & Create

Tuesday, June 30, 2015

A Gift For You by Karen Maldonado

3:30 AM 1 Comments

Hi Cheery Lynn friends!  It's Karen sharing a lovely gift card with you today!
It can be used for any special occasion.  
This one is for that special coffee or tea lover!


I started by making a 5.5 x 5.5 card based and then layered the designer
paper right on top, and stitched some crazy stitching using my sewing machine.

Then, I die cut the A2 Frames Rectangle Scalloped
along with the Card Maker Rectangle Classic and layered the Scalloped piece 
to the bottom.  Then proceeded by cutting a 1.5 strip of designer paper
 to go across the card.  I tucked the Border Carnivale and layered 
that piece right beneath the strip of paper.

Next, I took the Card Maker Rectangle Classic die and put as the next layer.
The final layer was cutting the B546 Royal Scandinavian Tag 2 and stamping
the sentiment on top, and adding a few pearls!

Finally, I made two sweet distressed flowers using 
the Judy's Bloom &  Leafy Flourish dies, added some seed beads for the centers!
Finished the card off by making a pretty distressed crinkly ribbon! 


Just need to add a gift card inside for that special person!

Cheery Lynn dies used:

Come and play in this week's challenge "Christmas in July"
for a chance at a $20 spending spree to the Cheery Lynn on-line store!!

Can't wait to see what you all create!!

Enjoy your day!

Hugs & Smiles,

Copyright Statement


All content, including designs, pictures and words are the exclusive property of the author of each blog post. Information shared here is for inspiration only and may not be copied for publication, competition or profit. Thank you for your cooperation.

SOCIAL MEDIA 2


Follow Us @jointhemakersmovement


All content, including designs, pictures and words are the exclusive property of the author of each blog post.
Information shared here is for inspiration only and may not be copied for publication, competition or profit. Thank you for your cooperation.