Hello dear Cheery lynn designs lovers,
Kianel here today with a vintage card and a tutorial.
Today i am showing you how to create a very elegant frame for any shape of the XL or little stackers that has inverted scallop option.
The card is about 16x16cm. The base of the card is made using the Mini pearl french flair mega doily, biggest size. The paper i used is white and i then inked it and stamped it.
I then placed a Kaleidoscope lace french flair mega doily.
Using the XL french flair stackers, i cut size 4 in printed paper and placed it on white cardstock to cut a bit larger, for it to fit my Kaleidoscope shape.
I added an elegant frame to decorate my image, using Little scalloped oval stackers and Little inverted scallop oval stackers (see the tutorial right under this project).
I used the same idea for the expandable tiny borders that i decorated with thread too, having exactly the same design! Mini fanciful flourish, wreath strip, 3 butterflies from the mini dimensional butterflies set.
I added a sentiment "Love", tiniest one in the top corner.
To build my flower, i used the Cherry blossoms that i inked and stamped with a text. I shaped it using embossing tool and placed a brad in the center.
I added olive branches on the sides, a mini dimensional butterflies and a sentiment frame #1 for my text.
Dies from Cheery Lynn Designs, inks from Ranger and Colorbox, printed paper from MME, stamps from Cartoscrap / Stampabilities / Hampton Arts, embellishments from a french online store.
Let's now focus on this frame and i am going to show you how to make one easily:
All it takes to do it is the Little scalloped oval stackers largest size and a smaller Little inverted scallop oval stackers. You can do that with the ovals, but also with the circle and the squares.
First, cut a scalloped oval.
Take the die that you will use of the inverted scallop die and mark the "highs" with a pen on the back of the die (don't hesitate to do that on several areas all around the die to make sure you align correctly before cutting (here is just to show you how that looks): that is to be able to put them in line with the "lows" of the scalloped die. Not sure i am making myself clear here but i guess you'll see what i mean on the next step, lol. Put the die in the middle and cut.
So here is what you get, pretty cool isn't it? Don't worry if it's not "perfect", you can hide the "wrong" parts with decorations later on. It takes several attempts to get the perfect one.
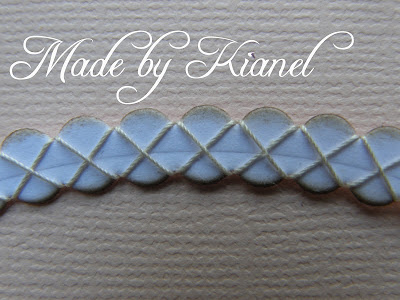
To make my frame elegant, i just used some cotton thread and laced it around the cut frame. First time i wind it around like that. (Just attach your thread with a tiny piece of double sided tape for the beginning and then just go through the frame).
And here is what you get after you went through the whole frame another time but in the other direction.
Now you just have to grab your stackers and give it a go as this is really cool!
Now you just have to grab your stackers and give it a go as this is really cool!
Don't forget to join our weekly challenge for a chance to win a 20$ shappoing spree and discover the marvellous projects of the challenge blog DT girls!
Have fun with your dies!
Love from France, Kianel.


This is breathtaking Kianel! :) Stunning creation, so elegant, delicate and pretty! :)
ReplyDeleteFab tutorial too hun - I wanna try that! :)
hugs
xxalisonxx
Kianel, your card is fabulous! all elements enhance so wonderfully this adorable picture, thank you for the tuto! will try. Hugs.
ReplyDeleteBeautiful. But have a question? Did you put the thread on the die and that made your card stock come out looking like that, OR did you wind the thread around the card stock after you cut it? Edna
ReplyDeleteHello Edna,
ReplyDeleteThanks for your comment and for your question. I did wind the thread around the cardstock after i cut it, in one way first and then the other way to make it cross each other.
Hope this helps, love from France, Kianel.
I love this, I also love the thread on that oval what a fantastic idea!!!
ReplyDeleteGorgeous card! Thanks for sharing your tutorial!
ReplyDeleteYour frame is beautiful and unique...Kudos to you! Thanks for telling us how you made it Kianel!!!
ReplyDeletePaper Hugs,
Jan
Kianel this is VERY Pretty!! It is unique!! I love it and thank you for sharing the frame!
ReplyDeleteGorgeous project and I love your tutorial. I'll have to give it a try!
ReplyDeletehugs,
Gini
absolutely stunning!!! looove the frame!!! thanks for such a fabulous tutorial! I will definately be trying this!
ReplyDeleteAlways beautiful, love your frame and how you wound the thread around it, criss-crossed.
ReplyDeleteAbsolutely beautiful! Thanks so much for the tutorial!
ReplyDelete