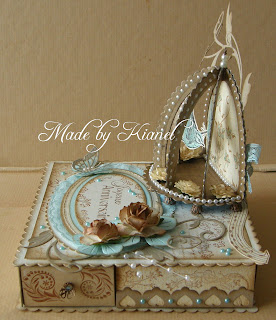
Kianel here with you today. I have put aside my maggies for a while and i thought i would show you a small bird cage made with your CLD dies. I also made a tutorial as i got some questions from my last post with the big bird cage. This one is smaller and only half but it works exactly the same way. This bird cage i used as a decoration on a box made with matches box. The whole thing is in a vintage style.
To make this birdcage box i used the following ingredients: thick recycled cookies packet and white Canson paper 224gr. Stamps from Katzelkraft. Dies from CLD "XL scalloped oval stackers" "XL oval stackers" "tropical flourish" "little circle stackers" "little scallop circle stackers" "mini tropical butterflies" "mini angel wings" "Judy's blooms" "frills and hearts border" (which is on sale right now) "XL square stackers" "XL scalloped square stackers" "XL circle stackers". Lace, pearls, flowers, sprays, charms coming from an online french shop. Inks and paints: colorbox, stamperia, Creative Inspirations paints "mocha latte" "sea foam".
STEP 1
Cut 6 XL scalloped oval stackers in a thick paper (i used an old cookie package that i recycled). The die i used is the one measuring 12,8 x 8,5 cm (sorry, i don't know what that can be in inches but you pretty much have to divide by 2,5) which is size 3.
Inside 5 of them, cut an XL oval stacker size 2.
STEP 2
Bend those oval frames in two in heighth. Cut at 4cm from the bottom and bend at 5cm from the bottom. See picture for clearer informations (at least i hope, ah ah ah!).
STEP 3
Paint your arches (i used CI paint "mocha latte"). Glue them together half side of one arch with half side of another one. Just remeber to leave unglued the last and first half arch because you will fix them on the back later on. Here you have a cage structure. Be cautious not to glue the 1cm bended part of each arch as those will be fixed on the base later on.
STEP 4
Cut a XL scalloped circle stacker (number 3) measuring 8,5cm diameter. Decorate as you wish and bend at 5,5cm from the bottom.
STEP 5
Take the last scalloped oval stacker that you have left and cut at 5cm from the bottom. This will be the back of your structure. Decorate as you wish and glue the cage structure on it (remeber those 1st and last half arch that we kept unglued...). To decorate the back i inked my paper with distress "antique linen" and added stamps from Katzelkraft and a bit of CI paints "sea foam" to shimmer it off a bit.
Put the whole structure on your circle stacker anglue the top bended part on the bottom of the back of your structure. Then you can glue all the 1cm parts of the half arches on the circle. And your structure is ready!
Decorate and voilà! Ready to be place wherever you want! I decorated my birdcage with pearl string, lace, stamps from Katzelkraft, CI paints, flowers, copper pearls and CLD die "tropical flourish". Use some decorations to hide the feet of the arches. Don't forget to paint the back of your birdcage if you want it to stand somewhere. (That last step isn't necessary if just want to glue the back on something else.). I stamped "birds on a branch" from Katzelkraft, coloured it with distress and CI paint "seafoam", cut all around and glued it on 2 of the arches to give it dimension.
I decided to add this mini bird cage as a decoration on a box i made out of 4 match' box. For that i added some bronze metal pearls under to make feet. I also added a tropical flourish and also decorated the back with stamp, flowers, lace and charm.
Here you can see the different layers made with XL stackers oval and scalloped oval and some lace decorating it. I used the "Judy's blooms" in seafoam cardstock that matched perfectly my paint. The "mini exotic butterfly" is painted and placed on the "mini angel wings" cut in seafoam cardstock. Some "tropical flourish" die from CLD adorn the whole thing.
Stamps are from Katzelkraft, dies from CLD, shimmer paints from CI, embellishments from french online shop, inks from Ranger and colorbox, papers from Canson and Bazzill.
Here are the dies i used on this project (click to go to the shop):
Stamps are from Katzelkraft, dies from CLD, shimmer paints from CI, embellishments from french online shop, inks from Ranger and colorbox, papers from Canson and Bazzill.
Here are the dies i used on this project (click to go to the shop):
I hope that you will like it and if you have any question, please feel free to ask and i'll do my best to answer.
Don't forget that you see beautiful creations from our Dt here everyday! And i hope you haven't missed the sale going on in the shop! See you next week, love from France, Kianel.


Wow! I'm speachless. This is one amazingly beautiful project. Thanks for sharing!!!
ReplyDeleteWOWZERS who knew you could make something so magical with those dies. gorgeous work Kianel, thanks for sharing!
ReplyDeleteThis is amazing! Love that design and the wonderful tutorial.
ReplyDeleteThanks for sharing.
Wow... what an awesome project and tutorial!
ReplyDeleteThis is gorgeous!!!
ReplyDeleteDarling Project!!! I love the colors on this and your DARLING Bird Cage!!!
ReplyDeleteBeautiful job hun!!
Hugs,
Cheryl
wow!!! this is really gorgeous. so creative!
ReplyDeleteVery gorgeous and creative. Great tutorial!!
ReplyDeletePretty Amazing! This is one fabulous project!!
ReplyDeleteWouah !!!Super joli et très bien expliqué !!!
ReplyDeleteAmicalement
Evy
Superbe je suis en admiration , bon travail , bravo
ReplyDelete