Kianel here with you today to share a box i made lately for my niece's birthday. The last tomic challenge is about recycling so i used a cereal box to cut all my dies. I am also showing you another use of your XL scalloped oval stackers building a simple arch (i already showed you a big complete birdcage, several layers on a card and a little half bird cage with base). Here is the finished box:
And i have made a tutorial to show you how to build a bush with Cheery Lynn Designs dies.
STEP 1
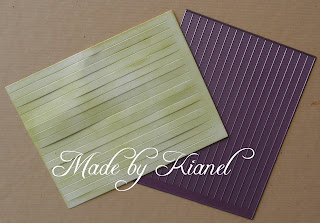
Cut out 2 pieces with the "wittle wicker" die in a thick paper. I used white Canson paper 224gr that i covered with distress ink and Creative Inspirations paints for the shimmery look.
STEP 2
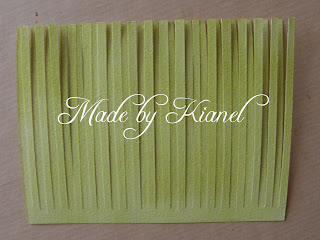
Cut each piece in half and keep the ones with the 0,5cm plain border. Cut in 2 each little fringe and here is what you get.
STEP 3
Glue the plain 0,5cm part for each piece and roll it around a pencil. Let it dry with the help of a clothespin to keep it tight.
STEP 4
Here is what you get when it is dry. Add a piece of double sided tape at the bottom. This will help maintain your first rolled fringes at the base.
STEP 5
With the help of a pencil, roll every fringe at different heights as the picture shows.
STEP 6
Here's what you get when finished: a nice little bush!
STEP 7
To complete your small bushes, just add some flowers in it and place on any creation you want. Of course using different lengths of fringe, you can make bigger or smaller bushes.
Here are the dies i used on this box (click to go directly to the shop):
XL scalloped oval stackers, XL oval stackers, XL scalloped square stackers, XL square stackers, pierce rectangle plate, wittle wicker plate, English tea party doily, Little circle stackers, Little scalloped circle stackers, slightly script 5/8" font and don't forget to use the cuttlehug to get a beautiful cut!
Well, I hope that you liked that box as much as my niece did. I just became the world's best auntie! yeah!
Don't forget to pop by everyday to see the marvelous projects my DT mates make. If you have any question about the tutorial, feel free to ask and I'll do my best to answer.
Love from France, Kianel.


Kianel love this box! The scalloped die used as an arch is fabulous!! Unique way to create a bush too. Love the colors, Tilda and embellishments!!
ReplyDeleteLove the rose bushes!
ReplyDeleteKindest regards,
Jennifer Ferrell
Love all the details on that lovely box and the bushes adds more interest to the flowers. Great job!
ReplyDeleteHugs,
Joy
This is adorable as can be- love the tree tutorial you shared sweetie
ReplyDeleteLove it! Very sweet and so much detail!!
ReplyDeleteThis projects is gorgeous, tons of beautiful little details to look at. TFS
ReplyDeleteI love this ... beautiful! Thanks so much for sharing.
ReplyDeleteloved this!!! great tutorial. the bushes are really cute!
ReplyDeleteThis is just gorgeous!!
ReplyDeleteBeautiful work as always, Kianel and a great tutorial for the flower embellishment.
ReplyDeleteGreat tutorial and project!
ReplyDeleteSo much fun! Love it!
ReplyDeleteWhouahhhh,c'est super beau!Quelle imagination!C'est superbe.
ReplyDeleteFélicitations également pour tes réalisations exceptionnelles dans le Magnolia Ink Magazine!
Quel talent!